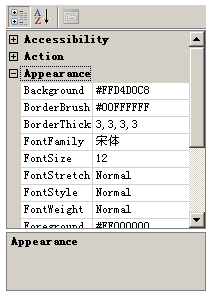
由于WPF中没有提供PropertyGrid控件,有些业务需要此类的控件。这篇文章介绍在WPF中实现PropertyGrid的三种方式,三种方式都是俺平时使用时总结出来的。
第一种方式:使用WindowsForm的PropertyGrid控件。 用过WPF的童鞋都晓得,可以通过WindowsFormsHost将WindowsForm的控件宿主到WPF中使用。很简单,分为简单的3步。 第一步:引用dll:在WPF应用程序中引入System.Windows.Forms.dll。 第二步:引用命名空间:在窗体的.cs代码中引用此命名空间:using System.Windows.Forms;在XAML中引用此命名空间代码如下:
xmlns:my="clr-namespace:System.Windows.Forms;assembly=System.Windows.Forms" <WindowsFormsHost Height="287" HorizontalAlignment="Left" Margin="18,12,0,0" Name="windowsFormsHost1" VerticalAlignment="Top" Width="200">
<my:PropertyGrid x:Name="PropertyGrid1"></my:PropertyGrid>
</WindowsFormsHost>
使用方式很简单。由于它是WPF控件,所以不需要使用WindowsFormsHost。
<Window x:Class="WPGDemoApp.Window1"
        xmlns="http://schemas.microsoft.com/winfx/2006/xaml/presentation"
        xmlns:x="http://schemas.microsoft.com/winfx/2006/xaml"
        xmlns:wpg="clr-namespace:WPG;assembly=WPG"
        Title="Window1" Height="300" Width="300">
    <DockPanel VerticalAlignment="Stretch" >
        <Button DockPanel.Dock="Top" x:Name="btn">button for test</Button>
        <wpg:PropertyGrid  DockPanel.Dock="Top" Instance="{Binding ElementName=btn}"  VerticalAlignment="Stretch" IsEnabled="True"></wpg:PropertyGrid>
    </DockPanel>
</Window>第三种方式:使用WF4.0设计器里面的属性框控件。WF4.0的流程设计器有一个这样的PropertyGrid控件。我们利用它来实现自己的PropertyGrid控件。这也是本文重点介绍的
方式。参考:Native WPF 4 PropertyGrid。分五个步骤去实现。
1、自定义一个用户控件,这个控件继承Grid类。grid将包含真正的界面元素。
2、用Workflow Foundation的WorkflowDesigner一个对象作为这个控件的私有成员。
3、对于需要设计的对象,在grid中添加一个PropertyInspectorView对象的子元素。对外它是一个Grid,其实它的类型是ProperyInspector。
4、通过反射获取和使用PropertyInspector的一些方法。
5、实现一个SelectedObject属性,标准的PropertyGrid都有它。用来处理PropertyInspector选择对象的改变。
代码如下:
using System.Activities.Presentation;
using System.Activities.Presentation.Model;
using System.Activities.Presentation.View;
using System.Reflection;
using System.Windows.Controls;

namespace System.Windows.Control
{
    /// <summary>
    /// WPF Native PropertyGrid class, taken from Workflow Foundation Designer
    /// </summary>
    public class WpfPropertyGrid : Grid
    {
        #region Private fields
        private WorkflowDesigner Designer;
        private MethodInfo RefreshMethod;
        private MethodInfo OnSelectionChangedMethod;
        private TextBlock SelectionTypeLabel;
        private object TheSelectedObject = null;
        #endregion

        #region Public properties
        /// <summary>
        /// Get or sets the selected object. Can be null.
        /// </summary>
        public object SelectedObject
        {
            get
            {
                return this.TheSelectedObject;
            }
            set
            {
                this.TheSelectedObject = value;

                if (value != null)
                {
                    var context = new EditingContext();
                    var mtm = new ModelTreeManager(context);
                    mtm.Load(value);
                    var selection = Selection.Select(context, mtm.Root);

                    OnSelectionChangedMethod.Invoke(Designer.PropertyInspectorView, new object[] { selection });
                    this.SelectionTypeLabel.Text = value.GetType().Name;
                }
                else
                {
                    OnSelectionChangedMethod.Invoke(Designer.PropertyInspectorView, new object[] { null });
                    this.SelectionTypeLabel.Text = string.Empty;
                }
            }
        }

        /// <summary>
        /// XAML information with PropertyGrid's font and color information
        /// </summary>
        /// <seealso>Documentation for WorkflowDesigner.PropertyInspectorFontAndColorData</seealso>
        public string FontAndColorData
        {
            set
            {
                Designer.PropertyInspectorFontAndColorData = value;
            }
        }
        #endregion

        /// <summary>
        /// Default constructor, creates a hidden designer view and a property inspector
        /// </summary>
        public WpfPropertyGrid()
        {
            this.Designer = new WorkflowDesigner();

            var inspector = Designer.PropertyInspectorView;
            Type inspectorType = inspector.GetType();

            inspector.Visibility = Visibility.Visible;
            this.Children.Add(inspector);

            var methods = inspectorType.GetMethods(Reflection.BindingFlags.Public | Reflection.BindingFlags.NonPublic | Reflection.BindingFlags.Instance |
                Reflection.BindingFlags.DeclaredOnly);

            this.RefreshMethod = inspectorType.GetMethod("RefreshPropertyList",
                Reflection.BindingFlags.NonPublic | Reflection.BindingFlags.Instance | Reflection.BindingFlags.DeclaredOnly);
            this.OnSelectionChangedMethod = inspectorType.GetMethod("OnSelectionChanged",
                Reflection.BindingFlags.Public | Reflection.BindingFlags.Instance | Reflection.BindingFlags.DeclaredOnly);
            this.SelectionTypeLabel = inspectorType.GetMethod("get_SelectionTypeLabel",
                Reflection.BindingFlags.Public | Reflection.BindingFlags.NonPublic | Reflection.BindingFlags.Instance |
                Reflection.BindingFlags.DeclaredOnly).Invoke(inspector, new object[0]) as TextBlock;

            this.SelectionTypeLabel.Text = string.Empty;
        }

        /// <summary>
        /// Updates the PropertyGrid's properties
        /// </summary>
        public void RefreshPropertyList()
        {
            RefreshMethod.Invoke(Designer.PropertyInspectorView, new object[] { false });
        }
    }
}
总结:本文提供了三种方式去在WPF中实现PropertyGrid。
代码:http://files.cnblogs.com/zhuqil/WpfPropertyGrid_Demo.rar
作者:朱祁林
出处:http://zhuqil.cnblogs.com
本文版权归作者和博客园共有,欢迎转载,但未经作者同意必须保留此段声明,且在文章页面明显位置给出原文连接,否则保留追究法律责任的权利。


 816
816

 被折叠的 条评论
为什么被折叠?


