


快速创建一个springboot项目来完成一个简单的表单操作,能够使用浏览器进行表单操作,需要现在数据库中创建一个user的表格,字段类型分别为int,varchar,int
1-导入需要的依赖
 <!--springmvc依赖-->
    <dependency>
      <groupId>org.springframework.boot</groupId>
      <artifactId>spring-boot-starter-web</artifactId>
      <version>2.7.3</version>
    </dependency>

    <!--mybatis依赖-->
    <dependency>
      <groupId>org.mybatis.spring.boot</groupId>
      <artifactId>mybatis-spring-boot-starter</artifactId>
      <version>2.2.2</version>
    </dependency>

    <!--mysql驱动-->
    <dependency>
      <groupId>mysql</groupId>
      <artifactId>mysql-connector-java</artifactId>
      <version>8.0.33</version>
    </dependency>

    <!--thymeleaf依赖-->
    <dependency>
      <groupId>org.springframework.boot</groupId>
      <artifactId>spring-boot-starter-thymeleaf</artifactId>
      <version>2.7.3</version>
    </dependency>
注意:
- 这里所使用的spring-boot-starter-web的版本要以jdk的版本相对应,这里使用的是jdk1.8
- mysql驱动的版本也要与mysql数据库的版本对应
2-创建配置相关文件
在main目录下面,新创建一个resources文件夹,在里面新建一个application.yml文件
#写入端口以及自己数据库的地址,用户和密码
server:
  port: 10000
spring:
  datasource:
    url: jdbc:mysql://localhost/pratice
    username: root
    password: root
3-编写后端代码
3-1编写启动入口
import org.springframework.boot.SpringApplication;
import org.springframework.boot.autoconfigure.SpringBootApplication;

@SpringBootApplication
public class App
{
    public static void main( String[] args )
    {
        SpringApplication.run(App.class, args);
    }
}
3-2编写实体
/**
 * user实体
 */
public class User {

    public int id;

    public String name;

    public int age;

    public User(int id, String name, int age) {
        this.id = id;
        this.name = name;
        this.age = age;
    }

    public User() {

    }

    public long getId() {
        return id;
    }

    public void setId(int id) {
        this.id = id;
    }

    public String getName() {
        return name;
    }

    public void setName(String name) {
        this.name = name;
    }

    public int getAge() {
        return age;
    }

    public void setAge(int age) {
        this.age = age;
    }
}
3-3编写mapper
import com.xq.pojo.User;
import org.apache.ibatis.annotations.Insert;
import org.apache.ibatis.annotations.Mapper;

@Mapper
public interface userMapper {

    @Insert("insert into user(id, name, age) VALUES (#{id},#{name},#{age})")
    void save(User user);

}
3-4编写service以及serviceImpl
service代码
import com.xq.pojo.User;

public interface userService {

    void save(User user);
}
serviceImpl代码
import com.xq.mapper.userMapper;
import com.xq.pojo.User;
import com.xq.service.userService;
import org.springframework.beans.factory.annotation.Autowired;
import org.springframework.stereotype.Service;

@Service
public class userServiceImpl implements userService {

    @Autowired
    userMapper userMapper;

    @Override
    public void save(User user) {
        userMapper.save(user);
    }
}
3-5编写控制器
import com.xq.pojo.User;
import com.xq.service.userService;
import org.springframework.beans.factory.annotation.Autowired;
import org.springframework.stereotype.Controller;
import org.springframework.web.bind.annotation.GetMapping;
import org.springframework.web.bind.annotation.PostMapping;
import org.springframework.web.bind.annotation.RequestParam;

@Controller
public class userController {

    @Autowired
    userService userservice;

    @GetMapping("/form")
    public String Users() {
        return "form";
    }

    @PostMapping("/insertUser")
    public String insertUser(@RequestParam int userId,@RequestParam String name,@RequestParam int age) {
        User user = new User(userId,name,age);
        userservice.save(user);
        return "form";
    }
}
3-6编写templates内的表单文件
以下是编写的名为form.html的表单操作文件
<!DOCTYPE html>
<html lang="en" xmlns:th="http://www.thymeleaf.org">
<head>
    <meta charset="UTF-8">
    <title>表单操作</title>
</head>
<body>

<form method="post" th:action="@{/insertUser}">
    <label>用户ID</label>
    <input type="text" id="userId" name="userId">
    <label>姓名</label>
    <input type="text" id="name" name="name">
    <label>年龄</label>
    <input type="text" id="age" name="age">
    <input type="submit">
</form>
</body>
</html>
4-测试
启动App后,从浏览器中访问 http://localhost:10000/form

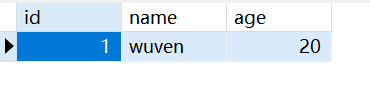
在表单中填入测试数据后点击提交

点击提交后再次跳转到form界面,此时发现数据中对应的表格中已经有了数据


 被折叠的 条评论
为什么被折叠?
被折叠的 条评论
为什么被折叠?
 到【灌水乐园】发言


