


1 概念
1.1 什么是任务调度
任务调度是指系统为了自动完成特定任务,在定的特定时刻去执行任务的过程。有了任务调度即可解放更多的人力,由系统自动去执行任务。
1.2 Elastic-Job简介
Elastic-Job是当当⽹开源的⼀个分布式调度解决⽅案,基于Quartz⼆次开发的,由两个相互独⽴的⼦项⽬Elastic-Job-Lite和Elastic-Job-Cloud组成 。本次学习Elastic-Job-Lite,它定位为轻量级⽆中⼼化解决⽅案,使⽤Jar包的形式提供分布式任务的协调服务。Elastic-Job依赖于Zookeeper进⾏分布式协调。
1.3 Cron表达式详解
cron` 表达式共有 7 个字段,包括 `Seconds, Minutes, Hours, Day of mouth, Mouth, Day of week, Year,其中 Year 是可选的。
| Seconds | Minutes | Hours | Day of mouth | Mouth | Day of week | [Year] |
|---|---|---|---|---|---|---|
| 秒 | 分 | 时 | 天 | 月 | 周 | [年] |
| 字段名 | 允许值 | 允许的特殊字符 |
|---|---|---|
| Seconds | 0-59 | , - * / |
| Minutes | 0-59 | , - * / |
| Hours | 0-23 | , - * / |
| Day of mouth | 1-31 | , - * / ? L W |
| Mouth | 1-12 or JAN-DEC | , - * / |
| Day of week | 1-7 or SUN-SAT(1表示星期天,2表示星期一,… ) | , - * / ? L # |
| Year | empty(允许为空), 1970-2099 | , - * / |
特殊字符的含义
***** :匹配该字段允许的任意值,如果该字符在秒的位置处,表示每秒都会触发事件
- :表示范围,如果在分钟的位置处使用 5-20,即从第 5 分钟到第 20 分钟每分钟触发一次
/ :表示触发的起始时间和间隔时间,如果在分钟位置使用 5/20 ,即从第 5 分钟开始每隔 20 分钟触发一次
, :表示列出枚举值,如果在分钟位置使用 5, 20 ,即在第 5 和第 20 分钟各触发一次
? :只能用在 Day of mouth 和 Day of week 字段中,表示忽略任意值,因为这两个字段值可能会发生冲突,当其中一个值被指定后,需要忽略另一个来避免冲突。
L (last) :表示最后,在 Day of mouth 字段中表示”这个月最后一天”,在 Day of week 字段如果配合数字使用 ,如5L,表示”该月的最后一个星期四”
W (weekday) :工作日,表示最接近指定天的工作日(周一到周五),比如 15W,指最近接本月第15天的工作日,如果那天是周六,则在那周五即前一天触发事件,如果那天是周日,则在下周周一触发事件,如果那天是在周一到周五的范围内,则在当天触发。
# :只能用在 Day of week 字段中,表示该月的第几个周几,如 6#3 表示第3个周五(3 表示第 3 个,6 表示周五),如果指定日期不存在,事件不会触发。
| 表达式 | 意义 |
|---|---|
"0 0 12 * * ?" | 每天中午12点触发 |
"0 15 10 ? * *" | 每天上午10:15触发 |
"0 15 10 * * ?" | 每天上午10:15触发 |
"0 15 10 * * ? *" | 每天上午10:15触发 |
"0 15 10 * * ? 2005" | 2005年的每天上午10:15触发 |
"0 * 14 * * ?" | 在每天下午2点到下午2:59期间的每1分钟触发 |
"0 0/5 14 * * ?" | 在每天下午2点到下午2:55期间的每5分钟触发 |
"0 0/5 14,18 * * ?" | 在每天下午2点到2:55期间和下午6点到6:55期间的每 5分钟触发 |
"0 0-5 14 * * ?" | 在每天下午2点到下午2:05期间的每1分钟触发 |
"0 10,44 14 ? 3 WED" | 每年三月的星期三的下午2:10和2:44触发 |
"0 15 10 ? * MON-FRI" | 周一至周五的上午10:15触发 |
"0 15 10 15 * ?" | 每月15日上午10:15触发 |
"0 15 10 L * ?" | 每月最后一日的上午10:15触发 |
"0 15 10 ? * 6L 2002-2005" | 2002年至2005年的每月的最后一个星期五上午 10:15触发 |
"0 15 10 ? * 6#3" | 每月的第三个星期五上午10:15触发 |
2 快速入门demo项目
引入jar包
<dependency>
    <groupId>com.dangdang</groupId>
    <artifactId>elastic-job-lite-core</artifactId>
    <version>2.1.5</version>
</dependency>
2.1定义任务
任务需要实现com.dangdang.ddframe.job.api.simple.SimpleJob接口。
/**
* 执行作业的具体逻辑
* @param shardingContext 分片上下文
*/
@Override
public void execute(ShardingContext shardingContext) {
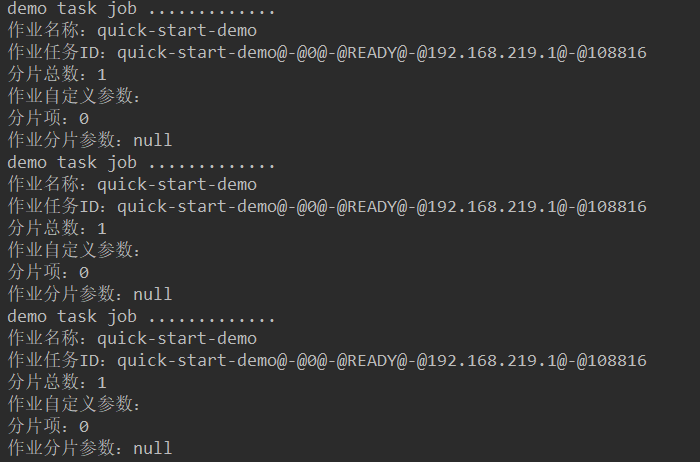
System.out.println("demo task job .............");
System.out.println("作业名称:"+shardingContext.getJobName());//作业
System.out.println("作业任务ID:"+shardingContext.getTaskId());
System.out.println("分片总数:"+shardingContext.getShardingTotalCount());
System.out.println("作业自定义参数:"+shardingContext.getJobParameter());
System.out.println("分片项:"+shardingContext.getShardingItem());
System.out.println("作业分片参数:"+shardingContext.getShardingParameter());
}
2.2 任务调度
2.2.1配置zookeeper配置中心
zookeeper协调调度,不能让任务重复执⾏,通过命名空间分类管理任务,对应到zookeeper的⽬录
//zk配置数据 zk地址端口,namespace
ZookeeperConfiguration zookeeperConfiguration = new ZookeeperConfiguration("192.168.219.102:2181",
"david-job-demo-quick-start");
//配置注册中心
CoordinatorRegistryCenter zookeeperRegistryCenter = new ZookeeperRegistryCenter(zookeeperConfiguration);
zookeeperRegistryCenter.init();
2.2.2 配置任务
//任务配置,任务名称 cron表达式(每2秒执行一次),任务分片数
JobCoreConfiguration jobConfig = JobCoreConfiguration.newBuilder("quick-start-demo", "*/2 * * * * ?",1).build();
//构建任务
SimpleJobConfiguration simpleJobConfiguration = new SimpleJobConfiguration(jobConfig, DemoJob.class.getName());
2.2.3 启动任务
new JobScheduler(zookeeperRegistryCenter, LiteJobConfiguration.newBuilder(simpleJobConfiguration).build()).init();
2.3 测试效果
3 工作原理
3.1 整体架构
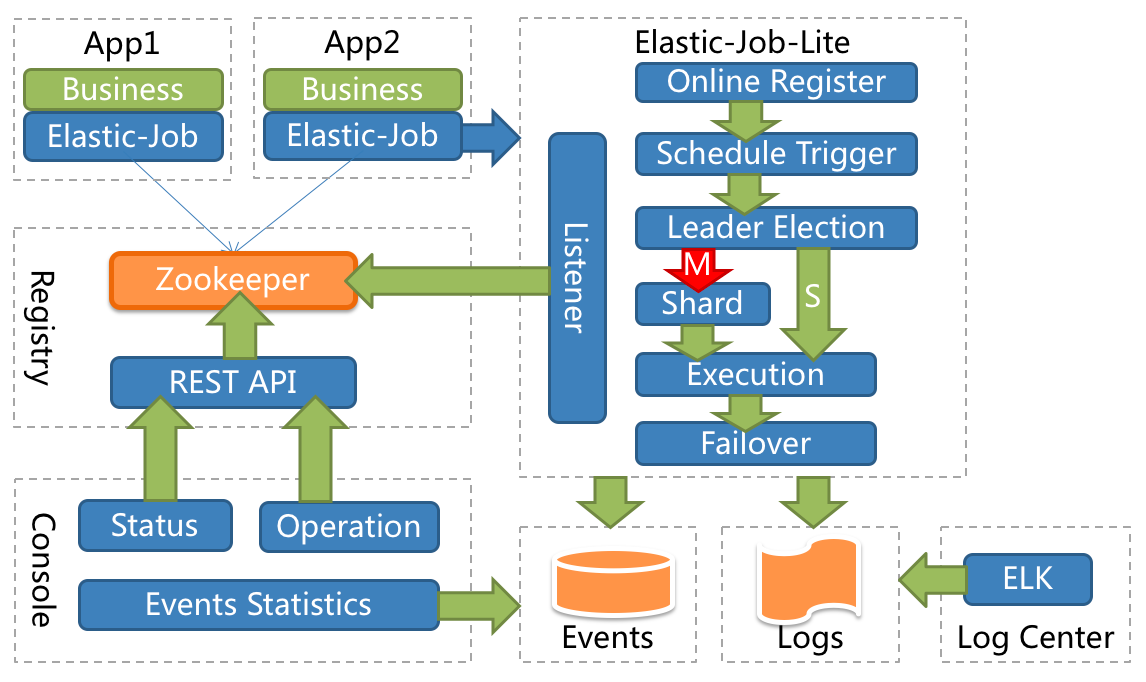
App:应用程序,内部包含任务执行业务逻辑和Elastic-Job-Lite组件,其中执行任务需要实现ElasticJob接口完成与Elastic-Job-Lite组件的集成,并进行任务的相关配置。应用程序可启动多个实例,也就出现了多个任务执行实例。
Elastic-Job-Lite:Elastic-Job-Lite定位为轻量级无中心化解决方案,使用jar包的形式提供分布式任务的协调服务,此组件负责任务的调度,并产生日志及任务调度记录。无中心化,是指没有调度中心这一概念,每个运行在集群中的作业服务器都是对等的,各个作业节点是自治的、平等的、节点之间通过注册中心进行分布式协调。
Registry:以Zookeeper作为Elastic-Job的注册中心组件,存储了执行任务的相关信息。同时,Elastic-Job利用该组件进行执行任务实例的选举。
Console:Elastic-Job提供了运维平台,它通过读取Zookeeper数据展现任务执行状态,或更新Zookeeper数据修改全局配置。通过Elastic-Job-Lite组件产生的数据来查看任务执行历史记录。
应用程序在启动时,在其内嵌的Elastic-Job-Lite组件会向Zookeeper注册该实例的信息,并触发选举(此时可能已经启动了该应用程序的其他实例),从众多实例中选举出一个Leader,让其执行任务。当到达任务执行时间时,Elastic-Job-Lite组件会调用由应用程序实现的任务业务逻辑,任务执行后会产生任务执行记录。当应用程序的某一个实例宕机时,Zookeeper组件会感知到并重新触发leader选举。
3.2 zookeeper的作用
- Elastic-Job依赖ZooKeeper完成对执行任务信息的存储(如任务名称、任务参与实例、任务执行策略等);
在命名空间下/任务/config保存了任务的信息,比如任务名称,class等等

- Elastic-Job依赖ZooKeeper实现选举机制,在任务执行实例数量变化时(如在快速上手中的启动新实例或停止实例),会触发选举机制来决定让哪个实例去执行该任务。
4.elasticjob整合springboot
4.1 maven依赖
springboot版本为:2.1.3.RELEASE
<parent>
    <groupId>org.springframework.boot</groupId>
    <artifactId>spring-boot-starter-parent</artifactId>
    <version>2.1.3.RELEASE</version>
</parent>
引入相关依赖
<dependencies>
        <dependency>
            <groupId>org.springframework.boot</groupId>
            <artifactId>spring-boot-starter-web</artifactId>
        </dependency>
        <dependency>
            <groupId>org.springframework.boot</groupId>
            <artifactId>spring-boot-starter-test</artifactId>
        </dependency>
        <dependency>
            <groupId>com.dangdang</groupId>
            <artifactId>elastic-job-lite-spring</artifactId>
            <version>2.1.5</version>
        </dependency>
 </dependencies>
4.2 配置文件
主要分为注册中心配置数据和任务相关配置数据
spring:
  application:
    name: job-springboot
job:
  regCenter:
    serverList: 192.168.219.102:2181
    namespace: david-job-demo-springboot

  demojob:
    className: com.david.elasticjob.job.DemoJob
    cron: "*/5 * * * * ?"
    shardingTotalCount: 1
    jobName: "demo-springboot"
  hellojob:
    className: com.david.elasticjob.job.HelloJob
    cron: "*/5 * * * * ?"
    shardingTotalCount: 1
    jobName: "hello-springboot"
server:
  port: 28888
4.3 配置类
注册中心配置类:
@Configuration
public class ElasticJobRegistryConfig {
    @Bean(initMethod = "init")
    public ZookeeperRegistryCenter zookeeperRegistryCenter(@Value("${job.regCenter.serverList}") String serverList,
                                                           @Value("${job.regCenter.namespace}")String nameSpace){
        ZookeeperConfiguration zookeeperConfiguration = new ZookeeperConfiguration(serverList, nameSpace);
        return new ZookeeperRegistryCenter(zookeeperConfiguration);
    }
}
任务配置类:
@Configuration
public class DemoJobConfig {
    @Value("${job.demojob.cron}")
    private  String corn;
    @Value("${job.demojob.shardingTotalCount}")
    private Integer shardingTotalCount;

    @Value("${job.demojob.jobName}")
    private  String jobName;
    @Value("${job.demojob.className}")
    private  String className;
    @Bean
    public DemoJob demoJob(){
        return new DemoJob();
    }

    @Bean(initMethod = "init")
    public JobScheduler demoJobScheduler(DemoJob demoJob, ZookeeperRegistryCenter zookeeperRegistryCenter){
        return new SpringJobScheduler(demoJob,zookeeperRegistryCenter,
                getLiteJobConfiguration(className,jobName,corn,shardingTotalCount));
    }
    private LiteJobConfiguration getLiteJobConfiguration(String jobClassName,String jobName,String cron,Integer shardingTotalCount){
        JobCoreConfiguration jobCoreConfiguration = JobCoreConfiguration.newBuilder(jobName, cron, shardingTotalCount).build();
        SimpleJobConfiguration simpleJobConfiguration = new SimpleJobConfiguration(jobCoreConfiguration, jobClassName);
        LiteJobConfiguration liteJobConfiguration = LiteJobConfiguration.newBuilder(simpleJobConfiguration).overwrite(true).build();
        return liteJobConfiguration;

    }
}
多个job采用多个配置即可:
@Configuration
public class HelloJobConfig {
    @Value("${job.hellojob.cron}")
    private  String corn;
    @Value("${job.hellojob.shardingTotalCount}")
    private Integer shardingTotalCount;

    @Value("${job.hellojob.jobName}")
    private  String jobName;
    @Value("${job.hellojob.className}")
    private  String className;
    @Bean
    public HelloJob helloJob(){
        return new HelloJob();
    }

    @Bean(initMethod = "init")
    public JobScheduler helloJobScheduler(HelloJob helloJob, ZookeeperRegistryCenter zookeeperRegistryCenter){
        return new SpringJobScheduler(helloJob,zookeeperRegistryCenter,
                getLiteJobConfiguration(className,jobName,corn,shardingTotalCount));
    }

    private LiteJobConfiguration getLiteJobConfiguration(String jobClassName,String jobName,String cron,Integer shardingTotalCount){
        JobCoreConfiguration jobCoreConfiguration = JobCoreConfiguration.newBuilder(jobName, cron, shardingTotalCount).build();
        SimpleJobConfiguration simpleJobConfiguration = new SimpleJobConfiguration(jobCoreConfiguration, jobClassName);
        LiteJobConfiguration liteJobConfiguration = LiteJobConfiguration.newBuilder(simpleJobConfiguration).overwrite(true).build();
        return liteJobConfiguration;

    }
}
4.4 任务
DemoJob
public class DemoJob implements SimpleJob {
    @Override
    public void execute(ShardingContext shardingContext) {
        System.out.println("===================demo task job =====================");
        System.out.println("demo-作业名称:"+shardingContext.getJobName());//作业
        System.out.println("demo-作业任务ID:"+shardingContext.getTaskId());
        System.out.println("demo-分片总数:"+shardingContext.getShardingTotalCount());
        System.out.println("demo-作业自定义参数:"+shardingContext.getJobParameter());
        System.out.println("demo-分片项:"+shardingContext.getShardingItem());
        System.out.println("demo-作业分片参数:"+shardingContext.getShardingParameter());
        System.out.println("===================demo task job =====================");
    }
}
HelloJob:
public class HelloJob implements SimpleJob {
    @Override
    public void execute(ShardingContext shardingContext) {
        System.out.println("=========================hello job start =========================");
        System.out.println("hello:作业名称:"+shardingContext.getJobName());//作业
        System.out.println("hello:作业任务ID:"+shardingContext.getTaskId());
        System.out.println("hello:分片总数:"+shardingContext.getShardingTotalCount());
        System.out.println("hello:作业自定义参数:"+shardingContext.getJobParameter());
        System.out.println("hello:分片项:"+shardingContext.getShardingItem());
        System.out.println("hello:作业分片参数:"+shardingContext.getShardingParameter());
        System.out.println("=========================hello job end! =========================");
    }
}
4.5 启动类
正常启动springboot即可:
@SpringBootApplication
public class Application {
    public static void main(String[] args) {
        SpringApplication.run(Application.class,args);
    }
}
4.6 启动测试效果

zk节点信息:

5.作业分片
5.1 概念
作业分片是指任务的分布式执行,需要将一个任务拆分为多个独立的任务项,然后由分布式的应用实例分别执行某一个或几个分片项。
例如:Elastic-Job快速入门中文件备份的例子,现有2台服务器,每台服务器分别跑一个应用实例。为了快速的执行作业,那么可以将作业分成4片,每个应用实例个执行2片。作业遍历数据的逻辑应为:实例1查找text和image类型文件执行备份;实例2查找radio和vedio类型文件执行备份。如果由于服务器扩容应用实例数量增加为4,则作业遍历数据的逻辑应为:4个实例分别处理text、image、radio、video类型的文件。
可以看到,通过对任务合理的分片化,从而达到任务并行处理的效果,最大限度的提高执行作业的吞吐量。
分片顶与业务处理解耦
Elastic-Job并不直接提供数据处理的功能,框架只会将分片项分配至各个运行中的作业服务器,开发者需要自行处理分片项与真实数据的对应关系。
最大限度利用资源
建议将分片项设置为大于服务器的数量,最好是大于服务器倍数的数量,作业将会合理的利用分布式资源,动态的分配分片项。
5.2 demo代码
在springboot的基础之上,以person表,根据性别 sex(1:男,0:女)来分片,分2个sharding,启动2个实例来运行任务。
5.2.1 maven依赖
新增mysql驱动,jdbc相关依赖。
<dependencies>
    <dependency>
        <groupId>org.springframework.boot</groupId>
        <artifactId>spring-boot-starter-web</artifactId>
    </dependency>
    <dependency>
        <groupId>org.springframework.boot</groupId>
        <artifactId>spring-boot-starter-test</artifactId>
    </dependency>
    <dependency>
        <groupId>org.springframework.boot</groupId>
        <artifactId>spring-boot-starter-jdbc</artifactId>
    </dependency>
    <dependency>
        <groupId>mysql</groupId>
        <artifactId>mysql-connector-java</artifactId>
        <version>5.1.47</version>
    </dependency>
    <dependency>
        <groupId>com.dangdang</groupId>
        <artifactId>elastic-job-lite-spring</artifactId>
        <version>2.1.5</version>
    </dependency>
</dependencies>
5.2.2 Person 实体类以及建表语句
CREATE TABLE `person` (
  `id` int(11) NOT NULL AUTO_INCREMENT,
  `name` varchar(255) DEFAULT NULL,
  `sex` tinyint(2) DEFAULT NULL COMMENT '1:男 0:女',
  `age` int(3) DEFAULT NULL,
  `state` int(2) DEFAULT NULL,
  PRIMARY KEY (`id`)
) ENGINE=InnoDB AUTO_INCREMENT=1001 DEFAULT CHARSET=utf8;
public class Person implements Serializable {
    private int id;
    private String name;
    private int sex;
    private int age;
    private int state;
    //省略getter,setter
}
5.2.3 模拟业务实现
根据传入的性别参数,来实现对person表的操作,模拟业务实现。假设业务处理过后将person表的state字段update 1.
@Service
public class PersonService {
    @Autowired
    private JdbcTemplate jdbcTemplate;

    private static final Logger LOGGER=LoggerFactory.getLogger(PersonService.class);

    public void doSomething(Integer sex){
        LOGGER.info("开始处理任务:sex:{}",sex==1?"男":"女");
        String sql="select * from person where sex=? and state=0 limit 1";
        List<Person> personList = jdbcTemplate.query(sql, new Object[]{sex}, new BeanPropertyRowMapper<>(Person.class));
        LOGGER.info("查询条数:num:{}",personList.size());
        if (!CollectionUtils.isEmpty(personList)){
            String sql2="update person set state=1 where id = ?";
            Person person = personList.get(0);
            LOGGER.info("处理任务:name:{},id:{},age:{}",person.getName(),person.getId(),person.getAge());
            jdbcTemplate.update(sql2,new Object[]{person.getId()});
        }
    }
}
5.2.4 application.yml
端口在启动参数配置,方便启动多个进程实例。
spring:
  application:
    name: job-springboot
  datasource:
    driver-class-name: com.mysql.jdbc.Driver
    url: jdbc:mysql://localhost:3306/elastic_job
    username: root
    password: 123456
job:
  regCenter:
    serverList: 192.168.219.102:2181
    namespace: david-job-demo-sharding

  personJob:
    className: com.david.elasticjob.job.PersonJob
    cron: "*/5 * * * * ?"
    shardingTotalCount: 2
    jobName: "job-sharding-person"
    shardingParameter: "0=0,1=1" #分片参数,前面是分片序号,后面是分片数据 此处0代表女 1代表男
server:
  port: ${port:28888}
5.2.5 具体任务实现
@Component
public class PersonJob implements SimpleJob {

    private static final Logger LOGGER= LoggerFactory.getLogger(PersonJob.class);
    @Autowired
    private PersonService personService;
    @Value("${server.port}")
    private Integer port;
    @Override
    public void execute(ShardingContext context) {
        String taskId = context.getTaskId();
        String shardingParameter = context.getShardingParameter();
        LOGGER.info("端口:{},定时任务开始:taskId:{},shardingParameter:{}",port,taskId,shardingParameter);
        personService.doSomething(Integer.valueOf(shardingParameter));
    }
}
5.2.6 注册中心配置以及任务配置
注册中心:
@Configuration
public class ElasticJobRegistryConfig {
    @Bean(initMethod = "init")
    public ZookeeperRegistryCenter zookeeperRegistryCenter(@Value("${job.regCenter.serverList}") String serverList,
                                                           @Value("${job.regCenter.namespace}")String nameSpace){
        ZookeeperConfiguration zookeeperConfiguration = new ZookeeperConfiguration(serverList, nameSpace);
        return new ZookeeperRegistryCenter(zookeeperConfiguration);
    }
}
任务配置:关键在于分片参数
@Configuration
public class PersonJobConfig {
    @Value("${job.personJob.cron}")
    private  String corn;

    @Value("${job.personJob.shardingTotalCount}")
    private Integer shardingTotalCount;

    @Value("${job.personJob.shardingParameter}")
    private  String shardingParameter;

    @Value("${job.personJob.jobName}")
    private  String jobName;

    @Value("${job.personJob.className}")
    private  String className;


    @Bean(initMethod = "init")
    public JobScheduler helloJobScheduler(PersonJob personJob, ZookeeperRegistryCenter zookeeperRegistryCenter){
        return new SpringJobScheduler(personJob,zookeeperRegistryCenter,
                getLiteJobConfiguration(className,jobName,corn,shardingTotalCount));
    }

    private LiteJobConfiguration getLiteJobConfiguration(String jobClassName,String jobName,String cron,Integer shardingTotalCount){
        JobCoreConfiguration jobCoreConfiguration = JobCoreConfiguration.newBuilder(jobName, cron, shardingTotalCount)
                .shardingItemParameters(shardingParameter) //分片参数,前面是分片序号,后面是分片数据 此处0代表女 1代表男
                .build();

        SimpleJobConfiguration simpleJobConfiguration = new SimpleJobConfiguration(jobCoreConfiguration, jobClassName);
        LiteJobConfiguration liteJobConfiguration = LiteJobConfiguration.newBuilder(simpleJobConfiguration).overwrite(true).build();
        return liteJobConfiguration;
    }
}
5.2.7 启动类
@SpringBootApplication
public class ApplicationMain {
    public static void main(String[] args) {
        SpringApplication.run(ApplicationMain.class,args);
    }
}
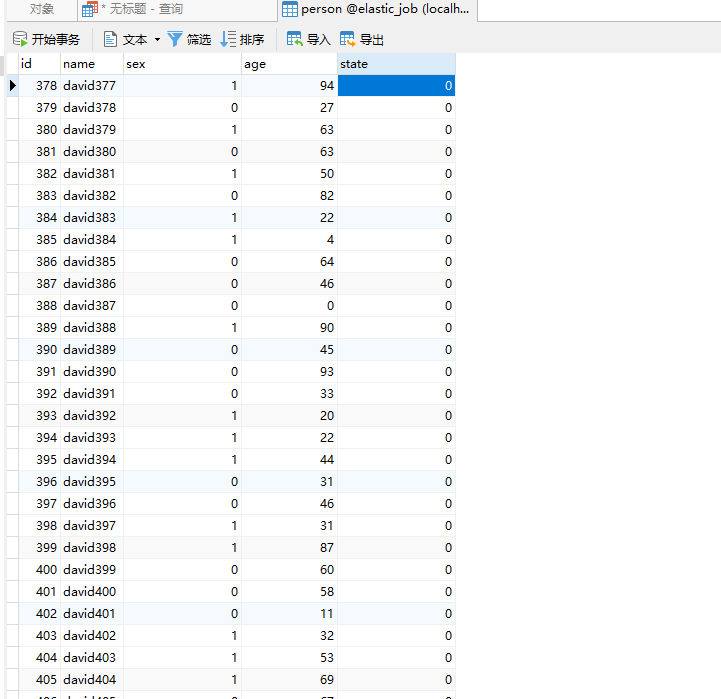
5.2.8 测试数据准备
随机插入1000条数据,state为0.
@RunWith(SpringRunner.class)
@SpringBootTest
public class Test {
    @Autowired
    private JdbcTemplate jdbcTemplate;

    @org.junit.Test
    public void test(){
        String sql="insert into person (name,sex,age,state) values (?,?,?,?)";
        Random random=new Random();
        for (int i = 0; i < 1000; i++) {
            jdbcTemplate.update(sql,new Object[]{"david"+i,random.nextInt(2),random.nextInt(100),0});
        }
    }
}
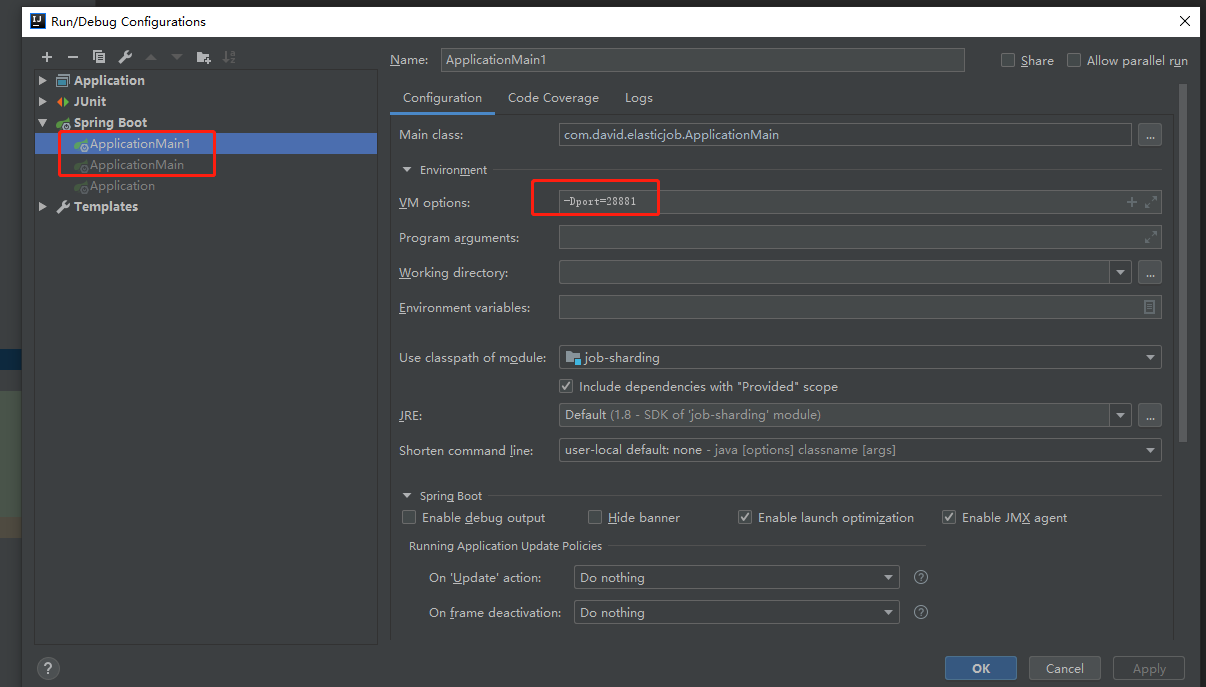
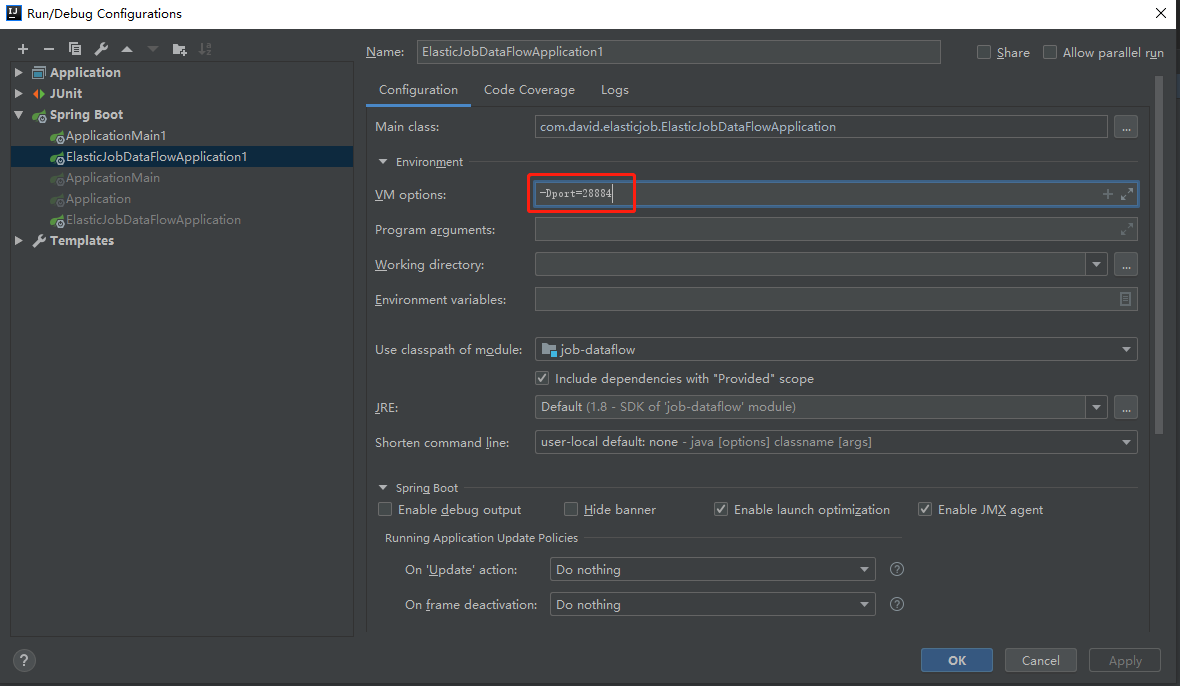
5.2.9 启动参数配置
配置2个启动参数,端口分别为28880,28881
5.2.10 测试结果
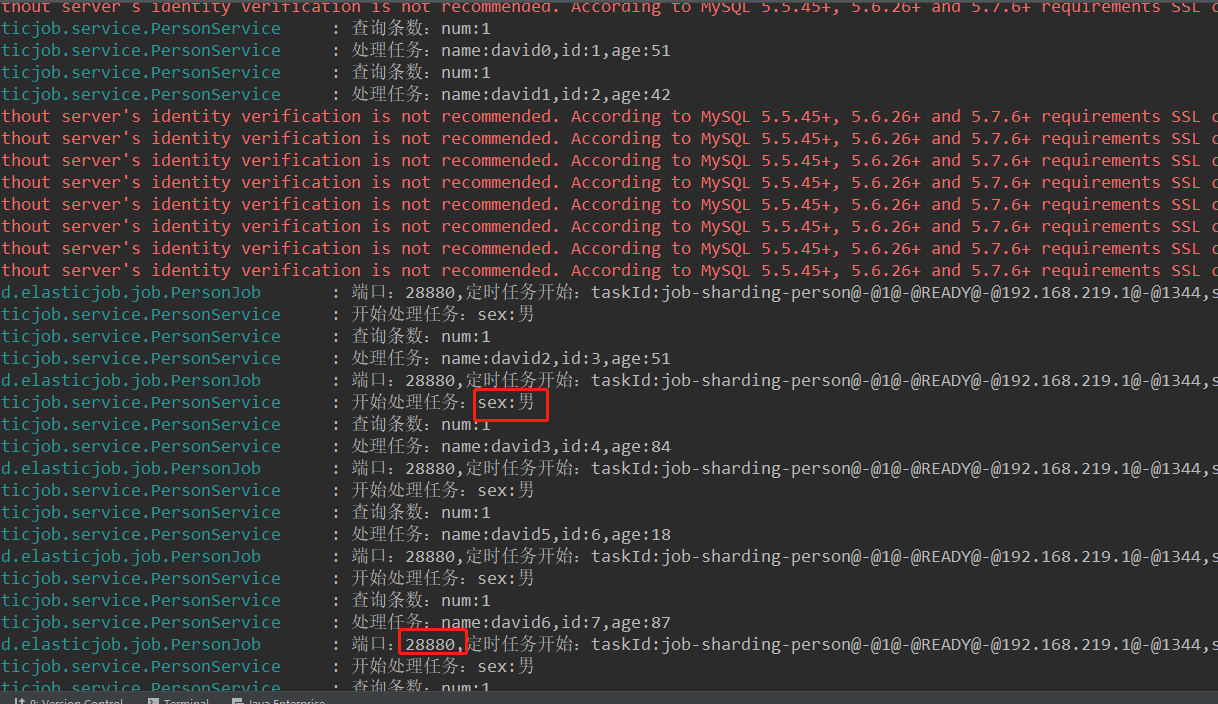
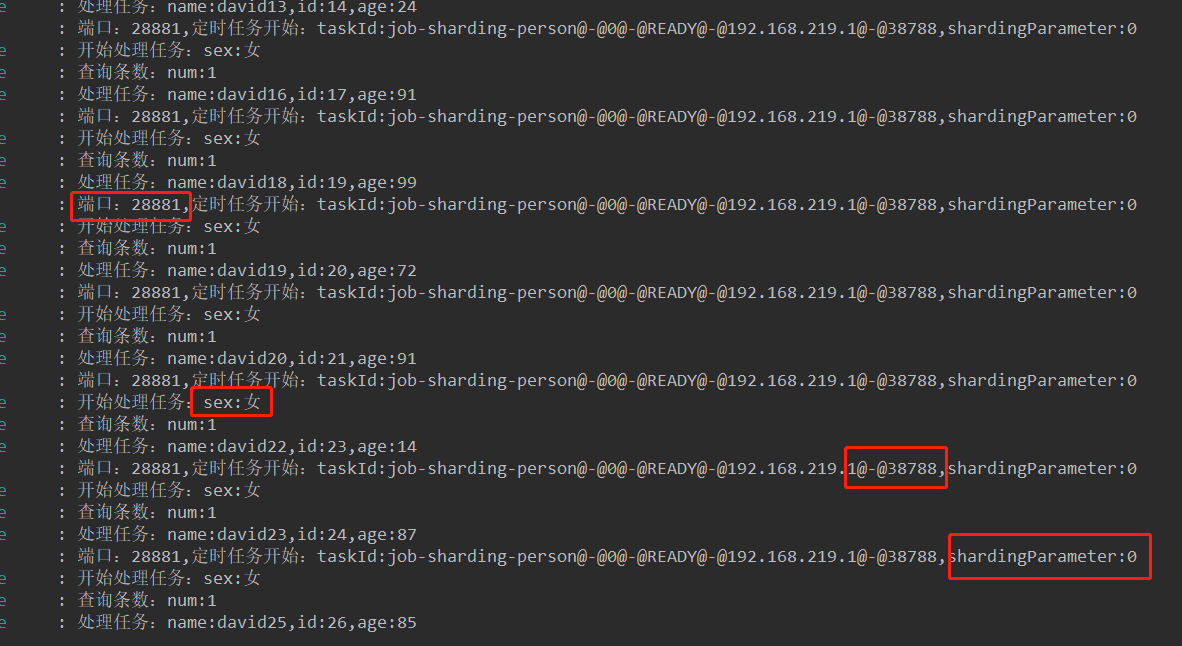
可见28880端口实例处理的是sex为男的分片,28881处理的是女,达到预期效果。

zookeeper节点信息:可以看出有2个sharding,其中sharding0的实例正好是38788。
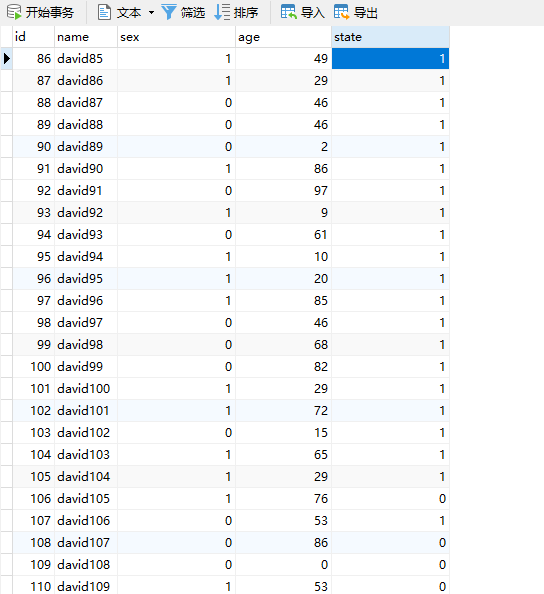
数据库完成效果:
6.elastic-job配置说明
以下配置来源elastic-job官网:
注册中心配置相关的,目前注册中心仅仅支持zookeeper。
| 属性名 | 类型 | 构造器注入 | 缺省值 | 描述 |
|---|---|---|---|---|
| serverLists | String | 是 | 连接Zookeeper服务器的列表 包括IP地址和端口号 多个地址用逗号分隔 如: host1:2181,host2:2181 | |
| namespace | String | 是 | Zookeeper的命名空间 | |
| baseSleepTimeMilliseconds | int | 否 | 1000 | 等待重试的间隔时间的初始值 单位:毫秒 |
| maxSleepTimeMilliseconds | String | 否 | 3000 | 等待重试的间隔时间的最大值 单位:毫秒 |
| maxRetries | String | 否 | 3 | 最大重试次数 |
| sessionTimeoutMilliseconds | boolean | 否 | 60000 | 会话超时时间 单位:毫秒 |
| connectionTimeoutMilliseconds | boolean | 否 | 15000 | 连接超时时间 单位:毫秒 |
| digest | String | 否 | 连接Zookeeper的权限令牌 缺省为不需要权限验证 |
JobCoreConfiguration属性详细说明
| 属性名 | 类型 | 构造器注入 | 缺省值 | 描述 |
|---|---|---|---|---|
| jobName | String | 是 | 作业名称 | |
| cron | String | 是 | cron表达式,用于控制作业触发时间 | |
| shardingTotalCount | int | 是 | 作业分片总数 | |
| shardingItemParameters | String | 否 | 分片序列号和参数用等号分隔,多个键值对用逗号分隔 分片序列号从0开始,不可大于或等于作业分片总数 如: 0=a,1=b,2=c | |
| jobParameter | String | 否 | 作业自定义参数 作业自定义参数,可通过传递该参数为作业调度的业务方法传参,用于实现带参数的作业 例:每次获取的数据量、作业实例从数据库读取的主键等 | |
| failover | boolean | 否 | false | 是否开启任务执行失效转移,开启表示如果作业在一次任务执行中途宕机,允许将该次未完成的任务在另一作业节点上补偿执行 |
| misfire | boolean | 否 | true | 是否开启错过任务重新执行 |
| description | String | 否 | 作业描述信息 | |
| jobProperties | Enum | 否 | 配置jobProperties定义的枚举控制Elastic-Job的实现细节 JOB_EXCEPTION_HANDLER用于扩展异常处理类 EXECUTOR_SERVICE_HANDLER用于扩展作业处理线程池类 |
7.作业分片策略
7.1 AverageAllocationJobshardingstrategy
全路径:
com.dangdang.ddframe.job.lite.api.strategy.impl.AverageAllocationjobShardingStrategy
策略说明:
基于平均分配算法的分片策略,也是默认的分片策略。
如果分片不能整除,则不能整除的多余分片将依次追加到序号小的服务器。如:
如果有3台服务器,分成9片,则每台服务器分到的分片是:1=[0,1,2],2=[3,4,5],3=[6,7,8]
如果有3台服务器,分成8片,则每台服务器分到的分片是:1=[0,1,6],2=[2,3,7],3=[4,5]
如果有3台服务器,分成10片,则每台服务器分到的分片是:1=[0,1,2,9],2=[3,4,5],3=[6,7,8]
7.2 odevitySortByNameJobshardingstrategy
全路径:
com.dangdang.ddframe.job.lite.api.strategy.impl.OdevitySortByNamelobShardingStrategy
策略说明:
根据作业名的哈希值奇偶数决定IP升降序算法的分片策略。
作业名的哈希值为奇数则IP升序。
作业名的哈希值为偶数则IP降序。
用于不同的作业平均分配负载至不同的服务器。
AverageAllocationjobShardingStrategy的缺点是,一旦分片数小于作业服务器数,作业将永远分配至IP地址靠前的服务器,导致IP地址靠后的服务器空闲。
而OdevitySortByNamelobShardingStrategy则可以根据作业名称重新分配服务器负载。如:
如果有3台服务器,分成2片,作业名称的哈希值为奇数,则每台服务器分到的分片是:1=[0],2=[1],3=[0]
如果有3台服务器,分成2片,作业名称的哈希值为偶数,则每台服务器分到的分片是:3=[0],2=[1],1=[0]
7.3 RotateServerByNamelobShardingstrategy
全路径:
com.dangdang.ddframe.job.lite.api.strategy.impl.RotateServerByNamelobShardingStrategy
策略说明:
根据作业名的哈希值对服务器列表进行轮转的分片策略。(轮训)
7.4 配置分片策略
与配置通常的作业属性相同,在spring命名空间或者JobConfiguration中配置jobShardingStrategyClass属性,属性值是作业分片策略类的全路径。
分片策略配置xml方式:
<job:simple id="hotelsimpleSpringJob" class="com.chuanzhi.spiderhotel.job.SpiderJob" registry-center-ref="regCenter" cron="0/10 * * * * ?"sharding-total-count="4" sharding-item-parameters="0=A,1=B,2=C,3=D" monitor-port="9888" reconcile-interval-minutes="10" job-sharding-strategy-class="com.dangdang.ddframe.job.lite.api.strategy.imp1.RotateServerByName lobShardingStrategy"/>
分片策略配置java方式:
//定义Lite作业根配置
JobRootConfiguration simple]obRootConfig =
LiteJobConfiguration.newBuilder(simpleJobConfig).jobShardingStrategyClass("com.dangdang.ddframe.job.lite,api.strategy.imp1.OdevitysortByNameJobSrardingstrategy").build();
8.DataFlow类型定时任务
Dataflow类型用于处理数据流,它和SimpleJob不同,它以数据流的方式执行,调用fetchData抓取数据,直到抓取不到数据才停止作业。
Dataflow类型的定时任务需实现DataflowJob接口,该接口提供2个方法可供覆盖,分别用于抓取(fetchData)和处理(processData)数据。
流式处理数据只有fetchData方法的返回值为null或集合长度为空时,作业才停止抓取,否则作业将一直运行下去; 非流式处理数据则只会在每次作业执行过程中执行一次fetchData方法和processData方法,随即完成本次作业。可以通过配置是否以流式作业进行。
8.1 demo代码
8.1.1 maven依赖
和sharing项目一致
<dependencies>
    <dependency>
        <groupId>org.springframework.boot</groupId>
        <artifactId>spring-boot-starter-web</artifactId>
    </dependency>
    <dependency>
        <groupId>org.springframework.boot</groupId>
        <artifactId>spring-boot-starter-test</artifactId>
    </dependency>
    <dependency>
        <groupId>org.springframework.boot</groupId>
        <artifactId>spring-boot-starter-jdbc</artifactId>
    </dependency>
    <dependency>
        <groupId>mysql</groupId>
        <artifactId>mysql-connector-java</artifactId>
        <version>5.1.47</version>
    </dependency>
    <dependency>
        <groupId>com.dangdang</groupId>
        <artifactId>elastic-job-lite-spring</artifactId>
        <version>2.1.5</version>
    </dependency>
</dependencies>
8.1.2 配置文件
每10秒执行一次
spring:
  application:
    name: job-springboot
  datasource:
    driver-class-name: com.mysql.jdbc.Driver
    url: jdbc:mysql://localhost:3306/elastic_job
    username: root
    password: 123456
job:
  regCenter:
    serverList: 192.168.219.102:2181
    namespace: david-job-demo-sharding

  personJob:
    className: com.david.elasticjob.job.PersonJob
    cron: "*/10 * * * * ?"
    shardingTotalCount: 2
    jobName: "job-sharding-person"
    shardingParameter: "0=0,1=1" #分片参数,前面是分片序号,后面是分片数据 此处0代表女 1代表男
server:
  port: ${port:28888}
8.1.3 job实现
实现DataflowJob接口,重写2个方法,fetchData数据拉取和processData数据处理,如果是流式处理,定时任务一旦触发fetchData将不停的拉取数据,直到fetchData返回null,当前作业才停止。
@Component
public class PersonJob implements DataflowJob<Person> {

    private static final Logger LOGGER= LoggerFactory.getLogger(PersonJob.class);
    @Autowired
    private PersonService personService;
    @Value("${server.port}")
    private Integer port;

    @Override
    public List<Person> fetchData(ShardingContext shardingContext) {
        Integer sex = Integer.valueOf(shardingContext.getShardingParameter());
        List<Person> personList = personService.findPersonBySex(sex, 5);
        String now = new SimpleDateFormat("yyyy-MM-dd HH:mm:ss").format(new Date());
        LOGGER.info("抓取时间:{},服务端口为:port:{},性别:{},数据抓取:personList:{}",now,port,sex==0?"女":"男",personList);
        return personList;
    }

    @Override
    public void processData(ShardingContext shardingContext, List<Person> data) {
        LOGGER.info("服务端口为:port:{},处理数据:data:{}",port,data);
        personService.doSomething(data);
    }
}
8.1.3 job配置
与simpleJob不一样的地方是需要配置DataflowJobConfiguration,其中JobCoreConfiguration的配置是一致的,需要传入streamingProcess是否流式处理字段。
@Configuration
public class PersonJobConfig {
    @Value("${job.personJob.cron}")
    private  String corn;
    @Value("${job.personJob.shardingTotalCount}")
    private Integer shardingTotalCount;
    @Value("${job.personJob.shardingParameter}")
    private  String shardingParameter;
    @Value("${job.personJob.jobName}")
    private  String jobName;
    @Value("${job.personJob.className}")
    private  String className;
    @Bean(initMethod = "init")
    public JobScheduler helloJobScheduler(PersonJob personJob, ZookeeperRegistryCenter zookeeperRegistryCenter){
        return new SpringJobScheduler(personJob,zookeeperRegistryCenter,
                getLiteJobConfiguration(className,jobName,corn,shardingTotalCount));
    }

    private LiteJobConfiguration getLiteJobConfiguration(String jobClassName,String jobName,String cron,Integer shardingTotalCount){
        JobCoreConfiguration jobCoreConfiguration = JobCoreConfiguration.newBuilder(jobName, cron, shardingTotalCount)
                .shardingItemParameters(shardingParameter) //分片参数,前面是分片序号,后面是分片数据 此处0代表女 1代表男
                .build();
        DataflowJobConfiguration dataflowJobConfiguration = new DataflowJobConfiguration(jobCoreConfiguration, jobClassName, true);
        LiteJobConfiguration liteJobConfiguration = LiteJobConfiguration.newBuilder(dataflowJobConfiguration).overwrite(true).build();
        return liteJobConfiguration;
    }
}
8.1.4 业务处理模拟
主要分为2步,查询数据和更新数据
@Service
public class PersonService {
@Autowired
private JdbcTemplate jdbcTemplate;
private static final Logger LOGGER=LoggerFactory.getLogger(PersonService.class);
public void doSomething(List<Person> personList){
LOGGER.info("开始处理任务:personList:{}",personList);
for (Person person : personList) {
String sql2="update person set state=1 where id = ?";
LOGGER.info("处理任务:name:{},id:{},age:{}",person.getName(),person.getId(),person.getAge());
jdbcTemplate.update(sql2,new Object[]{person.getId()});
}
}
public List<Person> findPersonBySex(Integer sex,Integer n){
String sql="select * from person where sex=? and state=0 limit ?";
List<Person> personList = jdbcTemplate.query(sql, new Object[]{sex,n}, new BeanPropertyRowMapper<>(Person.class));
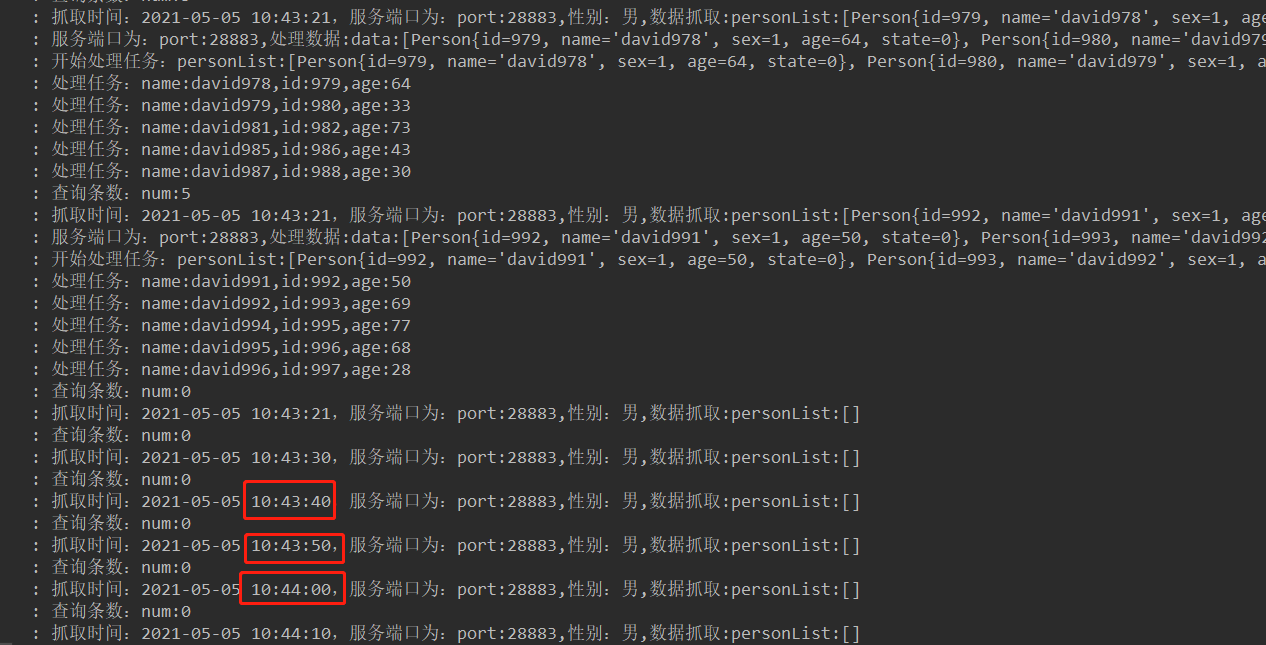
LOGGER.info("查询条数:num:{}",personList.size());
return personList;
}
}
其余配置和job-sharding项目一样。
8.1.5 测试验证
分别配置端口28883和28884.
虽然定时任务配置的是每10秒触发一次,因为配置的流式处理方式,任务还是一直抓取,直到抓取的数据返回为null。
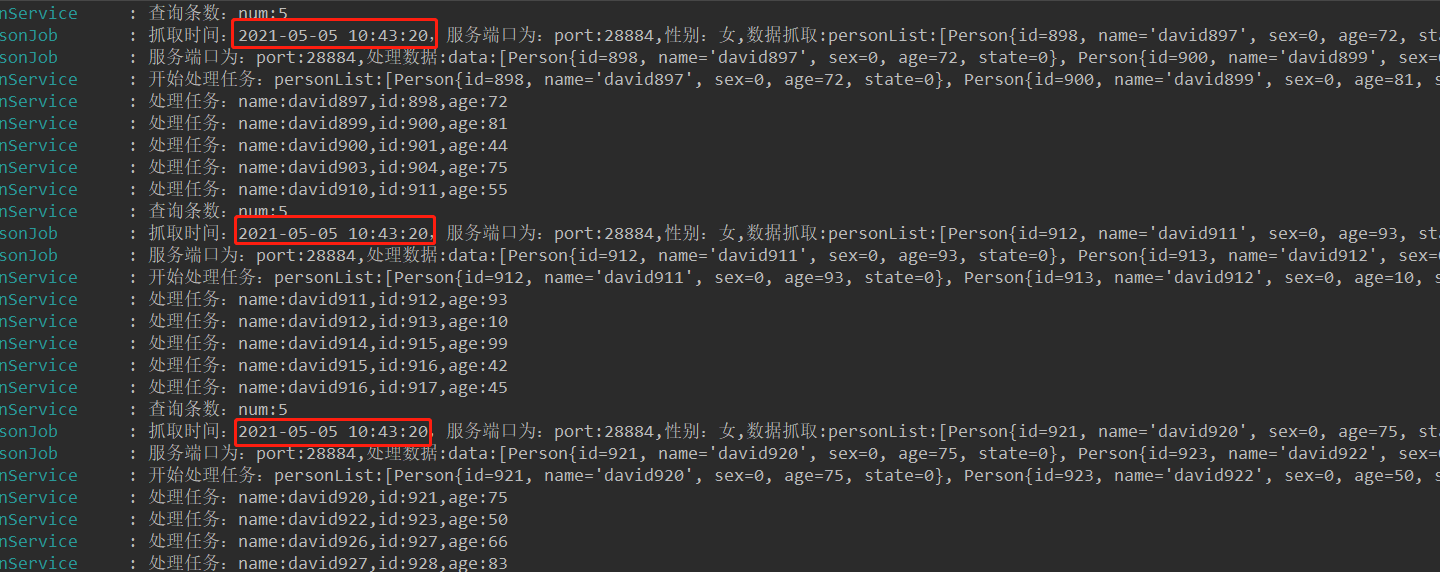
直到抓取数据返回为null或者size==0的时候,才停止当前作业。
9.事件追踪
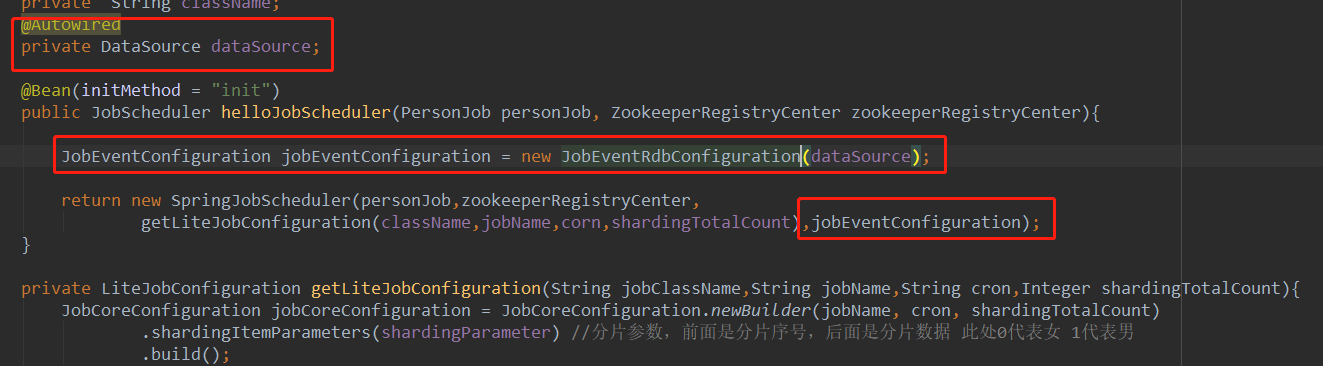
也就是记录作业日志,通常将作业日志持久化到数据库或者以其他的方式持久化,便于后续分析操作。
通常在配置任务的时候配置一个事件监听,JobEventConfiguration是一个接口,可以自定义实现逻辑,elastic job默认给了一个实现JobEventRdbConfiguration,需要注入数据源DataSource。
启动项目后会在数据库生成2张表:
JOB_EXECUTION_LOG:记录每次作业的执行历史。
分为两个步骤:
1.作业开始执行时向数据库插入数据,除failure_cause和complete_time外的其他字段均不为空。
2.作业完成执行时向数据库更新数据,更新is_success,complete_time和failure_cause(如果作业执行失)
JOB_STATUS_TRACE_LOG:记录作业状态变更痕迹表。可通过每次作业运行的taskid查询作业状态变化的生命周期和运行轨迹。
[外链图片转存失败,源站可能有防盗链机制,建议将图片保存下来直接上传(img-oVlWPVcO-1622479744973)(C:%5CUsers%5CWuXiaoLong%5CDesktop%5Celastic-job%5Cimages%5Cimage-20210505111835865.png)]


 864
864


 被折叠的 条评论
为什么被折叠?
被折叠的 条评论
为什么被折叠?
 到【灌水乐园】发言


