


背景
最近在玩esp32。在使用了屏幕后就想着显示中文。我的屏幕使用tff_espi这个库,它本身也提供了自定义字体的功能。网络上存在一些教程,教人使用它库本身带了一个processing的工程,可以用来把字体转换为vlw格式,这也是processing这个ide默认使用的字体格式。有些教程之后再将vlw转换为h文件,也有人说库本身也可以直接使用vlw。不过随着库工具更新,目前这个工程是直接导出h文件的。
由于各种原因(主要是不太想再安装一个ide),我决定自己实现一个软字库。恰好看到这个项目和这个项目,给了我一点启发。首先完全可以将位图信息保存在文件中;且来估算一下,如果字符大小为16*16,一个字可以用32Bytes存储,就算是unicode中两万余个汉字,全部存下来也只需625KB;如果字符为20*20,则需要约1MB。对于esp32至少4M的flash而言,非常足够了。这样,在单片机中,只需要获取每一个字的unicode编码,然后从文件中查找字模显示就行了。而且unicode编码相对比较连续,这甚至只需要一个简单的映射。
创建字库
我们的字库会收录以下字符,对于中文和日文应该很友好。
- 0x00~0x7F / 0-127 ascii码 共128个
- 0x2010~0x205E / 8208-8286 通用标点 共79个
- 0x3000~0x30FF / 12288-12543 中日标点和日本假名 共256个
- 0x4E00~0x9FA5 / 19968-40869 东亚通用汉字 共20902个
- 0xFF00~0xFFEF / 65280-65519 中日全宽或半宽字符 共240个
为了方便,使用python制作字模库,制作16像素或20像素。总共21605个字符,16像素时字库675KB,20像素时1MB。
在python中,利用PIL库的能力加载字体,然后将文字按照指定大小画在画布上,最后处理画布,得到字模。这里仅仅为了展示,使用得意黑字体,感谢大佬的付出。PIL处理文字时,可能存在一些小问题,譬如文字并不是恰好在我们预想的大小范围,因此可能需要调整。像 #5 downoffset = -4,需要一个竖直方向的偏移。类似得意黑的比较细长的字体,文字高度可能超过预期,则需要在#8 处导入字体时微调fontsize的参数。
# python创建字库
from PIL import Image, ImageFont, ImageDraw
import numpy as np

fontsize = 20  #  字符的大小/像素
downoffset = -4 # 如果fontsize是16的话这里就是-5

im = Image.new('P',(fontsize,fontsize),(0,0,0))
font = ImageFont.truetype('./SmileySans.ttf', fontsize-3, encoding='unic')
#  上面的fontsize需要根据情况微调
draw = ImageDraw.Draw(im)
with open('./smiley'+str(fontsize)+'.font','wb') as f:  # 写入字库,重复的劳动,想要添加字符的话复制粘贴for循环即可
    for a in range(0x00,0x80):
        draw.rectangle([(0,0),(fontsize,fontsize)], fill = (0,0,0))
        draw.text((0, downoffset), chr(a), fill=(255, 255, 255), font=font, stroke_width=0)
        temp = np.packbits(np.array(im).flatten()).tobytes()
        f.write(temp)
    for a in range(0x2010,0x205F):
        draw.rectangle([(0,0),(fontsize,fontsize)], fill = (0,0,0))
        draw.text((0, downoffset), chr(a), fill=(255, 255, 255), font=font, stroke_width=0)
        temp = np.packbits(np.array(im).flatten()).tobytes()
        f.write(temp)
    for a in range(0x3000,0x3100):
        draw.rectangle([(0,0),(fontsize,fontsize)], fill = (0,0,0))
        draw.text((0, downoffset), chr(a), fill=(255, 255, 255), font=font, stroke_width=0)
        temp = np.packbits(np.array(im).flatten()).tobytes()
        f.write(temp)
    for a in range(0x4E00,0x9FA6):
        draw.rectangle([(0,0),(fontsize,fontsize)], fill = (0,0,0))
        draw.text((0, downoffset), chr(a), fill=(255, 255, 255), font=font, stroke_width=0)
        temp = np.packbits(np.array(im).flatten()).tobytes()
        f.write(temp)
    for a in range(0xFF00,0xFFF0):
        draw.rectangle([(0,0),(fontsize,fontsize)], fill = (0,0,0))
        draw.text((0, downoffset), chr(a), fill=(255, 255, 255), font=font, stroke_width=0)
        temp = np.packbits(np.array(im).flatten()).tobytes()
        f.write(temp)
同时简单使用python在控制台输出看一下。
效果展示 20像素

              ████
      ████████████████████
        ████      ████
        ████      ████
    ██████████████████████

      ████████████████
      ████          ██
      ████████████████
      ██            ██
      ████████████████
            ██
    ██  ██  ████    ████
  ████  ██        ██████
  ██    ██      ████  ██
  ██      ████████
如此,字库文件“xxx.font”就创建好了,之后上传到单片机的flash即可
单片机内使用字库
- 处理字符串为unicode码数组(实现为链表)
unic* unichead_from_str(char* test_str) - 从文件中查找字模,得到字模数组(链表)
glyph* get_glyph_from_unic(unic* strhead) - 顺次输出到屏幕
void tft_chn(tft* tft,int x,int y,int color,char *print_str)此函数内部调用unichead_from_str()和get_glyph_from_unic()
以下是使用arduino平台测试的代码,使用中仅需要调用tft_chn()函数即可。这里我只实现了单行文字输出。
// test.ino
#include <LittleFS.h>
#include <TFT_eSPI.h>

TFT_eSPI tft = TFT_eSPI();

String fontFilePath = "/smiley16.font";

const int fontsize = 16;

// unicode码结构体
typedef struct unic_node {
  struct unic_node *next;
  int val;
} unic;

// 字模结构体
typedef struct glyph_node {
  struct glyph_node *next;
  uint8_t val[2 * fontsize + 1];
} glyph;

// 用于通过unicode码计算偏移量
int unicode_to_offset(int unicode) {
  if (unicode < 0x80) {
    return unicode;
  } else if (unicode >= 0x2010 && unicode <= 0x205E) {
    return unicode - 0x2010 + 128;
  } else if (unicode >= 0x3000 && unicode <= 0x30FF) {
    return unicode - 0x3000 + 128 + 79;
  } else if (unicode >= 0x4E00 && unicode <= 0x9FA5) {
    return unicode - 0x4E00 + 128 + 79 + 256;
  } else if (unicode >= 0xFF00 && unicode <= 0xFFEF) {
    return unicode - 0xFF00 + 128 + 79 + 256 + 20902;
  } else {
    return 1;
  }
}

// 从unicode数组获取其中字模的数组
glyph *get_glyph_from_unic(unic *strhead) {
  glyph *fonthead = NULL;
  unic *temphead = strhead;
  if (LittleFS.exists(fontFilePath)) {
    File file = LittleFS.open(fontFilePath, "r");
    while (temphead != NULL) {
      glyph *temp_glyph_node = (glyph *)malloc(sizeof(glyph));
      //设定文件偏移量
      file.seek(unicode_to_offset(temphead->val)*fontsize*fontsize/8, SeekSet);
      file.read(temp_glyph_node->val, fontsize * fontsize / 8);
      temp_glyph_node->next = fonthead;
      fonthead = temp_glyph_node;
      temphead = temphead->next;
    }
    file.close();
  }
  glyph *gly_conv = glyph_convert(fonthead);
  return gly_conv;
}

//最主要的函数,用于在屏幕上绘制文字
// 注意,这个只能显示一行文字,且没有实现半角字符
void tft_chn(TFT_eSPI &tftoutput, int x, int y, int color, char *printstr) {
  unic *temp_unic = unichead_from_str(printstr);
  glyph *temp_glyph = get_glyph_from_unic(temp_unic);
  delstr(temp_unic);
  glyph *temp_gly_head = temp_glyph;
  int now_x = x;
  int now_y = y;
  while(temp_gly_head !=NULL ){
    tft_chn_one(tftoutput,now_x,now_y,color,temp_gly_head);
    temp_gly_head = temp_gly_head->next;
    now_x += fontsize+2;
  }
  delgly(temp_glyph);
  return;
}

// 输出单字符
void tft_chn_one(TFT_eSPI &tftoutput, int x, int y, int color, glyph *printstr) {
  char strbindata;
  int now_row = 0;// add on y
  int now_col = 0;// add on x
  for (int i = 0; i < fontsize * fontsize / 8; i++) {
    char temp = printstr->val[i];
    for (int j = 0; j < 8; j++) {
      if ((temp >> (7 - j)) & 0x1) {
        tftoutput.drawPixel(x+now_col,y+now_row,color);
      }
      now_col++;
      if (now_col >= fontsize) {
        now_row++;
        now_col = 0;
      }
    }
  }
  return;
}

// 从字符串转为unicode整数的链表
unic *unichead_from_str(char *test_str) {
  unic *strhead = NULL;
  int state = 0;  //表达状态,0为解析完成没有更多
  int byte_number = 0;
  int unicodeindex = 0;

  for (int i = 0; i < strlen(test_str); i++) {
    if (state == 0) {                          //新一轮解析
      int daistr = (int)(test_str[i] & 0xff);  //待解析字符
      if (daistr < 0x80) {                     //单字节编码,马上进入下一轮
        unic *newnode = (unic *)malloc(sizeof(unic));
        newnode->val = (int)(test_str[i] & 0xff);
        newnode->next = strhead;
        strhead = newnode;
      } else if ((daistr & 0xE0) == 0xC0) {  //二字节编码
        state = 1;
        byte_number = 2;
        unicodeindex = daistr & 0x1F;
      } else if ((daistr & 0xF0) == 0xE0) {  //三字节编码
        state = 1;
        byte_number = 3;
        unicodeindex = daistr & 0x0F;
      } else if ((daistr & 0xF8) == 0xF0) {  //四字节编码
        state = 1;
        byte_number = 4;
        unicodeindex = daistr & 0x07;
      } else {  //非法
        continue;
      }
    } else {  //已经解析第一个,解析剩下的
      byte_number--;
      int daistr = (int)(test_str[i] & 0xff);  //待解析字符
      if ((daistr & 0xC0) != 0x80) {           //非法
        state = 0;
        continue;
      }
      unicodeindex = (unicodeindex << 6) | (daistr & 0x3F);
      if (byte_number <= 1) {  //完毕
        state = 0;
        unic *newnode = (unic *)malloc(sizeof(unic));
        newnode->val = (int)unicodeindex;
        newnode->next = strhead;
        strhead = newnode;
      }
    }
  }
  unic *conv_str = unic_convert(strhead);
  return conv_str;
}

// 反转链表,内部用
unic *unic_convert(unic *unichead) {
  unic *newhead = NULL;
  unic *temp = NULL;
  if (unichead == NULL || unichead->next == NULL) {
    return newhead;
  }
  while (unichead != NULL) {
    temp = unichead;
    unichead = unichead->next;
    temp->next = newhead;
    newhead = temp;
  }
  return newhead;
}

glyph *glyph_convert(glyph *unichead) {
  glyph *newhead = NULL;
  glyph *temp = NULL;
  if (unichead == NULL || unichead->next == NULL) {
    return newhead;
  }
  while (unichead != NULL) {
    temp = unichead;
    unichead = unichead->next;
    temp->next = newhead;
    newhead = temp;
  }
  return newhead;
}

// 释放链表
void delstr(unic *strhead) {
  unic *temp;
  while (strhead != NULL) {
    temp = strhead;
    strhead = temp->next;
    free(temp);
  }
  return;
}

void delgly(glyph *strhead) {
  glyph *temp;
  while (strhead != NULL) {
    temp = strhead;
    strhead = temp->next;
    free(temp);
  }
  return;
}

void setup() {
  //测试
  Serial.begin(9600);
  LittleFS.begin();
  tft.begin();
  tft.setRotation(1);
  tft.fillScreen(TFT_BLACK);
  String ss = "你好,世界!";
  char *hello  = (char*)ss.c_str();
  tft_chn(tft,80,112,TFT_YELLOW,hello);
  LittleFS.end();
}

void loop() {
}
该测试代码在240*240 ips 屏幕上显示示意图
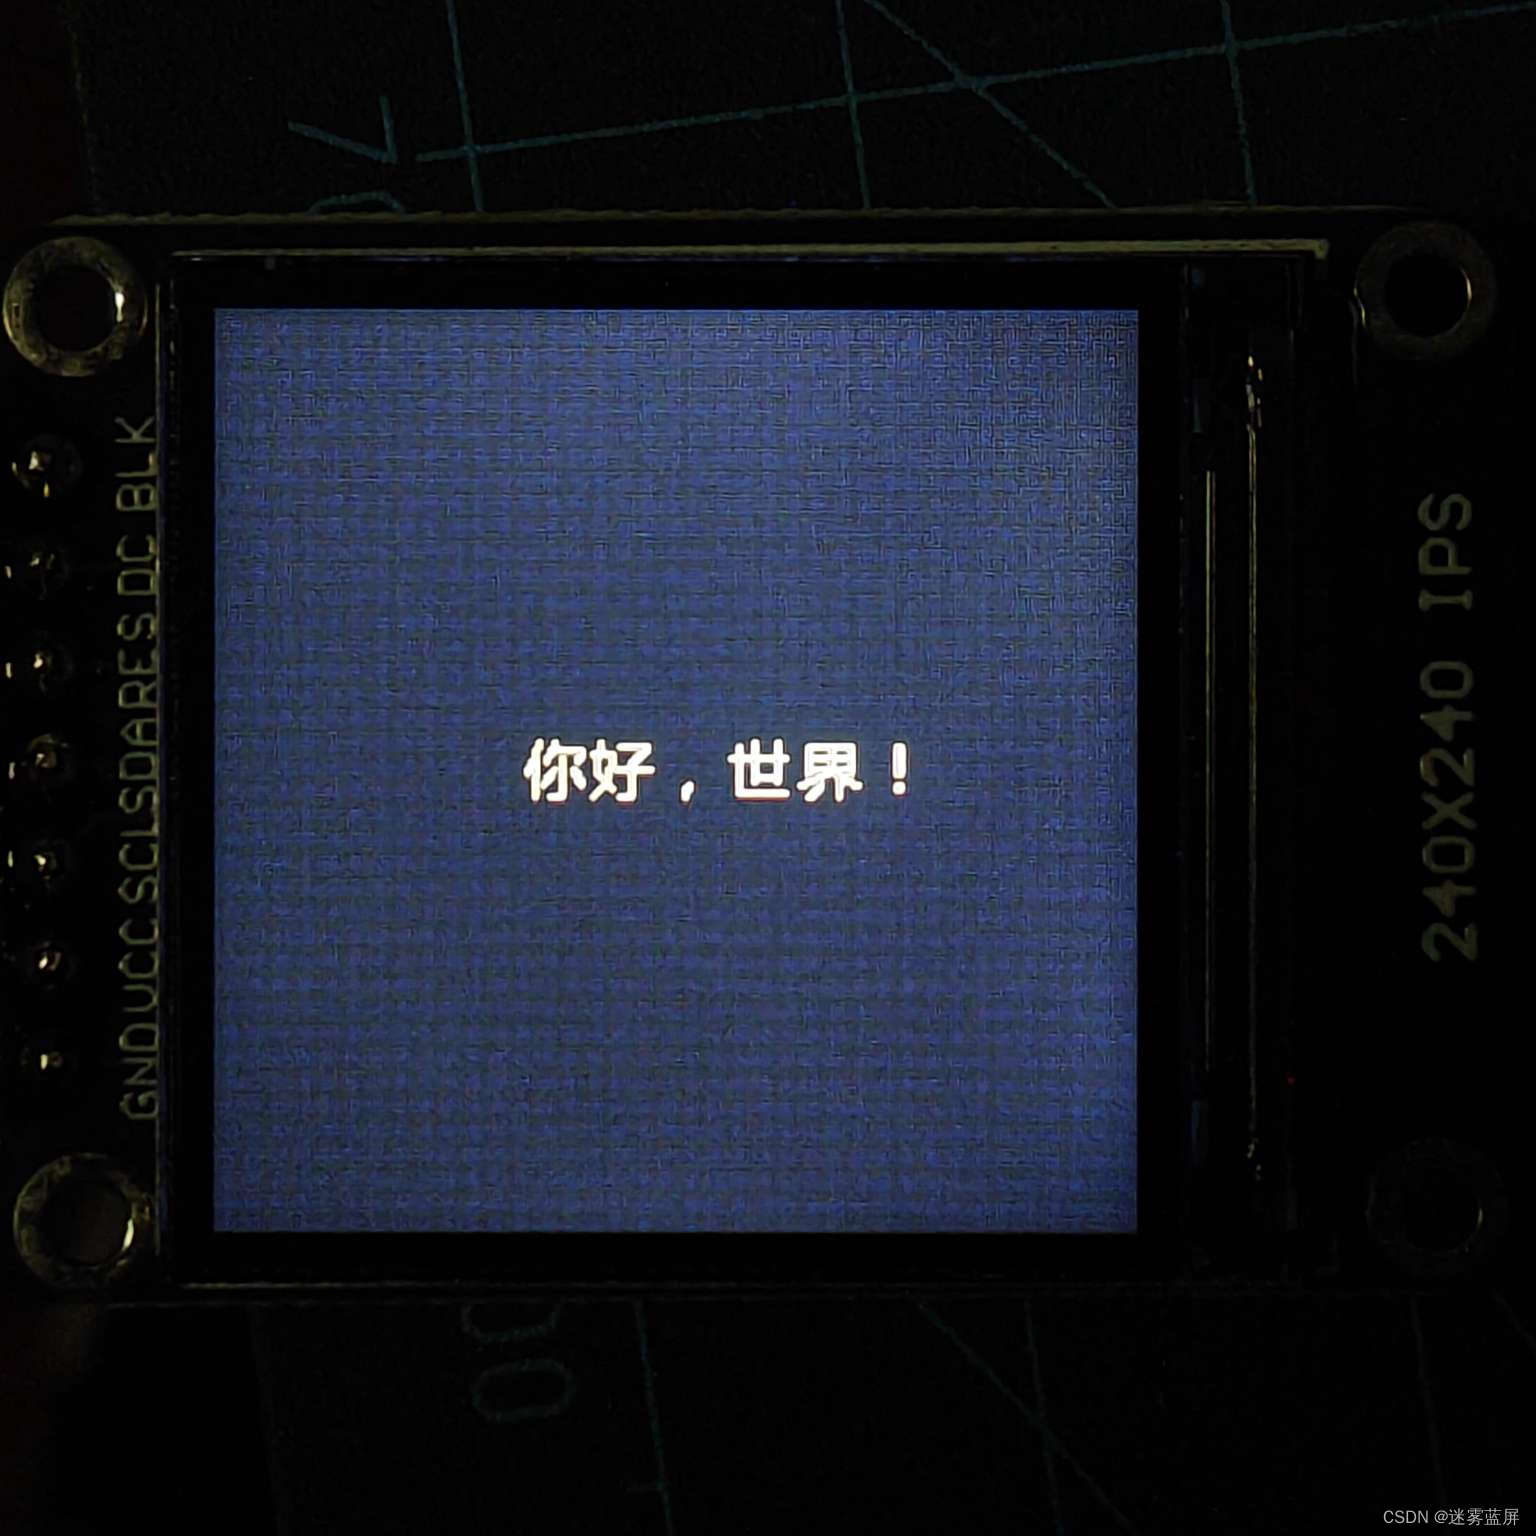
240*240 ips 屏幕上显示测试代码
参考资料


 3976
3976


 被折叠的 条评论
为什么被折叠?
被折叠的 条评论
为什么被折叠?
 到【灌水乐园】发言


