


[TOC]
Spring Security功能的实现主要是由一系列过滤器相互配合完 成。也称之为过滤器链,Spring Security默认加载15个过滤器, 但是随着配置可以增加或者删除一些过滤器.
一、过滤器链介绍
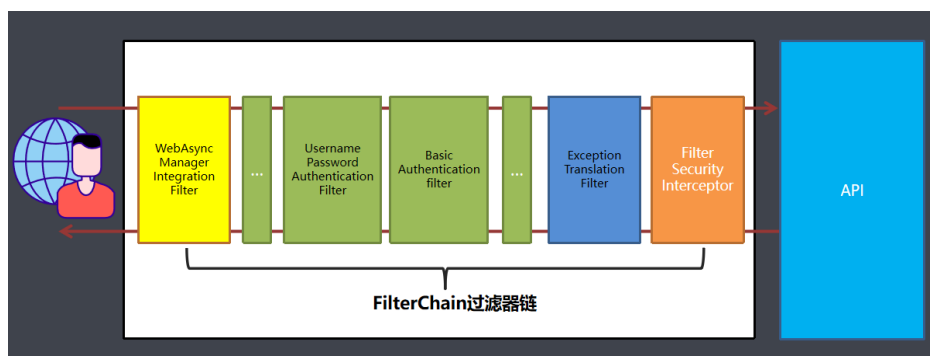
过滤器是一种典型的AOP思想,下面简单了解下这些过滤器链,后续再源码剖析中在涉及到过滤器链在 仔细讲解
1.org.springframework.security.web.context.request.async.WebAsyncManagerIntegrationFilter
根据请求封装获取WebAsyncManager,从WebAsyncManager获取/注册的安全上下文可调 用处理拦截器
2.org.springframework.security.web.context.SecurityContextPersistenceFilter
SecurityContextPersistenceFilter主要是使用SecurityContextRepository在session中保存 或更新一个SecurityContext,并将SecurityContext给以后的过滤器使用,来为后续fifilter 建立所需的上下文。SecurityContext中存储了当前用户的认证以及权限信息。
3.org.springframework.security.web.header.HeaderWriterFilter
向请求的Header中添加相应的信息,可在http标签内部使用security:headers来控制
4.org.springframework.security.web.csrf.CsrfFilter
csrf又称跨域请求伪造,SpringSecurity会对所有post请求验证是否包含系统生成的csrf的 token信息,如果不包含,则报错。起到防止csrf攻击的效果。
5.org.springframework.security.web.authentication.logout.LogoutFilter
匹配URL为/logout的请求,实现用户退出,清除认证信息。
6.org.springframework.security.web.authentication.UsernamePasswordAuthenticationFilter
表单认证操作全靠这个过滤器,默认匹配URL为/login且必须为POST请求
7.org.springframework.security.web.authentication.ui.DefaultLoginPageGeneratingFilter
如果没有在配置文件中指定认证页面,则由该过滤器生成一个默认认证页面。
8.org.springframework.security.web.authentication.ui.DefaultLogoutPageGeneratingFilter
由此过滤器可以生产一个默认的退出登录页面
9.org.springframework.security.web.authentication.www.BasicAuthenticationFilter
此过滤器会自动解析HTTP请求中头部名字为Authentication,且以Basic开头的头信息
10.org.springframework.security.web.savedrequest.RequestCacheAwareFilter
通过HttpSessionRequestCache内部维护了一个RequestCache,用于缓存 HttpServletRequest
org.springframework.security.web.servletapi.SecurityContextHolderAwareRequestFilter
针对ServletRequest进行了一次包装,使得request具有更加丰富的API
12.org.springframework.security.web.authentication.AnonymousAuthenticationFilter
当SecurityContextHolder中认证信息为空,则会创建一个匿名用户存入到 SecurityContextHolder中。spring security为了兼容未登录的访问,也走了一套认证流程, 只不过是一个匿名的身份。
org.springframework.security.web.session.SessionManagementFilter
securityContextRepository限制同一用户开启多个会话的数量
14.org.springframework.security.web.access.ExceptionTranslationFilter
异常转换过滤器位于整个springSecurityFilterChain的后方,用来转换整个链路中出现的异 常
org.springframework.security.web.access.intercept.FilterSecurityInterceptor
获取所配置资源访问的授权信息,根据SecurityContextHolder中存储的用户信息来决定其 是否有权限。
二、认证方式
2.1 HttpBasic认证
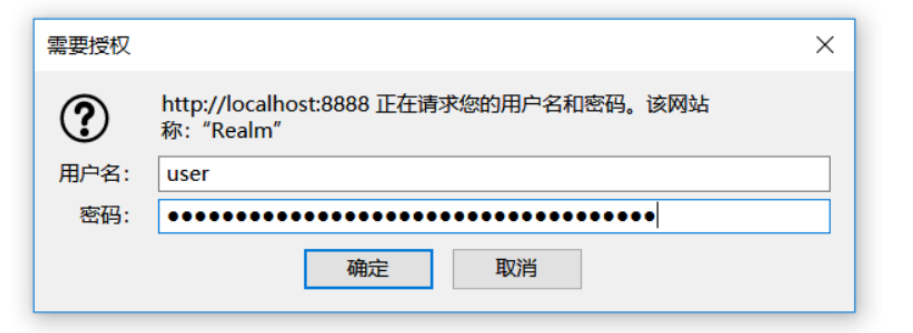
HttpBasic登录验证模式是Spring Security实现登录验证最简单的一种方式,也可以说是最简陋 的一种方式。它的目的并不是保障登录验证的绝对安全,而是提供一种“防君子不防小人”的登录验 证。
在使用的Spring Boot早期版本为1.X版本,依赖的Security 4.X版本,那么就无需任何配置,启动 项目访问则会弹出默认的httpbasic认证。现在使用的是spring boot2.0以上版本(依赖Security 5.X版本),HttpBasic不再是默认的验证模式,在spring security 5.x默认的验证模式已经是表单 模式。
HttpBasic模式要求传输的用户名密码使用Base64模式进行加密。如果用户名是 “admin” , 密码是“ admin”,则将字符串"admin:admin" 使用Base64编码算法加密。加密结果可能是: YWtaW46YWRtaW4=。HttpBasic模式真的是非常简单又简陋的验证模式,Base64的加密算法是 可逆的,想要破解并不难
2.2 formLogin登录认证模式
Spring Security的HttpBasic模式,该模式比较简单,只是进行了通过携带Http的Header进行 简单的登录验证,而且没有定制的登录页面,所以使用场景比较窄。对于一个完整的应用系统,与 登录验证相关的页面都是高度定制化的,非常美观而且提供多种登录方式。这就需要Spring Security支持我们自己定制登录页面, spring boot2.0以上版本(依赖Security 5.X版本)默认会生 成一个登录页面.
2.3 表单认证
2.3.1 在config包下编写SecurityConfiguration配置类
/**
 * @author wuzhixuan
 * @version 1.0.0
 * @ClassName SecurityConfiguration.java
 * @Description Security配置类
 * @createTime 2021年11月24日 16:35:00
 */

@Configuration
public class SecurityConfiguration extends WebSecurityConfigurerAdapter {

    @Override
    protected void configure(AuthenticationManagerBuilder auth) throws Exception {
        super.configure(auth);
    }

    @Override
    public void configure(WebSecurity web) throws Exception {
        super.configure(web);
    }

    @Override
    protected void configure(HttpSecurity http) throws Exception {
        /*http.httpBasic() // 开启base验证
                .and().authorizeRequests().anyRequest().authenticated(); //所有请求都需要登录认证才能访问*/
        http.formLogin().loginPage("/toLoginPage") // 开启表单验证
                .and().authorizeRequests()
                .antMatchers("/toLoginPage").permitAll() // 放行当前请求
                .anyRequest().authenticated(); //所有请求都需要登录认证才能访问;
    }
}
[外链图片转存失败,源站可能有防盗链机制,建议将图片保存下来直接上传(img-81h71k6k-1637821497496)(https://cdn.wuzx.cool/image-20211124164629344.png)]
重启服务发现css,js等静态文件没有成功加载
2.3.2 解决静态资源被拦截问题
@Override
public void configure(WebSecurity web) throws Exception {
    //解决静态资源被拦截的问题
    web.ignoring().antMatchers("/css/**", "/js/**", "/images/**", "/favicon.ico");
}
Spring Security 中,安全构建器 HttpSecurity 和 WebSecurity 的区别是 :
- WebSecurity 不仅通过 HttpSecurity 定义某些请求的安全控制,也通过其他方式定义其他某些 请求可以忽略安全控制;
- HttpSecurity 仅用于定义需要安全控制的请求(当然 HttpSecurity 也可以指定某些请求不需要 安全控制);
- 可以认为 HttpSecurity 是 WebSecurity 的一部分, WebSecurity 是包含 HttpSecurity 的更大 的一个概念;
- 构建目标不同
- WebSecurity 构建目标是整个 Spring Security 安全过滤器 FilterChainProxy`,
- HttpSecurity 的构建目标仅仅是 FilterChainProxy 中的一个 SecurityFilterChain 。
改造登录
protected void configure(HttpSecurity http) throws Exception {
/*http.httpBasic() // 开启base验证
.and().authorizeRequests().anyRequest().authenticated(); //所有请求都需要登录认证才能访问*/
http.formLogin() // 开启表单验证
.loginPage("/toLoginPage") // 自定义登录页面
.loginProcessingUrl("/login") // 登录请求url
.usernameParameter("username") // 修改自定义表单name值
.passwordParameter("password")
.successForwardUrl("/") // 登录成功跳转的路径
.and().authorizeRequests()
.antMatchers("/toLoginPage").permitAll() // 放行当前请求
.anyRequest().authenticated(); //所有请求都需要登录认证才能访问;
// 关闭csrf防护
http.csrf().disable();
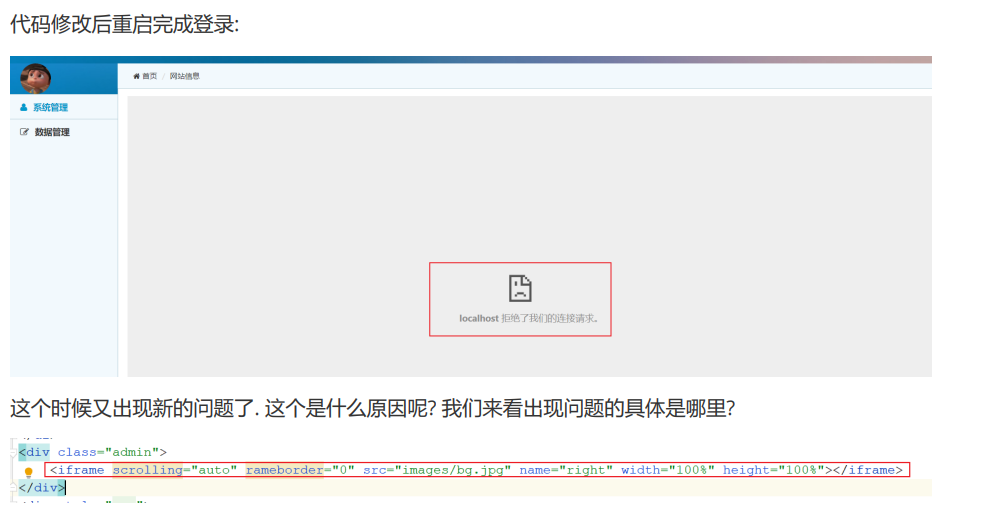
// 允许iframe加载页面
http.headers().frameOptions().sameOrigin();
}
发现行内框架iframe这里出现问题了. Spring Security下,X-Frame-Options默认为DENY,非Spring Security环境下,X-Frame-Options的默认大多也是DENY,这种情况下,浏览器拒绝当前页面加载任何 Frame页面,设置含义如下:
- DENY:浏览器拒绝当前页面加载任何Frame页面 此选择是默认的.
- SAMEORIGIN:frame页面的地址只能为同源域名下的页面

设置之后看到成功展示了
2.4 基于数据库实现认证功能
之前我们所使用的用户名和密码是来源于框架自动生成的, 那么我们如何实现基于数据库中的用户名和 密码功能呢? 要实现这个得需要实现security的一个UserDetailsService接口, 重写这个接口里面 loadUserByUsername即可
- 编写MyUserDetailsService并实现UserDetailsService接口,重写loadUserByUsername方法
public class MyUserDetailsService implements UserDetailsService {

    @Autowired
    private UserService userService;

    @Override
    public UserDetails loadUserByUsername(String username) throws UsernameNotFoundException {
        User user = userService.findByUsername(username);
        if (user == null) {
            throw new UsernameNotFoundException(username);// 用户名没有找到
        }
        // 先声明一个权限集合, 因为构造方法里面不能传入null
        Collection<? extends GrantedAuthority> authorities = new ArrayList<>();

        return new org.springframework.security.core.userdetails.User(username,
                "{noop}" + user.getPassword(),// {noop}表示不加密认证
                true, // 用户是否启用 true 代表启用
                true,// 用户是否过期 true 代表未过期
                true,// 用户凭据是否过期 true 代表未过期
                true,// 用户是否锁定 true 代表未锁定
                authorities
                );
    }
}
- 在SecurityConfiguration配置类中指定自定义用户认证
/**
 * 身份验证管理器
 * @param auth
 * @throws Exception
 */
@Override
protected void configure(AuthenticationManagerBuilder auth) throws Exception {
    auth.userDetailsService(myUserDetailsService);
}
2.5 密码加密验证
在基于数据库完成用户登录的过程中,我们所是使用的密码是明文的,规则是通过对密码明文添加 {noop} 前缀。那么下面 Spring Security 中的密码编码进行一些探讨。
Spring Security 中 PasswordEncoder 就是我们对密码进行编码的工具接口。该接口只有两个功能: 一个是匹配验证。另一个是密码编码。

- BCrypt算法介绍
BCrypt强哈希方法 每次加密的结果都不一样,所以更加的安全。
2.6 推出登录
org.springframework.security.web.authentication.logout.LogoutFilter
匹配URL为/logout的请求,实现用户退出,清除认证信息。
只需要发送请求,请求路径为/logout即可, 当然这个路径也可以自行在配置类中自行指定, 同时退出操作也有对应的自定义处理LogoutSuccessHandler,退出登录成功后执行,退出的同时如果有remember-me的数据,同时一并删除
/*** 自定义登录成功,失败,退出处理类 */ @Service public class MyAuthenticationService implements AuthenticationSuccessHandler, AuthenticationFailureHandler, LogoutSuccessHandler { private RedirectStrategy redirectStrategy = new DefaultRedirectStrategy(); ................ @Override public void onLogoutSuccess(HttpServletRequest request, HttpServletResponse response, Authentication authentication) throws IOException, ServletException { System.out.println("退出成功后续处理...."); redirectStrategy.sendRedirect(request, response, "/toLoginPage"); } }
SecurityConfig配置修改
.and().logout().logoutUrl("/logout")//设置退出url .logoutSuccessHandler(myAuthenticationService)//自定义退出处理
2.7 图形验证码验证
图形验证码一般是防止恶意,人眼看起来都费劲,何况是机器。不少网站为了防止用户利用机器人自动注册、登录、灌水,都采用了验证码技术。所谓验证码,就是将一串随机产生的数字或符号,生成一幅图片, 图片里加上一些干扰, 也有目前需要手动滑动的图形验证码. 这种可以有专门去做的第三方平台
spring security添加验证码大致可以分为三个步骤:
- 根据随机数生成验证码图片;
- 将验证码图片显示到登录页面
- 认证流程中加入验证码校验
Spring Security的认证校验是UsernamePasswordAuthenticationFilter过滤器完成的,所以我们的验证码校验逻辑应该在这个过滤器之前。验证码通过后才能到后续的操作. 流程如下:
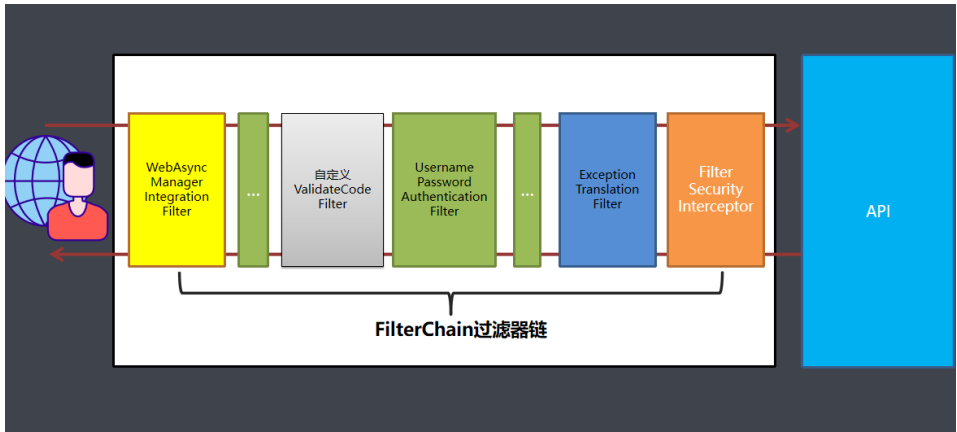
自定义验证码过滤器ValidateCodeFilter
/**
 * @author wuzhixuan
 * @version 1.0.0
 * @ClassName ValidateCodeFilter.java
 * @Description 验证码验证filter 需要继承OncePerRequestFilter确保在一次请求只通过一次filter,而不 需要重复执行
 * @createTime 2021年11月25日 11:19:00
 */
@Component

public class ValidateCodeFilter extends OncePerRequestFilter {

    @Autowired
    MyAuthenticationService myAuthenticationService;
    @Autowired
    StringRedisTemplate stringRedisTemplate;

    @Override
    protected void doFilterInternal(HttpServletRequest httpServletRequest, HttpServletResponse httpServletResponse, FilterChain filterChain) throws ServletException, IOException {

        // 判断是否是登录请求,只有登录请求才校验验证码
        if (httpServletRequest.getRequestURI().equals("/login") && httpServletRequest.getMethod().equals("POST")) {
            try {
                validate(httpServletRequest);
            } catch (ValidateCodeException e) {
                myAuthenticationService.onAuthenticationFailure(httpServletRequest, httpServletResponse, e);
                return;
            }
        }

        //如果不是登录请求,直接调用后面的过滤器链
        filterChain.doFilter(httpServletRequest, httpServletResponse);
    }

    private void validate(HttpServletRequest request) {

        //获取ip
        String remoteAddr = request.getRemoteAddr();
        //拼接redis的key
        String redisKey = ValidateCodeController.REDIS_KEY_IMAGE_CODE + "-" + remoteAddr;

        //从redis中获取imageCode
        String redisImageCode = stringRedisTemplate.boundValueOps(redisKey).get();
        String imageCode = request.getParameter("imageCode");

        if (!StringUtils.hasText(imageCode)) { throw new ValidateCodeException("验证码的值不能为空!"); }

        if (redisImageCode == null) { throw new ValidateCodeException("验证码已过期!"); }

        if (!redisImageCode.equals(imageCode)) { throw new ValidateCodeException("验证码不正确!"); }

        // 从redis中删除imageCode
        stringRedisTemplate.delete(redisKey);
    }
}
securityConfig加入自定义验证码拦截器
// 加在用户名密码过滤器的前面
http.addFilterBefore(validateCodeFilter, UsernamePasswordAuthenticationFilter.class);
前端验证码代码
<img src="/code/image" alt="" width="100" height="32" class="passcode"
                              style="height:43px;cursor:pointer;"onclick="this.src=this.src+'?'">
获取验证码后台接口
package com.lagou.controller;

import com.lagou.domain.ImageCode;
import org.springframework.beans.factory.annotation.Autowired;
import org.springframework.data.redis.core.StringRedisTemplate;
import org.springframework.web.bind.annotation.RequestMapping;
import org.springframework.web.bind.annotation.RestController;

import javax.imageio.ImageIO;
import javax.servlet.http.HttpServletRequest;
import javax.servlet.http.HttpServletResponse;
import java.awt.*;
import java.awt.image.BufferedImage;
import java.io.IOException;
import java.util.Random;
import java.util.concurrent.TimeUnit;

/**
 * 处理生成验证码的请求
 */
@RestController
@RequestMapping("/code")
public class ValidateCodeController {

    public final static String REDIS_KEY_IMAGE_CODE = "REDIS_KEY_IMAGE_CODE";
    public final static int expireIn = 60;  // 验证码有效时间 60s

    //使用sessionStrategy将生成的验证码对象存储到Session中,并通过IO流将生成的图片输出到登录页面上。
    @Autowired
    public StringRedisTemplate stringRedisTemplate;

    @RequestMapping("/image")
    public void createCode(HttpServletRequest request, HttpServletResponse response) throws IOException {
        //获取访问IP
        String remoteAddr = request.getRemoteAddr();
        //生成验证码对象
        ImageCode imageCode = createImageCode();
        //生成的验证码对象存储到redis中 KEY为REDIS_KEY_IMAGE_CODE+IP地址
        stringRedisTemplate.boundValueOps(REDIS_KEY_IMAGE_CODE + "-" + remoteAddr)
                .set(imageCode.getCode(), expireIn, TimeUnit.SECONDS);
        //通过IO流将生成的图片输出到登录页面上
        ImageIO.write(imageCode.getImage(), "jpeg", response.getOutputStream());
    }

    /**
     * 用于生成验证码对象
     *
     * @return
     */
    private ImageCode createImageCode() {

        int width = 100;    // 验证码图片宽度
        int height = 36;    // 验证码图片长度
        int length = 4;     // 验证码位数
        //创建一个带缓冲区图像对象
        BufferedImage image = new BufferedImage(width, height, BufferedImage.TYPE_INT_RGB);
        //获得在图像上绘图的Graphics对象
        Graphics g = image.getGraphics();

        Random random = new Random();

        //设置颜色、并随机绘制直线
        g.setColor(getRandColor(200, 250));
        g.fillRect(0, 0, width, height);
        g.setFont(new Font("Times New Roman", Font.ITALIC, 20));
        g.setColor(getRandColor(160, 200));
        for (int i = 0; i < 155; i++) {
            int x = random.nextInt(width);
            int y = random.nextInt(height);
            int xl = random.nextInt(12);
            int yl = random.nextInt(12);
            g.drawLine(x, y, x + xl, y + yl);
        }

        //生成随机数 并绘制
        StringBuilder sRand = new StringBuilder();
        for (int i = 0; i < length; i++) {
            String rand = String.valueOf(random.nextInt(10));
            sRand.append(rand);
            g.setColor(new Color(20 + random.nextInt(110), 20 + random.nextInt(110), 20 + random.nextInt(110)));
            g.drawString(rand, 13 * i + 6, 16);
        }
        g.dispose();
        return new ImageCode(image, sRand.toString());
    }

    /**
     * 获取随机演示
     *
     * @param fc
     * @param bc
     * @return
     */
    private Color getRandColor(int fc, int bc) {
        Random random = new Random();
        if (fc > 255) {
            fc = 255;
        }
        if (bc > 255) {
            bc = 255;
        }
        int r = fc + random.nextInt(bc - fc);
        int g = fc + random.nextInt(bc - fc);
        int b = fc + random.nextInt(bc - fc);
        return new Color(r, g, b);
    }

}


 1412
1412


 被折叠的 条评论
为什么被折叠?
被折叠的 条评论
为什么被折叠?
 到【灌水乐园】发言


