Android中关于View的ScrollTo、ScrollBy

转:

Android学习Scroller(一)——View调用scrollTo()的理解及使用

关于View的ScrollTo, getScrollX 和 getScrollY


Android学习Scroller(一)——View调用scrollTo()的理解及使用


MainActivity如下:

[java]  view plain  copy
  1. package cc.uu;  
  2.   
  3. import android.os.Bundle;  
  4. import android.view.View;  
  5. import android.view.View.OnClickListener;  
  6. import android.widget.Button;  
  7. import android.widget.TextView;  
  8. import android.app.Activity;  
  9. /** 
  10.  * Demo描述: 
  11.  * scrollTo()和scrollBy()的理解以及使用 
  12.  *  
  13.  * 原理说明: 
  14.  * 1 其实View是没有边界,在屏幕上看到的只是View的一部分而已 
  15.  * 2 scrollTo()和scrollBy()的本质一样只是表现形式略有不同 
  16.  *   与这两个方法密切相关的两个变量mScrollX和mScrollY在 
  17.  *   View的源码中可以看到: 
  18.  *    
  19.  *   //The offset,in pixels,by which the content of this view is scrolled horizontally. 
  20.  *   protected int mScrollX; 
  21.  *    
  22.  *   //The offset,in pixels,by which the content of this view is scrolled vertically. 
  23.  *   protected int mScrollY; 
  24.  *    
  25.  *   通过文档描述可知: 
  26.  *   mScrollX和mScrollY表示:View的内容(content)相对于View本身在水平或垂直方向的偏移量. 
  27.  *    
  28.  *   scrollTo(int x, int y)方法: 
  29.  *   将一个视图的内容移动到指定位置.此时偏移量 mScrollX,mScrollY就分别等于x,y. 
  30.  *   默认情况下 mScrollX和mScrollY均为0 
  31.  *    
  32.  *   scrollBy(int x, int y)方法: 
  33.  *   在现有的基础上继续移动视图的内容. 
  34.  *   在该方法的源码很简单,也体现了这一点,如下: 
  35.  *   public void scrollBy(int x, int y) {   
  36.  *      scrollTo(mScrollX + x, mScrollY + y);   
  37.  *   }   
  38.  *   默认情况下 mScrollX和mScrollY均为0 
  39.  *    
  40.  *   再次强调和注意: 
  41.  *   scrollTo()和scrollBy()移动的只是View的内容,但是View的背景是不移动的. 
  42.  *   为了体现这点,在该示例中为View添加了背景色. 
  43.  *    
  44.  *   继续上面问题的延伸: 
  45.  *   假如一个ViewGroup(比如XXXLayout)调用了scrollTo(By)()方法会怎样? 
  46.  *   它的Content(即它所有的子View)都会移动,这点在下个例子中可以看到. 
  47.  *    
  48.  *    
  49.  * 3 scrollTo(int x,int y)和scrollBy(int x,int y)方法的坐标说明 
  50.  *   比如我们对于一个TextView调用scrollTo(0,25) 
  51.  *   那么该TextView中的content(比如显示的文字:Hello)会怎么移动呢? 
  52.  *   向下移动25个单位?不,恰好相反. 
  53.  *   这是为什么呢? 
  54.  *   因为调用这两个方法会导致视图重绘. 
  55.  *   即调用public void invalidate(int l, int t, int r, int b)方法. 
  56.  *   此处的l,t,r,b四个参数就表示View原来的坐标. 
  57.  *   在该方法中最终会调用: 
  58.  *   tmpr.set(l - scrollX, t - scrollY, r - scrollX, b - scrollY); 
  59.  *   p.invalidateChild(this, tmpr); 
  60.  *   其中tmpr是ViewParent,tmpr是Rect,this是原来的View. 
  61.  *   通过这两行代码就把View在一个Rect中重绘. 
  62.  *   请注意第一行代码: 
  63.  *   原来的l和r均减去了scrollX 
  64.  *   原来的t和b均减去了scrollY 
  65.  *   就是说scrollX如果是正值,那么重绘后的View的宽度反而减少了;反之同理 
  66.  *   就是说scrollY如果是正值,那么重绘后的View的高度反而减少了;反之同理 
  67.  *   所以,TextView调用scrollTo(0,25)和我们的理解相反 
  68.  *    
  69.  *   scrollBy(int x,int y)方法与上类似,不再赘述. 
  70.  *    
  71.  *    
  72.  *   该示例的说明,请参加下面的代码注释 
  73.  *    
  74.  *    
  75.  * 参考资料: 
  76.  * 1 http://blog.csdn.net/wangjinyu501/article/details/32339379 
  77.  * 2 http://blog.csdn.net/qinjuning/article/details/7247126 
  78.  *   Thank you very much 
  79.  *    
  80.  *  
  81.  * 备注说明: 
  82.  * 使用scrollTo(By)()方法移动过程较快而且比较生硬. 
  83.  * 为了优化scrollTo(By)()的滑动过程可采用Scroller类. 
  84.  * 该类源码第一句This class encapsulates scrolling. 
  85.  * 就指明了该类的目的:封装了滑动过程. 
  86.  * 在后面的示例中,将学习到Scroller的使用. 
  87.  * 
  88.  */  
  89. public class MainActivity extends Activity {  
  90.     private TextView mTextView;  
  91.     private Button mLeftButton;  
  92.     private Button mRightButon;  
  93.     @Override  
  94.     protected void onCreate(Bundle savedInstanceState) {  
  95.         super.onCreate(savedInstanceState);  
  96.         setContentView(R.layout.main);  
  97.         init();  
  98.     }  
  99.       
  100.     private void init(){  
  101.         mTextView=(TextView) findViewById(R.id.textView);  
  102.         mLeftButton=(Button) findViewById(R.id.leftButton);  
  103.         mLeftButton.setOnClickListener(new ClickListenerImpl());  
  104.         mRightButon=(Button) findViewById(R.id.rightButton);  
  105.         mRightButon.setOnClickListener(new ClickListenerImpl());  
  106.     }  
  107.       
  108.     /** 
  109.      * 示例说明: 
  110.      * 1 每次点击leftButton的时候 
  111.      *   1.1 调用scrollBy()让mTextView的内容(即文字)在原本偏移的基础上往左移30 
  112.      *   1.2 调用scrollBy()让mLeftButton的内容(即文字)在原本偏移的基础上也往左移30 
  113.      * 2 每次点击rightButton的时候 
  114.      *   2.1 调用scrollTo()让mTextView的内容(即文字)直接往右偏移30,而不管以前的基础(即 mScrollX和mScrollY) 
  115.      * 3 连续几次点击leftButton会看到mTextView的内容(即文字)每点一次都会往左移动30, 
  116.      *   然后再点击一次rightButton会看到mTextView的内容(即文字)直接一次性到了往右30的位置,而 
  117.      *   不是慢慢移动过去. 
  118.      *   这么操作 
  119.      *   1 很好的体现了这两个方法的区别. 
  120.      *   2 直观地看了scrollTo()方法的效用,它是不管以前的偏移量的. 
  121.      * 4 在该例中也可以看到调用这两个方法时,View的背景是没有移动.移动的是内容. 
  122.      */  
  123.     private class ClickListenerImpl implements OnClickListener {  
  124.         @Override  
  125.         public void onClick(View v) {  
  126.             switch (v.getId()) {  
  127.             case R.id.leftButton:  
  128.                 //让mTextView的内容往左移  
  129.                 mTextView.scrollBy(300);  
  130.                 //让mLeftButton的内容也往左移  
  131.                 mLeftButton.scrollBy(200);  
  132.                 break;  
  133.             case R.id.rightButton:  
  134.                 //让mTextView的内容往右移直接到-30的位置  
  135.                 mTextView.scrollTo(-300);  
  136.                 break;  
  137.             default:  
  138.                 break;  
  139.             }  
  140.         }  
  141.   
  142.     }  
  143.   
  144. }  


main.xml如下:

[html]  view plain  copy
  1. <RelativeLayout xmlns:android="http://schemas.android.com/apk/res/android"  
  2.     xmlns:tools="http://schemas.android.com/tools"  
  3.     android:layout_width="match_parent"  
  4.     android:layout_height="match_parent"  
  5.     >  
  6.   
  7.     <TextView  
  8.         android:id="@+id/textView"  
  9.         android:layout_width="wrap_content"  
  10.         android:layout_height="wrap_content"  
  11.         android:text="@string/hello_world"   
  12.         android:layout_centerHorizontal="true"  
  13.         android:layout_marginTop="20dip"  
  14.         android:background="@android:color/darker_gray"  
  15.     />  
  16.       
  17.     <Button   
  18.         android:id="@+id/leftButton"  
  19.          android:layout_width="wrap_content"  
  20.         android:layout_height="wrap_content"  
  21.         android:text="TextView移向屏幕的左边"   
  22.         android:layout_centerHorizontal="true"  
  23.         android:layout_marginTop="150dip"/>  
  24.       
  25.     <Button   
  26.         android:id="@+id/rightButton"  
  27.          android:layout_width="wrap_content"  
  28.         android:layout_height="wrap_content"  
  29.         android:text="TextView移向屏幕的右边"   
  30.         android:layout_centerHorizontal="true"  
  31.         android:layout_marginTop="250dip"/>  
  32.   
  33. </RelativeLayout>  


========================================================================================================================================================================================================================================================================


关于View的ScrollTo, getScrollX 和 getScrollY


当利用 Scroller 去滑动屏幕或者扩展 ScrollView 的时候,总是会用到 getScrollX 和 getScrollY 去获取当前View 滑动到的位置,那么getScrollX() 和 getScrollY() 获取的到底是什么呢? 

由于getScrollX 和 getScrollY 本质 上是一样的东西,下面只说明一下getScrollX, 一般是在屏幕上面左右划动的时候会去获取这个值。

请看下图:


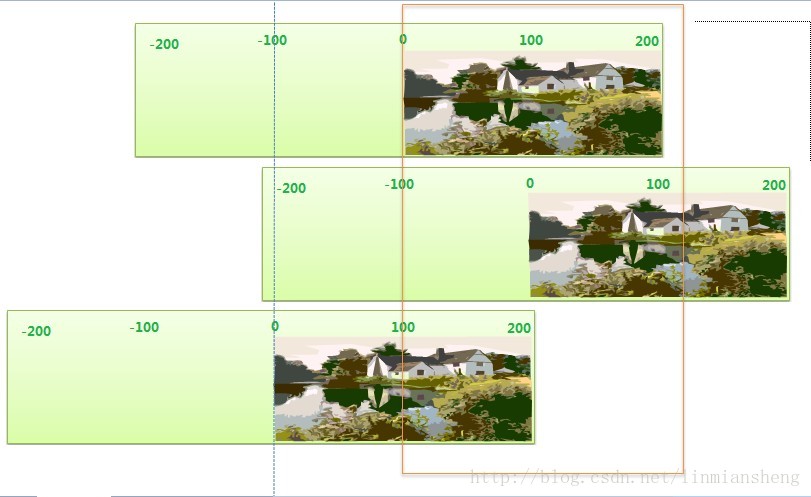
图上面,褐色的框,其实就是我们眼睛看到的手机界面,就是一个窗口。

而绿色的长方体呢,就是一块可以左右拉动的幕布啦,其实也就是我们要显示在窗口上面的内容,它其实是可以很大的,大到无限大,只是没在窗口中间的,所以我们就看不到。

而getScrollX 其实获取的值,就是这块 幕布在窗口左边界时候的值了,而幕布上面哪个点是原点(0,0)呢?就是初始化时内容显示的位置。

所以当我们将幕布往右推动的时候,幕布在窗口左边界的值就会在0的左边(-100),而向左推动,则其值会是在0的右边(100)。


下面以一个实际例子来看一下。

随便在CSDN上面截了一下图,


我们在一个LinearLayout 里面定义了三个TextView 来显示 getScrollX() 的值,三个ImageView来显示图片, 都是指向同一张图片,布局如下:

[html]  view plain  copy
  在CODE上查看代码片 派生到我的代码片
  1. <?xml version="1.0" encoding="utf-8"?>  
  2. <LinearLayout xmlns:android="http://schemas.android.com/apk/res/android"  
  3.     android:layout_width="match_parent"  
  4.     android:layout_height="match_parent"  
  5.     android:background="#000000"  
  6.     android:orientation="vertical" >  
  7.     <TextView  
  8.         android:id="@+id/textView"  
  9.         android:textColor="#FFFFFF"  
  10.         android:textSize="16sp"  
  11.         android:layout_height="wrap_content"   
  12.         android:layout_width="match_parent"/>  
  13.     <ImageView   
  14.         android:id="@+id/scrollImageView"  
  15.         android:layout_width="wrap_content"  
  16.         android:layout_height="wrap_content"  
  17.         android:src="@drawable/scroll_testing"  
  18.         android:contentDescription="Testing Scrolling"/>  
  19.     <TextView  
  20.         android:id="@+id/textViewToRight"  
  21.         android:textColor="#FFFFFF"  
  22.         android:textSize="16sp"  
  23.         android:layout_height="wrap_content"   
  24.         android:layout_width="match_parent"/>  
  25.     <ImageView   
  26.         android:id="@+id/scrollImageViewToRight"  
  27.         android:layout_width="wrap_content"  
  28.         android:layout_height="wrap_content"  
  29.         android:src="@drawable/scroll_testing"  
  30.         android:contentDescription="Testing Scrolling"/>  
  31.     <TextView  
  32.         android:id="@+id/textViewToLeft"  
  33.         android:textColor="#FFFFFF"  
  34.         android:textSize="16sp"  
  35.         android:layout_height="wrap_content"   
  36.         android:layout_width="match_parent"/>  
  37.     <ImageView   
  38.         android:id="@+id/scrollImageViewToLeft"  
  39.         android:layout_width="wrap_content"  
  40.         android:layout_height="wrap_content"  
  41.         android:src="@drawable/scroll_testing"  
  42.         android:contentDescription="Testing Scrolling"/>  
  43.   
  44. </LinearLayout>  

然后我们在Activity 中,分别对下面两张ImageView 进行 scrollTo 操作,然后获取其getScrollX()  的值,放到对应的TextView 上面,其代码如下:

[java]  view plain  copy
  在CODE上查看代码片 派生到我的代码片
  1. public class ScrollActivity extends Activity{  
  2.   
  3.     protected void onCreate(Bundle savedInstanceState){  
  4.         super.onCreate(savedInstanceState);  
  5.         setContentView(R.layout.scroll_layout);  
  6.           
  7.         ImageView imageView = (ImageView) findViewById(R.id.scrollImageView);  
  8.         TextView textView = (TextView) findViewById(R.id.textView);  
  9.         textView.setText("getScrollX() = " + imageView.getScrollX());  
  10.           
  11.         ImageView imageViewToRight = (ImageView) findViewById(R.id.scrollImageViewToRight);  
  12.         imageViewToRight.scrollTo(-1000);  
  13.         TextView textViewToRight = (TextView) findViewById(R.id.textViewToRight);  
  14.         textViewToRight.setText("getScrollX() = " + imageViewToRight.getScrollX());  
  15.           
  16.         ImageView imageViewToLeft = (ImageView) findViewById(R.id.scrollImageViewToLeft);  
  17.         imageViewToLeft.scrollTo(1000);  
  18.         TextView textViewToLeft = (TextView) findViewById(R.id.textViewToLeft);  
  19.         textViewToLeft.setText("getScrollX() = " + imageViewToLeft.getScrollX());  
  20.     }  
  21. }  

下面是运行后的效果


可以看到,正如上面所说的,向右滚动的时候,等于是把背后的幕布向右推动,使得没有内容的幕布(X < 0)显示出来, 而向左滚动,则是把幕左向左推动,让右边的内容(X > 0)移到窗口的左边缘上。


在View上面还一个叫ScrollBy的函数,跟ScrollTo的区别在于,ScrollTo 是 到那个位置,ScrollBy 是经过这段位置,这个从英文的To 跟 By 来理解就很简单了。


  • 0
    点赞
  • 1
    收藏
    觉得还不错? 一键收藏
  • 0
    评论
评论
添加红包

请填写红包祝福语或标题

红包个数最小为10个

红包金额最低5元

当前余额3.43前往充值 >
需支付:10.00
成就一亿技术人!
领取后你会自动成为博主和红包主的粉丝 规则
hope_wisdom
发出的红包
实付
使用余额支付
点击重新获取
扫码支付
钱包余额 0

抵扣说明:

1.余额是钱包充值的虚拟货币,按照1:1的比例进行支付金额的抵扣。
2.余额无法直接购买下载,可以购买VIP、付费专栏及课程。

余额充值