


一群热爱技术并且向往优秀的程序猿同学,不喜欢水文,不喜欢贩卖焦虑,只喜欢谈技术,分享的都是技术干货。Talk is cheap. Show me the code
Spring Boot 20天入门(day8)
Springboot 缓存
缓存使用
首先我们需要引入相关依赖:
  <dependency>
            <groupId>org.springframework.boot</groupId>
            <artifactId>spring-boot-starter-cache</artifactId>
  </dependency>
然后在Springboot的配置类上(一般是启动类)标注@EnableCaching注解开启缓存
@EnableCaching
@MapperScan(value = "com.github.springbootcache.mapper",basePackageClasses = Repository.class)
@SpringBootApplication
public class SpringBootCacheApplication {

    public static void main(String[] args) {
        SpringApplication.run(SpringBootCacheApplication.class, args);
    }
}
最后在需要使用缓存的方法上添加下列注解:
@Cacheable  //将方法的运行结果进行缓存;第二次再要相同的数据,直接从缓存中获取,不再调用方法;
@CacheEvict //移除缓存
@CachePut  //修改了数据库的某个数据,同时更新缓存
1、Cacheable:
value/cacheNames :表明缓存存放在哪个命名空间下

key : 缓存数据时的key,默认使用方法参数的值,编写 SPEL表达式  : #id,参数id的值  #a0 #p0 #rrot.args[0]

keyGenerator : key生成器,可以自己指定的组件id
            key/keyGenerator 二选一
cacheManager : 指定缓存管理器

condition : 指定符合条件的情况下缓存,condition = "#id>0"

unless : 否定缓存,当unless为true,方法的返回值不会缓存,可以获取到结果进行判断,unless = "#result==null"

sync : 是否使用异步模式
2、@CacheEvit:
@CacheEvit:缓存清除
@CacheEvit和@Cacheable的相同属性就不再赘述。
1、allEntries = true 每次删除,将指定缓存中的所有数据全都删除
2、beforeInvocation=false ,缓存的清除是否是在方法之前执行,默认false, 即在方法之后清除,当方法执
   行出现异常时,缓存不会清除。
   beforeInvocation=true ,方法之前清除,无论方法执行是否出现异常,缓存都会清除
3、@CachePut:
先调用目标方法,然后讲方法的返回值存进缓存中,属性和@Cacheable一致
4、@CacheConfig:
标注在类上,指定全局的属性,简化代码
@Target({ElementType.TYPE})
@Retention(RetentionPolicy.RUNTIME)
@Documented
public @interface CacheConfig {
    String[] cacheNames() default {};

    String keyGenerator() default "";

    String cacheManager() default "";

    String cacheResolver() default "";
}
5、@Caching:
将@Cacheable、@CachePut、@CacheEvit组合使用,可以写出复杂的注解逻辑
@Target({ElementType.TYPE, ElementType.METHOD})
@Retention(RetentionPolicy.RUNTIME)
@Inherited
@Documented
public @interface Caching {

	Cacheable[] cacheable() default {};

	CachePut[] put() default {};

	CacheEvict[] evict() default {};

}
缓存实战
实体类:
import java.io.Serializable;

/**
 * @Description : TODO
 * @Author : Weleness
 * @Date : 2020/05/22
 */
public class User implements Serializable {

    private static final long serialVersionUID = 3564291823518067604L;

    private Integer id;
    private String username;
    private String password;

    public User(Integer id, String username, String password) {
        this.id = id;
        this.username = username;
        this.password = password;
    }

    public User() {
    }

    public static long getSerialVersionUID() {
        return serialVersionUID;
    }

    public Integer getId() {
        return id;
    }

    public void setId(Integer id) {
        this.id = id;
    }

    public String getUsername() {
        return username;
    }

    public void setUsername(String username) {
        this.username = username;
    }

    public String getPassword() {
        return password;
    }

    public void setPassword(String password) {
        this.password = password;
    }

    @Override
    public String toString() {
        return "User{" +
                "id=" + id +
                ", username='" + username + '\'' +
                ", password='" + password + '\'' +
                '}';
    }
}
User服务:
@Service
public class UserSevice {

    @Autowired
    private UserMapper userMapper;

    @Cacheable(cacheNames = "user")
    public User getUser(Integer id){
        System.out.println("id");
        return userMapper.getUserById(id);
    }
}
controller:
**
 * @Description : TODO
 * @Author : Weleness
 * @Date : 2020/05/22
 */
@RestController
public class UserController {

    @Autowired
    private UserSevice userSevice;

    @GetMapping("/user/{id}")
    public User getUser(@PathVariable("id")Integer id){
        return userSevice.getUser(id);
    }
}
启动项目,访问接口:
可以看到,第一次访问的时候,执行了sql语句进行查询了。

清空控制台,再次访问:
可以看到控制台没有打印任何日志信息,但是网页获取到了数据,缓存开启成功。
缓存原理
了解过Springboot自动配置原理的同学都清楚,Springboot有各式各样的的xxxAutoConfiguration来帮我们自动配置和引入一些必要的组件。
CacheConfiguration
@Configuration(proxyBeanMethods = false)
@ConditionalOnClass(CacheManager.class)
@ConditionalOnBean(CacheAspectSupport.class)
@ConditionalOnMissingBean(value = CacheManager.class, name = "cacheResolver")//当我们没有自己配置缓存管理器时
@EnableConfigurationProperties(CacheProperties.class)//从配置文件中获取配置
@AutoConfigureAfter({ CouchbaseAutoConfiguration.class, HazelcastAutoConfiguration.class,
		HibernateJpaAutoConfiguration.class, RedisAutoConfiguration.class })
@Import({ CacheConfigurationImportSelector.class, CacheManagerEntityManagerFactoryDependsOnPostProcessor.class })//导入组件
public class CacheAutoConfiguration {
static class CacheConfigurationImportSelector implements ImportSelector {

		@Override
		public String[] selectImports(AnnotationMetadata importingClassMetadata) {
			CacheType[] types = CacheType.values();
			String[] imports = new String[types.length];
			for (int i = 0; i < types.length; i++) {
				imports[i] = CacheConfigurations.getConfigurationClass(types[i]);
			}
			return imports;
		}
	}
}
这个类我们就需要关注一个方法:CacheConfigurationImportSelector,这个方法会获取缓存管理器类型,Springboot2.x一共是10个:
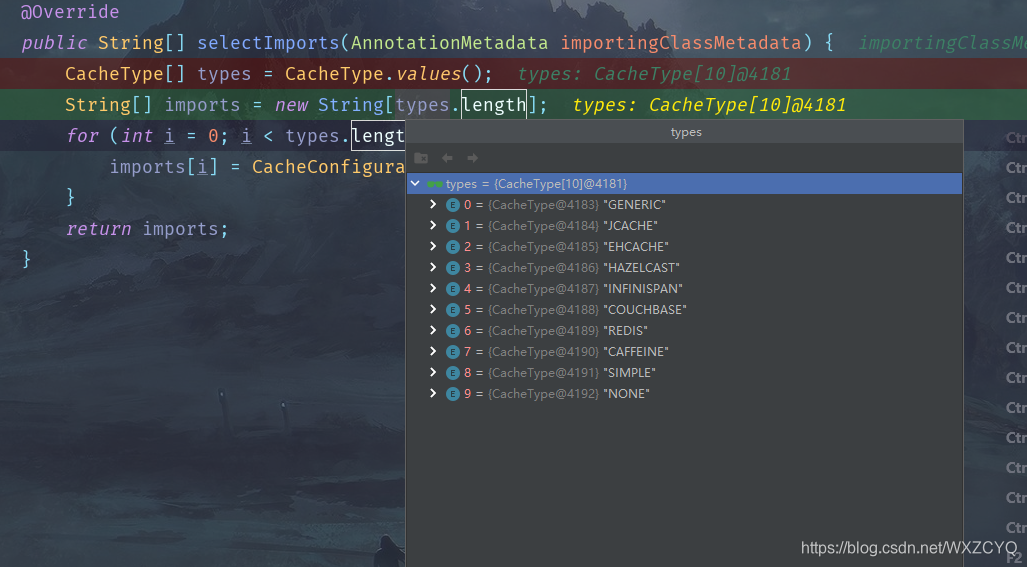
然后会为我们逐一获取这些自动配置类的全类名
0 = "org.springframework.boot.autoconfigure.cache.GenericCacheConfiguration"
1 = "org.springframework.boot.autoconfigure.cache.JCacheCacheConfiguration"
2 = "org.springframework.boot.autoconfigure.cache.EhCacheCacheConfiguration"
3 = "org.springframework.boot.autoconfigure.cache.HazelcastCacheConfiguration"
4 = "org.springframework.boot.autoconfigure.cache.InfinispanCacheConfiguration"
5 = "org.springframework.boot.autoconfigure.cache.CouchbaseCacheConfiguration"
6 = "org.springframework.boot.autoconfigure.cache.RedisCacheConfiguration"
7 = "org.springframework.boot.autoconfigure.cache.CaffeineCacheConfiguration"
8 = "org.springframework.boot.autoconfigure.cache.SimpleCacheConfiguration"【默认】
9 = "org.springframework.boot.autoconfigure.cache.NoOpCacheConfiguration"
默认是使用SimpleCacheConfiguration
SimpleCacheConfiguration
@Configuration(proxyBeanMethods = false)
@ConditionalOnMissingBean(CacheManager.class)
@Conditional(CacheCondition.class)
class SimpleCacheConfiguration {

	@Bean
	ConcurrentMapCacheManager cacheManager(CacheProperties cacheProperties,
			CacheManagerCustomizers cacheManagerCustomizers) {
		ConcurrentMapCacheManager cacheManager = new ConcurrentMapCacheManager();
		List<String> cacheNames = cacheProperties.getCacheNames();
		if (!cacheNames.isEmpty()) {
			cacheManager.setCacheNames(cacheNames);
		}
		return cacheManagerCustomizers.customize(cacheManager);
	}
}
该类会返回一个ConcurrentMapCacheManager对象,来作为缓存的cacheManager
这个ConcurrentMapCacheManager对象,会初始化一个ConcurrentMap
以键值对存储缓存组件。key就是自己指定的CacheName,值就是缓存对象。
public class ConcurrentMapCacheManager implements CacheManager, BeanClassLoaderAware {

	private final ConcurrentMap<String, Cache> cacheMap = new ConcurrentHashMap<>(16);

	private boolean dynamic = true;

	private boolean allowNullValues = true;

	private boolean storeByValue = false;

	@Nullable
	private SerializationDelegate serialization;
}
@Cacheable运行原理
在方法执行前,会先去cacheManager中查询Cache(缓存组件),根据cacheNames来获取,若不存在相应的缓存对象,返回一个新的Cache对象。
@Override
	@Nullable
	public Cache getCache(String name) {
		Cache cache = this.cacheMap.get(name);
		if (cache == null && this.dynamic) {
			synchronized (this.cacheMap) {
				cache = this.cacheMap.get(name);
				if (cache == null) {
					cache = createConcurrentMapCache(name);
					this.cacheMap.put(name, cache);
				}
			}
		}
		return cache;
	}
去Cache中查找缓存的内容,使用一个Key, 默认使用的key是方法的参数。
key是按照某种策略生成的: 默认使用SimpleKeyGenerator生成key.
 public static Object generateKey(Object... params) {
        if (params.length == 0) {
            return SimpleKey.EMPTY;
        } else {
            if (params.length == 1) {
                Object param = params[0];
                if (param != null && !param.getClass().isArray()) {
                    return param;
                }
            }

            return new SimpleKey(params);
        }
    }
没有就会执行方法
 //通过key查询缓存中有无数据,没有的话再调用目标方法
    protected Object lookup(Object key) {
        return this.store.get(key);
    }
然后将方法的返回值存入缓存中
总结:
@Cacheable标注的方法执行前会检查选择的cacheManager中的缓存有没有对应的数据(默认方法的参数作为key,如果有多个参数就都作为key),没有就执行目标方法,然后再将方法的返回值存入缓存。
Springboot整合redis
引入redis的starter:
  <dependency>
            <groupId>org.springframework.boot</groupId>
            <artifactId>spring-boot-starter-data-redis</artifactId>
 </dependency>
在配置文件中配置:
 redis:
    host: 127.0.0.1
    password:
    port: 6379
上面我们提到了Springboot在使用缓存的时候会逐一导入自动配置类,这些自动配置类的导入是有顺序的,现在我们导入了redis的依赖,意味着RedisCacheConfiguration配置类生效,就不会去执行默认的SimpleCacheConfiguration。
@Configuration(proxyBeanMethods = false)
@ConditionalOnClass(RedisOperations.class)
@EnableConfigurationProperties(RedisProperties.class)
@Import({ LettuceConnectionConfiguration.class, JedisConnectionConfiguration.class })
public class RedisAutoConfiguration {

	@Bean
	@ConditionalOnMissingBean(name = "redisTemplate")
	public RedisTemplate<Object, Object> redisTemplate(RedisConnectionFactory redisConnectionFactory)
			throws UnknownHostException {
		RedisTemplate<Object, Object> template = new RedisTemplate<>();
		template.setConnectionFactory(redisConnectionFactory);
		return template;
	}

	@Bean
	@ConditionalOnMissingBean
	public StringRedisTemplate stringRedisTemplate(RedisConnectionFactory redisConnectionFactory)
			throws UnknownHostException {
		StringRedisTemplate template = new StringRedisTemplate();
		template.setConnectionFactory(redisConnectionFactory);
		return template;
	}

}
我们可以看到整个自动配置类添加了两个组件RedisTemplate和StringRedisTemplate,一个是Redis用来操作对象的,一个是专门用来操作字符串的,也就是只能存取字符串类型的值。
整合测试
存字符串
因为这两个组件在自动配置的时候就加入到ioc容器中了,所以我们直接就可以自动注入然后使用了
@SpringBootTest
class SpringBootCacheApplicationTests {


    @Autowired
    StringRedisTemplate stringRedisTemplate;  // 操作字符串的

    @Autowired
    RedisTemplate<Object, User> redisTemplate; //k,v操作对象的
}
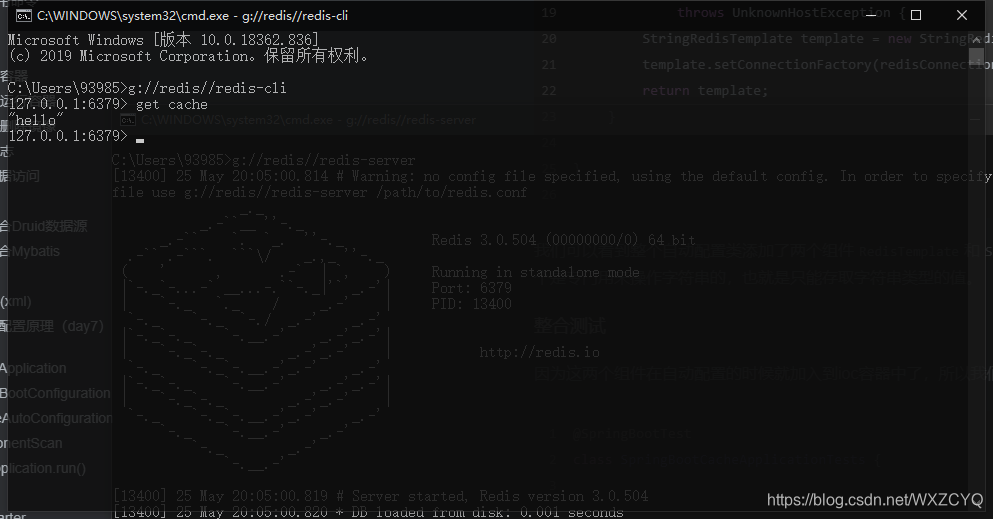
往redis中存入一个数据:
stringRedisTemplate.opsForValue().append("cache","hello");
查看redis客户端,根据key:cache获取值:
存对象
我们以1为key,将一个user对象存入缓存中
redisTemplate.opsForValue().set(1,new User(1,"qq","87487"));
redis是会先将对象进行序列化之后,再将对象存入缓存中,但是这样在redis就会以这种序列化之后的字符串进行显示,不雅观。

自定义RedisTemplate
redis默认的序列化规则是jdk的默认序列化规则
public void afterPropertiesSet() {
    super.afterPropertiesSet();
    boolean defaultUsed = false;
    if (this.defaultSerializer == null) {
        this.defaultSerializer = new JdkSerializationRedisSerializer(this.classLoader != null ? this.classLoader : this.getClass().getClassLoader());
    }

    if (this.enableDefaultSerializer) {
        if (this.keySerializer == null) {
            this.keySerializer = this.defaultSerializer;
            defaultUsed = true;
        }

        if (this.valueSerializer == null) {
            this.valueSerializer = this.defaultSerializer;
            defaultUsed = true;
        }

        if (this.hashKeySerializer == null) {
            this.hashKeySerializer = this.defaultSerializer;
            defaultUsed = true;
        }

        if (this.hashValueSerializer == null) {
            this.hashValueSerializer = this.defaultSerializer;
            defaultUsed = true;
        }
    }
我们要想让他变好看一点,可以将他的序列化规则转成json形式,对此我们可以对RedisTemplate进行改造:
创建一个配置类,添加Jackson2JsonRedisSerializer这个定制器,这个定制器是spring-boot-starter-data-redis中自带的,所以我们不需要重新引入其他的依赖
@Configuration
public class MyRedisConfig {

    @Bean
    public RedisTemplate<Object, User> redisTemplate(RedisConnectionFactory redisConnectionFactory) {
        RedisTemplate<Object, User> template = new RedisTemplate<>();
        template.setConnectionFactory(redisConnectionFactory);
        Jackson2JsonRedisSerializer<User> serializer = new Jackson2JsonRedisSerializer<User>(User.class);
        template.setDefaultSerializer(serializer);
        return template;
    }

}
测试:
redisTemplate.opsForValue().set(1,new User(1,"qq","87487"));
效果如下:

关于缓存的改变
缓存的自动配置类上有一个注册,@ConditionalOnMissingBean(value = CacheManager.class, name = “cacheResolver”),只有当容器中没有其他的cacheManager,自动配置类才会生效。
@Configuration(proxyBeanMethods = false)
@ConditionalOnClass(CacheManager.class)
@ConditionalOnBean(CacheAspectSupport.class)
@ConditionalOnMissingBean(value = CacheManager.class, name = "cacheResolver")
@EnableConfigurationProperties(CacheProperties.class)
@AutoConfigureAfter({ CouchbaseAutoConfiguration.class, HazelcastAutoConfiguration.class,
		HibernateJpaAutoConfiguration.class, RedisAutoConfiguration.class })
@Import({ CacheConfigurationImportSelector.class, CacheManagerEntityManagerFactoryDependsOnPostProcessor.class })
public class CacheAutoConfiguration {
当我们引入了redis的starter,会自动引入一个cacheManager:
public class RedisCacheManager extends AbstractTransactionSupportingCacheManager {
    private final RedisCacheWriter cacheWriter;
    private final RedisCacheConfiguration defaultCacheConfig;
    private final Map<String, RedisCacheConfiguration> initialCacheConfiguration;
    private final boolean allowInFlightCacheCreation;
那么这个cacheManager就会生效,缓存原来是存在concurrentHashMapManager中的,现在会存入redis中。


 被折叠的 条评论
为什么被折叠?
被折叠的 条评论
为什么被折叠?
 到【灌水乐园】发言


