


Core
IoC Container
依赖注入的方式如下:
- 通过构造函数参数
- 通过工厂方法的参数
- 从构造或者工厂方法返回的对象实例上设置的属性
这个过程通过直接使用类的构造或者类似服务定位器模式的机制来控制其依赖项的实力化或者位置,它把bean的控制交由程序来做,不再由程序员自己去控制,所以称为控制反转。
Spring Framework的IOC容器的基础就在org.springframework.beans和org.springframework.context包下。
BeanFactory提供了高级配置,能够控制任何类型的对象。
ApplicationContext是BeanFactory的子接口,它增加了:
- 与 Spring 的 AOP 功能轻松集成
- 消息资源处理(用于国际化)
- Event publication
- 特定于应用程序层的上下文,例如用于 Web 应用程序的
WebApplicationContext
BeanFactory提供了配置框架的基本的功能,ApplicationContext增加了具有企业特性的功能,ApplicationContext是BeanFactory的完整超集,在本章中仅使用 Spring 的 IoC 容器描述。
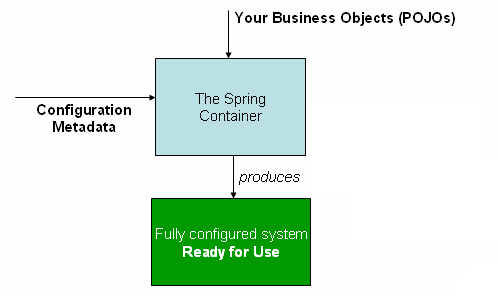
在spring中,构成应用程序主干并由 Spring IoC 容器管理的对象称为 bean。 Bean 是由 Spring IoC 容器实例化、组装和以其他方式管理的对象。否则,bean 仅仅是应用程序中许多对象之一。 Bean 及其之间的依赖关系反映在容器使用的配置元数据中。
Container OverView
ApplicationContext接口代表spring ioc容器,并且负责实例化、配置以及装配这些beans。容器通过读取配置元数据来获取有关要实例化,配置和组装哪些对象的指令。配置元数据代表xml配置文件、java注解以及java code。
尽管xml是定义元数据的标准格式,但是我们可以通过配置少量xml数据,并指定java注解和java code作为元数据的其他形式
在许多应用场景中,不需要显式的用户代码实例化一个或者多个ioc容器的对象
explicit 清楚明白的,显式的 boilerplate样板文件
Configuration Metadata
spring2.5引入了基于注解的配置
spring3.0引入了基于JavaConfig的配置,JavaConfig的诸多特性使其成为spring framework的核心,使用这些新特性需要了解@Configuration, @Bean, @Import, and @DependsOn 注解。
Spring配置由容器必须管理的至少一个(通常是多个)bean定义组成。基于xml的配置方式使用元素配置,JavaConfig配置方式需要在带有@Configuration注解的类中使用@Bean注解。
这些bean定义对应于组成应用程序的实际对象。
配置实例:
<?xml version="1.0" encoding="UTF-8"?>
<beans xmlns="http://www.springframework.org/schema/beans"
    xmlns:xsi="http://www.w3.org/2001/XMLSchema-instance"
    xsi:schemaLocation="http://www.springframework.org/schema/beans
        https://www.springframework.org/schema/beans/spring-beans.xsd">

    <bean id="..." class="...">
        <!-- collaborators and configuration for this bean go here -->
    </bean>

    <bean id="..." class="...">
        <!-- collaborators and configuration for this bean go here -->
    </bean>

    <!-- more bean definitions go here -->

</beans>
id:唯一标识bean
class:bean的类型,使用全限定名
intuitive直观的 correspond相应的 data access objects (DAO)数据访问对象
Instantiating a Container
提供给ApplicationContext构造函数的位置路径是资源字符串,这些资源字符串使容器可以从各种外部资源(例如本地文件系统,Java CLASSPATH等)加载配置元数据。例如:
ApplicationContext context = new ClassPathXmlApplicationContext("services.xml", "daos.xml");
service层xml配置文件的例子,需要引用dao层的文件
<?xml version="1.0" encoding="UTF-8"?>
<beans xmlns="http://www.springframework.org/schema/beans"
    xmlns:xsi="http://www.w3.org/2001/XMLSchema-instance"
    xsi:schemaLocation="http://www.springframework.org/schema/beans
        https://www.springframework.org/schema/beans/spring-beans.xsd">

    <!-- services -->

    <bean id="petStore" class="org.springframework.samples.jpetstore.services.PetStoreServiceImpl">
        <property name="accountDao" ref="accountDao"/>
        <property name="itemDao" ref="itemDao"/>
        <!-- additional collaborators and configuration for this bean go here -->
    </bean>

    <!-- more bean definitions for services go here -->

</beans>
dao.xml(数据访问层)
<?xml version="1.0" encoding="UTF-8"?>
<beans xmlns="http://www.springframework.org/schema/beans"
    xmlns:xsi="http://www.w3.org/2001/XMLSchema-instance"
    xsi:schemaLocation="http://www.springframework.org/schema/beans
        https://www.springframework.org/schema/beans/spring-beans.xsd">

    <bean id="accountDao"
        class="org.springframework.samples.jpetstore.dao.jpa.JpaAccountDao">
        <!-- additional collaborators and configuration for this bean go here -->
    </bean>

    <bean id="itemDao" class="org.springframework.samples.jpetstore.dao.jpa.JpaItemDao">
        <!-- additional collaborators and configuration for this bean go here -->
    </bean>

    <!-- more bean definitions for data access objects go here -->

</beans>
通常,每个单独的配置文件表示体系结构的一个层或者一个模块(后端程序一般都是分层开发,如果使用xml进行配置,那么对应每层都可以配置一个xml文件,方便管理),通过import使bean跨越多个配置文件可用,例如:
<beans>
    <import resource="services.xml"/>
    <import resource="resources/messageSource.xml"/>
    <import resource="/resources/themeSource.xml"/>
    <bean id="bean1" class="..."/>
    <bean id="bean2" class="..."/>
</beans>
在上述例子中,外部bean是在其他xml文件中定义的,所有位置路径都相对于进行导入的定义文件,尽量将所有的配置文件放在同一个文件夹下。
syntax句子,句法规则 slash斜线
Using the Container
ApplicationContext是一个高级工厂的接口,该工厂能够维护不同bean及其依赖项的注册表,通过使用getBean(String name, Class requiredType),可以取回bean的实例。例如:
// create and configure beans
ApplicationContext context = new ClassPathXmlApplicationContext("services.xml", "daos.xml");

// retrieve configured instance
PetStoreService service = context.getBean("petStore", PetStoreService.class);

// use configured instance
List<String> userList = service.getUsernameList();
最灵活的变体是结合reader的委托——GenericApplicationContext,例子如下:
GenericApplicationContext context = new GenericApplicationContext();
new XmlBeanDefinitionReader(context).loadBeanDefinitions("services.xml", "daos.xml");
context.refresh();
实际上应用程序代码永远不需要调用getBean方法,这也就完全不依赖于Spring API,Spring与各种web框架的继承为各种Web框架组件提供了依赖注入。
retrieve 找回,取回 variant 变体 delegate委托
Bean Overview
spring ioc容器管理一个或者多个beans
Naming Beans
一个bean只有一个标识符,也就是bean的id;但是如果想要多于一个标识的话,可以使用别名
在xml配置文件中,我们可以使用id、name,或者结合两者。id提供一个精确的名字,name提供别名。如果要给bean起多个名字,那么我们需要在name中定义多个名字,并使用空格、’,‘或者’;'隔开。如果开发人员不提供bean的名称,那么程序会自动生成一个,但是如果ref要使用bean的话,那么我们就必须提供一个id。
bean的命名使用驼峰法,第一个单词首字母小写,从第二个单词开始首字母大写。
在bean定义之外定义别名bean
然而,指定实际定义bean的所有别名并不总是足够的。有时需要为在别处定义的bean引入别名。
<alias name="fromName" alias="toName"/>
为名为fromName的bean定义了别名:toName
Instantiating Beans
通过静态函数进行实例化
<bean id="clientService"
    class="examples.ClientService"
    factory-method="createInstance"/>
public class ClientService {
    private static ClientService clientService = new ClientService();
    private ClientService() {}

    public static ClientService createInstance() {
        return clientService;
    }
}
通过非静态函数进行实例化
<bean id="serviceLocator" class="examples.DefaultServiceLocator">
    <!-- inject any dependencies required by this locator bean -->
</bean>

<bean id="clientService"
    factory-bean="serviceLocator"
    factory-method="createClientServiceInstance"/>

<bean id="accountService"
    factory-bean="serviceLocator"
    factory-method="createAccountServiceInstance"/>
public class DefaultServiceLocator {

    private static ClientService clientService = new ClientServiceImpl();

    private static AccountService accountService = new AccountServiceImpl();

    public ClientService createClientServiceInstance() {
        return clientService;
    }

    public AccountService createAccountServiceInstance() {
        return accountService;
    }
}
特定bean的运行时类型并不容易确定
了解特定bean的实际运行时类型的推荐方法是使用BeanFactory.getType调用指定的bean名称。
这将考虑到上述所有情况,并返回对象的类型BeanFactory.getBean调用将返回相同的bean名称。
Dependencies
Dependency Injection(依赖注入)
依赖注入通过构造函数参数、通过工厂方法的参数、从构造或者工厂方法返回的对象实例上设置的属性,容器在创建这些对象的时候注入其依赖。
类变得更易于测试,尤其是当依赖项依赖于接口或抽象基类时,它们允许在单元测试中使用存根或模拟实现。
Constructor-based Dependency Injection
构造函数参数解析匹配通过使用参数的类型进行
基于构造器的依赖注入
package x.y;

public class ThingOne {

    public ThingOne(ThingTwo thingTwo, ThingThree thingThree) {
        // ...
    }
}
<beans>
    <bean id="beanOne" class="x.y.ThingOne">
        <constructor-arg ref="beanTwo"/>
        <constructor-arg ref="beanThree"/>
    </bean>

    <bean id="beanTwo" class="x.y.ThingTwo"/>

    <bean id="beanThree" class="x.y.ThingThree"/>
</beans>
构造函数参数类型匹配
package examples;

public class ExampleBean {

    // Number of years to calculate the Ultimate Answer
    private int years;

    // The Answer to Life, the Universe, and Everything
    private String ultimateAnswer;

    public ExampleBean(int years, String ultimateAnswer) {
        this.years = years;
        this.ultimateAnswer = ultimateAnswer;
    }
}
<bean id="exampleBean" class="examples.ExampleBean">
    <constructor-arg type="int" value="7500000"/>
    <constructor-arg type="java.lang.String" value="42"/>
</bean>
构造函数参数索引
<bean id="exampleBean" class="examples.ExampleBean">
    <constructor-arg index="0" value="7500000"/>
    <constructor-arg index="1" value="42"/>
</bean>
构造函数参数名称匹配
<bean id="exampleBean" class="examples.ExampleBean">
    <constructor-arg name="years" value="7500000"/>
    <constructor-arg name="ultimateAnswer" value="42"/>
</bean>
请记住,要立即使用该功能,必须在启用调试标志的情况下编译代码,以便 Spring 可以从构造函数中查找参数名称。如果您不能或不想使用 debug 标志编译代码,则可以使用@ConstructorProperties JDK注解显式命名构造函数参数。然后,该示例类必须如下所示:
public class ExampleBean {

    // Fields omitted

    @ConstructorProperties({"years", "ultimateAnswer"})
    public ExampleBean(int years, String ultimateAnswer) {
        this.years = years;
        this.ultimateAnswer = ultimateAnswer;
    }
}
Setter-based Dependency Injection
基于设置器的 DI 是通过在调用无参数构造函数或无参数static工厂方法以实例化bean 之后,在 bean 上调用 setter 方法来完成的。
由于可以混合使用基于构造函数的 DI 和基于 setter 的 DI,因此将构造函数用于强制性依赖项并将 setter 方法或配置方法用于可选依赖性是一个很好的经验法则。
Spring 团队通常提倡构造函数注入,因为它可以让您将应用程序组件实现为不可变对象,并确保所需的依赖项不是null。此外,注入构造函数的组件始终以完全初始化的状态返回到 Client 端(调用)代码。附带说明一下,大量的构造函数自变量是一种不好的代码味道,这意味着该类可能承担了太多的职责,应该对其进行重构以更好地解决关注点分离问题。
Setter 注入主要应仅用于可以在类中分配合理的默认值的可选依赖项。否则,必须在代码使用依赖项的任何地方执行非空检查。 setter 注入的一个好处是,setter 方法使该类的对象在以后可以重新配置或重新注入。
使用最适合特定类的 DI 风格。有时,在处理您没有源代码的第三方类时,将为您做出选择。例如,如果第三方类未公开任何 setter 方法,则构造函数注入可能是 DI 的唯一可用形式。
Dependency Resolution Process
- ApplicationContext创建并且初始化描述所有bean的配置元数据
- 对于每个 bean,其依赖项都以属性,构造函数参数或 static-factory 方法的参数(如果使用它而不是常规构造函数)的形式表示。在实际创建 Bean 时,会将这些依赖项提供给 Bean。
- 每个属性或构造函数参数都是要设置的值的实际定义,或者是对容器中另一个 bean 的引用。
- 作为值的每个属性或构造函数参数都将从其指定的格式转换为该属性或构造函数参数的实际类型。默认情况下,Spring 可以将以字符串格式提供的值转换为所有内置类型,例如
int,long,String,boolean等等。
创建容器时,将创建具有单例作用域并设置为预先实例化(默认)的 Bean。否则,仅在请求时才创建 Bean。创建和分配 bean 的依赖关系及其依赖关系(依此类推)时,创建 bean 可能会导致创建一个 bean 图。
循环依赖
在实际创建 Bean 时,Spring 设置属性并尽可能晚地解决依赖关系。这意味着如果创建该对象或其依赖项之一时出现问题,则正确加载了 Spring 的容器以后可以在您请求对象时生成异常-例如,由于缺少或无效,Bean 引发异常属性。某些配置问题的这种潜在的延迟可见性是为什么默认情况下ApplicationContext实现会实例化单例 bean。
Examples of Dependency Injection
<bean id="exampleBean" class="examples.ExampleBean">
    <!-- setter injection using the nested ref element -->
    <property name="beanOne">
        <ref bean="anotherExampleBean"/>
    </property>

    <!-- setter injection using the neater ref attribute -->
    <property name="beanTwo" ref="yetAnotherBean"/>
    <property name="integerProperty" value="1"/>
</bean>

<bean id="anotherExampleBean" class="examples.AnotherBean"/>
<bean id="yetAnotherBean" class="examples.YetAnotherBean"/>
public class ExampleBean {

    private AnotherBean beanOne;

    private YetAnotherBean beanTwo;

    private int i;

    public void setBeanOne(AnotherBean beanOne) {
        this.beanOne = beanOne;
    }

    public void setBeanTwo(YetAnotherBean beanTwo) {
        this.beanTwo = beanTwo;
    }

    public void setIntegerProperty(int i) {
        this.i = i;
    }
}
基于构造函数构造
<bean id="exampleBean" class="examples.ExampleBean">
    <!-- constructor injection using the nested ref element -->
    <constructor-arg>
        <ref bean="anotherExampleBean"/>
    </constructor-arg>

    <!-- constructor injection using the neater ref attribute -->
    <constructor-arg ref="yetAnotherBean"/>

    <constructor-arg type="int" value="1"/>
</bean>

<bean id="anotherExampleBean" class="examples.AnotherBean"/>
<bean id="yetAnotherBean" class="examples.YetAnotherBean"/>
public class ExampleBean {

    private AnotherBean beanOne;

    private YetAnotherBean beanTwo;

    private int i;

    public ExampleBean(
        AnotherBean anotherBean, YetAnotherBean yetAnotherBean, int i) {
        this.beanOne = anotherBean;
        this.beanTwo = yetAnotherBean;
        this.i = i;
    }
}
现在考虑这个示例的一个变体,在该变体中,不是使用构造函数,而是告诉 Spring 调用static工厂方法以返回对象的实例:
<bean id="exampleBean" class="examples.ExampleBean" factory-method="createInstance">
    <constructor-arg ref="anotherExampleBean"/>
    <constructor-arg ref="yetAnotherBean"/>
    <constructor-arg value="1"/>
</bean>

<bean id="anotherExampleBean" class="examples.AnotherBean"/>
<bean id="yetAnotherBean" class="examples.YetAnotherBean"/>
public class ExampleBean {

    // a private constructor
    private ExampleBean(...) {
        ...
    }

    // a static factory method; the arguments to this method can be
    // considered the dependencies of the bean that is returned,
    // regardless of how those arguments are actually used.
    public static ExampleBean createInstance (
        AnotherBean anotherBean, YetAnotherBean yetAnotherBean, int i) {

        ExampleBean eb = new ExampleBean (...);
        // some other operations...
        return eb;
    }
}
static工厂方法的参数由<constructor-arg/>元素提供,与实际使用构造函数的情况完全相同。 factory 方法返回的类的类型不必与包含static factory 方法的类的类型相同
Dependencies and Configuration in Detail
<property/>元素的value属性将属性或构造函数参数指定为人类可读的字符串表示形式。 Spring 的conversion service用于将这些值从String转换为属性或参数的实际类型
<bean id="myDataSource" class="org.apache.commons.dbcp.BasicDataSource" destroy-method="close">
    <!-- results in a setDriverClassName(String) call -->
    <property name="driverClassName" value="com.mysql.jdbc.Driver"/>
    <property name="url" value="jdbc:mysql://localhost:3306/mydb"/>
    <property name="username" value="root"/>
    <property name="password" value="masterkaoli"/>
</bean>

<beans xmlns="http://www.springframework.org/schema/beans"
    xmlns:xsi="http://www.w3.org/2001/XMLSchema-instance"
    xmlns:p="http://www.springframework.org/schema/p"
    xsi:schemaLocation="http://www.springframework.org/schema/beans
    http://www.springframework.org/schema/beans/spring-beans.xsd">

    <bean id="myDataSource" class="org.apache.commons.dbcp.BasicDataSource"
        destroy-method="close"
        p:driverClassName="com.mysql.jdbc.Driver"
        p:url="jdbc:mysql://localhost:3306/mydb"
        p:username="root"
        p:password="masterkaoli"/>

</beans>

<bean id="mappings"
    class="org.springframework.beans.factory.config.PropertyPlaceholderConfigurer">

    <!-- typed as a java.util.Properties -->
    <property name="properties">
        <value>
            jdbc.driver.className=com.mysql.jdbc.Driver
            jdbc.url=jdbc:mysql://localhost:3306/mydb
        </value>
    </property>
</bean>
Spring 容器使用 JavaBeans PropertyEditor机制将<value/>元素内的文本转换为java.util.Properties实例。这是一个不错的捷径,并且是 Spring 团队偏爱使用嵌套<value/>元素而不是value属性样式的几个地方之一。
The idref element
idref元素只是将容器中另一个 bean 的id(字符串值-不是引用)传递给<constructor-arg/>或<property/>元素的一种防错方法。
<bean id="theTargetBean" class="..."/>
<bean id="theClientBean" class="...">
    <property name="targetName">
        <idref bean="theTargetBean"/>
    </property>
</bean>
通过<ref/>标签的bean属性指定目标 bean 是最通用的形式,并且允许创建对同一容器或父容器中任何 bean 的引用,而不管它是否在同一 XML 文件中。 bean属性的值可以与目标 Bean 的id属性相同,也可以与目标 Bean 的name属性中的值之一相同。下面的示例演示如何使用ref元素:
<ref bean="someBean"/>
通过parent属性指定目标 bean 将创建对当前容器的父容器中的 bean 的引用。 parent属性的值可以与目标 Bean 的id属性或目标 Bean 的name属性中的值相同。目标 Bean 必须位于当前容器的父容器中。主要在具有容器层次结构并且要使用与父 bean 名称相同的代理将现有 bean 封装在父容器中时,才应使用此 bean 参考变量。以下一对清单显示了如何使用parent属性:
<!-- in the parent context -->
<bean id="accountService" class="com.something.SimpleAccountService">
    <!-- insert dependencies as required as here -->
</bean>

<!-- in the child (descendant) context -->
<bean id="accountService" <!-- bean name is the same as the parent bean -->
    class="org.springframework.aop.framework.ProxyFactoryBean">
    <property name="target">
        <ref parent="accountService"/> <!-- notice how we refer to the parent bean -->
    </property>
    <!-- insert other configuration and dependencies as required here -->
</bean>
Inner Beans
<bean id="outer" class="...">
    <!-- instead of using a reference to a target bean, simply define the target bean inline -->
    <property name="target">
        <bean class="com.example.Person"> <!-- this is the inner bean -->
            <property name="name" value="Fiona Apple"/>
            <property name="age" value="25"/>
        </bean>
    </property>
</bean>
An inner bean definition does not require a defined ID or name. If specified, the container does not use such a value as an identifier. The container also ignores the scope flag on creation, because inner beans are always anonymous and are always created with the outer bean. It is not possible to access inner beans independently or to inject them into collaborating beans other than into the enclosing bean.(不可能独立地访问内部 bean 或将其注入到协作 bean 中而不是封装到封闭 bean 中)
Collections
<list/>,<set/>,<map/>和<props/>元素分别设置 Java Collection类型List,Set,Map和Properties的属性和参数。
<bean id="moreComplexObject" class="example.ComplexObject">
    <!-- results in a setAdminEmails(java.util.Properties) call -->
    <property name="adminEmails">
        <props>
            <prop key="administrator">[emailprotected]</prop>
            <prop key="support">[emailprotected]</prop>
            <prop key="development">[emailprotected]</prop>
        </props>
    </property>
    <!-- results in a setSomeList(java.util.List) call -->
    <property name="someList">
        <list>
            <value>a list element followed by a reference</value>
            <ref bean="myDataSource" />
        </list>
    </property>
    <!-- results in a setSomeMap(java.util.Map) call -->
    <property name="someMap">
        <map>
            <entry key="an entry" value="just some string"/>
            <entry key ="a ref" value-ref="myDataSource"/>
        </map>
    </property>
    <!-- results in a setSomeSet(java.util.Set) call -->
    <property name="someSet">
        <set>
            <value>just some string</value>
            <ref bean="myDataSource" />
        </set>
    </property>
</bean>
Spring 容器还支持合并集合。应用程序开发人员可以定义父级,
不能合并不同的集合类型(例如Map和List)。如果尝试这样做,则会抛出一个适当的Exception。 merge属性必须在较低的继承的子定义中指定。在父集合定义上指定merge属性是多余的,不会导致所需的合并。
<beans>
    <bean id="parent" abstract="true" class="example.ComplexObject">
        <property name="adminEmails">
            <props>
                <prop key="administrator">[emailprotected]</prop>
                <prop key="support">[emailprotected]</prop>
            </props>
        </property>
    </bean>
    <bean id="child" parent="parent">
        <property name="adminEmails">
            <!-- the merge is specified on the child collection definition -->
            <props merge="true">
                <prop key="sales">[emailprotected]</prop>
                <prop key="support">[emailprotected]</prop>
            </props>
        </property>
    </bean>
<beans>
如果使用 Spring 将强类型的Collection依赖项注入到 bean 中,则可以利用 Spring 的类型转换支持,以便将强类型Collection实例的元素转换为适当的类型,然后再添加到Collection。以下 Java 类和 bean 定义显示了如何执行此操作:
public class SomeClass {

    private Map<String, Float> accounts;

    public void setAccounts(Map<String, Float> accounts) {
        this.accounts = accounts;
    }
}
<beans>
    <bean id="something" class="x.y.SomeClass">
        <property name="accounts">
            <map>
                <entry key="one" value="9.99"/>
                <entry key="two" value="2.75"/>
                <entry key="six" value="3.99"/>
            </map>
        </property>
    </bean>
</beans>
当准备注入something bean 的accounts属性时,可以通过反射获得有关强类型Map<String, Float>的元素类型的泛型信息。因此,Spring 的类型转换基础结构将各种值元素识别为Float类型,并且字符串值(9.99, 2.75和3.99)被转换为实际的Float类型。
Null and Empty String Values
<bean class="ExampleBean">
    <property name="email" value=""/>
</bean>

<bean class="ExampleBean">
    <property name="email">
        <null/>
    </property>
</bean>
XML Shortcut with the p-namespace
p-namespace 允许您使用bean元素的属性(而不是嵌套的<property/>元素)来描述协作 Bean 的属性值,或同时使用这两者。
下面的示例显示了两个 XML 代码段(第一个使用标准 XML 格式,第二个使用 p 命名空间),它们可以解析为相同的结果:
<beans xmlns="http://www.springframework.org/schema/beans"
    xmlns:xsi="http://www.w3.org/2001/XMLSchema-instance"
    xmlns:p="http://www.springframework.org/schema/p"
    xsi:schemaLocation="http://www.springframework.org/schema/beans
        http://www.springframework.org/schema/beans/spring-beans.xsd">

    <bean name="classic" class="com.example.ExampleBean">
        <property name="email" value="[emailprotected]"/>
    </bean>

    <bean name="p-namespace" class="com.example.ExampleBean"
        p:email="[emailprotected]"/>
</beans>
<!--下一个示例包括另外两个 bean 定义,它们都引用了另一个 bean
第一个 bean 定义使用<property name="spouse" ref="jane"/>创建从 bean john到 Bean jane的引用,而第二个 bean 定义使用p:spouse-ref="jane"作为属性来执行完全相同的操作。在这种情况下,spouse是属性名称,而-ref部分表示这不是一个直接值,而是对另一个 bean 的引用-->
<beans xmlns="http://www.springframework.org/schema/beans"
    xmlns:xsi="http://www.w3.org/2001/XMLSchema-instance"
    xmlns:p="http://www.springframework.org/schema/p"
    xsi:schemaLocation="http://www.springframework.org/schema/beans
        http://www.springframework.org/schema/beans/spring-beans.xsd">

    <bean name="john-classic" class="com.example.Person">
        <property name="name" value="John Doe"/>
        <property name="spouse" ref="jane"/>
    </bean>

    <bean name="john-modern"
        class="com.example.Person"
        p:name="John Doe"
        p:spouse-ref="jane"/>

    <bean name="jane" class="com.example.Person">
        <property name="name" value="Jane Doe"/>
    </bean>
</beans>
XML Shortcut with the c-namespace
在 Spring 3.1 中引入的 c-namespace 允许使用内联属性来配置构造函数参数,而不是嵌套的constructor-arg元素。
<beans xmlns="http://www.springframework.org/schema/beans"
    xmlns:xsi="http://www.w3.org/2001/XMLSchema-instance"
    xmlns:c="http://www.springframework.org/schema/c"
    xsi:schemaLocation="http://www.springframework.org/schema/beans
        https://www.springframework.org/schema/beans/spring-beans.xsd">

    <bean id="beanTwo" class="x.y.ThingTwo"/>
    <bean id="beanThree" class="x.y.ThingThree"/>

    <!-- traditional declaration with optional argument names -->
    <bean id="beanOne" class="x.y.ThingOne">
        <constructor-arg name="thingTwo" ref="beanTwo"/>
        <constructor-arg name="thingThree" ref="beanThree"/>
        <constructor-arg name="email" value="something@somewhere.com"/>
    </bean>

    <!-- c-namespace declaration with argument names -->
    <bean id="beanOne" class="x.y.ThingOne" c:thingTwo-ref="beanTwo"
        c:thingThree-ref="beanThree" c:email="something@somewhere.com"/>

</beans>

<!-- c-namespace index declaration -->
<bean id="beanOne" class="x.y.ThingOne" c:_0-ref="beanTwo" c:_1-ref="beanThree"
    c:_2="something@somewhere.com"/>
p命名空间是setter依赖注入的简化,而c命名空间是对构造函数的依赖注入的简化
Using depends-on
depends-on属性可以在初始化使用此元素的 bean 之前显式强制初始化一个或多个 bean。以下示例使用depends-on属性表示对单个 bean 的依赖关系:
<bean id="beanOne" class="ExampleBean" depends-on="manager"/>
<bean id="manager" class="ManagerBean" />
要表示对多个 bean 的依赖性,请提供一个 bean 名称列表作为depends-on属性的值(逗号,空格和分号是有效的分隔符):
<bean id="beanOne" class="ExampleBean" depends-on="manager,accountDao">
    <property name="manager" ref="manager" />
</bean>

<bean id="manager" class="ManagerBean" />
<bean id="accountDao" class="x.y.jdbc.JdbcAccountDao" />
depends-on属性既可以指定初始化时间依赖性,也可以仅在singleton bean 的情况下指定相应的销毁时间依赖性。与给定 bean 定义depends-on关系的从属 bean 首先被销毁,然后再销毁给定 bean 本身。因此,depends-on也可以控制关闭 Sequences。
Lazy-initialized Beans
默认情况下,ApplicationContext会在初始化时急切地创建所有单例bean,通常情况下,这些预加载的bean是可取的,因为我们可以立刻发现程序的错误,而不是当需要使用的时候才发现。当不希望初始化时实例化bean对象时,我们可以通过把bean标记为lazy-initialized阻止预加载。lazy-initialized bean告诉ioc容器当该bean第一次请求时创建。
在 XML 中,此行为由<bean/>元素上的lazy-init属性控制,如以下示例所示:
<bean id="lazy" class="com.something.ExpensiveToCreateBean" lazy-init="true"/>
<bean name="not.lazy" class="com.something.AnotherBean"/>
然而,当一个lazy-initialized的bean是一个非lazy-initialized的bean的依赖时,它也会在启动时被加载,因为它必须满足单例的依赖关系。
还可以使用<beans/>元素上的default-lazy-init属性在容器级别控制延迟初始化,以下示例显示:
<beans default-lazy-init="true">
    <!-- no beans will be pre-instantiated... -->
</beans>
Autowiring Collaborators
| Mode | Explanation |
|---|---|
no | (默认)无自动装配。 Bean 引用必须由ref元素定义。对于大型部署,建议不要更改默认设置,因为明确指定协作者可以提供更好的控制和清晰度。在某种程度上,它记录了系统的结构。 |
byName | 按属性名称自动装配。 Spring 寻找与需要自动装配的属性同名的 bean。例如,如果一个 bean 定义被设置为按名称自动装配,并且包含一个master属性(即,它具有setMaster(..)方法),那么 Spring 将查找一个名为master的 bean 定义并使用它来设置属性。 |
byType | 如果容器中恰好存在一个该属性类型的 bean,则使该属性自动装配。如果存在多个错误,则会引发致命异常,这表明您可能不对该 bean 使用byType自动装配。如果没有匹配的 bean,则什么也不会发生(未设置该属性)。 |
constructor | 类似于byType,但适用于构造函数参数。如果容器中不存在构造函数参数类型的一个 bean,则将引发致命错误。 |
当在项目中一致使用自动装配时,自动装配效果最佳
缺点:
- property和constructor-arg中的设置会覆盖自动装配的属性;不能自动装配简单属性,例如:Strings和Classes(和一些简单属性的数组),这是设计的缺陷
- 自动装配不如显示装配精确
- 连接信息可能不适用于从spring容器生成文档的工具
- 容器内的多个 bean 定义可能与要自动装配的 setter 方法或构造函数参数指定的类型匹配。对于数组,集合或
Map实例,这不一定是问题。但是,对于需要单个值的依赖项,不会任意解决此歧义。如果没有唯一的 bean 定义可用,则引发异常。- 最后一个问题中我们可以抛弃自动装配
- 通过将其
autowire-candidate属性设置为false来避免自动装配 bean 定义 - 通过将其
<bean/>元素的primary属性设置为true,将单个 bean 定义指定为主要候选对象 - 通过java注解实现更加细粒度的控制
Excluding a Bean from Autowiring
从自动装配中排除bean,通过设置bean的autowire-candidate属性为false
autowire-candidate仅影响通过类型的自动装配。它不会影响按名称显示的显式引用,即使未将指定的 Bean 标记为自动装配候选,该名称也可得到解析。因此,如果名称匹配,按名称自动装配仍会注入 Bean。
Method Injection
当单例 Bean 需要与另一个单例 Bean 协作或非单例 Bean 需要与另一个非单例 Bean 协作时,通常可以通过将一个 Bean 定义为另一个 Bean 的属性来处理依赖性。当 bean 的生命周期不同时会出现问题。假设单例 bean A 需要使用非单例(原型)bean B,也许在 A 的每个方法调用上都使用。容器仅创建一次单例 bean A,因此只有一次机会来设置属性。每次需要一个容器时,容器都无法为 bean A 提供一个新的 bean B 实例。
一个解决方案是放弃某些控制反转。您可以通过实现ApplicationContextAware接口来使 bean A 知道容器,并在每次 bean A 需要它时对容器进行 getBean(“ B”)调用询问(通常是新的)bean B 实例。以下示例显示了此方法:
// a class that uses a stateful Command-style class to perform some processing
package fiona.apple;

// Spring-API imports
import org.springframework.beans.BeansException;
import org.springframework.context.ApplicationContext;
import org.springframework.context.ApplicationContextAware;

public class CommandManager implements ApplicationContextAware {

    private ApplicationContext applicationContext;

    public Object process(Map commandState) {
        // grab a new instance of the appropriate Command
        Command command = createCommand();
        // set the state on the (hopefully brand new) Command instance
        command.setState(commandState);
        return command.execute();
    }

    protected Command createCommand() {
        // notice the Spring API dependency!
        return this.applicationContext.getBean("command", Command.class);
    }

    public void setApplicationContext(
            ApplicationContext applicationContext) throws BeansException {
        this.applicationContext = applicationContext;
    }
}
前面的内容是不理想的,因为业务代码知道并耦合到 Spring 框架。方法注入是 Spring IoC 容器的一项高级功能,使您可以干净地处理此用例。
查找方法注入是容器重写容器管理的 Bean 上的方法并返回容器中另一个命名 Bean 的查找结果的能力。
Lookup Method Injection
查找方法注入是解决单例bean注入非单例bean的问题的,因为单例bean注入非单例bean意味着这个单例bean需要拥有一个可以改变的bean,但是单例bean只在初始化时进行设置,那么非单例bean也只能被设置以此,所以就需要通过方法注入,每次注入新的非单例bean
Spring 框架通过使用从 CGLIB 库生成字节码来动态生成覆盖该方法的子类来实现此方法注入。
对于前面的代码片段中的CommandManager类,Spring 容器将动态覆盖createCommand()方法的实现。 CommandManager类没有任何 Spring 依赖项,如重做的示例所示:
package fiona.apple;

// no more Spring imports!

public abstract class CommandManager {

    public Object process(Object commandState) {
        // grab a new instance of the appropriate Command interface
        Command command = createCommand();
        // set the state on the (hopefully brand new) Command instance
        command.setState(commandState);
        return command.execute();
    }

    // okay... but where is the implementation of this method?
    protected abstract Command createCommand();
}
在包含要注入的方法(在本例中为CommandManager)的 Client 端类中,要注入的方法需要以下形式的签名:
<public|protected> [abstract] <return-type> theMethodName(no-arguments);
如果方法是abstract,则动态生成的子类将实现该方法。否则,动态生成的子类将覆盖原始类中定义的具体方法。考虑以下示例:
<!-- a stateful bean deployed as a prototype (non-singleton) -->
<bean id="myCommand" class="fiona.apple.AsyncCommand" scope="prototype">
    <!-- inject dependencies here as required -->
</bean>

<!-- commandProcessor uses statefulCommandHelper -->
<bean id="commandManager" class="fiona.apple.CommandManager">
    <lookup-method name="createCommand" bean="myCommand"/>
</bean>
每当需要myCommand bean 的新实例时,标识为commandManager的 bean 就会调用其自己的createCommand()方法。如果确实需要myCommand bean 作为原型,则必须小心。如果它是singleton,则每次都返回myCommand bean 的相同实例。
在基于注解的开发中,可以通过@Lookup注解声明查找方法,而不必配置xml文件,例如:
public abstract class CommandManager {

    public Object process(Object commandState) {
        Command command = createCommand();
        command.setState(commandState);
        return command.execute();
    }
	//1、通过指定bean的名称
    @Lookup("myCommand")
    protected abstract Command createCommand();
    //2、可以依赖于目标 bean 根据查找方法的声明的返回类型来解析
    @Lookup
    protected abstract MyCommand createCommand();
}
Arbitrary Method Replacement
任意方法替换
public class MyValueCalculator {

    public String computeValue(String input) {
        // some real code...
    }

    // some other methods...
}

/**
 * meant to be used to override the existing computeValue(String)
 * implementation in MyValueCalculator
 */
public class ReplacementComputeValue implements MethodReplacer {

    public Object reimplement(Object o, Method m, Object[] args) throws Throwable {
        // get the input value, work with it, and return a computed result
        String input = (String) args[0];
        ...
        return ...;
    }
}

<bean id="myValueCalculator" class="x.y.z.MyValueCalculator">
    <!-- arbitrary method replacement -->
    <replaced-method name="computeValue" replacer="replacementComputeValue">
        <arg-type>String</arg-type>
    </replaced-method>
</bean>

<bean id="replacementComputeValue" class="a.b.c.ReplacementComputeValue"/>
可以在<replaced-method/>元素中使用一个或多个<arg-type/>元素来指示要覆盖的方法的方法签名。仅当方法重载且类中存在多个变体时,才需要对参数签名。
Bean Scopes
bean作用域
spring framework支持六种作用域
| Scope | Description |
|---|---|
| singleton | (默认)将每个 Spring IoC 容器的单个 bean 定义范围限定为单个对象实例。 |
| prototype | 将单个 bean 定义的作用域限定为任意数量的对象实例。 |
| request | 将单个 bean 定义的范围限定为单个 HTTP 请求的生命周期。也就是说,每个 HTTP 请求都有一个在单个 bean 定义后面创建的 bean 实例。仅在可感知网络的 Spring ApplicationContext中有效。 |
| session | 将单个 bean 定义的范围限定为 HTTP Session的生命周期。仅在可感知网络的 Spring ApplicationContext上下文中有效。 |
| application | 将单个 bean 定义的范围限定为ServletContext的生命周期。仅在可感知网络的 Spring ApplicationContext上下文中有效。 |
| websocket | 将单个 bean 定义的范围限定为WebSocket的生命周期。仅在可感知网络的 Spring ApplicationContext上下文中有效。 |
自spring3.0开始,线程作用域可用,SimpleThreadScope
The Singleton Scope
只有单个bean实例被管理,并且所有对具有 ID 或与该 bean 定义相匹配的 ID 的 bean 的请求都会导致该特定的 bean 实例由 Spring 容器返回。换句话说,当您定义一个 bean 定义并且其作用域为单例时,Spring IoC 容器将为该 bean 定义所定义的对象创建一个实例。该单个实例存储在此类单例 bean 的高速缓存中,并且对该命名 bean 的所有后续请求和引用都返回该高速缓存的对象。
[外链图片转存失败,源站可能有防盗链机制,建议将图片保存下来直接上传(img-pXgE5I3y-1604925312200)(https://docs.spring.io/spring-framework/docs/current/reference/html/images/singleton.png)]
单例作用域在spring中是默认作用域。以下两者等同
<bean id="accountService" class="com.something.DefaultAccountService"/>
<!-- the following is equivalent, though redundant (singleton scope is the default) -->
<bean id="accountService" class="com.something.DefaultAccountService" scope="singleton"/>
The Prototype Scope
原型作用域
每次对原型作用域的bean请求时都会返回一个新的bean实例,通常,我们将有状态的bean设置为prototype scope,把无状态的bean设置为singleton scope。
有状态的bean就是有实例变量的对象,可以保存数据,类里面有成员变量,而且成员变量是可变的,是非线程安全的。在不同方法调用间不保留任何状态。
无状态对象(Stateless Bean),就是没有实例变量的对象.不能保存数据,类里面没有成员变量,或者有成员变量但是不可变的、或者成员变量是单例的,是不变类,是线程安全的。
那么在spring中,有状态对象就是存储从数据库中查询到的实体类对象,也就是对应于entity,那么这类对象的作用域就是prototype;无状态对象就是在开发过程中的DAO和Service层对象,这些对象只负责查询数据,这些不存放状态,相当于immutable类,所以可以使用singleton
参考:https://www.cnblogs.com/yysbolg/p/9239410.html
[外链图片转存失败,源站可能有防盗链机制,建议将图片保存下来直接上传(img-mGSzYkGP-1604925312201)(https://docs.spring.io/spring-framework/docs/current/reference/html/images/prototype.png)]
数据访问对象(DAO)通常不配置为原型,因为典型的 DAO 不拥有任何对话状态。对于我们而言,重用单例图的核心更为容易。
Singleton Beans with Prototype-bean Dependencies
当您使用对原型 bean 有依赖性的单例作用域 Bean 时,请注意,依赖关系在实例化时已解决。因此,如果将依赖项原型的 bean 依赖项注入到单例范围的 bean 中,则将实例化新的原型 bean,然后将依赖项注入到单例 bean 中。原型实例是曾经提供给单例范围的 bean 的唯一实例。
但是,假设您希望单例作用域的 bean 在运行时重复获取原型作用域的 bean 的新实例。您不能将原型作用域的 bean 依赖项注入到您的单例 bean 中,因为当 Spring 容器实例化单例 bean 并解析并注入其依赖项时,该注入仅发生一次。如果在运行时多次需要一个原型 bean 的新实例,请使用方法注入Method Injection
Request, Session, Application, and WebSocket Scopes
只有在web应用中,这些作用域才会生效。如果将这些作用域与常规的 Spring IoC 容器(例如ClassPathXmlApplicationContext)一起使用,则会引发未知 bean 作用域的IllegalStateException
<bean id="loginAction" class="com.something.LoginAction" scope="request"/>
在注解驱动或者java配置时,可以使用@RequestSconpe注解设置
@RequestScope
@Component
public class LoginAction {
    // ...
}
<bean id="userPreferences" class="com.something.UserPreferences" scope="session"/>
@SessionScope
@Component
public class UserPreferences {
    // ...
}
在单个 HTTP Session的生存期内,Spring 容器通过使用userPreferences bean 定义来创建UserPreferences bean 的新实例。换句话说,userPreferences bean 的作用域实际上是 HTTP Session级别。与请求范围的 Bean 一样,您可以根据需要任意更改所创建实例的内部状态,因为知道其他 HTTP Session实例(也使用从相同userPreferences Bean 定义创建的实例)不会看到这些状态更改,因为它们特定于单个 HTTP Session。当最终丢弃 HTTP Session时,也将丢弃作用于该特定 HTTP Session的 bean。
<bean id="appPreferences" class="com.something.AppPreferences" scope="application"/>
@ApplicationScope
@Component
public class AppPreferences {
    // ...
}
此时每个servlet容器中只有一个bean,也就是说每个web容器中只有一个,相当于每个应用程序对应的tomcat容器中只有一个该bean的实例。
Spring 容器通过对整个 Web 应用程序使用appPreferences bean 定义来创建AppPreferences bean 的新实例。也就是说,appPreferences bean 的作用域为ServletContext级别,并存储为常规ServletContext属性。这有点类似于 Spring 单例 bean,但是有两个重要的区别:它是每个ServletContext而不是每个 Spring’ApplicationContext’(在任何给定的 Web 应用程序中可能都有多个),并且实际上是公开的,因此可见为ServletContext属性。
如果要让Http范围内的bean注入到一个作用域更长的bean中,则可以选择使用AOP代理来代替已定义范围的bean,也就是说需要注入一个代理对象,该对象公开与范围对象相同的公共接口,但也可以从相关范围(例如 HTTP 请求)中检索实际目标对象,并将方法调用委托给该真实对象。
<!--默认情况下,当 Spring 容器为使用<aop:scoped-proxy/>元素标记的 bean 创建代理时,将创建基于 CGLIB 的类代理-->
<bean id="userPreferences" class="com.something.UserPreferences" scope="session">
    <aop:scoped-proxy/>
</bean>

<bean id="userManager" class="com.something.UserManager">
    <property name="userPreferences" ref="userPreferences"/>
</bean>
Custom Scopes
Bean 作用域机制是可扩展的。您可以定义自己的范围,甚至重新定义现有范围,尽管后者被认为是不好的做法,并且您不能覆盖内置的singleton和prototype范围。
Creating a Custom Scope
要将自定义范围集成到 Spring 容器中,您需要实现org.springframework.beans.factory.config.Scope接口
Using a Custom Scope
在编写并测试一个或多个自定义Scope实现之后,您需要使 Spring 容器意识到您的新作用域。
void registerScope(String scopeName, Scope scope);

Scope threadScope = new SimpleThreadScope();
beanFactory.registerScope("thread", threadScope);
此方法在ConfigurableBeanFactory接口上声明,该接口可通过 Spring 附带的大多数具体ApplicationContext实现上的BeanFactory属性使用。
Customizing the Nature of a Bean
spring 提供了许多定义bean特性的接口,例如:
Lifecycle Callbacks
要与容器对 bean 生命周期的管理进行交互,可以实现 Spring InitializingBean和DisposableBean接口。容器对前者调用afterPropertiesSet(),对后者调用destroy(),以使 Bean 在初始化和销毁 Bean 时执行某些操作。
在现代 Spring 应用程序中,JSR-250 @PostConstruct和@PreDestroyComments 被认为是接收生命周期回调的最佳实践。使用这些注解意味着bean没有耦合特定的spring接口。
在内部,spring使用BeanPostProcessor实现生命周期回调的进程。如果你需要没有spring没有提供的生命周期回调功能,那么你可以字节实现BeanPostProcessor接口。
除了初始化和销毁回调之外,Spring 托管的对象还可以实现Lifecycle接口,以便这些对象可以在容器自身生命周期的驱动下参与启动和关闭过程。
interact相互作用交流
Initialization Callbacks
org.springframework.beans.factory.InitializingBean接口使spring配置完接口bean的属性以后对其进行初始化。但是spring官方并不推荐使用这个接口,他们推荐使用@PostConstruct或者指定一个初始化方法
<bean id="exampleInitBean" class="examples.ExampleBean" init-method="init"/>
Destruction Callbacks
org.springframework.beans.factory.DisposableBean接口使spring销毁bean时调用这个回调方法,但是同样不推荐使用,推荐使用的是@PreDestroy,或者使用xml配置的destroy-method属性。
<bean id="exampleInitBean" class="examples.ExampleBean" destroy-method="cleanup"/>
Default Initialization and Destroy Methods
默认的初始化和销毁函数的名称通常为init和destroy,我们可以把方法命名为这些默认的方法,然后再spring的xml配置中调用。例如,我们的默认初始化方法为init,那么我们可以如下调用:
<beans default-init-method="init" default-destroy-method="destroy">

    <bean id="blogService" class="com.something.DefaultBlogService">
        <property name="blogDao" ref="blogDao" />
    </bean>

</beans>
顶层<beans/>元素属性上default-init-method属性的存在会导致 Spring IoC 容器将 Bean 类上称为init的方法识别为初始化方法回调。创建和组装 bean 时,如果 bean 类具有此类方法,则会在适当的时间调用它。
Combining Lifecycle Mechanisms
为同一个 bean 配置的具有不同初始化方法的多种生命周期机制如下:
- 用
@PostConstruct注解 的方法 InitializingBean回调接口定义的afterPropertiesSet()- 自定义配置的
init()方法
销毁方法的调用 Sequences 相同:
- 用
@PreDestroy注解 的方法 DisposableBean回调接口定义的destroy()- 自定义配置的
destroy()方法
Startup and Shutdown Callbacks
启动和关闭调用的 Sequences 可能很重要。如果任何两个对象之间存在“依赖”关系,则依赖方在其依赖之后开始,而在依赖之前停止。但是,有时直接依赖项是未知的。您可能只知道某种类型的对象应该先于另一种类型的对象开始。在这些情况下,SmartLifecycle接口定义了另一个选项,即在其超级接口Phased上定义的getPhase()方法。
Shutting Down the Spring IoC Container Gracefully in Non-Web Applications
如果您在非 Web 应用程序环境中(例如,在富 Client 端桌面环境中)使用 Spring 的 IoC 容器,请向 JVM 注册一个关闭钩子。这样做可以确保正常关机,并在您的 Singleton bean 上调用相关的 destroy 方法,以便释放所有资源。您仍然必须正确配置和实现这些 destroy 回调。
要注册关闭钩子,请调用在ConfigurableApplicationContext接口上声明的registerShutdownHook()方法
import org.springframework.context.ConfigurableApplicationContext;
import org.springframework.context.support.ClassPathXmlApplicationContext;

public final class Boot {

    public static void main(final String[] args) throws Exception {
        ConfigurableApplicationContext ctx = new ClassPathXmlApplicationContext("beans.xml");

        // add a shutdown hook for the above context...
        ctx.registerShutdownHook();

        // app runs here...

        // main method exits, hook is called prior to the app shutting down...
    }
}
ApplicationContextAware and BeanNameAware
当ApplicationContext创建实现org.springframework.context.ApplicationContextAware接口的对象实例时,该实例将获得对该ApplicationContext的引用。
因此,bean 可以通过ApplicationContext接口或通过将引用转换为该接口的已知子类(例如ConfigurableApplicationContext,以公开其他功能)来以编程方式操纵创建它们的ApplicationContext。一种用途是通过编程方式检索其他 bean。但是我们应该避免使用它,因为这将使代码耦合到spring
Other Aware Interfaces
Bean Definition Inheritance
子定义可以覆盖某些值,也可以根据需要添加其他值。使用父bean和子bean定义可以节省大量输入。实际上,这是一种模板形式。
<bean id="inheritedTestBean" abstract="true"
        class="org.springframework.beans.TestBean">
    <property name="name" value="parent"/>
    <property name="age" value="1"/>
</bean>

<bean id="inheritsWithDifferentClass"
        class="org.springframework.beans.DerivedTestBean"
        parent="inheritedTestBean" init-method="initialize">  (1)
    <property name="name" value="override"/>
    <!-- the age property value of 1 will be inherited from parent -->
</bean>
如果没有指定bean类,子bean定义使用父定义中的bean类,但是也可以覆盖它。在后一种情况下,子bean类必须与父bean兼容(也就是说,它必须接受父bean的属性值)
子bean定义从父bean继承范围、构造函数参数值、属性值和方法覆盖,并提供添加新值的选项。
其余设置始终从子类获取:depends on, autowire mode, dependency check, singleton, and lazy init.
如果父类定义没有指定class,那么把它显示定义为abstract是必须的,也就是设置abstract属性为true。
<bean id="inheritedTestBeanWithoutClass" abstract="true">
    <property name="name" value="parent"/>
    <property name="age" value="1"/>
</bean>

<bean id="inheritsWithClass" class="org.springframework.beans.DerivedTestBean"
        parent="inheritedTestBeanWithoutClass" init-method="initialize">
    <property name="name" value="override"/>
    <!-- age will inherit the value of 1 from the parent bean definition-->
</bean>
父 bean 不能单独实例化,因为它是不完整的,并且还被明确标记为abstract。当定义为abstract时,它只能用作纯模板 bean 定义,用作子定义的父定义。
Container Extension Points
Customizing Beans by Using a BeanPostProcessor
BeanPostProcessor接口定义了回调方法,您可以实现这些回调方法,以提供自己的(或覆盖容器的默认值)实例化逻辑,依赖项解析逻辑等。如果您想在 Spring 容器完成实例化,配置和初始化 bean 之后实现一些自定义逻辑,则可以插入一个或多个BeanPostProcessor实现。
plugging in插入
Customizing Configuration Metadata with a BeanFactoryPostProcessor
我们要看的下一个扩展点是org.springframework.beans.factory.config.BeanFactoryPostProcessor。此接口的语义与BeanPostProcessor相似,但有一个主要区别:BeanFactoryPostProcessor对 Bean 配置元数据进行操作。也就是说,Spring IoC 容器允许BeanFactoryPostProcessor读取配置元数据,并可能在容器实例化BeanFactoryPostProcessor实例以外的任何 bean 之前*对其进行更改
您可以配置多个BeanFactoryPostProcessor实例,并且可以通过设置order属性来控制这些BeanFactoryPostProcessor实例的运行 Sequences。但是,仅当BeanFactoryPostProcessor实现Ordered接口时才能设置此属性。如果您编写自己的BeanFactoryPostProcessor,则也应该考虑实现Ordered接口。
您可以使用标准 Java Properties格式,使用PropertyPlaceholderConfigurer来从单独文件中的 bean 定义外部化属性值。这样做使部署应用程序的人员可以自定义特定于环境的属性,例如数据库 URL 和密码,而不会为修改容器的一个或多个主要 XML 定义文件带来复杂性或风险。
<bean class="org.springframework.beans.factory.config.PropertyPlaceholderConfigurer">
    <property name="locations" value="classpath:com/something/jdbc.properties"/>
</bean>

<bean id="dataSource" destroy-method="close"
        class="org.apache.commons.dbcp.BasicDataSource">
    <property name="driverClassName" value="${jdbc.driverClassName}"/>
    <property name="url" value="${jdbc.url}"/>
    <property name="username" value="${jdbc.username}"/>
    <property name="password" value="${jdbc.password}"/>
</bean>
将要替换的值指定为${property-name}形式的占位符
Customizing Instantiation Logic with a FactoryBean
FactoryBean接口是可插入 Spring IoC 容器的实例化逻辑的点。如果您有复杂的初始化代码,而不是(可能)冗长的 XML,可以用 Java 更好地表达,则可以创建自己的FactoryBean,在该类中编写复杂的初始化,然后将自定义FactoryBean插入容器。
Annotation-based Container Configuration
Comments 在声明中提供了很多上下文,从而使配置更短,更简洁。但是,XML 擅长连接组件而不接触其源代码或重新编译它们。
基于注解的配置提供了 XML 设置的替代方法,该配置依赖字节码元数据来连接组件,而不是尖括号声明。
注解注入在XML注入之前执行。因此,XML配置覆盖了通过这两种方法连接的属性的注释。
@Required
该注解应用于bean属性的setter方法
public class SimpleMovieLister {

    private MovieFinder movieFinder;

    @Required
    public void setMovieFinder(MovieFinder movieFinder) {
        this.movieFinder = movieFinder;
    }

    // ...
}
这个注解指出,必须在配置时通过bean定义中的显式属性值或自动装配来填充受影响的bean属性。如果未填充受影响的bean属性,容器将抛出异常。这允许出现迫切的和显式的失败,避免了NullPointerException实例或以后出现类似的情况。
Using @Autowired
JSP 330的@Inject注解可以替换spring的@Autowired注解
Fine-tuning Annotation-based Autowiring with @Primary
由于按类型自动装配可能会导致多个候选对象,因此通常有必要对选择过程进行更多控制。实现此目的的一种方法是使用 Spring 的@Primary注解。 @Primary表示当多个bean可以自动连接到单值依赖项的候选对象时,应优先考虑特定的 bean。如果候选中恰好存在一个主 bean,则它将成为自动装配的值。
@Configuration
public class MovieConfiguration {
    @Bean
    @Primary
    public MovieCatalog firstMovieCatalog() { ... }

    @Bean
    public MovieCatalog secondMovieCatalog() { ... }
    // ...
}
<?xml version="1.0" encoding="UTF-8"?>
<beans xmlns="http://www.springframework.org/schema/beans"
    xmlns:xsi="http://www.w3.org/2001/XMLSchema-instance"
    xmlns:context="http://www.springframework.org/schema/context"
    xsi:schemaLocation="http://www.springframework.org/schema/beans
        https://www.springframework.org/schema/beans/spring-beans.xsd
        http://www.springframework.org/schema/context
        https://www.springframework.org/schema/context/spring-context.xsd">

    <context:annotation-config/>

    <bean class="example.SimpleMovieCatalog" primary="true">
        <!-- inject any dependencies required by this bean -->
    </bean>

    <bean class="example.SimpleMovieCatalog">
        <!-- inject any dependencies required by this bean -->
    </bean>

    <bean id="movieRecommender" class="example.MovieRecommender"/>

</beans>
Fine-tuning Annotation-based Autowiring with Qualifiers
@Qualifier
您可以将限定符值与特定的参数相关联,从而缩小类型匹配的范围,以便为每个参数选择特定的bean。
对于后备匹配,bean名称被视为默认的限定符值。
就是说,如果您打算按名称表示注解驱动的注入,则不要主要使用@Autowired,即使它能够在类型匹配的候选对象中按 bean 名称进行选择。而是使用 JSR-250 @Resource注解,该 注解的语义定义是通过其唯一名称来标识特定目标组件,而声明的类型与匹配过程无关。
@Autowired具有不同的语义:按类型选择候选 Bean 之后,仅在那些类型选择的候选中考虑指定的String限定符值(例如,将account限定符与标记有相同限定符标签的 Bean 匹配)。
对于本身定义为集合Map或数组类型的 bean,使用@Resource是一个很好的解决方案,它通过唯一的名称引用特定的集合或数组 bean。也就是说,从 4.3 版本开始,只要元素类型信息保留在@Bean返回类型签名或集合继承层次结构中,就可以通过 Spring 的@Autowired类型匹配算法来匹配Map和数组类型。在这种情况下,您可以使用限定符值在同类型的集合中进行选择,如上一段所述。
@Autowired适用于字段,构造函数和多参数方法,从而允许在参数级别缩小限定符注解的范围。相反,仅具有单个参数的字段和 bean 属性设置器方法支持@Resource。因此,如果注入目标是构造函数或多参数方法,则应坚持使用限定符。
Using Generics as Autowiring Qualifiers
@Configuration
public class MyConfiguration {

    @Bean
    public StringStore stringStore() {
        return new StringStore();
    }

    @Bean
    public IntegerStore integerStore() {
        return new IntegerStore();
    }
}
假设前面的 bean 实现了通用接口(即Store<String>和Store<Integer>),则可以@Autowire Store接口,并且通用接口用作限定符,如以下示例所示:
@Autowired
private Store<String> s1; // <String> qualifier, injects the stringStore bean

@Autowired
private Store<Integer> s2; // <Integer> qualifier, injects the integerStore bean
以下示例将自动连接通用List
// Inject all Store beans as long as they have an <Integer> generic
// Store<String> beans will not appear in this list
@Autowired
private List<Store<Integer>> s;
Using CustomAutowireConfigurer
Injection with @Resource
JSR-250 @Resourcejavax.annotation.Resource 可以在属性或者bean的setter方法上调用
@Resource有一个name属性,默认情况下,spring将它作为bean的name进行注入。也就是说它遵循按名称的语义
如果未明确指定名称,则默认名称是从字段名称或 setter 方法派生的。如果是字段,则采用字段名称。在使用 setter 方法的情况下,它采用 bean 属性名称。
在未使用@Resource且未指定显式名称且与@Autowired类似的特殊情况下,@Resource查找主类型匹配而不是特定的命名 bean
Using @Value
@Value用于注入外部属性
@Component
public class MovieRecommender {

    private final String catalog;

    public MovieRecommender(@Value("${catalog.name}") String catalog) {
        this.catalog = catalog;
    }
}
BeanPostProcessor使用ConversionService将@Value的String类型转换为目标类型
如果你想把它转换为你自己需要的类型,那么你就需要实现自己的ConversionService,例如:
@Configuration
public class AppConfig {

    @Bean
    public ConversionService conversionService() {
        DefaultFormattingConversionService conversionService = new DefaultFormattingConversionService();
        conversionService.addConverter(new MyCustomConverter());
        return conversionService;
    }
}
Using @PostConstruct and @PreDestroy
Classpath Scanning and Managed Components
本节介绍了通过扫描 Classpath 来隐式检测候选组件的选项。候选组件是与过滤条件匹配的类,并在容器中注册了相应的 Bean 定义。这消除了使用 XML 进行 bean 注册的需要。相反,您可以使用 注解(例如@Component),AspectJ 类型表达式或您自己的自定义过滤条件来选择哪些类已向容器注册了 bean 定义。
@Component and Further Stereotype Annotations
@Repository注解是实现存储库的角色或构造型(也称为数据访问对象或DAO)的任何类的标记。
stereotype刻板印象,固定观念
Using Meta-annotations and Composed Annotations
spring提供的许多注解可以作为你代码中的元注解
此外,组合注解可以选择性地从元注解中重新声明属性,从而允许定制
Automatically Detecting Classes and Registering Bean Definitions
为了自动检测类并注册相关的类,你必须在你的@Configuration类上使用@ComponentScan注解,其basePackages属性是包名
此外,当您使用组件扫描元素时,AutowiredAnnotationBeanPostProcessor和CommonAnnotationBeanPostProcessor都是隐式包含的。这意味着这两个组件将自动检测并连接在一起,而不需要XML提供任何bean配置元数据。
Using Filters to Customize Scanning
| Filter Type | Example Expression | Description |
|---|---|---|
| annotation (default) | org.example.SomeAnnotation | An annotation to be present or meta-present at the type level in target components. |
| assignable | org.example.SomeClass | A class (or interface) that the target components are assignable to (extend or implement). |
| aspectj | org.example..*Service+ | An AspectJ type expression to be matched by the target components. |
| regex | org\.example\.Default.* | A regex expression to be matched by the target components’ class names. |
| custom | org.example.MyTypeFilter | A custom implementation of the org.springframework.core.type.TypeFilter interface. |
@Configuration
@ComponentScan(basePackages = "org.example",
        includeFilters = @Filter(type = FilterType.REGEX, pattern = ".*Stub.*Repository"),
        excludeFilters = @Filter(Repository.class))
public class AppConfig {
    ...
}
<beans>
    <context:component-scan base-package="org.example">
        <context:include-filter type="regex"
                expression=".*Stub.*Repository"/>
        <context:exclude-filter type="annotation"
                expression="org.springframework.stereotype.Repository"/>
    </context:component-scan>
</beans>
Defining Bean Metadata within Components
spring组件可以将bean定义元数据贡献给容器,可以在带有@Configuration注解的类中使用@Bean注解定义bean
@Component
public class FactoryMethodComponent {

    @Bean
    @Qualifier("public")
    public TestBean publicInstance() {
        return new TestBean("publicInstance");
    }

    public void doWork() {
        // Component method implementation omitted
    }
}
可以结合@Lazy和@Autowired或者@Inject注解,实现懒加载
如前所述,支持自动装配字段和方法,并支持对@Bean自动装配
对于@Value注解,表达式解析程序已预先配置为在解析表达式文本时查找bean名称
Naming Autodetected Components
如果没有指定bean的名字,那么默认的bean名称生成程序将会返回未大写的非限定类名
如果不想使用默认的策略,那么就可以自定义bean-naming 策略。首先,实现BeanNameGenerator接口,并且确定包含默认无参构造函数,然后在配置扫描器的时候提供完全限定类名
5.2.3 FullyQualifiedAnnotationBeanNameGenerator也可以用于此目的
@Configuration
@ComponentScan(basePackages = "org.example", nameGenerator = MyNameGenerator.class)
public class AppConfig {
    // ...
}
Providing a Scope for Autodetected Components
提供自动检测组件的范围
通常,自动检测到的组件默认且最常见的范围是singleton,但是你可以通过@Scope注解指定不同的范围
@Scope("prototype")
@Repository
public class MovieFinderImpl implements MovieFinder {
    // ...
}
@Scope注释仅在具体bean类(对于带注释的组件)或工厂方法(对于@Bean方法)上自省。与XML bean定义相反,不存在bean定义继承的概念,而且类级别的继承层次结构与元数据目的无关。
要提供范围解析的自定义策略,就必须实现ScopeMetadataResolver接口
@Configuration
@ComponentScan(basePackages = "org.example", scopeResolver = MyScopeResolver.class)
public class AppConfig {
    // ...
}
Providing Qualifier Metadata with Annotations
提供带注解的限定符元数据
@Component
@Qualifier("Action")
public class ActionMovieCatalog implements MovieCatalog {
    // ...
}
Generating an Index of Candidate Components
尽管 Classpath 扫描非常快,但可以通过在编译时创建候选静态列表来提高大型应用程序的启动性能。在这种模式下,应用程序的所有模块都必须使用此机制,因为当ApplicationContext检测到这样的索引时,它将自动使用它而不是扫描 Classpath。
要生成索引,请向每个包含组件的模块添加附加依赖关系,这些组件是组件扫描指令的目标。以下示例显示了如何使用 Maven 进行操作:
<dependencies>
    <dependency>
        <groupId>org.springframework</groupId>
        <artifactId>spring-context-indexer</artifactId>
        <version>5.3.0</version>
        <optional>true</optional>
    </dependency>
</dependencies>
Using JSR 330 Standard Annotations
maven导入依赖
<dependency>
    <groupId>javax.inject</groupId>
    <artifactId>javax.inject</artifactId>
    <version>1</version>
</dependency>
Dependency Injection with @Inject and @Named
可以使用@Inject代替@Autowired
如果你想在注入依赖的时候,指定限定名,你就应该使用@Named注解
import javax.inject.Inject;
import javax.inject.Named;

public class SimpleMovieLister {

    private MovieFinder movieFinder;

    @Inject
    public void setMovieFinder(@Named("main") MovieFinder movieFinder) {
        this.movieFinder = movieFinder;
    }

    // ...
}
此外,@Inject可以和java.util.Optional或者@Nullable使用
public class SimpleMovieLister {

    @Inject
    public void setMovieFinder(Optional<MovieFinder> movieFinder) {
        // ...
    }

    @Inject
    public void setMovieFinder(@Nullable MovieFinder movieFinder) {
        // ...
    }
}
@Named and @ManagedBean: Standard Equivalents to the @Component Annotation
可以使用@Named或者@ManageBean代替@Component
import javax.inject.Inject;
import javax.inject.Named;

@Named("movieListener")  // @ManagedBean("movieListener") could be used as well
public class SimpleMovieLister {

    private MovieFinder movieFinder;

    @Inject
    public void setMovieFinder(MovieFinder movieFinder) {
        this.movieFinder = movieFinder;
    }

    // ...
}
当使用@Named或者@ManageBean时,可以使用同样的扫描方法,@ComponentScan
| Spring | javax.inject.* | javax.inject restrictions / comments |
|---|---|---|
| @Autowired | @Inject | @Inject has no ‘required’ attribute. Can be used with Java 8’s Optional instead. |
| @Component | @Named / @ManagedBean | JSR-330 does not provide a composable model, only a way to identify named components. |
| @Scope(“singleton”) | @Singleton | The JSR-330 default scope is like Spring’s prototype. However, in order to keep it consistent with Spring’s general defaults, a JSR-330 bean declared in the Spring container is a singleton by default. In order to use a scope other than singleton, you should use Spring’s @Scope annotation. javax.inject also provides a @Scope annotation. Nevertheless, this one is only intended to be used for creating your own annotations. |
| @Qualifier | @Qualifier / @Named | javax.inject.Qualifier is just a meta-annotation for building custom qualifiers. Concrete String qualifiers (like Spring’s @Qualifier with a value) can be associated through javax.inject.Named. |
| @Value | - | no equivalent |
| @Required | - | no equivalent |
| @Lazy | - | no equivalent |
| ObjectFactory | Provider | javax.inject.Provider is a direct alternative to Spring’s ObjectFactory, only with a shorter get() method name. It can also be used in combination with Spring’s @Autowired or with non-annotated constructors and setter methods. |
Java-based Container Configuration
Basic Concepts: @Bean and @Configuration
@Configuration和@Bean配合使用可以完全摒弃xml注解
@Bean和的作用相同
此外,@Configuration通过调用同一类中的其他@Bean来定义Bean之间的依赖关系
在未使用@Configuration注解的类中声明@Bean方法时,它们被称为以精简模式处理。它具有某些优势,例如:服务组件可以通过每个适用的组件类上的附加@Bean方法向容器公开管理视图。在这种情况下,@Bean方法是一种通用的工厂方法机制。但是它无法声明类之间的依赖关系,它们在包含它们的组件内部运行,因此,此类@Bean方法不应调用其他@Bean方法。实际上,每个此类方法仅是用于特定 bean 引用的工厂方法,而没有任何特殊的运行时语义。
Instantiating the Spring Container by Using AnnotationConfigApplicationContext
当@Configuration类作为ApplicationContext的输入时,它自己被注册为bean定义,并且它声明的所有@Bean方法也被注册为bean定义
相对于使用xml文件作为ClassPathXmlApplicationContext的输入,我们可以使用带有@Configuration注解的类作为AnnotationConfigApplicationContext的输入,例如:
public static void main(String[] args) {
    ApplicationContext context = new AnnotationConfigApplicationContext(MyConfig.class);
    UserService userService = context.getBean("userService", UserService.class);
    System.out.println(userService.get());
}
如之前提到的,AnnotationConfigApplicationContext不仅限于使用带有@Configuration注解的类作为输入,他还可以使用带有@Component注解的类作为输入
public static void main(String[] args) {
    ApplicationContext ctx = new AnnotationConfigApplicationContext(MyServiceImpl.class, Dependency1.class, Dependency2.class);
    MyService myService = ctx.getBean(MyService.class);
    myService.doStuff();
}
可以通过无参构造函数创建AnnotationConfigApplicationContext,然后使用register方法进行bean的注册
public static void main(String[] args) {
    AnnotationConfigApplicationContext ctx = new AnnotationConfigApplicationContext();
    ctx.register(AppConfig.class, OtherConfig.class);
    ctx.register(AdditionalConfig.class);
    ctx.refresh();
    MyService myService = ctx.getBean(MyService.class);
    myService.doStuff();
}
可以使用scan方法进行组件扫描
public static void main(String[] args) {
    AnnotationConfigApplicationContext ctx = new AnnotationConfigApplicationContext();
    ctx.scan("com.acme");
    ctx.refresh();
    MyService myService = ctx.getBean(MyService.class);
}
在web应用中我们可以使用AnnotationConfigWebApplicationContext来代替AnnotationConfigApplicationContext,可以使用这种方法配置Spring ContextLoaderListener servlet listener, Spring MVC DispatcherServlet等。以下xml表现了一个标准的web定义。
<web-app>
    <!-- Configure ContextLoaderListener to use AnnotationConfigWebApplicationContext
        instead of the default XmlWebApplicationContext -->
    <context-param>
        <param-name>contextClass</param-name>
        <param-value>
            org.springframework.web.context.support.AnnotationConfigWebApplicationContext
        </param-value>
    </context-param>

    <!-- Configuration locations must consist of one or more comma- or space-delimited
        fully-qualified @Configuration classes. Fully-qualified packages may also be
        specified for component-scanning -->
    <context-param>
        <param-name>contextConfigLocation</param-name>
        <param-value>com.acme.AppConfig</param-value>
    </context-param>

    <!-- Bootstrap the root application context as usual using ContextLoaderListener -->
    <listener>
        <listener-class>org.springframework.web.context.ContextLoaderListener</listener-class>
    </listener>

    <!-- Declare a Spring MVC DispatcherServlet as usual -->
    <servlet>
        <servlet-name>dispatcher</servlet-name>
        <servlet-class>org.springframework.web.servlet.DispatcherServlet</servlet-class>
        <!-- Configure DispatcherServlet to use AnnotationConfigWebApplicationContext
            instead of the default XmlWebApplicationContext -->
        <init-param>
            <param-name>contextClass</param-name>
            <param-value>
                org.springframework.web.context.support.AnnotationConfigWebApplicationContext
            </param-value>
        </init-param>
        <!-- Again, config locations must consist of one or more comma- or space-delimited
            and fully-qualified @Configuration classes -->
        <init-param>
            <param-name>contextConfigLocation</param-name>
            <param-value>com.acme.web.MvcConfig</param-value>
        </init-param>
    </servlet>

    <!-- map all requests for /app/* to the dispatcher servlet -->
    <servlet-mapping>
        <servlet-name>dispatcher</servlet-name>
        <url-pattern>/app/*</url-pattern>
    </servlet-mapping>
</web-app>
Using the @Bean Annotation
@Bean是方法注解,它类似于,并且它包含bean的一些属性,例如:init-method、destroy-method、autowiring
声明一个bean,可以在方法上加一个@Bean注解来注册一个bean定义,并且方法指定的返回类型就是bean的类型。默认情况下,方法的名称就是bean的名称
@Configuration
public class AppConfig {

    @Bean
    public TransferServiceImpl transferService() {
        return new TransferServiceImpl();
    }
}
也可以使@Bean方法返回接口类型的class,例如:
@Configuration
public class AppConfig {

    @Bean
    public TransferService transferService() {
        return new TransferServiceImpl();
    }
}
但是,这将高级类型预测的可见性限制为指定的接口类型,然后仅使用一次容器已知的完整类型,就可以实例化受影响的单例bean
在bean方法的返回类型中声明可能的最具体的返回类型更为安全。
Bean Dependencies
@Bean注解方法可以有任意多参数用来描述创建这个bean需要的依赖,例如,如果我们的UserService需要UserMapper,那么我们可以使UserMapper作为其方法参数。
@Configuration
public class AppConfig {
    @Bean
    public TransferService transferService(AccountRepository accountRepository) {
        return new TransferServiceImpl(accountRepository);
    }
}
Receiving Lifecycle Callbacks
接收生命周期回调
任何使用@Bean注解定义的类都支持常规的生命周期回调,并且可以使用@PostConstruct和@PreDestroy注解,或者使用@Bean的属性initMethod等
public class BeanOne {

    public void init() {
        // initialization logic
    }
}

public class BeanTwo {

    public void cleanup() {
        // destruction logic
    }
}

@Configuration
public class AppConfig {

    @Bean(initMethod = "init")
    public BeanOne beanOne() {
        return new BeanOne();
    }

    @Bean(destroyMethod = "cleanup")
    public BeanTwo beanTwo() {
        return new BeanTwo();
    }
}
//默认情况下,使用 Java 配置定义的具有公共close或shutdown方法的 bean 会自动通过销毁回调注册。如果您有一个公共的close或shutdown方法,并且您不希望在容器关闭时调用它,则可以将@Bean(destroyMethod="")添加到 bean 定义中以禁用默认的(inferred)模式。
@Bean(destroyMethod="")
public DataSource dataSource() throws NamingException {
return (DataSource) jndiTemplate.lookup("MyDS");
}
对于前面注解示例中的BeanOne,在构造期间直接调用init()同样有效。
@Configuration
public class AppConfig {

    @Bean
    public BeanOne beanOne() {
        BeanOne beanOne = new BeanOne();
        beanOne.init();
        return beanOne;
    }

    // ...
}
通过@Scope指定作用域范围,默认的范围是singleton,但是你可以重载这个注解
@Configuration
public class MyConfiguration {

    @Bean
    @Scope("prototype")
    public Encryptor encryptor() {
        // ...
    }
}
@Scope 和 scoped-proxy
spring提供了一种通过bean proxy的方式处理范围内依赖项的方法,在@Scope注解中也可以配置代理,默认为ScopedProxyMode.NO,可以指定ScopedProxyMode.TARGET_CLASS或ScopedProxyMode.INTERFACES
自定义bean名称
@Configuration
public class AppConfig {

    @Bean(name = "myThing")
    public Thing thing() {
        return new Thing();
    }
}
bean别名,设置一系列别名
@Configuration
public class AppConfig {

    @Bean({"dataSource", "subsystemA-dataSource", "subsystemB-dataSource"})
    public DataSource dataSource() {
        // instantiate, configure and return DataSource bean...
    }
}
bean描述,给bean提供一个描述
@Configuration
public class AppConfig {

    @Bean
    @Description("Provides a basic example of a bean")
    public Thing thing() {
        return new Thing();
    }
}
Using the @Configuration annotation
@Configuration是一个类级别的注解,它表示的是bean定义的源。@Configuration定义的类通过@Bean注解定义bean,在该类中调用@Bean注解定义的方法可以定义内联bean。例如,将一个bean注入到另一个bean中:
@Configuration
public class AppConfig {

    @Bean
    public BeanOne beanOne() {
        return new BeanOne(beanTwo());
    }

    @Bean
    public BeanTwo beanTwo() {
        return new BeanTwo();
    }
}
Lookup Method Injection
查找方法注入是很少用到的高级特性,但是在singleton-scope bean中调用prototype-scope bean非常有用。
将Java用于这种类型的配置为实现此模式提供了自然的方法。
public abstract class CommandManager {
    public Object process(Object commandState) {
        // grab a new instance of the appropriate Command interface
        Command command = createCommand();
        // set the state on the (hopefully brand new) Command instance
        command.setState(commandState);
        return command.execute();
    }

    // okay... but where is the implementation of this method?
    protected abstract Command createCommand();
}

//By using Java configuration, you can create a subclass of CommandManager where the abstract createCommand() method is overridden in such a way that it looks up a new (prototype) command object.
@Bean
@Scope("prototype")
public AsyncCommand asyncCommand() {
    AsyncCommand command = new AsyncCommand();
    // inject dependencies here as required
    return command;
}

@Bean
public CommandManager commandManager() {
    // return new anonymous implementation of CommandManager with createCommand()
    // overridden to return a new prototype Command object
    return new CommandManager() {
        protected Command createCommand() {
            return asyncCommand();
        }
    }
}
Further Information About How Java-based Configuration Works Internally
@Configuration
public class AppConfig {

    @Bean
    public ClientService clientService1() {
        ClientServiceImpl clientService = new ClientServiceImpl();
        clientService.setClientDao(clientDao());
        return clientService;
    }

    @Bean
    public ClientService clientService2() {
        ClientServiceImpl clientService = new ClientServiceImpl();
        clientService.setClientDao(clientDao());
        return clientService;
    }

    @Bean
    public ClientDao clientDao() {
        return new ClientDaoImpl();
    }
}
上述例子中,clientService1和clientService2两次调用clientDao()方法,那么它可能希望clientDao有两个实例,但是这是不可能的,因为子方法在调用父方法并创建新实例之前,首先检查容器中是否有任何缓存(作用域)的 bean。
Composing Java-based Configurations
基于java的配置可以让你组合注解,减少复杂的配置
Using the @Import Annotation
@Import和作用相同,可以将定义在其他@Configuration的bean引入,例如:
@Configuration
public class ConfigA {

    @Bean
    public A a() {
        return new A();
    }
}

@Configuration
@Import(ConfigA.class)
public class ConfigB {

    @Bean
    public B b() {
        return new B();
    }
}
使用上述方法以后,我们可以不指定ConfigA,只指定ConfigB,就可以直接使用ConfigA中的bean,例如:
public static void main(String[] args) {
    ApplicationContext ctx = new AnnotationConfigApplicationContext(ConfigB.class);

    // now both beans A and B will be available...
    A a = ctx.getBean(A.class);
    B b = ctx.getBean(B.class);
}
Injecting Dependencies on Imported @Bean Definitions
通过bean的参数解决bean之间的依赖关系
@Configuration
public class ServiceConfig {

    @Bean
    public TransferService transferService(AccountRepository accountRepository) {
        return new TransferServiceImpl(accountRepository);
    }
}

@Configuration
public class RepositoryConfig {

    @Bean
    public AccountRepository accountRepository(DataSource dataSource) {
        return new JdbcAccountRepository(dataSource);
    }
}

@Configuration
@Import({ServiceConfig.class, RepositoryConfig.class})
public class SystemTestConfig {

    @Bean
    public DataSource dataSource() {
        // return new DataSource
    }
}

public static void main(String[] args) {
    ApplicationContext ctx = new AnnotationConfigApplicationContext(SystemTestConfig.class);
    // everything wires up across configuration classes...
    TransferService transferService = ctx.getBean(TransferService.class);
    transferService.transfer(100.00, "A123", "C456");
}
@Configuration classes最终也是ioc container中的一个bean,它也可以使用@Autowired和@Value注入
注意:确保你注入的依赖是最简单的类型,@Configuration类在context初始化中很快被执行,如果强制注入一个依赖将会导致意料之外的初始化。
以下例子显示了如何使用@Autowired
@Configuration
public class ServiceConfig {

    @Autowired
    private AccountRepository accountRepository;

    @Bean
    public TransferService transferService() {
        return new TransferServiceImpl(accountRepository);
    }
}

@Configuration
public class RepositoryConfig {

    private final DataSource dataSource;

    public RepositoryConfig(DataSource dataSource) {
        this.dataSource = dataSource;
    }

    @Bean
    public AccountRepository accountRepository() {
        return new JdbcAccountRepository(dataSource);
    }
}

@Configuration
@Import({ServiceConfig.class, RepositoryConfig.class})
public class SystemTestConfig {

    @Bean
    public DataSource dataSource() {
        // return new DataSource
    }
}

public static void main(String[] args) {
    ApplicationContext ctx = new AnnotationConfigApplicationContext(SystemTestConfig.class);
    // everything wires up across configuration classes...
    TransferService transferService = ctx.getBean(TransferService.class);
    transferService.transfer(100.00, "A123", "C456");
}
从 Spring Framework 4.3 开始,仅支持@Configuration类中的构造方法注入。还要注意,如果目标 bean 仅定义一个构造函数,则无需指定@Autowired。在前面的示例中,RepositoryConfig构造函数上不需要@Autowired。
当我们使用@Autowired AccountRepository时,我们并不知道它具体定义在哪里,但是我们可以借助ide工具进行查看。如果想在代码中查看的话,我们可以通过引入对应的config类,然后调用它的bean,就可以知道bean的具体定义。例如:
@Configuration
public class ServiceConfig {

    @Autowired
    private RepositoryConfig repositoryConfig;

    @Bean
    public TransferService transferService() {
        // navigate 'through' the config class to the @Bean method!
        return new TransferServiceImpl(repositoryConfig.accountRepository());
    }
}
在上述代码中,accountRepository的定义非常明确,也就是在repositoryConfig中。但是,这使得ServiceConfig和repositoryConfig完全耦合,这是一种妥协,我们可以使用以下方法缓解耦合。
@Configuration
public class ServiceConfig {

    @Autowired
    private RepositoryConfig repositoryConfig;

    @Bean
    public TransferService transferService() {
        return new TransferServiceImpl(repositoryConfig.accountRepository());
    }
}

@Configuration
public interface RepositoryConfig {

    @Bean
    AccountRepository accountRepository();
}

@Configuration
public class DefaultRepositoryConfig implements RepositoryConfig {

    @Bean
    public AccountRepository accountRepository() {
        return new JdbcAccountRepository(...);
    }
}

@Configuration
@Import({ServiceConfig.class, DefaultRepositoryConfig.class})  // import the concrete config!
public class SystemTestConfig {

    @Bean
    public DataSource dataSource() {
        // return DataSource
    }

}

public static void main(String[] args) {
    ApplicationContext ctx = new AnnotationConfigApplicationContext(SystemTestConfig.class);
    TransferService transferService = ctx.getBean(TransferService.class);
    transferService.transfer(100.00, "A123", "C456");
}
Conditionally Include @Configuration Classes or @Bean Methods
如果你想有条件性的激活@Configuration类和个人的@Bean方法,可以使用@Profile注解。
@Profile注解是通过使用大量灵活的@Conditional注解实现的,在bean定义注册之前会咨询该org.springframework.context.annotation.Condition的实现类
实现Condition接口提供的matches方法,并返回true或者false,true表明可以注册,false表明无需注册
@Override
public boolean matches(ConditionContext context, AnnotatedTypeMetadata metadata) {
    // Read the @Profile annotation attributes
    MultiValueMap<String, Object> attrs = metadata.getAllAnnotationAttributes(Profile.class.getName());
    if (attrs != null) {
        for (Object value : attrs.get("value")) {
            if (context.getEnvironment().acceptsProfiles(((String[]) value))) {
                return true;
            }
        }
        return false;
    }
    return true;
}
结合java注解配置和xml配置,java注解不能完全替代xml,有些工具仍然是配置容器的理想方式,例如命名空间。
XML-centric Use of @Configuration Classes
Declaring @Configuration classes as plain Spring <bean/> elements
@Configuration注解最终还是container内的bean定义。
在一些例子中,我们创建一个@Configuration类,并把它放进xml的标签中,因为context:annotation-config/是开启的,所以容器可以正确识别@Configuration类和@Bean方法。
@Configuration
public class AppConfig {

    @Autowired
    private DataSource dataSource;

    @Bean
    public AccountRepository accountRepository() {
        return new JdbcAccountRepository(dataSource);
    }

    @Bean
    public TransferService transferService() {
        return new TransferService(accountRepository());
    }
}
<beans>
    <!-- enable processing of annotations such as @Autowired and @Configuration -->
    <context:annotation-config/>
    <context:property-placeholder location="classpath:/com/acme/jdbc.properties"/>

    <bean class="com.acme.AppConfig"/>

    <bean class="org.springframework.jdbc.datasource.DriverManagerDataSource">
        <property name="url" value="${jdbc.url}"/>
        <property name="username" value="${jdbc.username}"/>
        <property name="password" value="${jdbc.password}"/>
    </bean>
</beans>
@Configuration Class-centric Use of XML with @ImportResource
在以@Configuration为配置的程序中,也可能需要xml文件,在这种情况下,我们可以使用@ImportResource注解,并且定义任意多你需要的xml文件
@Configuration
@ImportResource("classpath:/com/acme/properties-config.xml")
public class AppConfig {

    @Value("${jdbc.url}")
    private String url;

    @Value("${jdbc.username}")
    private String username;

    @Value("${jdbc.password}")
    private String password;

    @Bean
    public DataSource dataSource() {
        return new DriverManagerDataSource(url, username, password);
    }
}
properties-config.xml
<beans>
    <context:property-placeholder location="classpath:/com/acme/jdbc.properties"/>
</beans>
jdbc.properties
jdbc.url=jdbc:hsqldb:hsql://localhost/xdb
jdbc.username=sa
jdbc.password=
modularity模块化 mitigate缓和,减轻,缓解 hierarchy层次结构层次体系 conditionally有条件性的
Environment Abstraction
profiles 和 properties
只有在profile激活的时候,profile内定义的bean才会被注册到容器中。无论是定义在xml中还是通过注解,bean定义都会与profile相关联。与profile相关的Environment对象决定当前哪个profile被激活,并且决定哪个profile被默认激活
配置文件在所有的应用中都起着重要作用,并且它的来源多种多样:properties files, JVM system properties, system environment variables, JNDI, servlet context parameters, ad-hoc Properties objects, Map objects, and so on.与properties关联的Environment对象提供了一个简单的服务接口用来配置properties数据源
Bean Definition Profiles
Bean definition profiles在core container中提供了一种允许不同的bean在不同的environment中注册的机制。“environment”对不同的用户有不同的含义,这一特性能帮助我们做很多事:
- 在开发中针对内存中的数据源进行工作,而不是在进行 QA 或生产时从 JNDI 查找相同的数据源。
- 仅在将应用程序部署到性能环境中时注册监视基础结构。
- 为 ClientA 和 ClientB 部署注册 bean 的自定义实现。
考虑第一个用例,在测试环境中,我们可能如下配置:
@Bean
public DataSource dataSource() {
    return new EmbeddedDatabaseBuilder()
        .setType(EmbeddedDatabaseType.HSQL)
        .addScript("my-schema.sql")
        .addScript("my-test-data.sql")
        .build();
}
现在假设应用程序数据源已在生产应用程序服务器的JNDI目录注册,请考虑如何将该应用程序部署到 QA 或生产环境中,现在做如下配置即可。
@Bean(destroyMethod="")
public DataSource dataSource() throws Exception {
    Context ctx = new InitialContext();
    return (DataSource) ctx.lookup("java:comp/env/jdbc/datasource");
}
Using @Profile
@Profile注解使您可以指示一个或多个指定配置文件处于活动状态时有资格注册的组件,我们可以使用@Profile注解重写前面的示例:
@Configuration
@Profile("development")
public class StandaloneDataConfig {

    @Bean
    public DataSource dataSource() {
        return new EmbeddedDatabaseBuilder()
            .setType(EmbeddedDatabaseType.HSQL)
            .addScript("classpath:com/bank/config/sql/schema.sql")
            .addScript("classpath:com/bank/config/sql/test-data.sql")
            .build();
    }
}

@Configuration
@Profile("production")
public class JndiDataConfig {

    @Bean(destroyMethod="")
    public DataSource dataSource() throws Exception {
        Context ctx = new InitialContext();
        return (DataSource) ctx.lookup("java:comp/env/jdbc/datasource");
    }
}
可以将@Profile注解作为元注解定制自己的注解,用以在不同的环境下使用不同的注解,例如:
@Target(ElementType.TYPE)
@Retention(RetentionPolicy.RUNTIME)
@Profile("production")
public @interface Production {
}
如果一个@Configuration注解类被@Profile注解标识,那么所有的@Bean和@Import注解关联的类将会被忽略,除非其对应的profile被激活
@Profile也能够被定义到在一个@Configuration类中的方法级别上,例如:
@Configuration
public class AppConfig {

    @Bean("dataSource")
    @Profile("development")
    public DataSource standaloneDataSource() {
        return new EmbeddedDatabaseBuilder()
            .setType(EmbeddedDatabaseType.HSQL)
            .addScript("classpath:com/bank/config/sql/schema.sql")
            .addScript("classpath:com/bank/config/sql/test-data.sql")
            .build();
    }

    @Bean("dataSource")
    @Profile("production")
    public DataSource jndiDataSource() throws Exception {
        Context ctx = new InitialContext();
        return (DataSource) ctx.lookup("java:comp/env/jdbc/datasource");
    }
}
对于@Bean方法上的@Profile,可能适用特殊情况:对于具有相同 Java 方法名称的@Bean方法重载(类似于构造函数重载),必须在所有重载方法上一致声明@Profile条件。如果条件不一致,则仅重载方法中第一个声明的条件很重要。因此,@Profile不能用于选择具有特定自变量签名的重载方法。在创建时,相同 bean 的所有工厂方法之间的解析都遵循 Spring 的构造函数解析算法。
如果要定义具有不同概要文件条件的备用 Bean,请使用@Bean name 属性使用不同的 Java 方法名称来指向相同的 Bean 名称,如前面的示例所示。如果参数签名都相同(例如,所有变体都具有 no-arg 工厂方法),则这是首先在有效 Java 类中表示这种排列的唯一方法(因为只能有一个特定名称和参数签名的方法)。
XML Bean Definition Profiles
<beans profile="development"
    xmlns="http://www.springframework.org/schema/beans"
    xmlns:xsi="http://www.w3.org/2001/XMLSchema-instance"
    xmlns:jdbc="http://www.springframework.org/schema/jdbc"
    xsi:schemaLocation="...">

    <jdbc:embedded-database id="dataSource">
        <jdbc:script location="classpath:com/bank/config/sql/schema.sql"/>
        <jdbc:script location="classpath:com/bank/config/sql/test-data.sql"/>
    </jdbc:embedded-database>
</beans>
<beans profile="production"
    xmlns="http://www.springframework.org/schema/beans"
    xmlns:xsi="http://www.w3.org/2001/XMLSchema-instance"
    xmlns:jee="http://www.springframework.org/schema/jee"
    xsi:schemaLocation="...">

    <jee:jndi-lookup id="dataSource" jndi-name="java:comp/env/jdbc/datasource"/>
</beans>

<beans xmlns="http://www.springframework.org/schema/beans"
    xmlns:xsi="http://www.w3.org/2001/XMLSchema-instance"
    xmlns:jdbc="http://www.springframework.org/schema/jdbc"
    xmlns:jee="http://www.springframework.org/schema/jee"
    xsi:schemaLocation="...">

    <!-- other bean definitions -->

    <beans profile="development">
        <jdbc:embedded-database id="dataSource">
            <jdbc:script location="classpath:com/bank/config/sql/schema.sql"/>
            <jdbc:script location="classpath:com/bank/config/sql/test-data.sql"/>
        </jdbc:embedded-database>
    </beans>

    <beans profile="production">
        <jee:jndi-lookup id="dataSource" jndi-name="java:comp/env/jdbc/datasource"/>
    </beans>
</beans>

	<beans profile="production">
        <beans profile="us-east">
            <jee:jndi-lookup id="dataSource" jndi-name="java:comp/env/jdbc/datasource"/>
        </beans>
    </beans>
Activating a Profile
在使用了@Profile注解以后,我们需要告诉spring哪个profile被激活,否则会出错
可以通过多种方式来激活配置文件,但是最直接的方法是针对通过ApplicationContext可用的Environment API 以编程方式进行配置,例如:
AnnotationConfigApplicationContext ctx = new AnnotationConfigApplicationContext();
ctx.getEnvironment().setActiveProfiles("development");
ctx.register(SomeConfig.class, StandaloneDataConfig.class, JndiDataConfig.class);
ctx.refresh();
也可以使用spring.profiles.active属性指定,在整体测试中可以使用@ActiveProfiles注解指定
上述方法还可以指定多个环境:
ctx.getEnvironment().setActiveProfiles("profile1", "profile2");
Default Profile
如果没有profile被激活,那么默认profile将会被激活
@Configuration
@Profile("default")
public class DefaultDataConfig {

    @Bean
    public DataSource dataSource() {
        return new EmbeddedDatabaseBuilder()
            .setType(EmbeddedDatabaseType.HSQL)
            .addScript("classpath:com/bank/config/sql/schema.sql")
            .build();
    }
}
如果任何profile被激活,那么默认profile就不被使用
可以使用setDefaultProfiles()或者spring.profiles.default修改默认profile名称
PropertySource Abstraction
spring的抽象environment提供了搜索属性源的机制,例如:
ApplicationContext ctx = new GenericApplicationContext();
Environment env = ctx.getEnvironment();
boolean containsMyProperty = env.containsProperty("my-property");
System.out.println("Does my environment contain the 'my-property' property? " + containsMyProperty);
当使用StandardEnvironment时,如果在运行时存在my-property系统属性或my-propertyi环境变量,则对env.containsProperty("my-property")的调用将返回 true。执行的搜索是分层的。默认情况下,系统属性优先于环境变量。
对于常见的StandardServletEnvironment,完整层次结构如下,最高优先级条目位于顶部:
- ServletConfig 参数(如果适用,例如,在
DispatcherServlet上下文的情况下) - ServletContext 参数(web.xml 上下文参数条目)
- JNDI 环境变量(
java:comp/env/个条目) - JVM 系统属性(
-D个命令行参数) - JVM 系统环境(os 环境变量)
当然我们也可以定义搜索的优先级:
ConfigurableApplicationContext ctx = new GenericApplicationContext();
MutablePropertySources sources = ctx.getEnvironment().getPropertySources();
sources.addFirst(new MyPropertySource());
Using @PropertySource
@PropertySource提供了一种简便且声明式的机制将PropertySource添加到spring environment
给定名为app.properties的文件,其中包含键值对testbean.name=myTestBean,以下@Configuration类使用@PropertySource,从而对testBean.getName()的调用返回myTestBean:
@Configuration
@PropertySource("classpath:/com/myco/app.properties")
public class AppConfig {

    @Autowired
    Environment env;

    @Bean
    public TestBean testBean() {
        TestBean testBean = new TestBean();
        testBean.setName(env.getProperty("testbean.name"));
        return testBean;
    }
}
@PropertySource资源位置中存在的任何${…}占位符都是根据已针对该环境注册的一组属性源来解析的,例如:
@Configuration
@PropertySource("classpath:/com/${my.placeholder:default/path}/app.properties")
public class AppConfig {

    @Autowired
    Environment env;

    @Bean
    public TestBean testBean() {
        TestBean testBean = new TestBean();
        testBean.setName(env.getProperty("testbean.name"));
        return testBean;
    }
}
假定my.placeholder存在于已注册的属性源之一(例如,系统属性或环境变量)中,则占位符将解析为相应的值。如果不是,则使用default/path作为默认值。如果未指定默认值并且无法解析属性,则会引发IllegalArgumentException。
根据 Java 8 约定,@PropertySource注解 是可重复的。但是,所有此类@PropertySource注解都需要在同一级别上声明,可以直接在配置类上声明,也可以在同一自定义注解中声明为元注解。不建议将直接注解和元注解混合使用,因为直接注解会有效地覆盖元 注解。
Placeholder Resolution in Statements
从历史上看,元素中占位符的值只能根据 JVM 系统属性或环境变量来解析。这已不再是这种情况。由于Environment抽象集成在整个容器中,因此很容易通过它路由占位符的解析。这意味着您可以按照自己喜欢的任何方式配置解析过程。您可以更改搜索系统属性和环境变量的优先级,也可以完全删除它们。您还可以根据需要将自己的属性源添加到组合中。
Registering a LoadTimeWeaver
LoadTimeWeaver被 Spring 使用,以在将类加载到 Java 虚拟机(JVM)中时对其进行动态转换
通过如下方式启用:
@Configuration
@EnableLoadTimeWeaving
public class AppConfig {
}
Additional Capabilities of the ApplicationContext
org.springframework.beans.factory提供了基本的管理bean的功能,org.springframework.context添加了ApplicationContext接口,其继承可BeanFactory接口,并扩展了其他接口以提供更多面向应用程序框架的样式的附加功能。许多人以完全声明性的方式使用ApplicationContext,甚至没有以编程方式创建它,而是依靠诸如ContextLoader之类的支持类来自动实例化ApplicationContext作为 Java EE Web 应用程序正常启动过程的一部分。
Internationalization using MessageSource
ApplicationContext继承了MessageSource接口,并且提供了国际化的功能。spring也提供了HierarchicalMessageSource接口,它可以分层解析消息,这些接口上定义的方法包括:
String getMessage(String code, Object[] args, String default, Locale loc):用于从MessageSource检索消息的基本方法。如果找不到针对指定语言环境的消息,则使用默认消息。使用标准库提供的MessageFormat功能,传入的所有参数都将成为替换值。String getMessage(String code, Object[] args, Locale loc):与以前的方法基本相同,但有一个区别:不能指定默认消息。如果找不到该消息,则抛出NoSuchMessageException。String getMessage(MessageSourceResolvable resolvable, Locale locale):前面方法中使用的所有属性也都包装在名为MessageSourceResolvable的类中,您可以将其与该方法一起使用。
加载ApplicationContext时,它将自动搜索上下文中定义的MessageSource bean。 Bean 必须具有名称messageSource。如果找到了这样的 bean,则对先前方法的所有调用都将委派给消息源。如果找不到消息源,则ApplicationContext尝试查找包含同名 bean 的父对象。如果是这样,它将使用该 bean 作为MessageSource。如果ApplicationContext找不到任何消息源,则实例化一个空的DelegatingMessageSource以便能够接受对上面定义的方法的调用。
Spring 提供了两个MessageSource实现ResourceBundleMessageSource和StaticMessageSource。两者都实现HierarchicalMessageSource以便进行嵌套消息传递。 StaticMessageSource很少使用,但提供了将消息添加到源中的编程方式。以下示例显示ResourceBundleMessageSource:
<beans>
    <bean id="messageSource"
            class="org.springframework.context.support.ResourceBundleMessageSource">
        <property name="basenames">
            <list>
                <value>format</value>
                <value>exceptions</value>
                <value>windows</value>
            </list>
        </property>
    </bean>
</beans>
下一个示例显示了执行MessageSource功能的程序。请记住,所有ApplicationContext实现也是MessageSource实现,因此可以转换为MessageSource接口。
public static void main(String[] args) {
    MessageSource resources = new ClassPathXmlApplicationContext("beans.xml");
    String message = resources.getMessage("message", null, "Default", null);
    System.out.println(message);
}
在以下示例中,手动指定了针对其解析(英国)消息的语言环境:
# in exceptions_en_GB.properties
argument.required=Ebagum lad, the {0} argument is required, I say, required.
public static void main(final String[] args) {
    MessageSource resources = new ClassPathXmlApplicationContext("beans.xml");
    String message = resources.getMessage("argument.required",
        new Object [] {"userDao"}, "Required", Locale.UK);
    System.out.println(message);
}
Standard and Custom Events
通过ApplicationEvent类和ApplicationListener接口提供ApplicationContext中的事件处理。 如果将实现ApplicationListener接口的bean部署到上下文中,则每次将ApplicationEvent发布到ApplicationContext时,都会通知该bean。 本质上,这是标准的Observer设计模式。
| Event | Explanation |
|---|---|
ContextRefreshedEvent | 在初始化或刷新ApplicationContext时发布(例如,通过使用ConfigurableApplicationContext接口上的refresh()方法)。在这里,“已初始化”是指所有 Bean 都已加载,检测到并激活了后处理器 Bean,已预先实例化单例,并且已准备好使用ApplicationContext对象。只要尚未关闭上下文,只要选定的ApplicationContext实际上支持这种“热”刷新,就可以多次触发刷新。例如,XmlWebApplicationContext支持热刷新,但GenericApplicationContext不支持。 |
ContextStartedEvent | 在ConfigurableApplicationContext界面上使用start()方法启动ApplicationContext时发布。在这里,“启动”是指所有Lifecycle bean 都收到一个明确的启动 signal。通常,此 signal 用于在显式停止后重新启动 Bean,但也可以用于启动尚未配置为自动启动的组件(例如,尚未在初始化时启动的组件)。 |
ContextStoppedEvent | 在ConfigurableApplicationContext接口上使用stop()方法停止ApplicationContext时发布。此处,“已停止”表示所有Lifecycle bean 都收到一个明确的停止 signal。停止的上下文可以通过start()调用重新启动。 |
ContextClosedEvent | 在ConfigurableApplicationContext接口上使用close()方法关闭ApplicationContext时发布。此处,“封闭”表示所有单例 bean 都被破坏。封闭的情境到了生命的尽头。无法刷新或重新启动。 |
RequestHandledEvent | 一个特定于 Web 的事件,告诉所有 Bean HTTP 请求已得到服务。请求完成后,将发布此事件。此事件仅适用于使用 Spring 的DispatcherServlet的 Web 应用程序。 |
此外,我们还可以创建和发布自己的事件。以下示例是一个简单的类,该类继承了ApplicationEvent
public class BlockedListEvent extends ApplicationEvent {

    private final String address;
    private final String content;

    public BlockedListEvent(Object source, String address, String content) {
        super(source);
        this.address = address;
        this.content = content;
    }

    // accessor and other methods...
}
要发布自定义ApplicationEvent,请在ApplicationEventPublisher上调用publishEvent()方法。通常,这是通过创建一个实现ApplicationEventPublisherAware的类并将其注册为 Spring bean 来完成的。
public class EmailService implements ApplicationEventPublisherAware {

    private List<String> blockedList;
    private ApplicationEventPublisher publisher;

    public void setBlockedList(List<String> blockedList) {
        this.blockedList = blockedList;
    }

    public void setApplicationEventPublisher(ApplicationEventPublisher publisher) {
        this.publisher = publisher;
    }

    public void sendEmail(String address, String content) {
        if (blockedList.contains(address)) {
            publisher.publishEvent(new BlockedListEvent(this, address, content));
            return;
        }
        // send email...
    }
}
在配置时,Spring 容器检测到EmailService实现ApplicationEventPublisherAware并自动调用setApplicationEventPublisher()。实际上,传入的参数是 Spring 容器本身。您正在通过其ApplicationEventPublisher接口与应用程序上下文进行交互。
要接收自定义ApplicationEvent,您可以创建一个实现ApplicationListener的类并将其注册为 Spring Bean。以下示例显示了此类:
public class BlackListNotifier implements ApplicationListener<BlackListEvent> {

    private String notificationAddress;

    public void setNotificationAddress(String notificationAddress) {
        this.notificationAddress = notificationAddress;
    }

    public void onApplicationEvent(BlackListEvent event) {
        // notify appropriate parties via notificationAddress...
    }
}
注意,ApplicationListener通常用您的自定义事件的类型(上一示例中的BlackListEvent)进行参数化。这意味着onApplicationEvent()方法可以保持类型安全,从而避免了向下转换的任何需要。您可以根据需要注册任意数量的事件侦听器,但是请注意,默认情况下,事件侦听器会同步接收事件。这意味着publishEvent()方法将阻塞,直到所有侦听器都已完成对事件的处理为止。这种同步和单线程方法的一个优点是,当侦听器收到事件时,如果有可用的事务上下文,它将在发布者的事务上下文内部进行操作。
Annotation-based Event Listeners
从 Spring 4.2 开始,您可以使用EventListener注解在托管 Bean 的任何公共方法上注册事件侦听器。 BlackListNotifier可以重写如下:
public class BlockedListNotifier {

    private String notificationAddress;

    public void setNotificationAddress(String notificationAddress) {
        this.notificationAddress = notificationAddress;
    }

    @EventListener
    public void processBlockedListEvent(BlockedListEvent event) {
        // notify appropriate parties via notificationAddress...
    }
}
方法签名再次声明其侦听的事件类型,但是这次使用灵活的名称并且没有实现特定的侦听器接口。只要实际事件类型在其实现层次结构中解析您的通用参数,也可以通过通用类型来缩小事件类型。
如果您的方法应该侦听多个事件,或者您要完全不使用任何参数来定义它,则事件类型也可以在注解本身上指定。以下示例显示了如何执行此操作:
@EventListener({ContextStartedEvent.class, ContextRefreshedEvent.class})
public void handleContextStart() {
    ...
}
以下示例显示了仅当事件的content属性等于my-event时,才可以重写我们的通知程序以进行调用:
@EventListener(condition = "#blEvent.content == 'my-event'")
public void processBlockedListEvent(BlockedListEvent blockedListEvent) {
    // notify appropriate parties via notificationAddress...
}
每个SpEL表达式都针对专用上下文进行评估。下表列出了可用于上下文的项目,以便您可以将它们用于条件事件处理:
| Name | Location | Description | Example |
|---|---|---|---|
| Event | root object | 实际的ApplicationEvent。 | #root.event |
| Arguments array | root object | 用于调用目标的参数(作为数组)。 | #root.args[0] |
| Argument name | evaluation context | 任何方法参数的名称。如果由于某种原因名称不可用(例如,因为没有调试信息),则参数名称也可以在#a<#arg>下获得,其中#arg代表参数索引(从 0 开始)。 | #blEvent或#a0(您也可以使用#p0或#p<#arg>表示法作为别名) |
请注意,即使您的方法签名实际上引用了已发布的任意对象,#root.event也使您可以访问基础事件。如果由于处理另一个事件而需要发布一个事件,则可以更改方法签名以返回应发布的事件,如以下示例所示:
@EventListener
public ListUpdateEvent handleBlackListEvent(BlackListEvent event) {
    // notify appropriate parties via notificationAddress and
    // then publish a ListUpdateEvent...
}
Generic Events
您还可以使用泛型来进一步定义事件的结构。考虑使用EntityCreatedEvent<T>,其中T是已创建的实际实体的类型。例如,您可以创建以下侦听器定义以仅接收Person 的EntityCreatedEvent:
@EventListener
public void onPersonCreated(EntityCreatedEvent<Person> event) {
    // ...
}
由于类型擦除,只有在触发的事件解析了事件侦听器所依据的通用参数(即诸如class PersonCreatedEvent extends EntityCreatedEvent<Person> { … })时,此方法才起作用。
Convenient Access to Low-level Resources
为了最佳使用和理解应用程序上下文,您应该熟悉 Spring 的Resource抽象,如Resources中所述。
应用程序上下文是ResourceLoader,可用于加载Resource对象。 Resource本质上是 JDK java.net.URL类的功能更丰富的版本。实际上,Resource的实现在适当的地方包装了java.net.URL的实例。 Resource可以从几乎任何位置以透明方式获取低级资源,包括从 Classpath,文件系统位置,可使用标准 URL 描述的任何位置以及其他一些变体。如果资源位置字符串是没有任何特殊前缀的简单路径,则这些资源的来源是特定的,并且适合于实际的应用程序上下文类型。
您可以配置部署到应用程序上下文中的 Bean,以实现特殊的回调接口ResourceLoaderAware,以便在初始化时使用应用程序上下文本身作为ResourceLoader进行自动回调。您还可以公开Resource类型的属性,以用于访问静态资源。它们像其他任何属性一样注入其中。您可以将这些Resource属性指定为简单的String路径,并在部署 bean 时依靠特殊的 JavaBean PropertyEditor(由上下文自动注册)将这些文本字符串转换为实际的Resource对象。
提供给ApplicationContext构造函数的一个或多个位置路径实际上是资源字符串,并且根据特定的上下文实现以简单的形式对其进行了适当处理。例如ClassPathXmlApplicationContext将简单的位置路径视为 Classpath 位置。您也可以使用带有特殊前缀的位置路径(资源字符串)来强制从 Classpath 或 URL 中加载定义,而不管实际的上下文类型如何。
Application Startup tracking
ApplicationContext管理Spring应用程序的生命周期,并提供围绕组件的丰富编程模型。 因此,复杂的应用程序可能具有同样复杂的组件图和启动阶段。
使用特定的度量来跟踪应用程序的启动步骤可以帮助理解启动阶段的时间花费在哪里,但是它也可以作为一种更好地理解整个上下文生命周期的方法。
AbstractApplicationContext通过ApplicationStartup检测,它可以收集不同的启动信息:
- 应用程序上下文周期
- benas生命周期
- 应用程序事件执行
// create a startup step and start recording
StartupStep scanPackages = this.getApplicationStartup().start("spring.context.base-packages.scan");
// add tagging information to the current step
scanPackages.tag("packages", () -> Arrays.toString(basePackages));
// perform the actual phase we're instrumenting
this.scanner.scan(basePackages);
// end the current step
scanPackages.end();
Convenient ApplicationContext Instantiation for Web Applications
您可以使用ContextLoader声明性地创建ApplicationContext实例。当然,您也可以使用ApplicationContext实现之一以编程方式创建ApplicationContext实例。
您可以使用ContextLoaderListener注册ApplicationContext,如以下示例所示:
<context-param>
    <param-name>contextConfigLocation</param-name>
    <param-value>/WEB-INF/daoContext.xml /WEB-INF/applicationContext.xml</param-value>
</context-param>

<listener>
    <listener-class>org.springframework.web.context.ContextLoaderListener</listener-class>
</listener>
侦听器检查contextConfigLocation参数。如果参数不存在,那么侦听器将使用/WEB-INF/applicationContext.xml作为默认值。当参数确实存在时,侦听器将使用 sched 义的定界符(逗号,分号和空格)来分隔String,并将这些值用作搜索应用程序上下文的位置。还支持 Ant 风格的路径模式。示例为/WEB-INF/*Context.xml(对于名称以Context.xml结尾并且位于WEB-INF目录中的所有文件)和/WEB-INF/**/*Context.xml(对于WEB-INF的任何子目录中的所有此类文件)。
Deploying a Spring ApplicationContext as a Java EE RAR File
The BeanFactory手写第三方框架集成spring所需知识
BeanFactory API 为 Spring 的 IoC 功能提供了基础。它的特定 Contract 主要用于与 Spring 的其他部分以及相关的第三方框架集成,并且其DefaultListableBeanFactory实现是更高级别GenericApplicationContext容器中的关键委托。
BeanFactory和相关接口(例如BeanFactoryAware,InitializingBean,DisposableBean)是其他框架组件的重要集成点。通过不需要任何注解甚至反射,它们可以在容器及其组件之间进行非常有效的交互。应用程序级 Bean 可以使用相同的回调接口,但通常更喜欢通过注解或通过程序配置进行声明式依赖注入。
BeanFactory or ApplicationContext?
除非有充分的理由,否则应使用ApplicationContext,除非GenericApplicationContext及其子类AnnotationConfigApplicationContext作为自定义引导的常见实现,否则应使用它们。对于所有常见目的,这些都是 Spring 核心容器的主要入口点:加载配置文件,触发 Classpath 扫描,以编程方式注册 Bean 定义和带注解的类,以及(从 5.0 版本开始)注册功能性 Bean 定义。
下表列出了BeanFactory和ApplicationContext接口和实现提供的功能。
| Feature | BeanFactory | ApplicationContext |
|---|---|---|
| Bean instantiation/wiring | Yes | Yes |
| Integrated lifecycle management | No | Yes |
Automatic BeanPostProcessor registration | No | Yes |
Automatic BeanFactoryPostProcessor registration | No | Yes |
Convenient MessageSource access (for internalization) | No | Yes |
plicationContext管理Spring应用程序的生命周期,并提供围绕组件的丰富编程模型。 因此,复杂的应用程序可能具有同样复杂的组件图和启动阶段。
使用特定的度量来跟踪应用程序的启动步骤可以帮助理解启动阶段的时间花费在哪里,但是它也可以作为一种更好地理解整个上下文生命周期的方法。
AbstractApplicationContext通过ApplicationStartup检测,它可以收集不同的启动信息:
- 应用程序上下文周期
- benas生命周期
- 应用程序事件执行
// create a startup step and start recording
StartupStep scanPackages = this.getApplicationStartup().start("spring.context.base-packages.scan");
// add tagging information to the current step
scanPackages.tag("packages", () -> Arrays.toString(basePackages));
// perform the actual phase we're instrumenting
this.scanner.scan(basePackages);
// end the current step
scanPackages.end();
Convenient ApplicationContext Instantiation for Web Applications
您可以使用ContextLoader声明性地创建ApplicationContext实例。当然,您也可以使用ApplicationContext实现之一以编程方式创建ApplicationContext实例。
您可以使用ContextLoaderListener注册ApplicationContext,如以下示例所示:
<context-param>
    <param-name>contextConfigLocation</param-name>
    <param-value>/WEB-INF/daoContext.xml /WEB-INF/applicationContext.xml</param-value>
</context-param>

<listener>
    <listener-class>org.springframework.web.context.ContextLoaderListener</listener-class>
</listener>
侦听器检查contextConfigLocation参数。如果参数不存在,那么侦听器将使用/WEB-INF/applicationContext.xml作为默认值。当参数确实存在时,侦听器将使用 sched 义的定界符(逗号,分号和空格)来分隔String,并将这些值用作搜索应用程序上下文的位置。还支持 Ant 风格的路径模式。示例为/WEB-INF/*Context.xml(对于名称以Context.xml结尾并且位于WEB-INF目录中的所有文件)和/WEB-INF/**/*Context.xml(对于WEB-INF的任何子目录中的所有此类文件)。
Deploying a Spring ApplicationContext as a Java EE RAR File
The BeanFactory手写第三方框架集成spring所需知识
BeanFactory API 为 Spring 的 IoC 功能提供了基础。它的特定 Contract 主要用于与 Spring 的其他部分以及相关的第三方框架集成,并且其DefaultListableBeanFactory实现是更高级别GenericApplicationContext容器中的关键委托。
BeanFactory和相关接口(例如BeanFactoryAware,InitializingBean,DisposableBean)是其他框架组件的重要集成点。通过不需要任何注解甚至反射,它们可以在容器及其组件之间进行非常有效的交互。应用程序级 Bean 可以使用相同的回调接口,但通常更喜欢通过注解或通过程序配置进行声明式依赖注入。
BeanFactory or ApplicationContext?
除非有充分的理由,否则应使用ApplicationContext,除非GenericApplicationContext及其子类AnnotationConfigApplicationContext作为自定义引导的常见实现,否则应使用它们。对于所有常见目的,这些都是 Spring 核心容器的主要入口点:加载配置文件,触发 Classpath 扫描,以编程方式注册 Bean 定义和带注解的类,以及(从 5.0 版本开始)注册功能性 Bean 定义。
下表列出了BeanFactory和ApplicationContext接口和实现提供的功能。
| Feature | BeanFactory | ApplicationContext |
|---|---|---|
| Bean instantiation/wiring | Yes | Yes |
| Integrated lifecycle management | No | Yes |
Automatic BeanPostProcessor registration | No | Yes |
Automatic BeanFactoryPostProcessor registration | No | Yes |
Convenient MessageSource access (for internalization) | No | Yes |
Built-in ApplicationEvent publication mechanism | No | Yes |


 1124
1124


 被折叠的 条评论
为什么被折叠?
被折叠的 条评论
为什么被折叠?
 到【灌水乐园】发言


