手把手教你如何创建一个连接到Binder上的服务(图文)(一)

参考文献:

http://blog.csdn.net/flydream0/article/details/7165127

http://blog.csdn.net/baiyanning/article/details/6191682

1 概述

       大家都知道在Android下的IPC机制是Binder,它可以实现两个进程之间的通信。有关Binder的介绍网上太多,这里就不费话,OK,还是进入这篇文章的主题,即教你如何创建一个连接到Binder上的服务.并且这个示例中的源代码是保证可以原样编译通过的.

      在开始之前,我们首先来简单介绍一下我们即将制作的服务ExampleServer, 这个示例服务由主程序加上一个libExample.so文件组成,libExample.so用来实现对Client端实现的接口,而主程序就是用来启动这个服务的.费话不说了,下面进入正题.

2 步骤

第1步:生成ExampleService.so文件

1: 在framework/base目录下新建一个目录,用来保存libExample.so的源码

[html]  view plain copy
  1. $cd framework/base/  
  2. $mkdir ExampleService  
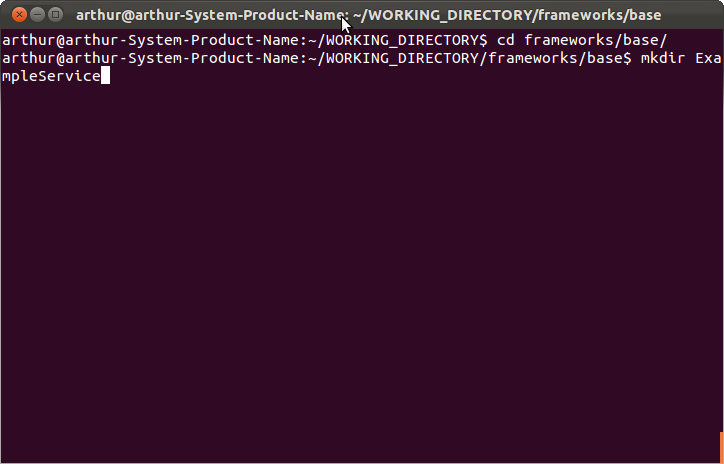
进入此目录:

[html]  view plain copy
  1. $cd ExampleService  
新建3个文件:ExampleService.h ,ExampleService.cpp,Android.mk

其中ExampleService.h文件的内容如下:

[cpp]  view plain copy
  1. // File: ExampleService.h  
  2. #ifndef ANDROID_EXAMPLE_SERVICE_H  
  3. #define ANDROID_EXAMPLE_SERVICE_H  
  4. #include <utils/threads.h>  
  5. #include <utils/RefBase.h>  
  6. #include <binder/IInterface.h>  
  7. #include <binder/BpBinder.h>  
  8. #include <binder/Parcel.h>  
  9.   
  10. namespace android {  
  11.     class ExampleService : public BBinder  
  12.     {  
  13.         mutable Mutex mLock;  
  14.         int32_t mNextConnId;  
  15.         public:  
  16.             static int instantiate();  
  17.             ExampleService();  
  18.             virtual ~ExampleService();  
  19.             virtual status_t onTransact(uint32_t, const Parcel&, Parcel*, uint32_t);  
  20.     };  
  21. }; //namespace  
  22. #endif  


ExampleService.cpp文件的内容如下:

[cpp]  view plain copy
  1. // File: ExampleService.cpp  
  2. #include "ExampleService.h"  
  3. #include <binder/IServiceManager.h>  
  4. #include <binder/IPCThreadState.h>  
  5.   
  6. namespace android {  
  7.   
  8.     static struct sigaction oldact;  
  9.     static pthread_key_t sigbuskey;  
  10.       
  11.     int ExampleService::instantiate()  
  12.     {  
  13.         LOGE("ExampleService instantiate");  
  14.         // 调用ServiceManager的addService方法进行系统服务注册,这样客户端程序就可以通过ServiceManager获得此服务的代理对象,从而请求其提供的服务  
  15.         int r = defaultServiceManager()->addService(String16("byn.example"), new ExampleService());  
  16.         LOGE("ExampleService r = %d/n", r);  
  17.         return r;  
  18.     }  
  19.   
  20.     ExampleService::ExampleService()  
  21.     {   
  22.         LOGV("ExampleService created");  
  23.         mNextConnId = 1;  
  24.         pthread_key_create(&sigbuskey, NULL);  
  25.     }  
  26.   
  27.     ExampleService::~ExampleService()  
  28.     {  
  29.         pthread_key_delete(sigbuskey);  
  30.         LOGV("ExampleService destroyed");  
  31.     }  
  32.     // 每个系统服务都继承自BBinder类,都应重写BBinder的onTransact虚函数。当用户发送请求到达Service时,系统框架会调用Service的onTransact函数  
  33.     status_t ExampleService::onTransact(uint32_t code, const Parcel& data, Parcel* reply, uint32_t flags)  
  34.     {  
  35.         switch(code)  
  36.         {  
  37.             case 0: {  
  38.                 pid_t pid = data.readInt32();  
  39.                 int num   = data.readInt32();  
  40.                 num = num + 100;  
  41.                 reply->writeInt32(num);  
  42.                 return NO_ERROR;  
  43.                 }  
  44.                 break;  
  45.             default:  
  46.                 return BBinder::onTransact(code, data, reply, flags);  
  47.         }  
  48.     }  
  49. }; //namespace  
Android.mk文件的内容如下:

[html]  view plain copy
  1. # File: Android.mk  
  2. LOCAL_PATH:= $(call my-dir)  
  3. include $(CLEAR_VARS)  
  4. LOCAL_SRC_FILES:= \  
  5.     ExampleService.cpp  
  6. LOCAL_C_INCLUDES := $(JNI_H_INCLUDE)  
  7. LOCAL_SHARED_LIBRARIES :=\  
  8.     libutils libbinder  
  9. LOCAL_MODULE_TAGS :optional  
  10. LOCAL_PRELINK_MODULE :false  
  11. LOCAL_MODULE :libExample  
  12.   
  13. include $(BUILD_SHARED_LIBRARY)  
这样ExampleService.so的三个源文件全了,接着返回到Android源代码根目录下.

[html]  view plain copy
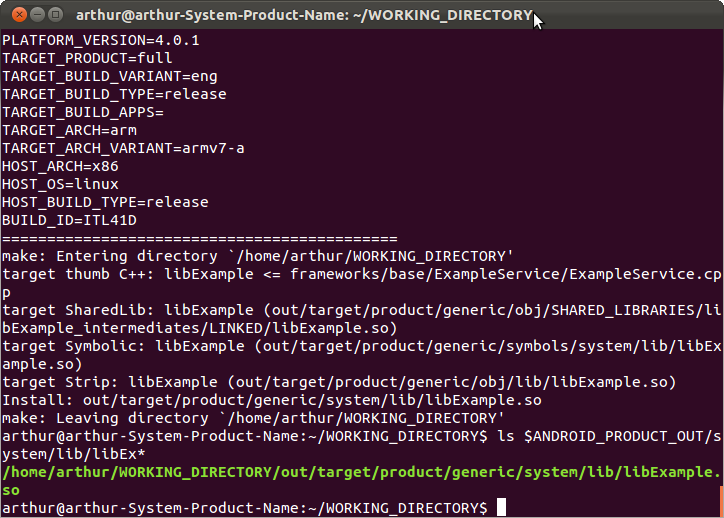
  1. $ cd ~/WORKING_DIRECTORY/  
初始化Android源码编译环境:

[plain]  view plain copy
  1. $ source build/envsetup.sh  
开始编译:

[plain]  view plain copy
  1. mmm frameworks/base/ExampleService/  


这样ExampleService.so文件就编译完了,完了可以在out/target/product/generic/symbols/system/lib/目录下看到libExample.so文件.如下图:


第2步:生成ExampleServer可执行程序

首先在frame/base目录下新建一个ExampleServer目录,用来保存ExampleServer可执行程序的源代码文件:

[cpp]  view plain copy
  1. $cd ~/WORKING_DIRECTORY/framework/base/  
  2. $mkdir ExampleServer  
  3. $cd ExampleServer  
在这个目录下有2个源文件:ExampleServer.cpp,Android.mk.

其中ExampleServer.cpp文件的内容如下:

[cpp]  view plain copy
  1. // File: ExampleServer.cpp  
  2. #include <sys/types.h>  
  3. #include <unistd.h>  
  4. #include <grp.h>  
  5. #include <binder/IPCThreadState.h>  
  6. #include <binder/ProcessState.h>  
  7. #include <binder/IServiceManager.h>  
  8. #include <utils/Log.h>  
  9. #include <private/android_filesystem_config.h>  
  10. #include "../ExampleService/ExampleService.h"  
  11.   
  12. using namespace android;  
  13.   
  14. int main(int argc, char** argv)  
  15. {  
  16.     sp<ProcessState> proc(ProcessState::self());  // 要想使用Binder机制,必须要创建一个ProcessState对象  
  17.     sp<IServiceManager> sm = defaultServiceManager();  
  18.     LOGI("ServiceManager: %p", sm.get());  
  19.     ExampleService::instantiate();  
  20.     ProcessState::self()->startThreadPool();  
  21.     IPCThreadState::self()->joinThreadPool();  
  22.     return 0;  
  23. }  
Android.mk文件的内容如下:

[cpp]  view plain copy
  1. # File: Android.mk  
  2. LOCAL_PATH:= $(call my-dir)  
  3. include $(CLEAR_VARS)  
  4. LOCAL_SRC_FILES:= \  
  5.     ExampleServer.cpp  
  6. LOCAL_C_INCLUDES := $(JNI_H_INCLUDE)  
  7. LOCAL_SHARED_LIBRARIES := \  
  8.     libutils libbinder libExample  
  9. LOCAL_MODULE_TAGS := optional  
  10. LOCAL_PRELINK_MODULE := false  
  11. LOCAL_MODULE := ExampleServer  
  12.   
  13. include $(BUILD_EXECUTABLE)  

这样ExampleServer的两个源文件全了,返回到Android根目录下:

[cpp]  view plain copy
  1. $cd ~/WORKING_DIRECTORY/  
编译:

[plain]  view plain copy
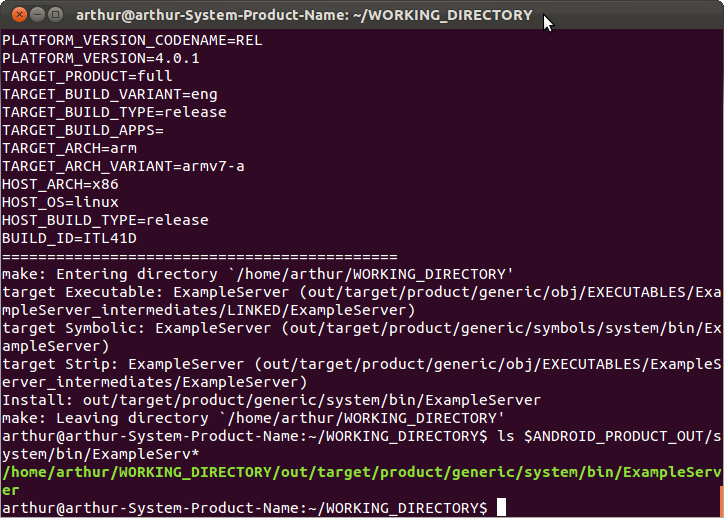
  1. $mmm framework/base/ExampleServer/  
如下图所示:


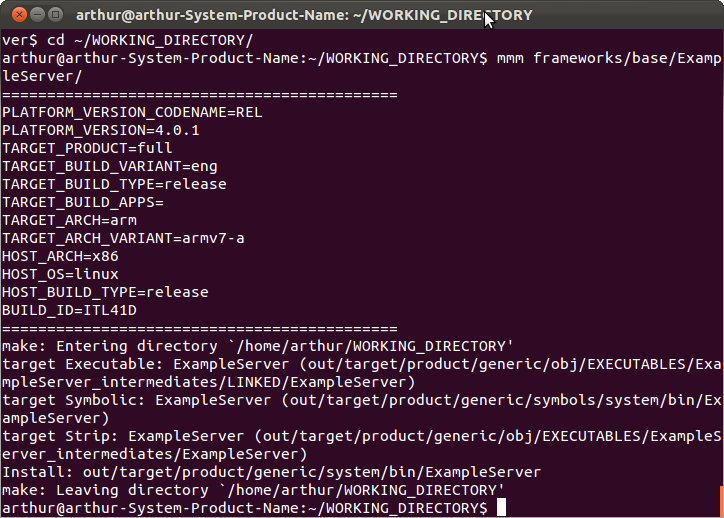
这样就编译完了可执行程序ExampleServer了.可以在out/target/product/generic/system/bin/目录下看到可执行程序ExampleServer:


OK,就这样binder的服务器端程序就完成了。

有关如何完成binder客户端的介绍请看我博客内下一篇文章.

http://blog.csdn.net/flydream0/article/details/7165308


完!

好的,下面是一个简单的 Android Binder Demo。 首先,我们定义一个 AIDL 接口文件 `IDemoService.aidl`,它包含一个方法 `int add(int a, int b)`,用于计算两个整数的和。 ```aidl // IDemoService.aidl interface IDemoService { int add(int a, int b); } ``` 然后,我们实现这个接口,创建一个名为 `DemoService` 的服务类,它继承自 `IDemoService.Stub`,实现 `add()` 方法。 ```java // DemoService.java public class DemoService extends IDemoService.Stub { @Override public int add(int a, int b) throws RemoteException { return a + b; } } ``` 接下来,我们创建一个 `Service` 类 `DemoServiceClass`,并在其中实现 `onBind()` 方法,返回 `DemoService` 对象。 ```java // DemoServiceClass.java public class DemoServiceClass extends Service { private DemoService demoService; @Override public void onCreate() { super.onCreate(); demoService = new DemoService(); } @Nullable @Override public IBinder onBind(Intent intent) { return demoService; } } ``` 最后,在 `AndroidManifest.xml` 中声明服务。 ```xml <!-- AndroidManifest.xml --> <manifest xmlns:android="http://schemas.android.com/apk/res/android" package="com.example.binderdemo"> <application android:allowBackup="true" android:icon="@mipmap/ic_launcher" android:label="@string/app_name" android:roundIcon="@mipmap/ic_launcher_round" android:supportsRtl="true" android:theme="@style/AppTheme"> <!-- 声明 DemoServiceClass --> <service android:name=".DemoServiceClass" /> <activity android:name=".MainActivity" android:theme="@style/AppTheme.NoActionBar"> <intent-filter> <action android:name="android.intent.action.MAIN" /> <category android:name="android.intent.category.LAUNCHER" /> </intent-filter> </activity> </application> </manifest> ``` 现在,我们可以在 `MainActivity` 中创建一个远程服务连接,调用 `add()` 方法并显示结果。 ```java // MainActivity.java public class MainActivity extends AppCompatActivity { private IDemoService demoService; private boolean connected = false; private ServiceConnection connection = new ServiceConnection() { @Override public void onServiceConnected(ComponentName componentName, IBinder iBinder) { demoService = IDemoService.Stub.asInterface(iBinder); connected = true; } @Override public void onServiceDisconnected(ComponentName componentName) { demoService = null; connected = false; } }; @Override protected void onCreate(Bundle savedInstanceState) { super.onCreate(savedInstanceState); setContentView(R.layout.activity_main); Intent intent = new Intent(this, DemoServiceClass.class); bindService(intent, connection, Context.BIND_AUTO_CREATE); Button button = findViewById(R.id.button); final TextView result = findViewById(R.id.result); button.setOnClickListener(new View.OnClickListener() { @Override public void onClick(View view) { if (connected) { try { int a = Integer.parseInt(((EditText) findViewById(R.id.input1)).getText().toString()); int b = Integer.parseInt(((EditText) findViewById(R.id.input2)).getText().toString()); int sum = demoService.add(a, b); result.setText(String.valueOf(sum)); } catch (RemoteException e) { e.printStackTrace(); } } else { result.setText("Service not connected"); } } }); } @Override protected void onDestroy() { super.onDestroy(); unbindService(connection); } } ``` 这就是一个简单的 Android Binder Demo。它演示了如何创建一个远程服务,实现 AIDL 接口并将其绑定到 Activity。
评论
添加红包

请填写红包祝福语或标题

红包个数最小为10个

红包金额最低5元

当前余额3.43前往充值 >
需支付:10.00
成就一亿技术人!
领取后你会自动成为博主和红包主的粉丝 规则
hope_wisdom
发出的红包
实付
使用余额支付
点击重新获取
扫码支付
钱包余额 0

抵扣说明:

1.余额是钱包充值的虚拟货币,按照1:1的比例进行支付金额的抵扣。
2.余额无法直接购买下载,可以购买VIP、付费专栏及课程。

余额充值