


一 openresty的安装
说明: 本文并'没有详细'的列出安装的过程,而是告知'安装'的一些'注意事项',属于'安装概念'① openresty安装问题
1) 和其他的'开源'软件一样,OpenResty 的安装有'多'种方法

比如:使用操作系统的'包管理器'、'源码编译'或者 'docker 镜像'

推荐:优先使用各'os操作系统'对应yum、apt-get、brew 这类'包管理系统'来安装 OpenResty
官方各种OS版本包管理器安装Openresty Centos6安装openresty
2) 这'看似简单'的安装背后,其实有'两个问题':

  [1]、为什么我'不推荐使用源码'来安装呢?

  [2]、为什么不能直接'从操作系统的官方仓库'安装,而是需要先'设置另外一个仓库地址'?
② 为什么不推荐源码安装openresty
1) 云厂商习惯用'nginx + lua'源码编译这种方法安装LB

注意: 源码编译的注意事项 
![]()
ssl_session_fetch_by_lua_block openresty打包脚本SPEC OpenResty 在CentOS中的打包脚本

openresty 维护的 'openssl/pcre/zlib' 都会安装在 '/usr/local/openresty/' 目录下

1.15.8 里面是依赖 'openssl 1.1' 的,所以尽量用 'rpm 之类'方式来处理
③ 为什么不能直接从操作系统的官方仓库安装


④ 源码编译 了解
1) 对于大多数项目来说都'没有必要'自己'折腾'编译安装,费时费力

2) 不过有时候'自己动手编译安装'也是'必须'的

  备注: 尝试用了下'--gdb',看来'想调试',不编译源码还是'不行'的

3) 因为根据具体项目的需,比如'CDN项目',官方的'默认编译'选项就'缺少一些必要的模块'

 比如:ngx_cache_purge模块;如果需要对'ipv6'做支持,还需要nginx的--with-ipv6编译选项等

 备注:华为云的'BasicService LB'之前就是'源码编译'的

4) 下面根据'官方打包文件spec'总结的'centos平台'下编译安装最新版本的openresty具体流程

# 安装 pcre
wget ftp://ftp.csx.cam.ac.uk/pub/software/programming/pcre/pcre-8.42.tar.bz2

tar xjf pcre-8.42.tar.bz2
cd pcre-8.42
 ./configure --prefix=/usr/local/openresty/pcre \
 --disable-cpp --enable-jit \
 --enable-utf --enable-unicode-properties
make -j8 V=1 > /dev/stderr
make install

rm -rf /usr/local/openresty/pcre/bin
rm -rf /usr/local/openresty/pcre/share
rm -f  /usr/local/openresty/pcre/lib/*.la
rm -f  /usr/local/openresty/pcre/lib/*pcrecpp*
rm -f  /usr/local/openresty/pcre/lib/*pcreposix*
rm -rf /usr/local/openresty/pcre/lib/pkgconfig

# 安装zlib
cd /usr/local/src
wget http://www.zlib.net/zlib-1.2.11.tar.xz
tar xf zlib-1.2.11.tar.xz
cd zlib-1.2.11
 ./configure --prefix=/usr/local/openresty/zlib
make -j8 \
CFLAGS='-O3 -D_LARGEFILE64_SOURCE=1 -DHAVE_HIDDEN -g' \
SFLAGS='-O3 -fPIC -D_LARGEFILE64_SOURCE=1 -DHAVE_HIDDEN -g' > /dev/stderr
make install
rm -rf /usr/local/openresty/zlib/share/
rm -f /usr/local/openresty/zlib/lib/*.la
rm -rf /usr/local/openresty/zlib/lib/pkgconfig/

# 安装openssl
cd /usr/local/src
wget https://www.openssl.org/source/openssl-1.1.0j.tar.gz
wget https://raw.githubusercontent.com/openresty/openresty/master/patches/openssl-1.1.0d-sess_set_get_cb_yield.patch --no-check-certificate
wget https://raw.githubusercontent.com/openresty/openresty/master/patches/openssl-1.1.0j-parallel_build_fix.patch --no-check-certificate
tar zxf openssl-1.1.0j.tar.gz
cd openssl-1.1.0j

patch -p1 < ../openssl-1.1.0d-sess_set_get_cb_yield.patch
patch -p1 < ../openssl-1.1.0j-parallel_build_fix.patch
./config \
    no-threads shared zlib -g \
    enable-ssl3 enable-ssl3-method \
    --prefix=/usr/local/openresty/openssl \
    --libdir=lib \
    -I%/usr/local/openresty/zlib/include \
    -L%/usr/local/openresty/zlib/lib \
    -Wl,-rpath,/usr/local/openresty/zlib/lib:/usr/local/openresty/openssl/lib
make -j8
make install_sw

rm -f /usr/local/openresty/openssl/bin/c_rehash
rm -rf /usr/local/openresty/openssl/lib/pkgconfig

# 最后开始编译安装openresty
cd /usr/local/src
wget https://openresty.org/download/openresty-1.15.8.1.tar.gz

# 如果下载出现ssl报错,yum update wget,再下载

tar zxf openresty-1.15.8.1.tar.gz
cd openresty-1.15.8.1
./configure \
    --prefix=/usr/local/openresty \
    --with-cc-opt="-DNGX_LUA_ABORT_AT_PANIC \
                -I/usrl/local/openresty/zlib/include \
                -I/usr/local/openresty/pcre/include \
                -I/usr/local/openresty/openssl/include" \
    --with-ld-opt="-L/usr/local/openresty/zlib/lib \
                -L/usr/local/openresty/pcre/lib \
                -L/usr/local/openresty/openssl/lib \
                -Wl,-rpath,/usr/local/openresty/zlib/lib:/usr/local/openresty/pcre/lib:/usr/local/openresty/openssl/lib" \
    --with-pcre-jit \
    --without-http_rds_json_module \
    --without-http_rds_csv_module \
    --without-lua_rds_parser \
    --with-stream \
    --with-stream_ssl_module \
    --with-stream_ssl_preread_module \
    --with-http_v2_module \
    --without-mail_pop3_module \
    --without-mail_imap_module \
    --without-mail_smtp_module \
    --with-http_stub_status_module \
    --with-http_realip_module \
    --with-http_addition_module \
    --with-http_auth_request_module \
    --with-http_secure_link_module \
    --with-http_random_index_module \
    --with-http_gzip_static_module \
    --with-http_sub_module \
    --with-http_dav_module \
    --with-http_flv_module \
    --with-http_mp4_module \
    --with-http_gunzip_module \
    --with-threads \
    --with-luajit-xcflags='-DLUAJIT_NUMMODE=2 -DLUAJIT_ENABLE_LUA52COMPAT' \
    -j8
make -j8
make install

rm -rf /usr/local/openresty/luajit/share/man
rm -rf /usr/local/openresty/luajit/lib/libluajit-5.1.a
1) 安装完 OpenResty 后,默认就已经把 OpenResty 的 'CLI:resty' 安装好了

备注: Centos 下需要'单独安装'  yum install openresty-resty -y

2) resty是个'1000多行的Perl脚本',OpenResty的'周边工具'都是 Perl 编写的,这个作者偏好决定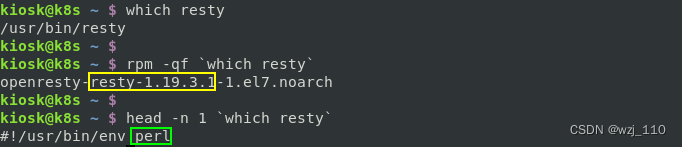
resty 的'功能'很强大,想了解'完整的列表',你可以查看'resty -h'或者'官方文档'1) --shdict='wzj 1m'
说明: 设置'共享内存字典'
具体: wzj 1m 是 nginx 的'一段配置',声明了一个'共享内存空间',名字是 wzj,'大小是 1m'
2) --http-include 和 --main-include 来设置 nginx 配置文件
--http-conf 'lua_shared_dict wzj 1m;'
3) OpenResty 世界中'常用的调试工具'
比如:gdb、valgrind、sysetmtap和Mozilla rr,可以和 resty 一起'配合'使用,方便开发和测试
它们分别对应着 resty 不同的指令,'内部的实现'其实很简单,就是多套了一层'命令行调用'
4) resty --valgrind -e "ngx.say('hello world'); "
5) 在后面'调试'、'测试'和'性能分析'的章节,会涉及到这些'工具的使用'
6) 通过'下面案例'了解resty背后'真正运行'的是什么 -->"重点"![]()
1) 关闭server

openresty -s quit -p `pwd` -c conf/nginx.conf
⑥ 独立思考
把 lua 代码写在 'nginx配置文件'中  --> '不推荐'

原因: 那代码的'可读性'和'可维护性'就无法保证了
⑦ openresty的框架

⑧ 扩展
set_by_lua 中现在不能使用 cosocket,但可以用 ngx.timer 的方式绕过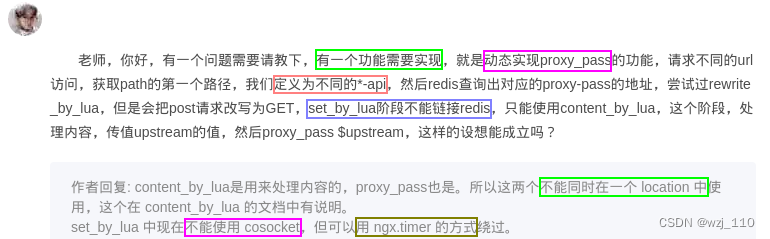


 1559
1559


 被折叠的 条评论
为什么被折叠?
被折叠的 条评论
为什么被折叠?
 到【灌水乐园】发言


