


前文:
《Tomcat源码:启动类Bootstrap与Catalina的加载》
《Tomcat源码:StandardServer与StandardService》
《Tomcat源码:StandardEngine、StandardHost、StandardContext、StandardWrapper》
写在开头:本文为个人学习笔记,内容比较随意,夹杂个人理解,如有错误,欢迎指正。
前言
在前文中,我们介绍了tomcat容器部分中的Engine、Host、Context、Wrapper,截止Wrapper中loadOnStartup=1的servelt启动后整个tomcat的启动就算完成了,不过除了容器tomcat还有连接器的部分,即如何将请求发给对应的servlet来进行处理。连接器的内容我们会在后续的文章中进行介绍。
本文我们来介绍下容器中最后的部分内容,即Pipeline 与 Valve,这两个组件也属于容器,不过他们的作用不是提供servlet服务,而是实现请求在各级容器中的传递,属于容器中的“连接器”。

目录
一、Pipeline 与 Valve的启动
1、StandardPipeline
在抽象类ContainerBase中定义了成员变量Pipeline,其实现类为StandardPipeline
// ContainerBase.java
protected final Pipeline pipeline = new StandardPipeline(this);
,由于ContainerBase是我们上文所讲的Engine、Host、Context、Wrapper容器的公共父类,所以这些容器都会有一个成员变量Pipeline。

1.1、生命周期方法
Pipeline同样继承了抽象类LifecycleBase,因此也实现了Lifecycle接口的生命周期的方法
public class StandardPipeline extends LifecycleBase implements Pipeline{
    // ...
}其中initInternal为空方法,而startInternal则用于启动另一个组件Valve,通过下面代码中的current = current.getNext();我们可以猜出Valve是类似于链表状的结构,这里的startInternal其实就是依次调用这个链表结构中的每个Valve的start方法。
    protected void initInternal() {
        // NOOP
    }

    protected synchronized void startInternal() throws LifecycleException {

        Valve current = first;
        if (current == null) {
            current = basic;
        }
        while (current != null) {
            if (current instanceof Lifecycle) {
                ((Lifecycle) current).start();
            }
            current = current.getNext();
        }

        setState(LifecycleState.STARTING);
    }
1.2、Valve管理方法
在Pipeline中有两个Valve的成员变量first与basic分别表示上面所说的Valve组成的链表结构的头尾节点,其结构如下图。
链表中每个节点的下一节点由每个Valve节点自己保存,可以通过getNext来获取。Valve的更多相关内容我们会在下文介绍,这里先继续看下Pipeline的另外两个方法。
首先是setBasic,从Engine到Wrapper的每个容器在构造方法中都会调用改方法,可以看出来这个方法是为了给StandardPipeline中的basic变量赋值,并且每个容器传入的Valve的实现类都不相同,可以从类名看出其具体类别与容器的实现类相关。
从setBasic的简化内容来看当basic变量为空时直接赋值,如果不为空则操作过程和链表一样先遍历到其前面一个节点,断开连接并将新的basic变量接在最后面。
    // StandardPipeline.java
    protected Valve basic = null;

    public void setBasic(Valve valve) {
        Valve oldBasic = this.basic;
        // ...
        Valve current = first;
        while (current != null) {
            if (current.getNext() == oldBasic) {
                current.setNext(valve);
                break;
            }
            current = current.getNext();
        }
        this.basic = valve;
    }

    // StandardEngine.java
    public StandardEngine() {
        pipeline.setBasic(new StandardEngineValve());
    }

    // StandardHost.java
    public StandardHost() {
        pipeline.setBasic(new StandardHostValve());
    }

    // StandardContext.java
    public StandardContext() {
        pipeline.setBasic(new StandardContextValve());
    }

    // StandardWrapper.java
    public StandardWrapper() {
        swValve = new StandardWrapperValve();
        pipeline.setBasic(swValve);
    }
然后是addValve方法,从简化的内容来看,除了basic外第一个加入的节点会成为first,第二个加入的会成为second,但basic不会变化,始终都会在最后。
    protected Valve first = null;
    public void addValve(Valve valve) {
        // ...
        if (first == null) {
            first = valve;
            valve.setNext(basic);
        } else {
            Valve current = first;
            while (current != null) {
                if (current.getNext() == basic) {
                    current.setNext(valve);
                    valve.setNext(basic);
                    break;
                }
                current = current.getNext();
            }
        }
    }
2、Valve
Valve在每个容器中的实现都不相同,对应我们前文中介绍容器的每个类中的实现分别为StandardEngineValve、StandardHostValve、StandardContextValve、StandardWrapperValve。
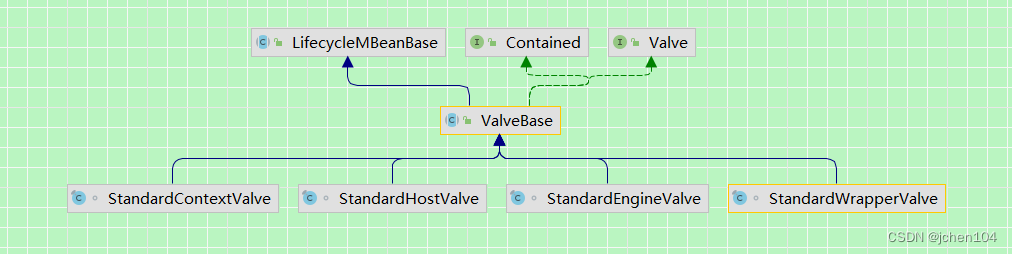
这四个实现类都继承于抽象类ValveBase,且均未实现生命周期方法,因此都是直接使用的父类ValveBase中的实现。可以从面的代码中看出initInternal、startInternal并未实现什么具体的操作,backgroundProcess则直接是空方法。这是因为Valve和Pipline一样虽然也属于容器但主要职责却是为连接请求提供转发服务,属于容器中的“连接器”。
    protected void initInternal() throws LifecycleException {
        // 调用父类LifecycleMBeanBase的initInternal方法
        // 内容为注册JMX
        super.initInternal();
        containerLog = getContainer().getLogger();
    }

    protected synchronized void startInternal() throws LifecycleException {
        setState(LifecycleState.STARTING);
    }

    public void backgroundProcess() {
        // NOOP by default
    }
二、Pipeline与Valve传递请求
后面我们会介绍连接器中的CoyoteAdapter的内容,该类的asyncDispatch方法(即请求分发方法)中有如下内容。
    // CoyoteAdapter#asyncDispatch
    connector.getService().getContainer().
            getPipeline().getFirst().invoke(
                    request, response);


    // ContainerBase.java
    protected final Pipeline pipeline = new StandardPipeline(this);

    public Pipeline getPipeline() {
        return this.pipeline;
    }

    // StandardPipeline.java
    protected Valve first = null;
    public void addValve(Valve valve) {
        // ...
        if (first == null) {
            first = valve;
            valve.setNext(basic);
        } else {
            Valve current = first;
            while (current != null) {
                if (current.getNext() == basic) {
                    current.setNext(valve);
                    valve.setNext(basic);
                    break;
                }
                current = current.getNext();
            }
        }
    }
getService即获取StandardService,Service的container即Engine容器。getPipeline则是直接复用的抽象父类ContainerBase 中的实现,内容很明确就是获取成员变量pipline。然后是getFirst,结合上文中的描述,这里是获取的Valve链表结构的first节点,如果first节点为空则转而获取basic节点,然后调用其invoke方法。 (getFirst获取的必然是Valve链表的第一个节点,之所以这么说是因为如果链表中没有first那么basic就是第一个)
下文我们以每个容器中默认的Valve作为切入点介绍下invoke方法,由于该方法中的具体内容需要结合后续的连接器的源码理解,所以暂时只做一些简单的介绍,详细的内容会在后续介绍完连接器后做分析。
1、StandardEngineValve
StandardEngine中的实现为StandardEngineValve,该类中的invoke方法首先获取当前请求中的Host对象,如果没有则直接返回。否则将继续如同上文一样调用host中setbasic时创建的Valve的invoke方法。
    // StandardEngine.java
    public StandardEngine() {
        pipeline.setBasic(new StandardEngineValve());
    }

    // StandardEngineValve.java
    public void invoke(Request request, Response response) throws IOException, ServletException {
        // 获取一个 Host 对象,获取不到就直接返回
        Host host = request.getHost();
        if (host == null) {
            if (!response.isError()) {
                response.sendError(404);
            }
            return;
        }
        if (request.isAsyncSupported()) {
            request.setAsyncSupported(host.getPipeline().isAsyncSupported());
        }

        host.getPipeline().getFirst().invoke(request, response);
    }
2、StandardHostValve
StandardHostValve中的invoke也和上文类似,获取当前请求中的context对象,如果没有则直接返回。否则将继续如同上文一样调用context中setbasic时创建的Valve的invoke方法。
    public void invoke(Request request, Response response) throws IOException, ServletException {

        Context context = request.getContext();
        if (context == null) {
            if (!response.isError()) {
                response.sendError(404);
            }
            return;
        }
        // 其余代码
        context.getPipeline().getFirst().invoke(request, response);
    }
3、StandardContextValve
StandardContextValve继续调用下一个子容器wrapper中的invoke方法。
    public void invoke(Request request, Response response) throws IOException, ServletException {

        Wrapper wrapper = request.getWrapper();
        if (wrapper == null || wrapper.isUnavailable()) {
            response.sendError(HttpServletResponse.SC_NOT_FOUND);
            return;
        }
        // Acknowledge the request
        try {
            response.sendAcknowledgement(ContinueResponseTiming.IMMEDIATELY);
        } catch (IOException ioe) {
            container.getLogger().error(sm.getString("standardContextValve.acknowledgeException"), ioe);
            request.setAttribute(RequestDispatcher.ERROR_EXCEPTION, ioe);
            response.sendError(HttpServletResponse.SC_INTERNAL_SERVER_ERROR);
            return;
        }
        wrapper.getPipeline().getFirst().invoke(request, response);
    }
另外这里的response.sendAcknowledgement() 方法 ,正是这里向客户端返回了请求正确接收的信号。从下面的代码中可以看到sendAcknowledgement会调用 Response #action() 方法,而Response 中又是调用了hook的action。
public class Response implements HttpServletResponse {
   public void sendAcknowledgement(ContinueResponseTiming continueResponseTiming) throws IOException {
        if (isCommitted()) {
            return;
        }
        // Ignore any call from an included servlet
        if (included) {
            return;
        }
        getCoyoteResponse().action(ActionCode.ACK, continueResponseTiming);
    }
}

public final class Response {
    volatile ActionHook hook;
    public void action(ActionCode actionCode, Object param) {
        if (hook != null) {
            if (param == null) {
                hook.action(actionCode, this);
            } else {
                hook.action(actionCode, param);
            }
        }
    }
}
Response 中的hook是在AbstractProcessor组件的构造方法中置入的(这个组件我们会在后续介绍)。然后我们看到AbstractProcessor#action,最后会进入到Http11Processor #ack中。
public abstract class AbstractProcessor extends AbstractProcessorLight implements ActionHook {
    protected AbstractProcessor(AbstractEndpoint<?, ?> endpoint, Request coyoteRequest, Response coyoteResponse) {
        ...
        request.setHook(this);
        ...
    }

    public final void action(ActionCode actionCode, Object param) {
        switch (actionCode) {
			// ...
            case ACK: {
                ack((ContinueResponseTiming) param);
                break;
            }
        }
    }
}
终于到了最后一步,outputBuffer.sendAck()即调用 Http11OutputBuffer#sendAck 方法,sendAck() 就是简单地将 HTTP/1.1 100 加上回车换行符写给客户端。
public class Http11Processor extends AbstractProcessor {
    @Override
    protected final void ack(ContinueResponseTiming continueResponseTiming) {
        // Only try and send the ACK for ALWAYS or if the timing of the request
        // to send the ACK matches the current configuration.
        if (continueResponseTiming == ContinueResponseTiming.ALWAYS ||
                continueResponseTiming == protocol.getContinueResponseTimingInternal()) {
            // Acknowledge request
            // Send a 100 status back if it makes sense (response not committed
            // yet, and client specified an expectation for 100-continue)
            if (!response.isCommitted() && request.hasExpectation()) {
                try {
                    outputBuffer.sendAck();
                } catch (IOException e) {
                    setErrorState(ErrorState.CLOSE_CONNECTION_NOW, e);
                }
            }
        }
    }
}

public class Http11OutputBuffer implements HttpOutputBuffer {
    public void sendAck() throws IOException {
        // It possible that the protocol configuration is changed between the
        // request being received and the first read of the body. That could led
        // to multiple calls to this method so ensure the ACK is only sent once.
        if (!response.isCommitted() && !ackSent) {
            ackSent = true;
            if (sendReasonPhrase) {
                socketWrapper.write(isBlocking(), Constants.ACK_BYTES_REASON, 0, Constants.ACK_BYTES_REASON.length);
            } else {
                socketWrapper.write(isBlocking(), Constants.ACK_BYTES, 0, Constants.ACK_BYTES.length);
            }
            if (flushBuffer(true)) {
                throw new IOException(sm.getString("iob.failedwrite.ack"));
            }
        }
    }
}
4、StandardWrapperValve
StandardWrapperValve是整个调用链的最后一环,在这里会调用wrapper.allocate();来获取一个Servlet实例,并调用ApplicationFilterChain#doFilter 方法来处理请求,由于涉及到连接器的内容,这里我们暂时略过,后续等介绍完了连接器我们再回来做具体分析。
    public void invoke(Request request, Response response) throws IOException, ServletException {

        boolean unavailable = false;
        StandardWrapper wrapper = (StandardWrapper) getContainer();
        Servlet servlet = null;
        Context context = (Context) wrapper.getParent();

        if (!context.getState().isAvailable()) {
            response.sendError(HttpServletResponse.SC_SERVICE_UNAVAILABLE,
                    sm.getString("standardContext.isUnavailable"));
            unavailable = true;
        }

        if (!unavailable && wrapper.isUnavailable()) {
            container.getLogger().info(sm.getString("standardWrapper.isUnavailable", wrapper.getName()));
            checkWrapperAvailable(response, wrapper);
            unavailable = true;
        }

        try {
            if (!unavailable) {
                servlet = wrapper.allocate();
            }
        }
        ApplicationFilterChain filterChain = ApplicationFilterFactory.createFilterChain(request, wrapper, servlet);
        Container container = this.container;
        try {
            if ((servlet != null) && (filterChain != null)) {
                filterChain.doFilter(request.getRequest(), response.getResponse());
            }
        }
        // 其余代码
    }
整个流程如下图所示,StandardEngineValve、StandardHostValve、StandardContextValve这三个 Valve 的 invoke 方法的核心逻辑就是调用子容器的 Pipeline 的 Valve 的invoke 方法,也就是 StandardEngineValve#invoke -> StandardHostValve#invoke -> StandardContextValve#invoke -> StandardWrapper#invoke 方法。
而 StandardWrapper#invoke 最终调用 ApplicationFilterChain#doFilter 方法来处理请求。
注意:有些文章里介绍说请求会通过getNext遍历子容器中的VAalve链表,但实际上并没有,这里只会调用getFirst来获取子容器中Valve链表的第一个节点(之所以必然是第一个是因为链表中如果没有first那么basic就是第一个)来触发invoke方法。

本文分析了 Pipeline 和 Valve 的相关内容,这两个组件真正起作用的时候是在 Connector 使用容器 Container 处理请求的时候,Connector 会找到自己关联的 Service 的里的 Container 对象(也就是 Engine 对象),然后获取这个对象的 Pipeline,通过这个 Pipeline 对象获取 Pipeline 对象的 Valve 对象,最后通过调用 Valve 对象的 invoke 方法来处理请求。
参考资料:


 511
511


 被折叠的 条评论
为什么被折叠?
被折叠的 条评论
为什么被折叠?
 到【灌水乐园】发言


