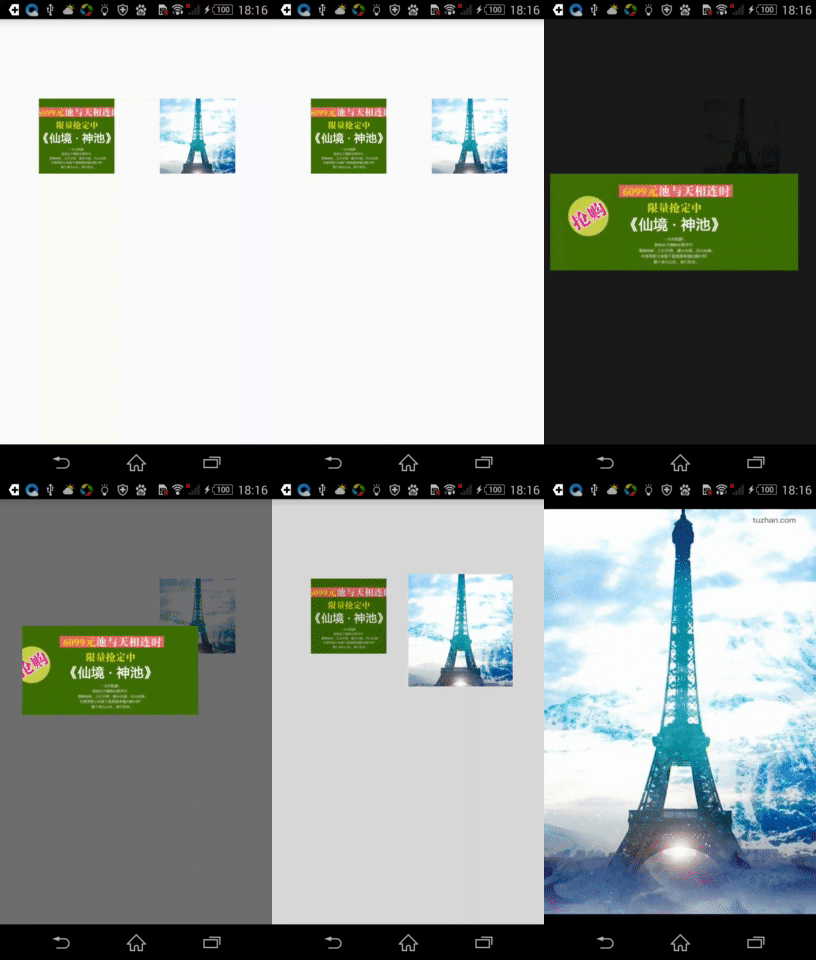
图片由小图放大裁剪至全屏显示大图,Google Photos 点击图片预览的效果

最近在项目中遇到要实现一个图片点击跳转到另一个activity预览大图的动画,由原图慢慢放大,包括裁剪,如下图:


思路是在上面这个view上做动画,并在动画过程中对view进行裁剪。

首先要知道图片在上一个view中显示的位置与宽高,

其次需要明确图片的真实宽高(Drawable的getIntrinsicHeight()和getIntrinsicWidth())和图片所在ImageView的宽高,才能效果很好的完成这个动画。


这其中图片分为三种情况:

1).小图片左右被裁剪显示的

2).小图片上下被裁剪显示的,但是显示大图时候高度填满屏幕的

3).小图片上下被裁剪显示的,但是显示大图时候宽度度填满屏幕的


根据这三种情况计算缩放的比例和裁剪的宽度

下面贴一段放大动画的代码


这是计算scale的代码:
if (originHeight / originWidth > (float) view.getHeight() / (float) view.getWidth()) {

			preZoom = preViewWidth / ((float) view.getHeight() * (originWidth / originHeight));
		} else {
			if (originHeight > originWidth) {
				preZoom = preViewWidth / ((float) view.getWidth());

			} else {
				preZoom = preViewHeight / ((float) view.getWidth() * (originHeight / originWidth));
			}
		}


<p>这是计算裁剪和位移的代码:</p>
private void initInAttr(float t, float mZoomStart) {
		float ratioPreView = preViewWidth / preViewHeight;
		float ratioOrigin = originWidth / originHeight;
		if (ratioPreView > ratioOrigin) {//clip up and down
			if (originHeight / originWidth < (float) view.getHeight() / (float) view.getWidth()) {//width full screen
				float realHeight = view.getWidth() * (originHeight / originWidth);
				float scaleHeight = (realHeight / ratioPreView) * ratioOrigin;
				rectHeight = scaleHeight + (view.getHeight() - scaleHeight) * t;
				rectWidth = view.getWidth();
				rectX = 0;
				rectY = (view.getHeight() - rectHeight) / 2;
			} else {
				float realWidth = view.getHeight() * (originWidth / originHeight);
				float scaleheight = (realWidth / preViewWidth) * preViewHeight;
				rectHeight = scaleheight + (view.getHeight() - scaleheight) * t;
				rectWidth = view.getWidth();
				rectX = 0;
				rectY = (view.getHeight() - rectHeight) / 2;
			}

		} else {//clip left and right

			float realHeight = view.getWidth() * (originHeight / originWidth);
			float scaleWidth = (realHeight / preViewHeight) * preViewWidth;
			rectWidth = scaleWidth + (view.getWidth() - scaleWidth) * t;
			rectHeight = view.getHeight();
			rectY = 0;
			rectX = (view.getWidth() - rectWidth) / 2;
		}

		float scale = mZoomStart + t * (1 - mZoomStart);
		setScale(scale);

		view.setPivotX(view.getWidth() / 2);
		view.setPivotY(view.getHeight() / 2);
		view.setTranslationX(translationX * (1 - t));
		view.setTranslationY(translationY * (1 - t));
		callBack.call(t);
	}

裁剪,位移,scale,同时在draw()里面重绘,完成上图中的效果。

具体代码请参看:https://github.com/kingty/ZoomAnimation


  • 1
    点赞
  • 1
    收藏
    觉得还不错? 一键收藏
  • 0
    评论
以下是在Vue2中实现屏幕截图、自定义裁剪大小并显示图片的完整代码: ```vue <template> <div> <div="screenshotArea"> <!-- 组件内容 --> div> <button @click="captureScreenshot">截图</button> <!-- 触发截图的按钮 --> <!-- 截图预览模态框 --> <div class="modal" v-if="previewImage"> <img :src="previewImage" alt="截图预览"> <button @click="saveScreenshot">保存截图</button> </div> </div> </template> <script> import html2canvas from 'html2canvas' import Cropper from 'cropperjs' export default { data() { return { previewImage: null, cropper: null } }, methods: { captureScreenshot() { html2canvas(this.$refs.screenshotArea).then(canvas => { const screenshotDataUrl = canvas.toDataURL() this.previewImage = screenshotDataUrl this.cropper = new Cropper(this.$refs.previewImage, { aspectRatio: 16 / 9, // 裁剪框的宽高比例 viewMode: 1, // 显示裁剪区域,不允许移动裁剪框外 dragMode: 'move', // 移动裁剪框时,只能移动裁剪区域内的图片 autoCropArea: 1, // 默认裁剪区域为图片的完整显示 cropBoxResizable: true, // 允许调整裁剪框的大小 cropBoxMovable: false, // 不允许移动裁剪框 minCropBoxWidth: 100, // 最小裁剪框宽度 minCropBoxHeight: 100, // 最小裁剪框高度 ready() { // 设置初始裁剪框的大小和位置 this.cropper.setCropBoxData({ width: 300, height: 200, left: (this.cropper.containerData.width - 300) / 2, top: (this.cropper.containerData.height - 200) / 2 }) } }) }) }, saveScreenshot() { const croppedCanvas = this.cropper.getCroppedCanvas() const croppedDataUrl = croppedCanvas.toDataURL() // 在这里可以将 croppedDataUrl 发送到服务器保存,或者进行其他操作 this.previewImage = null this.cropper.destroy() } } } </script> <style> .modal { position: fixed; top: 0; left: 0; width: 100%; height: 100%; background-color: rgba(0, 0, 0, 0.5); display: flex; justify-content: center; align-items: center; } .modal img { max-width: 100%; max-height: 100%; } button { margin-top: 10px; } </style> ``` 在这个示例代码中,通过引入 html2canvas 和 cropperjs 库,我们实现了在Vue2中进行屏幕截图并自定义裁剪大小的功能。 在模板中,我们有一个用于截图的区域(`<div ref="screenshotArea">`)和一个触发截图的按钮。当点击按钮时,我们使用 html2canvas 将指定的区域转为 canvas,并将其转换为图片的 base64 数据URL。然后,我们使用 cropperjs 创建一个裁剪框,并在截图预览模态框中显示截图结果。用户可以通过拖动和调整裁剪框的大小来选择需要的裁剪区域。最后,用户可以点击保存截图按钮,获取裁剪后的 canvas,并将其转为图片的 base64 数据URL。 请确保在使用这段代码之前,已经正确安装了 html2canvas 和 cropperjs 库,并在组件中正确引入了这两个库。

“相关推荐”对你有帮助么?

  • 非常没帮助
  • 没帮助
  • 一般
  • 有帮助
  • 非常有帮助
提交
评论
添加红包

请填写红包祝福语或标题

红包个数最小为10个

红包金额最低5元

当前余额3.43前往充值 >
需支付:10.00
成就一亿技术人!
领取后你会自动成为博主和红包主的粉丝 规则
hope_wisdom
发出的红包
实付
使用余额支付
点击重新获取
扫码支付
钱包余额 0

抵扣说明:

1.余额是钱包充值的虚拟货币,按照1:1的比例进行支付金额的抵扣。
2.余额无法直接购买下载,可以购买VIP、付费专栏及课程。

余额充值