


介绍
IsolatedStorageFile 对于桌面应用,独立存储是一种数据存储机制,它定义了将代码与保存的数据关联的标准化方式,从而提供隔离性和安全性。 同时,标准化也提供了其他好处。 管理员可以使用旨在操作独立存储的工具来支持配置文件存储空间、设置安全策略及删除未使用的数据。 通过独立存储,代码不再需要使用唯一的路径来指定文件系统中的安全位置,同时可以保护数据免遭只具有独立存储访问权限的其他应用程序的损坏。 不再需要指示应用程序的存储区域位置的硬编码信息。
独立存储优点
- 存储隔离
- 不必关心数据存储的文件路径
- 可操作应用数据的存储空间
独立存储方案
总结下来一共有9种存储方案,可参考如下表1。
表1: 隔离类型表
| User | User-Roaming(用户漫游) | Machine | |
|---|---|---|---|
| Assembly | User-Assembly | User-Roaming-Assembly | Machine-Assembly |
| Domain | User-Asembly-Domain | User-Roaming-Assembly-Domain | Machine-Assembly-Domain |
| Application | User-Application | User-Roaming-Application | Machine-Application |
存储区
%LOCALAPPDATA%\IsolatedStorage\:例如,User 范围的C:\Users\<username>\AppData\Local\IsolatedStorage\。%APPDATA%\IsolatedStorage\:例如,User|Roaming 范围的C:\Users\<username>\AppData\Roaming\IsolatedStorage\。%PROGRAMDATA%\IsolatedStorage\:例如,Machine 范围的C:\ProgramData\IsolatedStorage\。
每个用户的前两个位置都是独立的。 Windows 可确保同一计算机上的不同用户帐户无法访问彼此的用户配置文件文件夹。 使用 User 或 User|Roaming 存储区的两个不同用户帐户不会看到彼此的数据,并且不会干扰彼此的数据。
第三个位置在计算机上的所有用户帐户之间共享。 不同的帐户可以从此位置读取数据以及将数据写入此位置,并且可以查看彼此的数据。
隔离类型
独立存储访问包括(应用的域、程序集标识、应用程序标识)关联。 在运行时通过以下方式获取这些标识。
-
域标识表示证明应用的证据,对于 Web 应用,这可能就是完整 URL。 对于 shell 托管代码,域标识可能基于应用目录路径。 例如,如果通过路径 C:\Office\MyApp.exe 运行可执行文件,域标识为 C:\Office\MyApp.exe。
-
程序集标识是证明程序集的证据。 这可能来自加密数字签名,可以是程序集的强名称、程序集的软件发行者或程序集的 URL 标识。 如果程序集同时包含强名称和软件发行者标识,使用的是软件发行者标识。 如果程序集来自 Internet 且未签名,使用的是 URL 标识。 若要详细了解程序集和强名称,请参阅使用程序集编程。
-
应用程序标识 通过GetEntryAssembly方法获取应用程序标识。
通过将用户、域和程序集标识这些概念相结合,独立存储可以通过下列方式隔离数据,每种方式都有自己的使用方案:
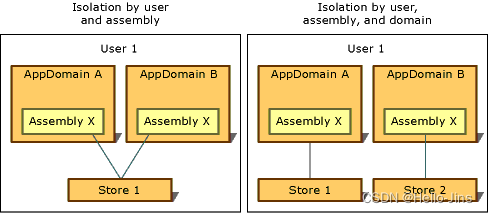
按程序集隔离
如果需要从任何应用的域都可以访问程序集使用的数据存储,按用户和程序集隔离更为合适。 在这种情况下,独立存储通常用于存储跨多个应用的数据,而不是与任何特定应用绑定的数据,如用户名或许可证信息。
// 按用户、程序集隔离
IsolatedStorageFile isoFile =
    IsolatedStorageFile.GetStore(IsolatedStorageScope.User |
    IsolatedStorageScope.Assembly, null, null);
 // 快捷方式
IsolatedStorageFile isoFile = IsolatedStorageFile.GetUserStoreForAssembly();
按域隔离
如果应用的程序集需要专用的数据存储,可以使用独立存储来存储专用数据。按用户、域、程序集隔离确保,仅当使用程序集的应用在程序集运行时创建独立存储,只有给定程序集中的代码才能够访问数据。按用户、域和程序集隔离可防止第三方程序集将数据泄漏给其他应用。 如果确定要使用独立存储,但不确定要使用哪种类型的隔离,此隔离类型应为默认选择。
// 按用户、域、程序集隔离
IsolatedStorageFile isoFile =
    IsolatedStorageFile.GetStore(IsolatedStorageScope.User |
        IsolatedStorageScope.Domain |
        IsolatedStorageScope.Assembly, null, null);
 // 快捷方式
 IsolatedStorageFile isoFile = IsolatedStorageFile.GetUserStoreForDomain();
按应用程序隔离
此方法与按程序集隔离相同,通过不同的目录区分而已。参考IsolatedStorageFile构造方法的InitStore方法(基于.Net6.0)
源码解读(可跳过看总结)
-
获取IsolatedStorageFile实例:
- 调用
GetUserStoreForXXX()或GetMachineStoreForXXX() - 调用
GetStore(ScoreFlags)
以上两种方式最终都会对调用
private static IsolatedStorageFile GetStore(IsolatedStorageScope scope) { return new IsolatedStorageFile(scope); } - 调用
-
生成独立存储路径解析
IsolatedStorageFile只有唯一一个内部的构造方法如下:internal IsolatedStorageFile(IsolatedStorageScope scope) { InitStore(scope, null, null); StringBuilder stringBuilder = new StringBuilder(Helper.GetRootDirectory(scope)); // 存储区路径 stringBuilder.Append(SeparatorExternal); // 分隔符 stringBuilder.Append(base.IdentityHash); // 通过InitStore初始化 IdentityHash stringBuilder.Append(SeparatorExternal); if (Helper.IsApplication(scope)) { stringBuilder.Append("AppFiles"); } else if (Helper.IsDomain(scope)) { stringBuilder.Append("Files"); } else { stringBuilder.Append("AssemFiles"); } stringBuilder.Append(SeparatorExternal); _rootDirectory = stringBuilder.ToString(); Helper.CreateDirectory(_rootDirectory, scope); }如上的代码配合注释可以就能到了解到路径都是和Scope挂钩的。 由获取Scope存储区的路径
Helper.GetRootDirectory(Scope)+目录分隔符+IdentityHash+目录分隔符+存储类型目录(AppFiles,Files,AssemFiles)。那剩下的只需要解析GetRootDirectory(Scope)与IdentityHash就万事大吉了。
Helper.GetRootDirectory(Scope)方法如下:internal static string GetRootDirectory(IsolatedStorageScope scope) { if (IsRoaming(scope)) { if (string.IsNullOrEmpty(s_roamingUserRootDirectory)) { s_roamingUserRootDirectory = GetDataDirectory(scope); } return s_roamingUserRootDirectory; } if (IsMachine(scope)) { if (string.IsNullOrEmpty(s_machineRootDirectory)) { s_machineRootDirectory = GetRandomDirectory(GetDataDirectory(scope), scope); } return s_machineRootDirectory; } if (string.IsNullOrEmpty(s_userRootDirectory)) { s_userRootDirectory = GetRandomDirectory(GetDataDirectory(scope), scope); } return s_userRootDirectory; } internal static string GetDataDirectory(IsolatedStorageScope scope) { Environment.SpecialFolder folder = IsMachine(scope) ? Environment.SpecialFolder.CommonApplicationData : (IsRoaming(scope) ? Environment.SpecialFolder.ApplicationData : Environment.SpecialFolder.LocalApplicationData); string folderPath = Environment.GetFolderPath(folder, Environment.SpecialFolderOption.Create); return Path.Combine(folderPath, "IsolatedStorage"); } internal static string GetRandomDirectory(string rootDirectory, IsolatedStorageScope scope) { // some code... // 这里代码做了精简,最终目的就是创建两层12位名称随机目录 return Path.Combine(rootDirectory, Path.GetRandomFileName(), Path.GetRandomFileName()); }如上代码所述: 根据
Scope(Roaming,Machine,User)这三种类型映射到对应的Environmen.SpecialFolder目录+IsolatedStorage+随机目录名+随机目录名。剩下
IdentityHash是怎么计算的。我们可以通过InitStore一探究竟。protected unsafe void InitStore(IsolatedStorageScope scope, Type domainEvidenceType, Type assemblyEvidenceType) { // some code... Scope = scope; Helper.GetDefaultIdentityAndHash(out object identity, out string hash, SeparatorInternal); if (Helper.IsApplication(scope)) { _applicationIdentity = identity; } else { // some code... _assemblyIdentity = identity; } IdentityHash = hash; // 计算的Hash } internal static void GetDefaultIdentityAndHash(out object identity, out string hash, char separator) { Assembly entryAssembly = Assembly.GetEntryAssembly(); // 获取入口程序集信息 string text = null; if (entryAssembly != (Assembly)null) { AssemblyName name = entryAssembly.GetName(); hash = IdentityHelper.GetNormalizedStrongNameHash(name); if (hash != null) { // 根据程序集强命名得到Hash hash = "StrongName" + separator.ToString() + hash; identity = name; return; } // 如果程序集没有进行强命名则使用程序集的文件路径 text = entryAssembly.Location; } if (string.IsNullOrEmpty(text)) { // 如果程序集文件路径获取失败则获取进程路径 text = Environment.ProcessPath; } if (string.IsNullOrEmpty(text)) { throw new IsolatedStorageException(System.SR.IsolatedStorage_Init); } Uri uri = new Uri(text); hash = "Url" + separator.ToString() + IdentityHelper.GetNormalizedUriHash(uri); // 问程序集强命名Key或程序集路径使用SHA1生成Hash identity = uri; }配合代码和注释,可以看到程序的Hash通过程序集的强命名Key或程序集的文件路径再使用SHA1加密获得。
最终路径如下:
Environment.GetFolderPath(Scope)\IsolatedStorage\12位随机目录\12位随机目录\(SHA1.Hash(程序集信息))\AppFiles
总结
-
独立存储的储存路径: 存储区路径+IsolatedStorage+(12位随机目录名)+(12位随机目录名)+隔离类型标识Hash目录+隔离类型目录名。
- User User-Roaming(用户漫游) Machine Assembly Hash\AssemFiles Hash\AssemFiles Hash\AssemFiles Domain Hash\Hash\Files Hash\Hash\Files Hash\Hash\Files Application Hash\AppFiles Hash\AppFiles Hash\AppFiles 举个例子: 由 User 与 Assembly 组成最终存储路径如下:
C:\Users\<username>\AppData\Local\IsolatedStorage\\(12位随机目录名)\\(12位随机目录名)\\Url.(应用程序路径Hash)\\AssemFiles -
不同的隔离区或不同的隔离类型之间存储不会互相干扰!
-
当程序路径变更后,也将用户的配置也将失效(除非程序集强命名)


 被折叠的 条评论
为什么被折叠?
被折叠的 条评论
为什么被折叠?
 到【灌水乐园】发言


