


1.自定义指令
分类:全局指令、局部指令
1.1 自定义全局指令
使用全局方法 Vue.directive(指令ID,定义对象) ,一个指令定义对象可以提供如下几个钩子函数 (均为可选):
- bind:只调用一次,指令第一次绑定到元素时调用。在这里可以进行一次性的初始化设置。
- inserted:被绑定元素插入父节点时调用 (仅保证父节点存在,但不一定已被插入文档中)。
- update:所在组件的 VNode 更新时调用,但是可能发生在其子 VNode 更新之前。指令的值可能发生了改变,也可能没有。但是你可以通过比较更新前后的值来忽略不必要的模板更新
- componentUpdated:指令所在组件的 VNode 及其子 VNode 全部更新后调用。
- unbind:只调用一次,指令与元素解绑时调用。
示例:
<!doctype html>
<html>

   <head>
       <meta charset="utf-8">
       <title></title>
       <meta name="viewport" content="width=device-width,initial-scale=1,minimum-scale=1,maximum-scale=1,user-scalable=no" />
       <link href="../css/mui.min.css" rel="stylesheet" />
   </head>

   <body>
       <header class="mui-bar mui-bar-nav">
           <h1 class="mui-title">自定义指令</h1>
       </header>
       <div class="mui-content" id="content">
           <div v-hello>{{msg}}</div>
           <button @click="changeData()" type="button" class="mui-btn mui-btn-blue">更新数据</button>
       </div>
       <script src="../js/mui.min.js"></script>
       <script src="../js/vue.js"></script>
       <script type="text/javascript">
           mui.init()
           /**
            * 自定义全局指令
            * 注,使用自定义指令时必须在指令名称前加前缀v,即v-指令名称
            */
           Vue.directive('hello', {
               bind: function() {
                   alert("指令第一次绑定到元素上时调用,只调用一次,可执行初始化操作");
               },
               inserted: function() {
                   alert("被绑定元素插入DOM中时调用");
               },
               update: function() {
                   alert("被绑定元素所在的模板更新时调用");
               },
               componentUpdated: function() {
                   alert("被绑定的元素所在的模板完成一次更新周期时调用,也就是更新完成了");
               },
               unbind: function() {
                   alert("指令与元素解绑时调用,只调用一次");
               }
           })
           var vm = new Vue({
               el: "#content",
               data: {
                   msg: "hello"
               },
               methods: {
                   changeData:function(){
                       this.msg="world"
                   }
               }
           })
       </script>
   </body>

</html>
1.2 钩子函数的参数 (即 el、binding、vnode 和 oldVnode)
指令钩子函数会被传入以下参数:
el:指令所绑定的元素,可以用来直接操作 DOM 。
binding:一个对象,包含以下属性:
- name:指令名,不包括 v- 前缀。
- value:指令的绑定值,例如:v-my-directive="1 + 1" 中,绑定值为 2。
- oldValue:指令绑定的前一个值,仅在 update 和 componentUpdated 钩子中可用。无论值是否改变都可用。
- expression:字符串形式的指令表达式。例如 v-my-directive="1 + 1" 中,表达式为 "1 + 1"。
- arg:传给指令的参数,可选。例如 v-my-directive:foo 中,参数为 "foo"。
- modifiers:一个包含修饰符的对象。例如:v-my-directive.foo.bar 中,修饰符对象为 { foo: true, bar: true }。
vnode:Vue 编译生成的虚拟节点。
oldVnode:上一个虚拟节点,仅在 update 和 componentUpdated 钩子中可用。
示例:
<!doctype html>
<html>

    <head>
        <meta charset="utf-8">
        <title></title>
        <meta name="viewport" content="width=device-width,initial-scale=1,minimum-scale=1,maximum-scale=1,user-scalable=no" />
        <link href="../css/mui.min.css" rel="stylesheet" />
    </head>

    <body>
        <header class="mui-bar mui-bar-nav">
            <h1 class="mui-title">自定义指令</h1>
        </header>
        <div class="mui-content" id="content">
<!--            <div v-hello>{{msg}}</div>
            <button @click="changeData()" type="button" class="mui-btn mui-btn-blue">更新数据</button> -->

            <div v-demo:我是参数=666>钩子函数参数</div>

            <div v-simple>hello world!</div>
        </div>
        <script src="../js/mui.min.js"></script>
        <script src="../js/vue.js"></script>
        <script type="text/javascript">
            mui.init()
            /**
             * 自定义全局指令
             * 注,使用自定义指令时必须在指令名称前加前缀v,即v-指令名称
             */
            Vue.directive('hello', {
                bind: function() {
                    alert("指令第一次绑定到元素上时调用,只调用一次,可执行初始化操作");
                },
                inserted: function() {
                    alert("被绑定元素插入DOM中时调用");
                },
                update: function() {
                    alert("被绑定元素所在的模板更新时调用");
                },
                componentUpdated: function() {
                    alert("被绑定的元素所在的模板完成一次更新周期时调用,也就是更新完成了");
                },
                unbind: function() {
                    alert("指令与元素解绑时调用,只调用一次");
                }
            })

            //钩子函数的参数
            Vue.directive('demo',{
                bind(el,binding){
                    console.log(el);//指令所绑定的元素,DOM对象
                    el.style.color="red";//可以对DOM对象进行操作

                    console.log(binding);//一个对象,包含了name、value等属性
                    console.log(binding.name)//demo
                    console.log(binding.value)//666
                    console.log(binding.arg)//传给指令的参数(我是参数)
                }
            })

            //传入一个简单的函数(也就是不写那么多钩子函数,直接写方法),bind和update时调用
            Vue.directive('simple',function(){
                alert("bind和update时调用");
            })

            var vm = new Vue({
                el: "#content",
                data: {
                    msg: "hello"
                },
                methods: {
                    changeData:function(){
                        this.msg="world"
                    }
                }
            })
        </script>
    </body>

</html>
1.3 自定义局部指令
示例:
<!doctype html>
<html>

    <head>
        <meta charset="utf-8">
        <title></title>
        <meta name="viewport" content="width=device-width,initial-scale=1,minimum-scale=1,maximum-scale=1,user-scalable=no" />
        <link href="../css/mui.min.css" rel="stylesheet" />
    </head>

    <body>
        <header class="mui-bar mui-bar-nav">
            <h1 class="mui-title">自定义指令</h1>
        </header>
        <div class="mui-content" id="content">
<!--            <div v-hello>{{msg}}</div>
            <button @click="changeData()" type="button" class="mui-btn mui-btn-blue">更新数据</button>
            <div v-demo:我是参数=666>钩子函数参数</div>
            <div v-simple>hello world!</div> -->

            <!-- 局部指令 -->
            <input v-focus type="text" v-model="msg">
        </div>
        <script src="../js/mui.min.js"></script>
        <script src="../js/vue.js"></script>
        <script type="text/javascript">
            mui.init()
            /**
             * 自定义全局指令
             * 注,使用自定义指令时必须在指令名称前加前缀v,即v-指令名称
             */
            Vue.directive('hello', {
                bind: function() {
                    alert("指令第一次绑定到元素上时调用,只调用一次,可执行初始化操作");
                },
                inserted: function() {
                    alert("被绑定元素插入DOM中时调用");
                },
                update: function() {
                    alert("被绑定元素所在的模板更新时调用");
                },
                componentUpdated: function() {
                    alert("被绑定的元素所在的模板完成一次更新周期时调用,也就是更新完成了");
                },
                unbind: function() {
                    alert("指令与元素解绑时调用,只调用一次");
                }
            })
            //钩子函数的参数
            Vue.directive('demo', {
                bind(el, binding) {
                    console.log(el); //指令所绑定的元素,DOM对象
                    el.style.color = "red"; //可以对DOM对象进行操作

                    console.log(binding); //一个对象,包含了name、value等属性
                    console.log(binding.name) //demo
                    console.log(binding.value) //666
                    console.log(binding.arg) //传给指令的参数(我是参数)
                }
            })
            //传入一个简单的函数(也就是不写那么多钩子函数,直接写方法),bind和update时调用
            Vue.directive('simple', function() {
                alert("bind和update时调用");
            })

            var vm = new Vue({
                el: "#content",
                data: {
                    msg: "hello"
                },
                methods: {
                    changeData: function() {
                        this.msg = "world"
                    }
                },
                directives: { //自定义局部指令
                    focus: {
                        //当被绑定元素插入到DOM中时,获取焦点
                        inserted(el) {
                            el.focus();
                        }
                    }
                }
            })
        </script>
    </body>

</html>
1.4 自定义指令实战
拖动页面中的元素(onmouseover,onmouseout,onmousedown,onmousemove,onmouseup),使用自定义指令。
<!doctype html>
<html>

    <head>
        <meta charset="utf-8">
        <title></title>
        <meta name="viewport" content="width=device-width,initial-scale=1,minimum-scale=1,maximum-scale=1,user-scalable=no" />
        <link href="../css/mui.min.css" rel="stylesheet" />
        <style>
            .hello{
                position: absolute;
                height: 50px;
                width: 50px;
                background: #007AFF;
                top: 0px;
                left: 0px;
            }
            .world{
                position: absolute;
                height: 50px;
                width: 50px;
                background: #2AC845;
                top: 0px;
                right: 0px;
            }
        </style>
    </head>

    <body>
        <div id="content">
            <div class="hello" v-drag>{{msg}}</div>
            <div class="world"b v-drag>world</div>
        </div>
        <script src="../js/vue.js"></script>
        <script src="../js/mui.min.js"></script>
        <script type="text/javascript">
            mui.init()

            var vm = new Vue({
                el: "#content",
                data: {
                    msg: "hello"
                },
                directives: {
                    drag: function(el) {
                        console.log(el);
                        el.onmousedown = function(e) { //鼠标按下
                            console.log(e.clientX); //鼠标点击位置距离页面左侧的距离
                            console.log(el.offsetLeft); //div元素距离页面左侧的距离

                            //获取鼠标点击处分别与div左边和上边的距离(鼠标位置-div距离))
                            var disX = e.clientX - el.offsetLeft;
                            var disY = e.clientY - el.offsetTop; //上边
                            console.log(disX, disY);

                            //移动(用document,不用el,为了防止鼠标移出div使用document.onmousemove)
                            document.onmousemove = function(e) {
                                //获取移动后div的位置(鼠标位置-disX/disY)
                                var l = e.clientX - disX;
                                var t = e.clientY - disY;
                                el.style.left = l + "px";
                                el.style.top = t + "px";
                            }

                            //停止移动(鼠标弹起时)
                            document.onmouseup = function(e) {
                                document.onmousemove = null;
                                document.onmouseup = null;
                            }
                        }
                    }
                }
            })
        </script>
    </body>

</html>
2.过渡(动画)
2.1 简介
Vue在插入、更新或者移除DOM时,提供了多种不同方式的应用过渡效果,本质上还是使用css3动画,transition、animation
2.2 基本用法
使用transition组件,将需要动画的元素放入组件中
  <transition name="">
    元素
  </transition>
过渡的类名
在进入/离开的过渡中,会有 6 个 class 切换。
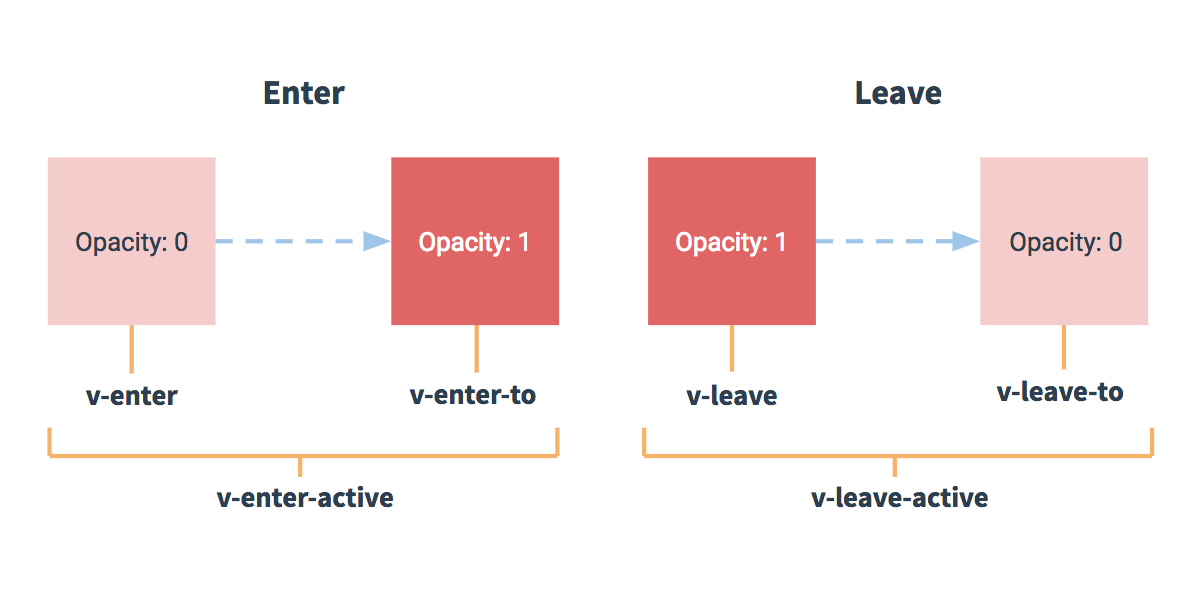
- v-enter:定义进入过渡的开始状态。在元素被插入之前生效,在元素被插入之后的下一帧移除。
- v-enter-active:定义进入过渡生效时的状态。在整个进入过渡的阶段中应用,在元素被插入之前生效,在过渡/动画完成之后移除。这个类可以被用来定义进入过渡的过程时间,延迟和曲线函数。
- v-enter-to: 2.1.8版及以上 定义进入过渡的结束状态。在元素被插入之后下一帧生效 (与此同时 v-enter 被移除),在过渡/动画完成之后移除。
- v-leave: 定义离开过渡的开始状态。在离开过渡被触发时立刻生效,下一帧被移除。
- v-leave-active:定义离开过渡生效时的状态。在整个离开过渡的阶段中应用,在离开过渡被触发时立刻生效,在过渡/动画完成之后移除。这个类可以被用来定义离开过渡的过程时间,延迟和曲线函数。
- v-leave-to: 2.1.8版及以上 定义离开过渡的结束状态。在离开过渡被触发之后下一帧生效 (与此同时 v-leave 被删除),在过渡/动画完成之后移除。
注:对于这些在过渡中切换的类名来说,如果你使用一个没有名字的 <transition>,则 v- 是这些类名的默认前缀。如果你使用了 <transition name="my-transition">,那么 v-enter 会替换为 my-transition-enter。
示例:
<!doctype html>
<html>

    <head>
        <meta charset="utf-8">
        <title></title>
        <meta name="viewport" content="width=device-width,initial-scale=1,minimum-scale=1,maximum-scale=1,user-scalable=no" />
        <link href="../css/mui.min.css" rel="stylesheet" />
        <style>
            .hello{
                width: 200px;
                height: 200px;
                background: #007AFF;
            }
            .fade-enter-active,.fade-leave-active{
                transition: all 3s ease;
            }
            .fade-enter-active{/*进入后*/
                opacity: 1;
                width: 200px;
                height: 200px;
            }
            .fade-leave-active{
                opacity: 0;/*透明度0,当宽高为20的时候变为0*/
                width: 20px;
                height: 20px;
            }
            /*进入的初始状态,需要放在.fade-enter-active的后面*/
            .fade-enter{
                opacity: 0;
                width: 50px;
                height: 50px;
            }
        </style>
    </head>

    <body>
        <div id="content">
            <button @click="show=!show">显示/隐藏</button>
            <transition name="fade">
                <div class="hello" v-show="show">{{msg}}</div>
            </transition>
        </div>
        <script src="../js/mui.min.js"></script>
        <script src="../js/vue.js"></script>
        <script type="text/javascript">
            mui.init()
            var vm = new Vue({
                el: "#content",
                data: {
                    show: false,
                    msg: "hello world!"
                }
            })
        </script>
    </body>

</html>
钩子函数
可以在属性中声明 JavaScript 钩子
<transition
  v-on:before-enter="beforeEnter"
  v-on:enter="enter"
  v-on:after-enter="afterEnter"
  v-on:enter-cancelled="enterCancelled"

  v-on:before-leave="beforeLeave"
  v-on:leave="leave"
  v-on:after-leave="afterLeave"
  v-on:leave-cancelled="leaveCancelled"
>
  <!-- ... -->
</transition>
示例:
<!doctype html>
<html>

    <head>
        <meta charset="utf-8">
        <title></title>
        <meta name="viewport" content="width=device-width,initial-scale=1,minimum-scale=1,maximum-scale=1,user-scalable=no" />
        <link href="../css/mui.min.css" rel="stylesheet" />
        <style>
            .hello{
                width: 200px;
                height: 200px;
                background: #007AFF;
            }
            .fade-enter-active,.fade-leave-active{
                transition: all 3s ease;
            }
            .fade-enter-active{/*进入后*/
                opacity: 1;
                width: 200px;
                height: 200px;
            }
            .fade-leave-active{
                opacity: 0;/*透明度0,当宽高为20的时候变为0*/
                width: 20px;
                height: 20px;
            }
            /*进入的初始状态,需要放在.fade-enter-active的后面*/
            .fade-enter{
                opacity: 0;
                width: 50px;
                height: 50px;
            }
        </style>
    </head>

    <body>
        <div id="content">
            <button @click="show=!show">显示/隐藏</button>
            <transition name="fade"
            @before-enter="beforeEnter"
            @enter="enter"
            @after-enter="afterEnter"
            @enter-cancelled="enterCancelled"
            @before-leave="beforeLeave"
            @leave="leave"
            @after-leave="afterLeave"
            @leave-cancelled="leaveCancelled">
                <div class="hello" v-show="show">{{msg}}</div>
            </transition>
        </div>
        <script src="../js/mui.min.js"></script>
        <script src="../js/vue.js"></script>
        <script type="text/javascript">
            mui.init()
            var vm = new Vue({
                el: "#content",
                data: {
                    show: false,
                    msg: "hello world!"
                },
                methods: {
                    beforeEnter: function(el) {
                        // alert("动画进入之前");
                    },
                    enter: function(el) {
                        // alert("动画进入时");
                    },
                    afterEnter: function(el) {
                        // alert("动画进入之后");
                        el.style.background="red";
                    },
                    beforeLeave: function(el) {
                        // alert("动画即将离开之前");
                    },
                    leave: function(el) {
                        // alert("动画离开时");
                    },
                    afterLeave: function(el) {
                        // alert("动画离开之后");
                        el.style.background="blue";
                    }
                }
            })
        </script>
    </body>

</html>
2.3 结合第三方动画库animate.css一起使用
示例:
<!doctype html>
<html>

    <head>
        <meta charset="utf-8">
        <title></title>
        <meta name="viewport" content="width=device-width,initial-scale=1,minimum-scale=1,maximum-scale=1,user-scalable=no" />
        <link href="../css/mui.min.css" rel="stylesheet" />
        <link href="../css/animate.css" rel="stylesheet" />
        <style>
            .hello{
                width: 100px;
                height: 100px;
                background: #4CD964;
                margin: 0 auto;
            }
        </style>
    </head>

    <body>
        <div id="content">
            <button @click="show=!show">显示/隐藏</button>
            <transition enter-active-class="animated bounceInLeft" leave-active-class="animated bounceOutRight">
                <div class="hello" v-show="show">{{msg}}</div>
            </transition>
        </div>
        <script src="../js/mui.min.js"></script>
        <script src="../js/vue.js"></script>
        <script type="text/javascript">
            mui.init()
            var vm = new Vue({
                el: "#content",
                data: {
                    show: false,
                    msg: "hello world!"
                }
            })
        </script>
    </body>

</html>
注:使用animate动画库的class时要先加上它的基础class,比如我们要使用从左进入的动画,需这样写:
class="animated bounceInLeft"
2.4 多元素动画
<transition-group> 元素作为多个元素/组件的过渡效果。 渲染一个真实的 DOM 元素。默认渲染 <span>,可以通过 tag 属性配置哪个元素应该被渲染。
注意,每个 <transition-group> 的子节点必须有 独立的 key ,动画才能正常工作
<transition-group> 支持通过 CSS transform 过渡移动。当一个子节点被更新,从屏幕上的位置发生变化,它将会获取应用 CSS 移动类 (通过 name 属性或配置 move-class 属性自动生成)。如果 CSS transform 属性是“可过渡”属性,当应用移动类时,将会使用 FLIP 技术 使元素流畅地到达动画终点。
<transition-group tag="ul" name="slide">
  <li v-for="item in items" :key="item.id">
    {{ item.text }}
  </li>
</transition-group>
练习:
<!doctype html>
<html>

    <head>
        <meta charset="utf-8">
        <title></title>
        <meta name="viewport" content="width=device-width,initial-scale=1,minimum-scale=1,maximum-scale=1,user-scalable=no" />
        <link href="../css/mui.min.css" rel="stylesheet" />
        <link href="../css/animate.css" rel="stylesheet" />
        <style>
            .hello{
                width: 100px;
                height: 100px;
                background: blue;
                margin: 10px auto;
            }
        </style>
    </head>

    <body>
        <div id="content">
            <input type="text" v-model="name" placeholder="输入一些字符,如果底下元素包含则显示" />
            <transition-group enter-active-class="animated bounceInLeft" leave-active-class="animated bounceOutRight">
                <div v-for="(item,index) in arr2" class="hello" :key="index" v-show="show">
                    {{item}}
                </div>
            </transition-group>
        </div>
        <script src="../js/mui.min.js"></script>
        <script src="../js/vue.js"></script>
        <script type="text/javascript">
            mui.init();
            var vm = new Vue({
                el: "#content",
                data: {
                    show: true,
                    msg: "hello world!",
                    arr: ['tom', 'jack', 'chaoyoung', 'mark', 'rose', 'curry'],
                    name: ""
                },
                computed: { //利用计算属性,筛选真正需要显示的arr(也就是包含输入框里的字符的)
                    arr2: function() {
                        var temp = [];
                        this.arr.forEach(value=>{
                            if (value.includes(this.name)) {
                                console.log('包含:'  + '--' + value);
                                temp.push(value);
                            }
                        })
                        return temp;
                    }
                },
                watch: {
                    name: function(newValue, oldValue) {
                        console.log("name变成了:" + newValue)
                    }
                }
            })
        </script>
    </body>

</html>
原创不易,转载请注明出处。


 2238
2238


 被折叠的 条评论
为什么被折叠?
被折叠的 条评论
为什么被折叠?
 到【灌水乐园】发言


