


什么是Mybatis
MyBatis 本是apache的一个开源项目iBatis, 2010年这个项目由apache software foundation 迁移到了google code,并且改名为MyBatis 。iBATIS一词来源于“internet”和“abatis”的组合,是一个基于Java的持久层框架。iBATIS提供的持久层框架包括SQL Maps和Data Access Objects(DAO)。
MyBatis参考资料官网:
官网对Mybatis的介绍更加具有权威性:
MyBatis 是支持定制化 SQL、存储过程以及高级映射的优秀的持久层框架。MyBatis 避免了几乎所有的 JDBC 代码和手工设置参数以及抽取结果集。MyBatis 使用简单的 XML 或注解来配置和映射基本体,将接口和 Java 的 POJOs(Plain Old Java Objects,普通的 Java对象)映射成数据库中的记录。
MyBatis是iBatis的升级版,用法有很多的相似之处,但是MyBatis进行了重要的改进。例如:
1、Mybatis实现了接口绑定,使用更加方便。
在ibatis2.x中我们需要在DAO的实现类中指定具体对应哪个xml映射文件, 而Mybatis实现了DAO接口与xml映射文件的绑定,自动为我们生成接口的具体实现,使用起来变得更加省事和方便。
2、对象关系映射的改进,效率更高
3、MyBatis采用功能强大的基于OGNL的表达式来消除其他元素。
对于IBatis与MyBatis的区别就不再多说了,感兴趣的朋友可以研究一下。
MyBatis的框架架构
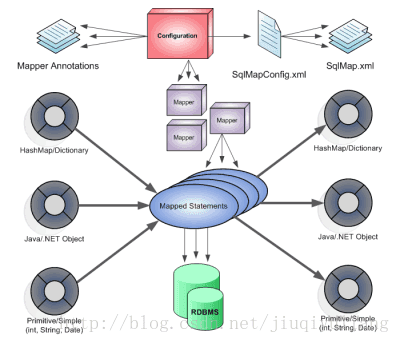
看到Mybatis的框架图,可以清晰的看到Mybatis的整体核心对象,我更喜欢用自己的图来表达Mybatis的整个的执行流程。如下图所示:
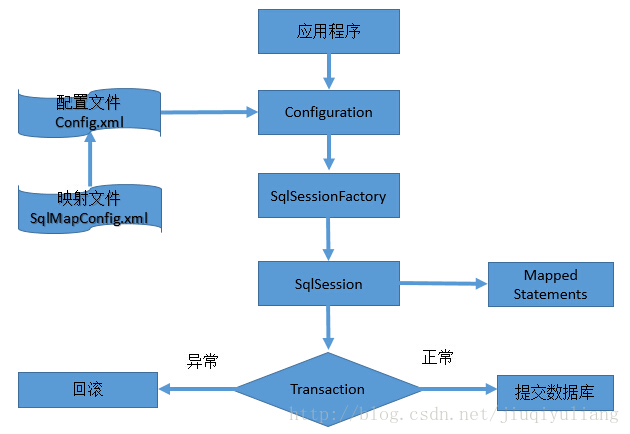
原理详解:
MyBatis应用程序根据XML配置文件创建SqlSessionFactory,SqlSessionFactory在根据配置,配置来源于两个地方,一处是配置文件,一处是Java代码的注解,获取一个SqlSession。SqlSession包含了执行sql所需要的所有方法,可以通过SqlSession实例直接运行映射的sql语句,完成对数据的增删改查和事务提交等,用完之后关闭SqlSession。
优点:
1、简单易学
mybatis本身就很小且简单。没有任何第三方依赖,最简单安装只要两个jar文件+配置几个sql映射文件易于学习,易于使用,通过文档和源代码,可以比较完全的掌握它的设计思路和实现。
2、灵活
mybatis不会对应用程序或者数据库的现有设计强加任何影响。 sql写在xml里,便于统一管理和优化。通过sql基本上可以实现我们不使用数据访问框架可以实现的所有功能,或许更多。
3、解除sql与程序代码的耦合
通过提供DAL层,将业务逻辑和数据访问逻辑分离,使系统的设计更清晰,更易维护,更易单元测试。sql和代码的分离,提高了可维护性。
4、提供映射标签,支持对象与数据库的orm字段关系映射
5、提供对象关系映射标签,支持对象关系组建维护
6、提供xml标签,支持编写动态sql。
缺点:
1、编写SQL语句时工作量很大,尤其是字段多、关联表多时,更是如此。
2、SQL语句依赖于数据库,导致数据库移植性差,不能更换数据库。
3、框架还是比较简陋,功能尚有缺失,虽然简化了数据绑定代码,但是整个底层数据库查询实际还是要自己写的,工作量也比较大,而且不太容易适应快速数据库修改。
4、二级缓存机制不佳
   mybatis的优点同样是mybatis的缺点,正因为mybatis使用简单,数据的可靠性、完整性的瓶颈便更多依赖于程序员对sql的使用水平上了。sql写在xml里,虽然方便了修改、优化和统一浏览,但可读性很低,调试也非常困难,也非常受限。
  mybatis没有hibernate那么强大,但是mybatis最大的优点就是简单小巧易于上手,方便浏览修改sql语句。
简单的mybatis示例
bean包下:
public class Student {

    private  Integer id;
    private  String name;


    public Student() {
    }

    public Student(Integer id, String name) {
        this.id = id;
        this.name = name;
    }

    @Override
    public String toString() {
        return "Student{" +
                "id=" + id +
                ", name='" + name + '\'' +
                '}';
    }

    public Integer getId() {
        return id;
    }

    public void setId(Integer id) {
        this.id = id;
    }

    public String getName() {
        return name;
    }

    public void setName(String name) {
        this.name = name;
    }
}
map包下:
(Interface)StudentMapper:
public interface StudentMapper {
    //查询所有学员
    List<Student>findAllStudent();

    //如果参数有多个,使用@Param注解规定参数的别名
    void insertStudent(@Param("sname") String name);

    void insertStu(Student student);

    void  updateStudent(Student student);

    void deleteStudent(@Param("sid") Integer id);
}
StudentMapper.xml下:
“`xml
public class BatisTest {

    @Test
    public void test1() throws IOException {
        //1,加载config文件

        String re = "config.xml";
        InputStream stream = Resources.getResourceAsStream(re);

        //2.创建SqlSessionFactory

        SqlSessionFactory factory = new SqlSessionFactoryBuilder().build(stream);

        //3,生产sqlSession对象

        SqlSession session = factory.openSession();

        //4.获取mapper对象
        StudentMapper mapper = session.getMapper(StudentMapper.class);

        //5.调用方法获取结果
        mapper.insertStudent("wangwu");
        Student stu = new Student();
        stu.setName("curry");
        stu.setId(2);

        //插入后紧接着获得id值,不需要再查一下,否则ID为null
        mapper.insertStu(stu);
        System.out.println(stu);

        mapper.updateStudent(stu);
        mapper.deleteStudent(2);
        List<Student> studentList = mapper.findAllStudent();
        System.out.println(studentList);
        session.commit();

        session.close();
    }
}
Resources包中配置:
1.config.xml:
<?xml version="1.0" encoding="UTF-8"?>
<!DOCTYPE configuration
        PUBLIC "-//mybatis.org//DTD Config 3.0//EN"
        "http://mybatis.org/dtd/mybatis-3-config.dtd">
<configuration>

    <!--这个配置文件中,所有的标签都有严格的顺序-->
<properties resource="db.properties"/>
    <environments default="${env_chosen}">
        <environment id="deve">
            <transactionManager type="JDBC"></transactionManager>
            <dataSource type="POOLED"> <!--是否有连接池-->
                <property name="driver" value="${jdbc.driver}"/>
                <property name="url" value="${jdbc.url}"/>
                <property name="username" value="${jdbc.username}"/>
                <property name="password" value="${jdbc.password}"/>
            </dataSource>
        </environment>
    </environments>

    <mappers>

        <!--<mapper resource="com/lanou/mapper/StudentMapper.xml"></mapper>-->

        <!--//自动读取mapper包下的所有xml文件-->
        <package name="com.lanou.mapper"/>

    </mappers>

</configuration>
db.properties:
jdbc.driver=com.mysql.jdbc.Driver
jdbc.url=jdbc:mysql://localhost:3306/db0602
jdbc.username=root
jdbc.password=111111

env_chosen=deve
最后就是pom.xml中的配置了:
<project xmlns="http://maven.apache.org/POM/4.0.0" xmlns:xsi="http://www.w3.org/2001/XMLSchema-instance"
  xsi:schemaLocation="http://maven.apache.org/POM/4.0.0 http://maven.apache.org/maven-v4_0_0.xsd">
  <modelVersion>4.0.0</modelVersion>
  <groupId>com.lanou</groupId>
  <artifactId>Mybatis_001</artifactId>
  <packaging>war</packaging>
  <version>1.0-SNAPSHOT</version>
  <name>Mybatis_001 Maven Webapp</name>
  <url>http://maven.apache.org</url>
  <dependencies>
    <dependency>
      <groupId>junit</groupId>
      <artifactId>junit</artifactId>
      <version>4.12</version>
      <!--<scope>test</scope>-->
    </dependency>


    <!--mybaties

    mysql-connector-java-->

    <!-- https://mvnrepository.com/artifact/org.mybatis/mybatis -->
    <dependency>
      <groupId>org.mybatis</groupId>
      <artifactId>mybatis</artifactId>
      <version>3.4.2</version>
    </dependency>

    <!-- https://mvnrepository.com/artifact/mysql/mysql-connector-java -->
    <dependency>
      <groupId>mysql</groupId>
      <artifactId>mysql-connector-java</artifactId>
      <version>5.1.40</version>
    </dependency>
  </dependencies>

  <build>
    <finalName>Mybatis_001</finalName>
    <resources>
      <resource>
        <directory>src/main/resources</directory>
        <includes>
          <include>**/*.properties</include>
          <include>**/*.xml</include>
          <include>**/*.tld</include>
        </includes>
        <filtering>false</filtering>
      </resource>
      <resource>
        <directory>src/main/java</directory>
        <includes>
          <include>**/*.properties</include>
          <include>**/*.xml</include>
          <include>**/*.tld</include>
        </includes>
        <filtering>false</filtering>
      </resource>
    </resources>
  </build>
</project>
至此,一个完整的Mybatis就完成了!


 4145
4145

 被折叠的 条评论
为什么被折叠?
被折叠的 条评论
为什么被折叠?
 到【灌水乐园】发言


