


大厂技术  高级前端  Node进阶点击上方 程序员成长指北,关注公众号
回复1,加入高级Node交流群❝原文链接: https://juejin.cn/post/7386873708601032754
❞
导读
自从写了 《NextJs 从入门放弃1》 文章后,直到最近开发项目,才重新关注 NextJs,其版本已更新到「V14」,趁着「V15」还在蓄势待发,先赶紧总结一下开发的心路历程...
环境&安装
node 环境
npx、yarn、bun 工具皆可(个人偏好bun2,因为它快)
初始化 next 项目
bunx create-next-app@latest
✔ What is your project named? … my-nextjs-app   - 项目目录名称
✔ Would you like to use TypeScript? … No / Yes  - 使用 Typescript
✔ Would you like to use ESLint? … No / Yes      - 使用 ESLint
✔ Would you like to use Tailwind CSS? … No / Yes   - 使用 Tailwind
✔ Would you like to use `src/` directory? … No / Yes  - 默认不使用src目录
    ✔ Would you like to use App Router? (recommended) … No / Yes - 默认使用 App Router,如果选择 No,则使用Page Router,这是Next13的用法
✔ Would you like to customize the default import alias (@/*)? … No / Yes  - 建议不使用
项目目录
├── README.md
├── app                     相当于src
│   ├── favicon.ico
│   ├── globals.css         全局CSS
│   ├── layout.tsx          项目入口文件,相当于 main.js
│   └── page.tsx            首页地址文件,访问 /
├── bun.lockb
├── next-env.d.ts
├── next.config.mjs         next 配置文件
├── package.json
├── postcss.config.mjs      postcss配置文件
├── public                  静态文件目录,存放图片
│   ├── next.svg
│   └── vercel.svg
├── tailwind.config.ts      tailwindcss 配置文件
└── tsconfig.json
安装 autoprefixer 及配置 postcss
bun add autoprefixer -D

// postcss.config.mjs
/** @type {import('postcss-load-config').Config} */
const config = {
  plugins: {
    tailwindcss: {},
    autoprefixer: {}, // 添加 autoprefixer
  },
};

export default config;
开始
从 Layout 开始
「app/layout.tsx」 是整个应用的主布局文件,相当于React的main.ts或App.tsx,它主要做以下几个事情:
项目 metadata
加载全局样式 globals.css
加载网络/本地字体
定义应用顶级布局
国际化 i18n
第三方组件库 Provider Wrapper
每个页面目录下,也可以定义自己的布局文件
「总结」:「顶层 RootLayout 作用于所有页面,各个子 Layout 只作用于自己所属的目录下的所有页面」
Example:

// app/layout.tsx
export default function RootLayout({
  children,
}: Readonly<{
  children: React.ReactNode;
}>) {
  return (
    <html lang="en">
      <body className={inter.className}>
        {/* header */}
        <Header />
        {/* 页面注入区 */}
        {children}
      </body>
    </html>
  );
}

// app/overview/layout.tsx
export default function Layout({
  children,
}: Readonly<{
  children: React.ReactNode;
}>) {
  return (
    <section className="flex mt-4 space-x-6">
      {/* Nav */}
      <Nav />
       {/* main */}
      <main className="w-full border border-green-600 p-4">{children}</main>
    </section>
  );
}
字体
Nextjs 使用 next/font 模块加载谷歌字体,而不像以前通过css去加载字体,这是next帮我们优化字体的加载
为什么要优化字体?
浏览器加载字体的流程
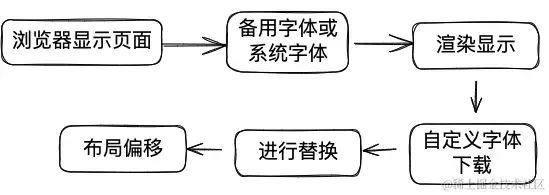
「进行替换时,会产生字体大小、空隙、布局的偏移,即CLS」 (CLS:谷歌用于评估网站性能和用户体验的指标之一,用于衡量网页在加载过程中内容布局的稳定性)
使用 next/font 模块后,NextJs会自动优化字体,项目构建时,会自动下载字体文件和其他资源文件放在一起,提升页面访问性能
如何做
import { Inter } from 'next/font/google';

// 按需下载字体的子集,节流
export const inter = Inter({ subsets: ['latin'] }); // 拉丁字符集
<body className={inter.className}>{children}</body>
页面路由
NextJs 14 默认使用 App Router 模式
与 Page Router 模式不同,App Router 模式下,任意目录下可访问页面,「必须固定定义为 page.tsx」,目录作为内容,比如:
| 访问 | App Router | Page Router |
|---|---|---|
| / | app/page.tsx | pages/index.tsx |
| /about | app/about/page.tsx | pages/about/index.tsx |
| /blog/1 | app/blog/[id]/page.tsx | pages/blog/[id]/index.tsx 或 pages/blog/[id].tsx |
| /test/1/a | app/test/[...slug]/page.tsx | pages/test/[...slug]/index.tsx 或 pages/test/[...slug].tsx |
Api路由
与 Page router 模式不同,App Router 模式下,api目录要放置在app目录下,而且,「必须命名为 route.ts」
| 访问 | App Router | Page Router |
|---|---|---|
| /api/product | app/api/product/route.ts | pages/api/product/index.ts |
| /api/product/1 | app/api/product/[id]/route.ts | pages/api/product/[id]/index.ts 或 pages/api/product/[id].ts |
API 处理
App Router 模式
export async function GET(request: NextRequest) {
   // 获取数据逻辑
   const data = await ...
   return NextResponse.json({ data });
}

export async function POST(request: NextRequest) {
   const body = await request.json();
   // 插入数据逻辑
   return NextResponse.json({ msg: 'Created success' });
}

export async function DELETE(request: NextRequest) {
   const id = request.nextUrl.searchParams.get('id')!;
   if (!id) {
     return NextResponse.json({ msg: 'Delete Failed' });
   }
   // 删除数据逻辑
   return NextResponse.json({ msg: 'Deleted Success ' });
}

export async function PUT(request: NextRequest) {
   const id = request.nextUrl.searchParams.get('id');
   if (!id) {
     return NextResponse.json({ msg: 'Update Failed' });
   }
   // 更新数据逻辑
   return NextResponse.json({ msg: 'Updated Success' });
}
Page Router模式
function handler(req, res) {
  switch (req.method) {
    case 'GET':
       // ...
    case 'POST':
       // ...
    case 'DELETE':
       // ...
    case 'PUT':
       // ...
    default:
        // ....
  }
}
目录创建技巧
基本上,我们会将页面目录、api目录、components目录、lib等都放在 app目录下,容易将页面目录与其他目录弄混,可以使用“虚拟目录”将所有非首页(/)页面目录都放入 app/(pages) 下,这不会影响路由的访问,放在(pages)下与放在app下的效果是一样的,这里这么做,是为了目录更加清晰,app目录如下:
├── (pages)              页面目录
│   ├── about            /about
│   │   └── page.tsx
│   └── overview
│       ├── layout.tsx     overview目录下的所有页面共享此layout
│       ├── page1          /overview/page1
│       │   └── page.tsx
│       └── page2         /overview/page2
│           └── page.tsx
├── api                   api目录
│   └── news
│       ├── [id]
│       │   └── route.ts      /api/news/123
│       └── route.ts          /api/news
├── components               组件目录
├── favicon.ico
├── global-error.tsx        顶层错误页面
├── globals.css             全局样式
├── layout.tsx              RootLayout
├── lib                     工具目录
│   └── db.ts
├── not-found.tsx          顶层404页面
├── page.tsx               / 首页
└── types                 typescript类型目录
    └── news-type.ts
图片
使用 next/image 模块,它会帮我们优化图片
为什么要优化图片?
把大图传给小屏幕,带宽浪费
图片从无到有的加载过程,容易造成CLS(布局偏移)
多个图片同时请求,造成页面渲染 blocking
如何做?
NextJs 提供了优化图片的方案——Image 组件,使用 Image 组件有四点好处:
优化图片大小:输出webp格式
-
对各个设备使用合适的尺寸与格式(使用Chrome访问页面时,图片会转换成webp格式)
防止CLS(累计布局偏移)
懒加载:图片在视图中才会被加载
自定义图片尺寸,width、height,因为设定了w和h,那么图片就有了固定的宽高比,防止CLS
-
Next.js 会根据 Image 的 width 与 height 值,在页面请求服务端时,转换并缓存相应大小的图片
import Image from 'next/image';

export default function About(props) {
  return (
    <>
      {/* <img
            src={'/img.jpeg'}
            alt="图片"
        /> */}
      <Image src={'/img.jpeg'} alt="图片" width={100} height={100} placeholder={占位图,必须是base64}/>
      <Image
        src="/hero-desktop.png"
        width={1000}
        height={760}
        className="hidden md:block"
        alt="Screenshots of the dashboard project showing desktop version"
      />
      <Image
        src="/hero-mobile.png"
        width={560}
        height={620}
        className="block md:hidden" // 当移动端时,才会下载图片并显示,so wonderful
        alt="Screenshots of the dashboard project showing desktop version"
      />
    </>
  );
}
请求外部限制访问的图片
配置 next.config
const nextConfig = {
   images: {
      remotePatterns: [
      {
         protocol: 'https',
  hostname: '*',
       },
      ],
   },
};
Image 错误处理
设置 width 和 height 为 auto
如果同时添加了 with 和 height 属性,浏览器会出现 Warning: Image with src "xxxx" has either width or height modified, but not the other. If you use CSS to change the size of your image, also include the styles 'width: "auto"' or 'height: "auto"' to maintain the aspect ratio.
「解决办法:给 Image 添加 width: auto,height: auto 样式」
LCP 优化提示
Image with src "xxx" was detected as the Largest Contentful Paint (LCP). Please add the "priority" property if this image is above the fold.
一般出现在页面的logo
LCP 是一个时间值,用于测量用户浏览器在视口中呈现最大内容元素所需的时间。最大的内容元素可以是:
包含文本(如标题或段落)的块级元素
使用 <img> HTML 标签、<svg> 元素中的 <image> SVG 标签或 CSS 函数 url() 定义的 CSS 背景图片(不包括渐变背景)添加的图片
带有 poster 属性的 <video> 元素(使用 poster 的图像的呈现时间)
「解决办法:给 Image 组件添加 priority属性」
图片请求失败,显示一个默认图片
当图片请求失败时,我们想要给它一个默认图片,可以在 Image 上使用 onError,然后配合 useState 重新赋值一个默认图片来处理
但这带来一个问题,useState 只能在客户端组件上使用,把在可以把 Image 单独抽象出来,并成为客户端组件
<ImageWithFallback
 height={200}
 width={300}
 src={p.article.image_url || defaultNewsPng}
 alt="Image for test"
 fallback={defaultNewsPng}
/>

// ImageWithFallback.tsx
'use client';
import { useState } from 'react';
import Image, { ImageProps, StaticImageData } from 'next/image';

type ImageWithFallbackType = ImageProps & {
 fallback: StaticImageData;
};

export function ImageWithFallback({ fallback, src, alt, ...p }
 : ImageWithFallbackType) {
 const [imgSrc, setImgSrc] = useState(src);
 return (
    <Image
       {...p}
       src={imgSrc}
       alt={alt || 'default alt'}
       onError={() => setImgSrc(fallback.src)}
    />
   );
}
导航 Link
用 Link 组件代替 a 的好处:
不会整页刷新
代码自动分割:根据路由自动 code-spliting
代码预取 pre-fetch,在生产环境,当 Link 组件在浏览器视口可见时(所见即所得),nextjs 会自动 prefetch Link.href 的页面
Active
注意:在客户端才能知晓当前 link 是否是 active,因此需要 'use client';
'use client';

import Link from 'next/link';
import { usePathname } from 'next/navigation';

export function Nav() {
    const pathname = usePathname;
    return (
      <ul>
        <li className={pathname === '/overview/page1' ? 'active' : ''}>page1</li>
        <li className={pathname === '/overview/page2' ? 'active' : ''}>page2</li>
      </ul>
    )
}
Not Found
NextJs 会自动生成 404 页面,如果我们要使用自己的 404 页面,要遵循以下几个原则:
全局 404
在 app 目录下,创建 not-found.tsx 文件,当访问路由不存在时,自动跳转到全局 not-found 页面
「注意:全局 not-found.tsx 只能在app目录下,否则不生效」
/app/not-found.tsx
局部 404
局部 404 多用于,请求数据获取不到而出现的场景,而非无此页面的情况
在某个页面或多个共享layout页面目录下,创建 not-found.tsx 文件,
需要手动触发 next/navigation 的 notFound 方法
比如:/app/overview/not-found.tsx,当访问 /app/overview/page2 时,page2页面获取不到接口数据时,出现局部404
// /app/overview/page2.tsx
import { notFound } from 'next/navigation';

export default function Page1() {
   // 模拟获取数据
   const data = null;

   if (!data) {
      return notFound();
   }

    return <h1>I am page2...</h1>;
}
Error
自定义错误页面
全局错误页面
全局错误页面,只能在 app 目录下,创建 global-error.tsx,否则不生效
在 production 环境下,可以看到全局错误页面,开发环境不可见
'use client';

export default function GlobalError({
   error, reset
}: {
  error: Error & { digest?: string };
  reset: () => void })
{
  return (
     <html>
 <body>
    <h2>Something went wrong!</h2>
    <button onClick={() => reset()}
           >Try again</button>
        </body>
      </html>
  );
}
局部错误页面
在某个页面或多个共享layout页面目录下,创建 error.tsx
export default async function Page1() {
 throw new Error('xxx');

 return <h1>I am page2...</h1>;
}
Loading
自定义 loading
页面级 loading
当访问 loading.tsx 所在目录下的任何页面时,浏览器会先自动加载并渲染 loading,当页面准备好后,才会隐藏loading,再渲染页面,这一切都是自动完成的
「最佳实践:」
全局loading:app/loading.tsx
局部loading: app/xxxx/loading.tsx
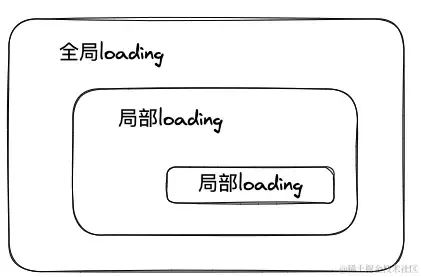
loading 隔离
/app/overview
  | page1/page.tsx
  | page2/page.tsx
  | page.tsx
  | loading.tsx
局部loading 将作用于 overview 下的所有页面
/app/overview
| page1
| page.tsx
| loading.tsx
| page2/page.tsx
| page.tsx
局部loading 只有作用于 overview/page1假设让局部 loading 只作用于某一个页面,而不作用于该目录下的其他页面的情况,该如何实现呢。假设某页面目录是这样的
「- 用“虚拟目录”(任意名字,叫xxx也可)包裹单独作用域的loading和page.tsx」
/app/overview
  |(overview)
     | loading.tsx
     | page.tsx
  | page1/page.tsx
  | page2/page.tsx
loading 将作用于 overview/(overview) 下的所有页面,
即访问 /overview 时,才出现局部loading
而访问 /overview/page1 或 /overview/page2 则回退到全局 loading
组件级 loading
使用于Suspense,作为 fallback 传入
<Suspense fallback={<LoadingComp />}
   <Comp />
</Suspense>
SSG 与 SSR
NextJS 14 默认SSG。 看一个例子
// http://localhost:3000
import { ArticleApi } from '@/app/api/article-api';

export default async function Home() {
 const articles = await ArticleApi.fetchToday();

 return (
    <>
     <section>{new Date().toLocaleTimeString()}</section>
     <section>{JSON.stringify(articles)}</section>;
   </>
 );
}
默认情况下,当你 npm run build 后,再 npm run start,无论你刷新多少次浏览器,内容都是不变的,即使有 fetch 也不行, 显示的时间仍旧是不变的
SSG:静态渲染,在服务端构建部署时,数据重新生效,产生的静态页面可以被分发、缓存到全世界各地
收益:访问更快、减轻服务器压力、利于SEO
场景:没有变化的数据、多页面共享的数据
SSR:动态渲染,在服务端接收到每个用户请求时,重新请求数据,重新渲染页面
收益:显示实时数据、特定用户的特定数据(用于区别对待)、可以获取到客户端请求的cookie和URL参数
Cache
SSG 生效时间
当你需要给SSG固定一个缓存生效时间,可以在页面文件顶部增加一行
export const revalidate = 10; // 10秒

export default Page() {}
将这行代码加入到上面的例子中 -> npm run build -> npm start
可以在浏览器观察到, 每10s 刷新后,时间才会发生变化,这是因为给整个页面设置了 revalidate 为 10s
设置布局或页面的默认重新验证时间。此选项不会覆盖单个 fetch 请求设置的revalidate,如果设置了,页面中的每个fetch都将拥有设置的生效时间
「注意:revalidate = 600 is valid, but revalidate = 60 * 10 is invalid」
SSR
在页面文件顶部加入一行,保证每次访问都是最新的
export const dynamic = 'force-dynamic';fetch 颗粒度缓存
细粒度缓存,应用于 fetch 请求,NextJs 14 默认为 fetch('https://...', { cache: 'force-cache' })
我们可以单独配置每个 fetch 请求的缓存行为。这使您可以更精细地控制缓存行为,比如,可以给fetch分别设置不同的 revalidate,或者一个不变的,一个是在超过有效期可以变化的,应用更加灵活
fetch revalidate 缓存验证时间5
可以给fetch添加next.revalidate属性,设置生命周期
const fetch1 = await(
 await fetch('/api/xxx', {
    next: {
        revalidate: 5, // 请求缓存有效期5秒, 如果设置为true,则表示没有缓存,每次都会请求
    },
 })
).json();
例外情况6
默认情况下,Next.js 会自动缓存服务器上数据缓存中的返回值 fetch 。这意味着可以在生成时或请求时获取数据,缓存数据,并在每个数据请求上重用,多用于查询数据,但是,存在例外情况, fetch 在以下情况下不会缓存请求:
在服务器操作中使用,Server Action
在使用该
POST方法的路由处理程序中使用
fetch no-store 禁用缓存5
将 fetch 选项'cache'设置为 'no-store' 表示在请求时动态获取数据,退出缓存
fetch('https://...', { cache: 'no-store' })no-store vs no-cache5
no-cache 指令并不意味着完全禁止缓存。实际上,它允许缓存存储响应,但要求在使用该缓存响应之前,必须先向原始服务器验证其有效性。
当一个请求带有 no-cache 指令时,浏览器会发送一个条件请求(如使用 If-Modified-Since 或 If-None-Match 头部),询问服务器缓存的内容是否仍然有效。如果服务器确认内容没有变化,就会返回一个 304 (未修改)状态码,指示浏览器可以继续使用缓存的版本;如果内容有变化,服务器则会返回新的内容。
no-store:指令则是彻底禁止缓存
no-cache 是要求在使用缓存响应前进行验证,而 no-store 则是完全禁止存储响应。no-cache 可能仍能提高加载速度,因为它允许在验证后使用缓存,而 no-store 则可能会导致性能下降,因为它强制每次都从服务器获取数据
API 路由缓存
在 route.ts 顶部,添加配置:
// export const dynamic = 'force-dynamic'
export const revalidate = 1000;

export async function GET(request: Request) {}
默认下,GET请求会缓存,POST请求为动态(不缓存)
Cache (服务器上通过第三方库获取数据)
如果您使用的是不支持或公开 fetch 的第三方库(例如,数据库、CMS 或 ORM 客户端),可以使用 API路由段配置选项 或 unstable_cache 进行配置
例如:在服务端,请求数据库
import { unstable_noStore as noStore } from 'next/cache';

export async function fetchRevenue() {
  noStore(); // 这里明确标记 noStore

  try {
    // 请求数据库
  } catch (error) {}
}
import { getUser } from './data';
import { unstable_cache } from 'next/cache';
const getCachedUser = unstable_cache(
async (id) => getUser(id),
['my-app-user']
);
export default async function Component({ userID }) {
const user = await getCachedUser(userID);
...
}React cache
React cache 函数也可以用于记忆数据请求
cache(fn) 将fn的执行结果缓存起来,再次调用时,可以从缓存中获取结果
应用场景:同一页面中,多个组件都会向服务器请求相同的接口或数据,我们只希望请求一次接口或数据
「疑问:上面的应用场景不对呀,如果大家共享数据,为什么不直接在父组件上请求数据,然后 props 传递呢,用 cache 不是多此一举么???」
假如,这些组件作为独立可请求数据的发布组件/页面呢
那么,显然我们需要 cache 来缓存结果
「如何使用?」
用 React.cache 将服务端/客户端请求数据的函数包裹起来,如果多个组件同时请求该函数,则在相同页面仅请求一次,看例子:
// app/utils.ts
import { cache } from 'react';

const getData = () => new Promise(resolve =>
  setTimeout(() => resolve(new Date().toLocaleTimeString())
,3000));

export const getItem = cache(async () => {
 console.log('------ 请求 ------');
 // 模拟查询数据库
 const item = await getData();
 return item;
});
// app/item/[id]/layout.tsx
import { getItem } from './lib/util';
export default async function Home() {
const time = (await getItem()) as string;
return ();
}
// app/item/[id]/page.tsx
import { getItem } from './lib/util';
export default async function Page() {
const time = (await getItem()) as string;
return ();
}看服务端日志,发现尽管layout和page都请求了getItem,但getItem只执行了一次,「Wonderful !!!」
SSG 预渲染动态参数的页面
使用 generateStaticParams 替代 nextjs@13 的 getStaticPaths
// /product/[id]/page.tsx
export const revalidate = 1000; // 1000秒

export function generateStaticParams() {
   // return { [propertyName]: value };
   return [1, 2, 3].map(id => {
     id
   })
}

export default async function Page(p: { params : { id: string }}) {
    const data = await getData(p.param.id);
    // return ...
}
Streaming(异步渲染)
「Stream 处理」:将一个“大块”数据分成“多个小块”来处理,说白了,就是 nextjs 可以将一个页面分成静态渲染部分和动态渲染部分,免于等待所有组件全加载完才渲染,造成页面 blocking
「应用场景」:流媒体、文件操作、stream 数据、异步渲染组件
「使用」:自从 React 17 后,前端就支持通过 Suspense/lazy 进行异步渲染组件,现在我们通过服务端渲染
「好处」:可以实现一个页面,部分静态渲染(数据不变化部分),部分动态渲染(数据变化部分),「Wonderfully」
先将数据请求放到组件中独立请求
保证数据请求是动态的(no-store),否则,没必要使用Stream,直接SSG就好了
引入组件,然后用 Suspense 包裹
// A、B 动态异步渲染,C 静态渲染,
import { Suspense } from 'react'
import { A } from '@/app/components/A';
import { B } from '@/app/components/B';
import { C } from '@/app/components/C';

export default function Page() {
  return (
      <C />
      <Suspense fallback={<p>Loading feed...</p>}>
          <A />
      </Suspense>
      <Suspense fallback={<p>Loading feed...</p>}>
          <B />
      </Suspense>
  )
}
Network Waterfall(网络瀑布)
请求 A --> 请求 B ---> 请求 C ---> ....
这就是网络请求瀑布,如果A、B、C三者没有强制依赖关系,那么如此请求全部完成后,才能渲染页面,性能低下
「Bad:」
export default async function Page() {
    const data1 = await fetch1();
    const data2 = await fetch2();
    const data3 = await fetch2();
    // return ...;
}
「Good:」
export default async function Page() {
  const [data1, data2, data3] = await Promise.all([
      fetch1(),
      fetch2(),
      fetch3()
  ])
  // return ...
}
「虽然,NextJs 支持在客户端请求数据,但一般不建议这么做,为什么呢?」
在 SPA 中获取数据的一种常见模式是最初呈现占位符,然后在组件挂载后(「useEffect」)获取数据。不幸的是,这意味着在父组件完成加载自己的数据之前,获取数据的子组件无法开始获取,这种现象称为:「客户端-服务端瀑布」
将数据请求转移到在服务器上进行请求,那么获取数据的组件,一定是 async function 的
// 'use client';
export default async function Page() {
  // request data from server
  const data = http / service 请求
  if (!data) return null

  //客户端请求
  //useEffect(() => {
  //  // http 请求
  //}, [])

  return <section>{JSON.stringify(data)}</section>
}
Client Component vs Server Compoennt
「NextJs 默认将所有组件都视为服务端组件」
Client Component: 客户端组件,组件顶部有
'use client'标识,,用户可以在浏览器进行页面交互,比如使用 useState、useEffuct、next/navigation等,「它既在服务器又在浏览器运行,先服务器,然后浏览器」Server Component: 服务端组件,完全在服务端渲染,因此无法进行用户交互
「❌ 错误认知:“它既然是客户端组件,那么它只在客户端运行”」
| Category | Render on Server | Render on Client |
|---|---|---|
| Server Component | ✅ | ❌ |
| Client Component | ✅ | ✅ |
「如果组件使用了 useState、useEffect 或 第三方库(用于交互)等,而没有将文件标识为 'use client',系统将会报错」
「如果将一个文件手动标记为 'use server'(虽然NextJs默认将所有文件都视为在服务端运行),但如果客户端组件'use client' 里面想直接调用服务端的函数,比如 form action、点击请求service, 需要告诉浏览器,这个函数是运行在服务端的」
为什么要这么做???
如果不做标记,你
'use client'的组件,import 要调用的函数,浏览器会把它当作在浏览器执行的,那么就 over 了
两种方式标记:
方式一:将客户端组件交互的函数内标记为
'use server'
// server, /app/actionss/user.ts
export async function createUser(body) {}
export async function test() {}

// client, /app/user/create/page.tsx
'use client';
import { createUser, test } from '@/app/actions/user';
export default function Page() {
  async function create(formData: FormData) {
    'use server'; // 标记
    // 调用服务端 service
    await createUer(formData);
  }

  async function clickHandler() {
    'use server'; // 标记
     await test()
  }

  return (
     <>
       <form action={create}>...</form>
       <section onClick={clickHandler}>test</section>
     </>;
}
方式二:直接在服务器文件顶部标记
use server,表示这个文件在服务端运行,客户端组件上调用时,就不用在函数内部再标识use server了
// server, /app/actionss/user.ts
'use server';
export async function createUser(body) {}
export async function test() {}

// client, /app/user/create/page.tsx
'use client';
import { createUser, test } from '@/app/actions/user';
export default function Page() {
  async function create(formData: FormData) {
    // 'use server'; // 标记
    // 调用服务端 service
    await createUer(formData);
  }

  async function clickHandler() {
    // 'use server'; // 标记
     await test()
  }

  return (
     <>
       <form action={create}>...</form>
       <section onClick={clickHandler}>test</section>
     </>;
}
use server 注意事项:
当一个文件标识为 'use server',那么它 export 的函数必须为 async,export 对象也不行,否则客户端组件 import 时,报错
-
"use server" file can only export async functions, found object. These functions are required to be defined as async, because "use server" marks them as Server Actions and they can be invoked directly from the client through a network request.
export type 没有问题,看一个例子
❌ 报错,user server 只能导出异步函数和类型,无法导出对象
// api/service.ts
'use server';
export const QueryUserSchema = z
    .object({
      name: z.string(),
      age: z.number().optional()
    });

// api/route.ts
import { QueryUserSchema } from './service.ts';
export async function GET(req: NextRequest) {
    const filters =
        getQueryParams<typeof QueryUserSchema._type>(req);

    return NextResponse.json({});
}
✅ 直接导出类型就 ok 了
// api/service.ts
'use server';
const QueryUserSchema = z
.object({
name: z.string(),
age: z.number().optional()
});
export type QueryUserParams = typeof
QueryUserSchema._type;
// api/route.ts
import { QueryUserParams } from './service.ts';
export async function GET(req: NextRequest) {
const filters =
getQueryParams<QueryUserParams>(req);
return NextResponse.json({});
}Hydration Mismatch(水合不匹配)
现象分析
服务端渲染与浏览器渲染不一致,react hydrate 不匹配
在渲染应用程序时,从服务器预渲染的 React 树和在浏览器中第一次渲染时渲染的 React 树之间存在差异(水合),浏览器这时会报错:Error: Text content does not match server-rendered HTML
「Hydration」 是指 React 通过附加事件处理程序将服务器中预呈现的 HTML 转换为完全交互式的应用程序
先看一个例子:
// Randmo 组件
'use client';
import { useEffect, useState } from 'react';

export default function Random(p: {}) {
 const [value, setValue] = useState(Math.random());
 useEffect(() => {
     const intervalId = setInterval(() => {
         setValue(Math.random());
     }, 1000);
     return () => {
  clearInterval(intervalId);
     };
 }, []);
 return <>{value}</>;
}

// page.tsx
export default function Page() {
   return (
     <>
       <h1>I am a random</h1>
       <Random />
     </>
}
浏览器报错 warning:Text content did not match. Server: "0.49532635194084684" Client: "0.11063157855511907"
诱因调查
「❌ html 标签嵌套有问题,万恶之源 p 标签」
<p> 嵌套在另一个 <p> 标签中: <p><p>111</p></p><section> 嵌套在 <p> 标签中: <p><section>222</section></p><ul> 或 <ol> 嵌套在 <p> 标签中: <p><ul></ul></p>交互式内容不能嵌套(嵌 <a> 套在 <a> 标签中、 <button> 嵌套在 <button> 标签中等)
❌ 使用像在渲染逻辑中一样 typeof window !== 'undefined' 的检查
❌ 使用仅限浏览器的 API,例如 window 渲染逻辑中的 API localStorage
❌ 在渲染逻辑中使用与时间相关的 API, Date() 例如构造函数
❌ 修改 HTML 的浏览器扩展
❌ CSS-in-JS 库配置不正确 请参照官方示例 github.com/vercel/next…3
❌ 未正确配置尝试修改 html 响应的 Edge/CDN,例如 Cloudflare Auto Minify
❌ iOS 尝试检测文本内容中的电话号码、电子邮件地址和其他数据,并将它们转换为链接,从而导致水合作用不匹配
可以使用以下 meta 标记禁用此功能:
<meta
  name="format-detection"
  content="telephone=no, date=no, email=no, address=no"
/>
药到病除
利用 useEffect 只能在浏览器上运行的原则
让出现问题的部分,只在客户端才真正渲染,因为在 React 水合期间, useEffect 被调用。这意味着浏览器 window API 可以在没有水合不匹配的情况下使用
// Randmo 组件
'use client';
import { useEffect, useState } from 'react';

export default function Random(p: {}) {
 const [value, setValue] = useState(Math.random());
   const [isClient, setIsClient] = useState(false);
 useEffect(() => {
            setIsClient(true); // Good boy !

     const intervalId = setInterval(() => {
         setValue(Math.random());
     }, 1000);
     return () => {
  clearInterval(intervalId);
     };
 }, []);
 return <>{isClient ? value : null}</>;
}
「不建议使用这种方式,它增加了组件的复杂度,」
推荐使用:在特定组件上禁用 SSR
首先,将特定组件导出方式改为
export default然后,在组件被引用处,使用使用
next/dynamic
// page.tsx
import dynamic from 'next/dynamic';

const NoSSR = dynamic(() => import('./Random')
    ,{ ssr: false }); // ✅

export default function Page() {
   return (
       <section>
           <h1>hy</h1>
           <RandomNoSSR />
       </section>
   );
}
使用 suppressHydrationWarning
有时,服务器和客户端之间的内容不可避免地会有所不同,例如时间戳。您可以通过添加到 suppressHydrationWarning={true} 元素来忽略水合不匹配警告
根据上面的例子,其他什么都不用做,只给不匹配的地方加上 suppressHydrationWarning 属性,即可
「该方案适用于非得用 SSR,又嫌改造组件麻烦的场景:」
'use client';

export default function Random(p: {}) {
   // ...
   return <section suppressHydrationWarning>{value}</section>;
}
最佳方案:父子组件 initialData
既然 Hydration mismatch 出现,是因为客户端第一次渲染与服务端渲染不一致,那么我们何不可以将服务端获取的初始数据传递给客户端组件不就解决问题了么
这样,既保留了组件的SSR权利,同时又保留了客户端交互能力
我们将特定组件拆分两个组件,服务端组件作为客户端组件的的父组件,父组件先 SSR,将请求的 initialData 通过 props 给子组件,子组件渲染传递 initialData,完美解决!
// Client.Random.tsx
'use client';
import { useEffect, useState } from 'react';

export function ClientRandom(p: { initialData: number }) {
   const [value, setValue] = useState(p.initialData);
   useEffect(() => {
      const intervalId = setInterval(() => {
        setValue(Math.random());
      }, 1000);
      return () => {
          clearInterval(intervalId);
      };
   }, []);
 return <section>{value}</section>;
}

// Server.Random.tsx
import { ClientRandom } from './Client.Radom';

export function ServerRandom() {
 return <ClientRandom initialData={Math.random()} />;
}

// page.tsx
import { ServerRandom } from './Server.Random';

export default function Page() {
    return (
        <section>
            <h1>hy</h1>
            <ServerRandom />
        </section>
    );
}
SSR/Streaming 同时保留客户端交互能力
「场景:」
实时更新新闻、股票、crypto信息等,假设每1分钟数据自动更新
「逻辑:」
组件装载后,每1分钟请求一次数据
防止 Hydration Mismatch
Streaming
「方案:」
父子组件 initialData 方案
「简要代码:」
// page.tsx
import { A as AServer } from '@/app/components/A/Server.A';
import { Suspense } from 'react';

export default function Page() {
  return (
     <>
       // ....
       <Suspense>
         <AServer />
       </Suspense>
     </>
  )
}

// /components/A/Server.A.tsx
impont { A as AClient } from './Client.A'
export async function A() {
    const data = await fetch('/api');
    return <AClient initialData={data} />
}

// /components/A/Client.A.tsx
'use client';
export function A(p: { initialData: SomeType }) {
  const [data, setData] = useState<SomeType>(p.initialData);

  const fetchFn = async () => {
    const res = await fetch('/api');
    setData(data);
  };

  useEffect(() => {
    fetchFn();
    const intervalId = setInterval(fetchFn, 10000);

    return () => {
      clearInterval(intervalId);
    };
  }, []);

 return <section>{JSON.stringify()}</section>
}
fetch data 的几种方式
详情请看 [NextJs 14] Summarize data fetching architecture4
Form 与 Server Action
Form表单基本流程:「前端Form校验 --> 提交数据 --> 服务端校验数据 --> 入库」
基础了解
在 React-SPA 项目中,提交表单,我们常常是 API POST 方式进行交互. 本文不再介绍 API 提交表单方式
NextJs 14,在保留了 API 交互方式外,还提供了 server action 模式,server action 表示操作是在服务器上执行的异步函数,它们可以在服务器和客户端组件中使用,以处理Next.js应用程序中的表单提交和数据变更.
使用 React "use server" 指令定义服务器操作。可以将指令放在 async 函数的顶部以将该函数标记为服务器操作,也可以将该文件的顶部放在单独文件的顶部以将该文件的所有导出标记为服务器操作
// 方式一:内联函数方式
// form.tsx
import { createUser } from '@/app/actions/user';
export default function Page() {
  async function create(formData: FormData) {
    'use server'; // ~~~~~~~~~~~
    // 调用服务端 service
    await createUer(formData);
  }

  return <form action={create}>
    <input name="username" />
    <button type="submit">Submit</button>
  </form>;
}

// @/app/actions/user.ts
export async function createUser(formData: FormData) {
  const username = formData.get('username'),
  // ...
}

// 方式二:模块方式
// form.tsx
import { createUser } from '@/app/actions/user';
async function create(formData: FormData) {
    // 调用服务端 service
    await createUer(formData);
}

// @/app/actions/user.ts
'user server';
export async function createUser(formData: FormData) {}
// ...
「注意:Server Component Form 与 Client Component Form 在使用上存在一定的差异」
| 组件 | inline 'use server' | module 'use server' | 用户交互 | 说明 |
|---|---|---|---|---|
| Server Component | ✅ | ✅ | ❌ | 「只能先提交服务端,才能在服务端进行表单验证后,才能反馈给页面显示错误,网速慢,那不疯了么」 |
| Client Component | ❌ | ✅ | ✅ | 「可以直接先在前端进行验证,然后才提交给服务端」 |
经对比:
服务端组件只能导入使用模块级
"use server"指令的操作建议使用客户端组件方式进行表单操作,在前端进行表单验证,验证都ok了,再真正提交表单数据。到server端进行验证。做到双保险.
无论是服务端组件还是客户端组件,都在server端进行表单验证,
表单交互
不建议 - 方式一:useFormState 与 useFormStatus
客户端组件结合 ReactDom.useFormState 与 ReactDom.useFormStatus,服务端可以返回表单验证错误信息,
这种方式,是服务端进行验证,然后反馈给客户端
import { useFormState  } from 'react-dom';
export default function CreatePage() {
  const { pending } = useFormStatus();
  return (
    <form action={formAction}>
      // ...
      <button type="submit" disabled={pending}>Submit</button>
    </form>
  )
}
Example:
// form.tsx
'use client';

import { useFormStatus, useFormState } from 'react-dom';
import { createUser } from '@/app/actions/user';
import type { State } from '@/app/actions/user';

export default function CreatePage() {
    // 初始化表单状态
    const { pending } = useFormStatus();
    // 初始化表单状态
    const initialState: State = { errors: {}, message: '' };
    const [state, dispatch] = useFormState(createUser, initialState);

    return (
        <form
            action={dispatch} // createUser
            className="space-y-4"
        >
            <section>
                <input
                    type="text"
                    name="username"
                    placeholder="please enter your name"
                />
                {/* 显示error */}
                {state.errors?.username &&
   state.errors.username.map((error: string) => (
                        <p className="mt-2 text-sm text-red-500"
                            key={error}>{error}</p>
                 ))}
            </section>
            <section>
                <input
                    type="password"
                    name="password"
                    placeholder="please enter your password"
                />
                {/* 显示error */}
                {state.errors?.password &&
                    state.errors.password.map((error: string) => (
                        <p className="mt-2 text-sm text-red-500"
                            key={error}>{error}</p>
          ))}
            </section>
            <button type="submit" disabled={pending}>
                Submit
            </button>
        </form>
    );
}
// /app/actions/user
'use server';
import { revalidatePath } from 'next/cache';
import { redirect } from 'next/navigation';
import { z } from 'zod';
export type State = {
errors?: {
username?: string[];
password?: string[];
};
message?: string;
};
const CreateUserSchema = z.object({
username: z.string(),
password: z.string().min(6, { message: 'Password should be at least 6 characters long' }),
});
export async function createUser(prevState: State, formData: FormData) {
// const rawFormDta = {
// username: formData.get('username'),
// password: formData.get('password'),
// };
const validatedFields = CreateUserSchema.safeParse(formData);
console.log(validatedFields?.error?.flatten().fieldErrors, validatedFields.data);
if (!validatedFields.success) {
return {
errors: validatedFields.error.flatten().fieldErrors,
message: 'Create User failed',
};
}
const { data } = validatedFields;
console.log(data);
// 插入数据库...
// 成功后,刷新缓存后跳转
revalidatePath('/userlist');
redirect('/');
}「技巧:表单提交,除了默认传递formData外,可以添加额外参数,比如update操作,需要id哈」
id包含在formData中方式,提交至服务端
// form.tsx
<input type="hidden" name="id" value={id}

// action.ts
export async function updateUser(formData: FormData) {
  const id = formData.get('id')
}
actionFn.bind(null, id) 方式,id不包含formData中,id作为actionFn的第一个参数
// form.tsx
const updateUserWithId = updateUser.bind(null, id);

<form action={updateUserWithId} />

// action.ts
export async function updateUser(id: string, formData: FormData) {}

// form-2.ts
const updateUserWithId = updateUser.bind(null, id);
const [state, dispatch] = useFormState(updateUserWithId, initialState);

<form action={dispatch} />

// action.ts
export async function updateUser(id: string, prevState: any, formData: FormData) {}
推荐 - react-hook-form + zod + @hookform/resolvers + @hookform/error-message
前端校验成功后 --> 表单提交 --> 服务端校验 --> 入库
react-hook-form5
'use client';

import { useForm } from 'react-hook-form';
import { createUser } from '@/app/actions/user';
export default function App() {
    const { register, handleSubmit, formState } = useForm({
      // 如果设置了 defaultValues,则会将value注入到相应表单元素上,一般用于update操作
      //  defaultValues: {
      //      name: 'xfz',
      //      age: 20,
      //  },
    })
    // 用 register 代替表单元素的 name,并用 handlerSubmit 包裹 actionFn 进行提交
    return (
        <form onSubmit={handleSubmit(submit)}>
            <input
                {...register('name', {
                    required: 'This field is required',
                    minLength: { value: 3, messsage: 'This is too short' },
                    validate: value => {
                        if (value === 'f*ck') {
                            return 'No bad words please';
                        }
                    },
                })}
            />
            {/* 显示校验error */}
            <span>{formState.errors.name.message}</span>

            <input
                type="number"
                {...register('age', { required: 'This field is required' })}
            />
            <span>{formState.errors.age.message}</span>
            <button type="submit">Submit</button>
        </form>
    )
};
即使客户端对表单进行了验证,但服务端依然需要对此再次校验,依然使用 zod 工具,至于服务端返回的错误可以通过 toast 显示
// @/app/actions/user.ts
'use server';

import { z } from 'zod';

const CreateUserSchema = z.object({
    name: z
        .string().min(3, { messsage: 'This is too short' })
        .refine(value => value !== 'f*ck', { message: 'No bad words please' }),
    age: z.number()
});

export type CreateUserSchemaParams = typeof CreateUserSchema._type;

export async function createUser(body: CreateUserSchemaParams) {
    try {
      CreateUserSchema.parse(body);
      // 插入数据库

      return { data: xxx, success: true }
    } catch (error) {
        return {
          data: null,
          status: false,
          status: 500,
          message: 'Something went wrong ' + (error as Error).message,
        }
    }
}
上面表单页面的代码有些乱,不够整洁,表单校验方法都写在了 html 部分上了,不便于维护,那么我们该如何解决呢? Fllow the article...
zod used in Component5
zod 校验工具,既可以在前端和后端都可使用,这就方便了,保持前后端校验一致,一套校验两处用,太帅了
与 react-hook-form 结合使用,额外需要 @hookform/resolvers 这个包,推荐大家还可以增加 @hookform/error-message,一套齐全,开整...
import { z } from 'zod';
import { useForm } from 'react-hook-form';
import { zodResolver } from '@hookform/resolvers/zod';
import { createUser } from '@/app/actions/user';
import { useRouter } from 'next/navigation';

const FormSchema = z.object({
    name: z
        .string()
        .min(3, { message: 'This is too short' })
        .refine(value => value !== 'f*ck', { message: 'No bad words' })
    age: z.number(),
});

export default function App() {
    const { register, handleSubmit, formState: { errors } } = useForm({
      // Here load the schema
      resolver: zodResolver(FormSchema),
      // 如果设置了 defaultValues,则会将value注入到相应表单元素上,一般用于update操作
      //  defaultValues: {
      //      name: 'xfz',
      //      age: 20,
      //  },
    })

    const submit = async (formData: typeof FormSchema._type) {
       const router = useRouter();

       try {
          const { success, message } = await createUser(formData);
          if (success) {
             alert('success');
             router.push('/userlist');
             router.refresh();
          } else {
             alert('Create failed: ' + message);
          }
       } catch (error) {
          console.error(error?.message ?? error)
       }
    }

    // 用 register 代替表单元素的 name,并用 handlerSubmit 包裹 actionFn 进行提交
    return (
        <form onSubmit={handleSubmit(submit)}>
            <input {...register('name')} />
            <span>{errors.name.message}</span>

            <input type="number" {...register('age')} />
            <span>{errors.age.message}</span>

            <button type="submit">Submit</button>
        </form>
    )
};
代码看着清爽多了,继续优化 error 信息...
@hookform/error-message5
根据上面的例子,我们可以将表单验证错误信息封装一个组件,方便使用
import { ErrorMessage } from '@hookform/error-message';
import { FieldErrors } from 'react-hook-form';

export function FieldError(p: { name: string; errors: FieldErrors }) {
    return (
        <section className="text-red-500">
            <ErrorMessage
                errors={p.errors}
                name={p.name}
            />
        </section>
    );
}
// <span>{errors.name.message}</span>
<FieldError name="name" errors={errors} />
<FieldError name="age" errors={errors} />SEO
在 /app/layout.tsx中,设置顶级 metadata
在页面中也可以设置专属页面 metadata,并与顶级 metadata 进行merge
// /app/layout.tsx
import { Metadata } from 'next';
export const metadata: Metadata = {
 title: 'Nextjs',
 description: 'How to use nextjs',
  keywords: ['nextjs14', 'react', 'typescript'],
  // 当页面被分享到社交平台时,会显示该图片
  openGraph: {
    images: '/opengraph-image.png',
  },
  // 这个地址作为某些配置项的前缀
  metadataBase: new URL('https://next-learn-dashboard.vercel.sh'),
};

// /app/about/page.tsx
import { Metadata } from 'next';
export const metadata: Metadata = {
 title: 'About',

};「如果要SSG动态参数与动态meta的页面,可以配合generateStaticParams 使用」
.env 文件说明
.env 文件存储着 NextJs 运行时的环境变量,包括api地址、数据库连接地址及相关密钥等信息。
以 NEXT_PUBLIC_ 前缀的变量,可以在客户端访问,否则,只能在服务端访问
注意:使用非私有仓库下,要在 .gitignore 添加对 .env 的忽略,防止安全信息被提交
DataBase
我们可以下载数据库到本地,也可以直接使用 云数据库
「数据库类型:」
mongoDB
mySql
sqlite
postgres
「云数据:」
supabase5 - postgres
MongoDB6 - mongodb
vercel7 - postgres
clould mongodb example
在 mongodb 上注册,创建数据名称
编辑 .env 文件,添加mongodb地址
「注意:在.gitignore 添加 .env 的忽略奥」
DATABASE_URL="mongodb+srv://{username}:{password}@cluster0.ugofsmz.mongodb.net/{databaseName}"bun add mongoose连接数据库
import mongoose from 'mongoose';

export const connectDB = async () => {
 await mongoose.connect(process.env.DATABASE_URL);
 console.log('DB Connected');
};
创建数据表 model
import mongoose from 'mongoose';

const Schema = new mongoose.Schema({
    user: {
        type: String,
        required: true,
    },
    age: {
        type: Number,
        required: true,
    },
});


// 定义 user 表
const UserModel = mongoose.models.user || mongoose.model('user', Schema);

export default UserModel;
操作数据库
/api/route.ts
import { connectDB } from '@/lib/config/db';
import UserModel from '@/lib/models/UserModel';
import { NextRequest, NextResponse } from 'next/server';

const LoadDB = async () => {
    await connectDB();
};

LoadDB();

export async function GET(request: NextRequest) {
    const data = await UserModel.find({});
    return NextResponse.json({ data });
}

export async function POST(request: NextRequest) {
    const { name, age } = await request.json();
    await UserModel.create({
        name,
        age,
    });
    return NextResponse.json({ msg: 'User Created' });
}

export async function DELETE(request: NextRequest) {
    const id = request.nextUrl.searchParams.get('id');
    await UserModel.findByIdAndDelete(id);

    return NextResponse.json({ msg: 'User Deleted' });
}

export async function PUT(request: NextRequest) {
    const id = request.nextUrl.searchParams.get('id');
    const body = await req.json();
    await UserModel.findByIdAndUpdate(id, {
        $set: {
            name: body.name,
            age: body.age
        });

    return NextResponse.json({ msg: 'Todo Updated' });
}
感觉操作还是有点麻烦哈,那么接下来,咱们改造一下,结合 Prisma 使用
Prisma
Prisma 可以自动生成的类型安全查询构建器,Prisma ORM 通过提供干净且类型安全的 API 来提交数据库查询,从而使开发人员能够轻松地推理他们的数据库查询,该数据库查询返回普通的 JavaScript 对象
假如我们直接操作“关系型”数据库,对于干过2年java的我来说,也有一定难度,而使用 prisma 来操作数据库,既简单又方便.
「目前支持:」
postgres
mongodb
mysql
SQLServer
...
「安装:」
bun add prisma -D
「使用:」
「1. 初始化 primsa (指定数据库类型)」
bunx prisma init --datasource-provider mongodb这里我选择 mongodb,也可以 postgres 或其他类型
如果不指定数据库类型
bunx prisma init,默认为postgresql生成 prisam/schema.prisma 文件
// prisam/schema.prisma
generator client {
  provider = "prisma-client-js"
}

datasource db {
  provider = "mongodb" // 数据库类型
  url      = env("DATABASE_URL")// 数据库地址
}
「2. 在 .env 文件中,增加 DATABASE_URL (从 Cloud MongoDB 获取)」
// ,env
DATABASE_URL="数据库地址"
「3. 在 prisam/schema.prisma 中,创建Model(数据表对应ORM)」 每一个 model 对应一个 table
// prisam/schema.prisma

// ...

model User {
  # id Int @id @default(autoincrement())
  id     String   @id @default(auto()) @map("_id") @db.ObjectId # mongodb 固定写法
  email  String   @unique  # 唯一
  name   String?  # 可以为空
  posts Post[]
}

model Post {
  id        String   @id @default(auto()) @map("_id") @db.ObjectId
  title     String
  content   String?
  published Boolean  @default(false)
  author    User     @relation(fields: [authorId], references: [id])
  authorId Int
}

# User 与 Post 两表关联,User.id 对应 Post.authorId,可以做两表联合查询
「4. bunx prisma generate」
它在引擎下运行
prisma generate(自动安装@prisma/client软件包并根据您的模型生成量身定制的 Prisma 客户端 API)。
# 注意:`prisma migrate`命令仅适用于SQL数据库,因为它们具有严格的表结构。比如 postgres、mysql
# 但是MongoDB是一个文档数据库,这些数据是非结构化的,,千万要注意这一点,

# 第一次,则需要执行下面的命令
bunx prisma migrate dev --name init
(init 为这次迁移操作的名称,相当于git commit的信息)
- prisma migrate 迁移以创建数据库表
- 做这一步,我们还没有数据库,执行该命令,创建 mongodb 数据库和默认表示的 `User` 和 `Post` 表
- 该命令做了三件事:
    - 它在 `prisma/migrations` 目录中为此迁移创建了一个新的 SQL 迁移文件
    - 它对数据库执行了 SQL 迁移文
    - 运行 prisma generate
在 /prisma 目录下,生成 migration/xxxx_init/migration.sql 文件

# 如果要变更的数据表,比如在 User 表增加一个 job 字段(String),需要再次进行
迁移
prisma migrate dev --name added_job
生成文件 migrations/xxx_added_job/migration.sql 文件

# 将 Prisma Migrate 添加到现有项目
1. prisma db pull
2. 删除已有的`prisma/migrations` 文件夹
3. mkdir -p prisma/migrations/0_init
4. bunx prisma migrate diff \  生成迁移并将其保存到文件中

# 应用初始迁移
1. bunx prisma migrate resolve --applied 0_init
2. prisma migrate deploy

迁移这块,我还没有研究明白,可查看文档
https://www.prisma.io/docs/orm/prisma-migrate/getting-started
「5. 操作数据库」
const { PrismaClient } = require('@prisma/client');

const prisma = new PrismaClient();

async function main() {
 // 创建
 // await prisma.user.createMany([
 //   { name: '111', email: '111@prisma.io' },
 //   { name: '222', email: '222@prisma.io' },
 // ]);

 // await prisma.user.create({
 //   data: {
 //     name: 'Bob',
 //     email: 'bob@prisma.io',
 //     posts: {
 //        create: [
 //       {
 //   title: 'Hello World',
 //   published: true,
 //       },
 //       {
 //   title: 'My second post',
 //   content: 'This is still a draft',
 //       },
 //   ],
 //    },
 //  },
 // });

 // update
 // await prisma.user.update({
 //   where: {
 //  id: '667edacd346db77a9b95dfab',
 //   },
 //   data: {
 //  name: 'hahaha',
 //   },
 // });

 // delete
 // await prisma.user.delete({
 //   where: {
 //  id: '667edacd346db77a9b95dfab',
 //   },
 // });

    // 查询
    const users = await prisma.user.findMany({
        include: {
            posts: true,
        },
    });
    console.log(users);
}
main()
    .catch(async e => {
        console.error(e);
        process.exit(1);
    })
    .finally(async () => {
        await prisma.$disconnect();
    });
第一次执行时,数据库还没有User表,当插入数据时,没有表,则自动创建表
「6. npx prisma studio」
打开 prisma 客户端 GUI,已连接远程云数据库,便于查询
「7. 修改 prisma」
以 mongodb 为例,创建新索引并重新生成 Prisma 客户端,并推送至远程数据库
bunx prisma db push
创建新索引并重新生成 Prisma 客户端,才能生效
Prisma Used in NextJs
做完上面的步骤,我们可以在 NextJs 中,进行具体操作 「1. 创建 Prisma Cliemt 工具类」
// app/lib/db.ts
import { PrismaClient } from '@prisma/client';

const prismaClientSingleton = () => {
 return new PrismaClient({
            log: proccess.env..NODE_ENV === "development" ? ["query", "error", "warn"] : ["error"],
        });
};

declare global {
 var DB: undefined | ReturnType<typeof prismaClientSingleton>;
}

const DB = globalThis.DB ?? prismaClientSingleton();

export { DB };

if (process.env.NODE_ENV !== 'production') globalThis.DB = DB;
「2. 在业务 service / action 中使用」 @prisma/client 能很好的映射我们在 schema 中定义的 model 数据类型,就不用我们再写相关数据的类型了,方便我们给变量设置类型
'use server';

import { z } from 'zod';
import { DB } from '@/app/lib/db';
// 看出来 prisma 多方便了吧,直接将 User表的数据类型映射过来了
// 因为我们使用
import { User } from '@prisma/client';

const GetUserByIdSchema = z.object({
    id: z.string(),
});

export async function getUserById({ id }: typeof GetUserByIdSchema._type) {
    try {
        const data = await DB.user.findMany({
            where: { id },
        });
        return {
            status: 500,
            data,
            success: true,
            message: 'success',
        };
    } catch (e: unknown) {
        return {
            data: null,
            success: false,
            status: 500,
            message: 'Something went wrong: ' + (e as Error).message,
        };
    }
}

const UserSchema: z.ZodType<Omit<User, 'id'>> = z.object({
 email: z.string(),
 name: z.string().nullable(),
 job: z.string().nullable(),
});

export async function createUser(body: typeof UserSchema._type) {
    try {
        UserSchema.parse(body);
        const result = await DB.user.create({ data: body });
        return {
            status: 500,
            data: result,
            success: true,
            message: 'success',
        };
    } catch (e: unknown) {
        return {
            data: null,
            success: false,
            status: 500,
            message: 'Something went wrong ' + (e as Error).message,
        };
    }
}
// form.tsx
'use client';
import { User } from '@prisma/client';
// ...
// create or update form
export function Form({ user }: { user: User }) {
// ...
}Middleware 中间件
❝中间件是介于应用系统和系统软件之间的一类软件,它使用系统软件所提供的基础服务(功能),衔接网络上应用系统的各个部分或不同的应用,能够达到功能共享的目的
❞
NextJs Middleware 简介
在 NextJS 中,中间件允许在请求完成之前(在缓存内容和路由匹配之前)运行代码,然后,根据传入的请求,可以通过重写、重定向、修改请求或响应标头或直接响应来修改响应

因此,我们可以通过中间件进行 Log 日志记录,权限/登录校验等
在项目跟目录,创建 middleware.ts 文件
「注意:middleware.ts 必须与app目录保持在同级,否则不生效」,血泪史啊,差点把电脑都砸了
「如果有 src 目录,则 src/middleware.ts」
「如果没有 src 目录,则 middleware.ts」
// middleware.ts
import { NextRequest } from 'next/server';

// 中间件处理逻辑
export default function middleware(req: NextRequest) {
   console.log('I am the middleware');

   return NextResponse.next();
}
当请求服务器时,当请求服务器时,服务后台先将打印 “I am the middleware”,然后再匹配路由
但是,打印很多日志,因为每个请求都走了中间件,比如图片、api、甚至是favicon.ico ,因此我们应该隔离掉一些请求
在 middleware 中,增加 config 进行资源匹配,并 export 出来
export default function middleware(req: NextRequest) {
    console.log('I am the middleware');
    if (req.nextUrl.pathname === '/a') {
        // 中间件中,redirect / rewrite,执行使用绝对路径地址,不能使用相对路径
        // return NextResponse.redirect('/');
        return NextResponse.redirect(new URL('/', req.url));
    }
}

// 中间件匹配原则,不在这个范围内则不会执行 middleware 逻辑
export const config = {
 matcher: ['/((?!.*\\..*|_next).*)', '/', '/(api|trpc)(.*)'],
};
刷新页面,这次清爽了~
中间件使用场景
身份验证和授权:在授予对特定页面或 API 路由的访问权限之前,确保用户身份并检查会话 cookie
服务器端重定向:根据特定条件(例如,区域设置、用户角色)在服务器级别重定向用户
路径重写:支持 A/B 测试、功能部署或旧版路径,根据请求属性动态重写路径到 API 路由或页面。
爬虫程序检测:通过检测和阻止爬虫程序流量来保护您的资源
日志记录和分析:在页面或 API 处理之前捕获和分析请求数据以获取内容
功能标记:动态启用或禁用功能,以实现无缝的功能推出或测试
中间不适用的场景
复杂的数据获取和操作
繁重的计算任务:中间件应该是轻量级的,响应速度快,否则可能会导致页面加载延迟
大量的session处理:虽然中间件可以处理基本的session task,但大量的session处理应由专用的身份验证服务或路由处理程序管理
不建议在中间件中执行直接数据库操作
cookie headers、CORS
cookie
export default function middleware(req: NextRequest) {
 let cookie = req.cookies.get('xxx');
 console.log(cookie);

 const allCookies = req.cookies.getAll();
 console.log(allCookies);

 req.cookies.has('xxx'); // => boolean
 req.cookies.delete('xxx');

 // Setting cookies on the response using the `ResponseCookies` API
 const response = NextResponse.next();
 response.cookies.set('vercel', 'fast');
 response.cookies.set({
            name: 'vercel',
            value: 'fast',
            path: '/',
 });
 cookie = response.cookies.get('vercel');
 console.log(cookie);
        return response; // 会在浏览器中设置 cookie
}
headers
export default function middleware(req: NextRequest) {
 // Clone the request headers and set a new header `x-hello-from-middleware1`
 const requestHeaders = new Headers(req.headers);
 requestHeaders.set('x-hello-from-middleware1', 'hello');
 // 可以在 api 请求中,req.headers 看到  'x-hello-from-middleware1' => { name: 'x-hello-from-middleware1', value: 'hello' },

 // You can also set request headers in NextResponse.rewrite
 const response = NextResponse.next({
        request: {
            // New request headers
            headers: requestHeaders,
        },
 });

 // Set a new response header `x-hello-from-middleware2`
 response.headers.set('x-hello-from-middleware2', 'hello');
 return response;
}
CORS
import { NextRequest, NextResponse } from 'next/server';

const allowedOrigins = ['https://acme.com', 'https://my-app.org'];

const corsOptions = {
 'Access-Control-Allow-Methods': 'GET, POST, PUT, DELETE, OPTIONS',
 'Access-Control-Allow-Headers': 'Content-Type, Authorization',
};

export function middleware(request: NextRequest) {
 // Check the origin from the request
 const origin = request.headers.get('origin') ?? '';
 const isAllowedOrigin = allowedOrigins.includes(origin);

 // Handle preflighted requests
 const isPreflight = request.method === 'OPTIONS';

 if (isPreflight) {
  const preflightHeaders = {
   ...(isAllowedOrigin && { 'Access-Control-Allow-Origin': origin }),
   ...corsOptions,
  };
  return NextResponse.json({}, { headers: preflightHeaders });
 }

 // Handle simple requests
 const response = NextResponse.next();

 if (isAllowedOrigin) {
  response.headers.set('Access-Control-Allow-Origin', origin);
 }

 Object.entries(corsOptions).forEach(([key, value]) => {
  response.headers.set(key, value);
 });

 return response;
}

export const config = {
 matcher: '/api/:path*',
};
waitUntil
waitUntil() 方法将 promise 作为参数,并延长中间件的生存期,直到 promise 结算。这对于在后台执行工作很有用,比如日志记录
import { NextRequest, NextResponse } from 'next/server';
import type { NextFetchEvent } from 'next/server'

export default function middleware(req: NextRequest, event: NextFetchEvent) {
  event.waitUntil(
    fetch('https://my-analytics-platform.com', {
      method: 'POST',
      body: JSON.stringify({ pathname: req.nextUrl.pathname }),
    })
  )
  return NextResponse.next();
}

export const config = {
 matcher: ['/(api|trpc)(.*)'],
};
使用多个中间件
虽然每个项目只支持一个 middleware.ts 文件,但您仍然可以以模块化方式组织中间件逻辑。将中间件功能分解为单独的 .ts 文件或 .js 文件,并将它们导入到主 middleware.ts 文件中 参考方案8
「Example:」
「1. 在项根目录创建 middlewares 文件夹」
「2. 在 /middlewares 下创建几个 middleware」
// /middlewares/authMiddleware.ts
import { NextRequest, NextResponse } from 'next/server';
import type { NextFetchEvent } from 'next/server';

export default function auth(req: NextRequest, ev: NextFetchEvent) {
 console.log('------- auth ------');
 const userId = req.cookies.get('userId');
 if (!userId) {
  return NextResponse.redirect(new URL('/login', req.url));
 }
 return NextResponse.next();
}

// /middlewares/loggerMiddleware.ts
import { NextRequest, NextResponse } from 'next/server';
import type { NextFetchEvent } from 'next/server';

// mock api
const analyze = (data: { pathname: string; searchParams: Record<string, string> }) =>
    new Promise<void>(resolve => {
        setTimeout(() => {
            console.log('---- Record log ----');
            resolve();
        }, 2000);
    });

export default function loggerMiddleware(req: NextRequest, event: NextFetchEvent) {
    const {
        nextUrl: { pathname, searchParams },
    } = req;
    event.waitUntil(
        // fetch('https://my-analytics-platform.com', {
        //   method: 'POST',
        //   body: JSON.stringify({ pathname: req.nextUrl.pathname }),
        // })

        analyze({
            pathname,
            searchParams: Object.fromEntries(searchParams),
        })
    );
 return NextResponse.next();
}

// /middlewares/testMiddleware.ts
import { NextRequest, NextResponse } from 'next/server';

export default function testMiddleware(req: NextRequest) {
    console.log('------- test ------');

    return NextResponse.next();
}
3.在项目根目录创建 middleware.ts 文件,并整合上面的中间件
// /middleware.ts
import { NextRequest } from 'next/server';
import type { NextFetchEvent } from 'next/server';
import authMiddleware from './middlewares/authMiddleware';
import logMiddleware from './middlewares/loggerMiddleware';
import testMiddleware from './middlewares/testMiddleware';

// 中间件处理逻辑
export default function middleware(req: NextRequest, ev: NextFetchEvent) {
    const { pathname } = new URL(req.url);

    if (pathname.startsWith('/create')) {
        authMiddleware(req, ev);
    }

    if (pathname.startsWith('/api') || pathname.startsWith('/trpc')) {
        logMiddleware(req, ev);
    }

    return testMiddleware(req);
}

export const config = {
    matcher: [
        '/create/:path*', // 匹配 /create 路径
        '/(api|trpc)(.*)', // 匹配 /api 路径
    ],
};
因为我想 auth 通过后,后面都执行test,所以,才没有都加上 return,如果每一个中间件都有自己的匹配路径的话,可以都return
if (pathname.startsWith('/create')) {
        return authMiddleware(req, ev);
    }

    if (pathname.startsWith('/api') || pathname.startsWith('/trpc')) {
        return logMiddleware(req, ev);
    }
身份验证 和 授权
概念了解
Authentication:身份验证,验证用户是否已登录
Authorization:授权,用户是否拥有访问某些资源的权限
Cookie 与 Session
「Cookie:」 是服务器能在用户客户端设备存储状态信息,存储在浏览器上
「Session:」 当用户登录时,服务器会创建一个 session,并为其生成一个唯一的 session ID。这个 session ID 会被存储在客户端的 cookie 中。服务器通常在后端存储 session 数据,例如在内存、数据库或其他存储系统中,当客户端发起请求时,会携带cookie,服务单根据 session ID 获取对应存储的用户数据,从而进行身份验证
JWT(JSON Web Token)
JWT 是与 Session 截然不同的认证解决方案。Session 是将用户数据全部存在服务端,JWT 则是将所有数据都保存在客户端,为确保安全性,会加上签名,每次请求的时候都会携带这些数据,后端解析后获取该用户的身份信息。使用 JWT 的好处在于服务器不需要保存任何 session 数据,更容易实现扩展
「JWT 就是串加密后的随机字符串」,它由三部分组成
「Isuuer Data」:: 发行人数据
「Custom Data」:自定义数据,如用户信息
「Secret Signing Key」:密钥(存储在服务端,客户端永远看不到)
Seesion vs Token
| 「Type」 | 「session」 | 「token(例如 JWT)」 |
|---|---|---|
| 「存储方式」 | 当用户登录时,服务器会创建一个 session,并为其生成一个唯一的 session ID。这个 session ID 会被存储在客户端的 cookie 中。服务器通常在后端存储 session 数据,例如在内存、数据库或其他存储系统中 | 当用户登录时,服务器会生成一个 token。这个 token 包含了一些用户的数据,以及签名来确保其完整性。客户端会存储这个 token,例如在 cookie、localStorage 或其他地方。当客户端进行请求时,它会将 token 发送到服务器,服务器会验证 token 的有效性 |
| 「状态」 | 通常是有状态的。意味着服务器需要存储关于每个 session 的信息 | 通常是无状态的。服务器不需要存储 token 的信息,因为每次请求都会带有 token,服务器只需验证其有效性 |
| 「跨域」 | Cookies 在默认情况下不支持跨域 | 可以轻松地在不同的域之间传输,因为它们只是一个字符串 |
| 「过期方式」 | 可以设置 session 的过期时间,在此时间后,session 就会失效 | 可以在生成 token 时设置过期时间,也可以为 token 设置刷新策略 |
| 「安全性」 | 由于 session ID 通常存储在 cookie 中,它可能容易受到 CSRF(跨站请求伪造)攻击 | 如果存储在 HTTP-only 的 cookie 中,可以减少 XSS(跨站脚本)攻击的风险,但如果不当地使用,可能会暴露于其他攻击。 |
| 「可扩展性」 | 对于大型应用,管理服务器上的 session 可能会变得复杂,尤其是在负载均衡环境中 | 由于是无状态的,因此很容易扩展,适用于大型、分布式应用 |
| 「使用场景」 | 适合传统的、单一的 web 应用 | 适合 SPA(单页应用)、移动应用、API 服务和跨域场景 |
登录身份验证第三方库及平台
Auth0
Clerk
Lucia
NextAuth.js
...
身份验证和授权流程
通过一个模拟的小例子,来熟悉一下身份验证和授权流程,不用在意代码细节,可能细节有点问题
「1. 创建一个登录页面 /app/login/page.tsx」
import { login } from '@/app/actions/auth';

export default function LoginPage() {
    return (
        <form action={login}>
            <input
                type="email"
                name="email"
  placeholder="Email"
                required
            />
            <input
                type="password"
                name="password"
  placeholder="Password"
                required
            />
            <button type="submit">Login</button>
        </form>
    );
}
「2. 编写 login action」
用户身份信息验证成功后,生成session,然后将seesion写到客户端浏览器上
// @/app/actions/auth.ts
'use server';
import { cookies } from 'next/headers';
import { NextResponse } from 'next/server';
import { redirect } from 'next/navigation';

export async function login(formData: FormData) {
    try {
        // 用户名+密码校验通过后...

        // 生成session,并写道浏览器上
        const expires = +new Date(Date.now() + 60 * 60 * 1000); // 有效期1h
        const session = 'test123';
        cookies().set('session', session, { expires, httpOnly: true });

        // 在service中,不能使用 NextResponse 进行重定向
        // NextResponse.redirect('/');
        redirect('/');
    } catch (error) {
        throw error;
    }
}
「3. 授权(中间件)」
通过中间件,进行路由守卫
// middleware.ts
import { NextRequest, NextResponse } from 'next/server';

export default function middleware(req: NextRequest) {
    const { pathname } = new URL(req.url);

    if (pathname.startsWith('/create')) {
        const session = req.cookies.get('session')?.value;
        if (!session) {
            return NextResponse.redirect(new URL('/login', req.url));
        }
    }

    return NextResponse.next();
}

export const config = {
    matcher: ['/create/:path*']
}
当访问
/create时,如果未登录(获取不到session),则重定向到/login

NextAuth
next-auth 它是开源js库,提供了不同的验证用户方案,可用于实现自己的登录和注销,常见的几种:
「OAuth 身份验证」(使用 Google、GitHub、LinkedIn 等登录...
「用户名和密码」 登录验证
next-auth 同时还提供了 auth, signIn, signOut 等方法,用于身份验证
「具体使用如下:」
「1. bun add next-auth@beta」
「2. 在 .env 设置唯一环境变量 AUTH_SECRET」
bunx auth secret或者openssl rand -base64 32将生成的字符串拷贝到
.env文件中用于加密令牌和电子邮件验证哈希的随机值
「3. 创建 /app/login/page.tsx」
'use client';
import { authenticate } from '@/app/actions/authentication';

export default LoginPage() {
  // ...
  <form action={authenticate}>...</form>
}
「4. 创建 /app/actions/authentication.ts」
'use server';
import { AuthError } from 'next-auth';
import { signIn } from '@/auth';

export async function authenticate(
  prevState: string | undefined,
  formData: FormData,
) {
  try {
    // 选用 “邮箱密码” 登录方式
    await signIn('credentials', {
        ...formData,
        redirect: true,
        callbackUrl: '/',
    });
  } catch (error) {
    if (error instanceof AuthError) {
      switch (error.type) {
        case 'CredentialsSignin':
          return 'Invalid credentials.';
        default:
          return 'Something went wrong.';
      }
    }
    throw error;
  }
}
「5. 在项目根目录创建 auth.ts 文件,导出 next-auth 的signIn、signOut 等方法」
import NextAuth from 'next-auth';
import Credentials from 'next-auth/providers/credentials';
import bcrypt from 'bcrypt';
import { z } from 'zod';
// import { getUser } from '@/app/service/user';

export const { signIn, signOut, auth } = NextAuth({
    // 有几种验证方式,就有几个provider,这里使用邮箱/密码方式
    providers: [
        Credentials({
            async authorize(credentials) {
                // 表单验证用户凭证
                const parsedCredentials = z
                    .object({ email: z.string().email(), password: z.string().min(6) })
                    .safeParse(credentials);

                // 如果验证成功,获取数据库中相应的用户信息
                if (parsedCredentials.success) {
                    const { email, password } = parsedCredentials.data;
                    // const user = await getUser(email);
                    const user = { userId: '123', email, password: 'xxxxx' };
                    // 用户不存在,则验证失败
                    if (!user) return null;
                    // 密码验证
                    const passwordsMatch = await bcrypt.compare(password, user.password);
                    if (passwordsMatch) return user;
                }

                // 表单验证失败
                console.log('Invalid credentials');
                return null;
            },
        }),
    ],
});
「6. 配置 auth.config」
// auth.config.ts
import { NextAuthConfig } from 'next-auth';

export const authConfig = {
    pages: {
        signIn: '/login', // 配置这个:当验证失败,会自动跳转到 /login
    },
    callbacks: {
        // auth 保存用户的 session
        // request 发起的请求
        authorized({ auth, request: { nextUrl } }) {
            // 在页面路由切换时,调用该方法,这里判断是否登录
            const isLoggedIn = !!auth?.user;
            if (nextUrl.pathname.startsWith('/create')) {
                // if (isLoggedIn) return true;
                // return false; // Redirect unauthenticated users to login page
                return isLoggedIn;
            } else if (isLoggedIn) {
                return Response.redirect(new URL('/creat', nextUrl));
            }
            return true;
        },
    },
    providers: [], // Add providers with an empty array for now
} as NextAuthConfig;
「7.将 auth.config 添加到 NextAuth 上」
// auth.ts
import { authConfig } from './auth.config';

export const { auth, signIn, signOut } = NextAuth({
  ...authConfig,
  providers: [
      // ...
  ]
「8. 在 middleware.ts 中,导入 auth.config」
import NextAuth from 'next-auth';
import { authConfig } from './auth.config';

export default NextAuth(authConfig).auth;

// 配置什么时候执行中间件检查
export const config = {
  matcher: ['/((?!api|_next/static|_next/image|.*\\.png$).*)'], // 排除这些地址
};
「9. 浏览器访问 /create 看效果吧」
clerk 第三方登录平台
cleark9 为用户提供了登录验证/注销、注册用户、用户角色等服务,作为一个平台,它提供了精美的登录/注销/注册页面,因此用户session保存在该平台服务器上
通过 @clerk/nextjs。当集成至我们的服务中后,我们可以同 我们可以通过相关 api 获取到 seesion,然后存到我们自己的数据库中,便于我们管理.
具体操作跟着官网一步一步来就可以了,比较方便简单
国际化 i18n
NextJs 提供配置内容的路由和呈现以支持多种语言的能力。使网站适应不同的区域的内容显示
next-intl
以 next-intl 为例,项目结构如下
├── messages
│   ├── en.json  英文
│   └── cn.json  中文
├── next.config.mjs
└── middleware.ts
└── app
    └── [locale]
        ├── layout.tsx
        └── page.tsx
        └── sign-in
             └── page.tsx
        └── sign-up
             └── page.tsx
「1. bun add next-intl」
「2. 根目录下,创建 messages 目录,用于存放不同语言的内容信息」
「3. 在 messages 目录下,创建相关语言的内容信息文件,一种语言,一个文件,对应页面的内容信息」
// /messages/en.json
{
  "rootLayout": {
     "test": "Test"
  },
  "auth": { // 可以根据路由定义 key
      "sign-in": {
          "title": "Sign in !"
       },
       "sign-out": {
          "title": "Sign out !"
       },
    }
  },
  "home": {
     "buttons": {
         "add": "Add",
         "remove": "Remove"
     }
  }
}

// /messages/cn.json
{
  "rootLayout": {
     "test": "测试"
  },
  "auth": { // 可以根据路由定义 key
      "sign-in": {
          "title": "登录 !"
       },
       "sign-out": {
          "title": "注销 !"
       },
    }
  },
  "home": {
     "buttons": {
         "add": "添加",
         "remove": "删除"
     }
  }
}
「4. 配置 next.config.mjs」
/** @type {import('next').NextConfig} */

import createNextIntlPlugin from 'next-intl/plugin';

const nextConfig = {
 reactStrictMode: false,
};

const withNextIntl = createNextIntlPlugin();

export default withNextIntl(nextConfig);
「5. 在根目录创建 i18n.ts,配置语言信息」
import { notFound } from 'next/navigation';
import { getRequestConfig } from 'next-intl/server';

// Can be imported from a shared config
export const LOCALES = ['en', 'cn'] as const;
export const DEFAULT_LOCALE = 'en';
export type LOCALES_TYPE = (typeof LOCALES)[number];

export default getRequestConfig(async ({ locale }) => {
    // Validate that the incoming `locale` parameter is valid
    if (!LOCALES.includes(locale as any)) notFound();

    return {
        messages: (await import(`./messages/${locale}.json`)).default,
    };
});
「6. 配置 middleware」
import createMiddleware from 'next-intl/middleware';
import { LOCALES, DEFAULT_LOCALE } from './i18n';

// 国际化中间件
const intlMiddleware = createMiddleware({
    locales: LOCALES,
    defaultLocale: DEFAULT_LOCALE,
});

// 不做 auth 校验的页面
const publicPages = ['/', '/sign-in', '/sign-up']

const publicPathnameRegex = RegExp(
 `^(/(${LOCALES.join('|')}))?(${publicPages
        .flatMap((p) => (p === '/' ? ['', '/'] : p))
        .join('|')})/?$`,'i');


export default function middleware(req: NextRequest) {
  const isPublicPage = publicPathnameRegex.test(req.nextUrl.pathname);

  if (isPublicPage) {
     return intlMiddleware(req);
  } else {
      return // 身份校验
  }
}

export const config = {
 matcher: ['/((?!.+\\.[\\w]+$|_next).*)', '/', '/(api|trpc)(.*)'],
};
「7. 将 app 里面的内容,都放到 /app/[locale] 中」
「8,Layout导入i18n,并包裹 NextIntlClientProvider」 用 NextIntlClientProvider 包裹的组件及子组件,可以共享 message
import {NextIntlClientProvider} from 'next-intl';
import {getMessages, getTranslations} from 'next-intl/server';

export default async function LocaleLayout({
  children,
  params: {locale}
}: {
  children: React.ReactNode;
  params: {locale: string};
}) {
  // Providing all messages to the client
  // side is the easiest way to get started
  const messages = await getMessages({
      locale: params.locale,
  });
  const t = await getTranslations('rootLayout');

  return (
    <html lang={locale}>
      <body>
        <NextIntlClientProvider messages={messages}>
          <section>{t('test')}</section>
          {children}
        </NextIntlClientProvider>
      </body>
    </html>
  );
}
访问 /en/~,显示
Test,访问 /cn/~,显示
测试
「9. 在相关页面的设置对应 locale 的信息内容」
**服务端组件: 使用getTranslations **
import { getTranslations } from 'next-intl/server';

export default async function Page() {
  const t = await getTranslations('home');

  return (
      <section>
        <button>{t('add')}</button>
        <button>{t('remove')}</button>
      </section>
  )
}
**客户端组件:使用 useTranslations **
import { useTranslations } from 'next-intl';

export default function Page() {
  const t = useTranslations('home');

  return (
      <section>
        <button>{t('add')}</button>
        <button>{t('remove')}</button>
      </section>
  )
}
「10. 切换语言组件」
'use client';
import { useLocale } from 'next-intl';
import { usePathname, useRouter } from 'next/navigation';

export function ToggleLocale() {
    const locale = useLocale();
    const router = useRouter();
    const pathname = usePathname();

    const toggleLanguage = (item: string) =>
  locale !== item && router.replace(`${item}${pathname.split('/' + locale)[1]}`);

    return {
        <ul>
            {['en', 'cn'].map(item => (
                <li
                    className={`${locale === item ? 'active' : ''}`}
                    onClick={() => toggleLanguage(item)}>
                    {item}
                </li>
            ))}
      </ul>
    }
}
小技巧: 给 useTranslation 或 getTranslation 增加代码提示
// global.d.ts
type Messages = typeof import('./messages/en.json')
declare interface IntlMessages extends Messages {}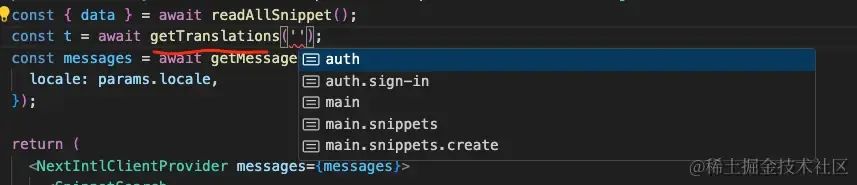
tRPC
tRPC提供前后端共享typescript数据类型,这样可以构建类型安全的API,有着直观的类型提示,开发别提有多丝滑了,对我个人的开发效率提升增加不少
虽然,tRPC 和 REST API 都是用在前后端 http 通信的,但 tRPC 相较于 REST API,甚至是 Graph,使用更加方便
tRPC vs REST API
「REST API 方式:约束型协议」
在客户端配置一个基础的请求地址,如 my.com/10
在客户端配置不同的请求方式以及相应的请求地址:get、post、put、delete
客户端发起请求后,服务端根据不同的请求地址、请求方式,执行对应的处理函数,最后将处理结果返回给客户端
前端 typescirpt 编写,后端可以是任意语言
「tRPC 方式:」
仅有一个请求地址,如 my.com/10 ,任何请求无需再拼接其他子地址
在服务端编写处理函数
在客户端只需要通过函数名称调用即可,(直说哈,方便到飞起)
前端/后端统一 typescirpt 编写,适用于全栈项目
REST API
| Client | Server |
|---|---|
| axios.get('/api/user') | GET /api/user -> getUsers() |
| axios.post('/api/user') | POST /api/user -> addUser(user) |
| axios.put('/api/user') | PUT /api/user -> updateUser(user) |
| axios.delete('/api/user') | DELETE /api/user -> deleteUser(id) |
tRPC
| Client | Server |
|---|---|
| trpcClient.getUsers.query() | -> getUsers() |
| trpcClient.addUser.mutate() | -> addUser(user) |
| trpcClient.updateUser.mutate() | -> updateUser(user) |
| trpcClient.deleteUser.mutate() | -> deleteUser(id) |
tRPC 特点
不需要 method 与 子 URL,由客户端直接调用服务端的函数(RPC)
同一页面中,多个请求会合并为一个请求
作为一个前端模块,零依赖、体积小
新/老项目都可以使用,适用于多种流行框架
tRPC 快速入门
「安装环境:」
bun add @trpc/server@next @trpc/client@next
「服务端:」
初始化 tRPC 服务端
定义函数 procedure
查询:query
操作:mutation (增删改)
组织函数 router (代替api路由)
开启 server 服务,接收请求
// /server/index.js
const { initTRPC } from '@trpc/server';

// 初始化 tRPC 服务端
export const t = initTRPC.create();
/**
 * t.router()
 * t.procedure
 */

// 定义 router
const appRouter = t.router({
    hello: t.procedure.query((params = {}) => {
        // 获取数据 ...
        const data = 'Hello World';
        return data;
    }),
    // input 获取客户端请求数据,可以在此做校验
    // mutation 操作数据
    save: t.procedure.input(val => val).mutation(opt => {
        // 存储数据 ...
        console.log(opt.input)
        return '保存成功';
    })
})

/**
 * opt
 *   .ctx   //  context
 *   .type  // 'mutation'
 *   .getRawInput
 *   .meta
 *   .input // 客户端传来的数据
 *   .next
 */

// 定一个 server 服务器
const server = createHTTPServer({
    router: appRouter
}).listen(5000, () => {
    console.log('server running ...');
})
「客户端:」
创建 tRPC 客户端
配置调用后端服务地址
调用远程函数(RPC)
// /client/index.js
import { createTRPCClient } from '@trpc/client';

// 创建 tRPC 客户端
export const trpcClient = createTRPCClient({
    links: [
        // 配置服务端请求地址
        httpBatchLink({
            url: `http://localhost:5000`
        })
    ]
})

// 使用 trpcClient.query(params?) 调用 trpcServer 的 query
trpcClient.hello.query().then(data => {
    console.log(data); // 'Hello World'
})

// 使用 trpcClient.mutate(data?) 调用 trpcServer 的 mutation
trpcClient.mutate({id: 1, name: 'xfz'}).then(data => {
    console.log(data); // '保存成功'
})
Usage in NextJs
「个人见解」:官网例子使用了react-query 来解决React 组件挂载时没有数据的问题(代替 useEffect 请求初始数据的方式),既然 NextJs 支持 SSR、SSG,没必要使用 react-query,降低代码复杂度
在 NextJs 中,除了使用 @trpc/server 和 @trpc/client 之外,还需要 @trpc/next,@trpc/next 为 tRPC 和 Next.js 的集成提供了特定的功能和工具
「API 路由处理」:使得在项目中设置和处理 tRPC 路由变得非常简单和直接
「Next.js 环境特定功能」:在使用 SSR 和 SSG时,方便与tRPC 一起使用
「简化的客户端和服务器端通信」
「自动类型生成」:动生成类型定义,确保前后端类型一致性
❝官网的例子,使用了 @trpc/next 及 react-query,个人感觉没有必要,
❞
1. 定义结构目录(根据个人喜好)
├── (pages)                    # 页面虚拟目录(页面路由),用于区分其它目录
│   ├── createUser             # http://localhost:3000/createUser
│   │   └── page.tsx
│   └── ssrTest                # http://localhost:3000/ssrTest
│       └── page.tsx
│   ├── favicon.ico
│   ├── globals.css
│   ├── layout.tsx           # RootLayout
│   ├── page.tsx             # http://localhost:3000
├── _trpc                    # 用于存放 trpcRouter 及相关工具
│   ├── index.ts             # trpcRouter 总入口文件,集成各业务router
│   ├── routers              # trpcRouter 业务拆分目录
│   │   ├── product.ts       # 业务1-router
│   │   └── user.ts          # 业务2-router
│   ├── trpcCaller.ts        # 服务端组件调用业务 router 入口
│   └── trpcClient.ts        # 客户端组件调用业务 router 入口
├── api                      # API 路由
│   ├── news                 # RESTFUL API 方式  /api/news
│   │   └── route.ts
│   └── trpc                 # trpc 路由方式
│       └── [...trpc]        # /api/trpc/xxxx
│           └── route.ts
├── lib
│   ├── trpc                # trpc 工具
│   │   ├── context.ts      # trpc 上下文
│   │   └── index.ts        # trpc 初始化
│   └── utils.ts            # 工具集
└── types                   # types
    └── user.ts
    └── product.ts
2. 初始化 trpc 服务
「创建 trpc 上下文」
// app/lib/trpc/context.ts
import { CreateNextContextOptions } from '@trpc/server/adapters/next';

export async function createTRPCContext(opts?: CreateNextContextOptions) {
 // const session = await getServerSession();
        // 模拟 session
 const session = { user: { id: 1, name: 'xfz', role: 'admin' } };
 return { ...(opts || {}), session };
}

export type Context = typeof createTRPCContext;
「初始化 trpc 服务(包含Authorize),并导出相关工具」
上下文
meta
Authorize
// app/lib/trpc/index.ts
import { TRPCError, initTRPC } from '@trpc/server';
import type { Context } from './context';

// 过程元数据,允许添加可选的过程特定 meta 属性,该属性将在所有中间件函数参数中可用
// 一般用于,身份校验,角色区分等
interface Meta {
    authRequired?: boolean; // 是否需要身份验证
    role?: 'tourist' | 'user' | 'admin'; // 用户角色区分
}

const t = initTRPC
    .context<Context>()
    .meta<Meta>()
    .create({
        defaultMeta: {
            authRequired: false,
            role: 'tourist',
        },
    });

export const router = t.router;
export const middleware = t.middleware;
export const publicProcedure = t.procedure;
// Meta: { authRequired: false, role: 'tourist' }

// 需要身份验证的 procedure,其实就是一个 middleware
export const authedProcedure = t.procedure
    .use(async opts => {
        const { next, ctx } = opts;
        if (!ctx.session) {
            throw new TRPCError({ code: 'UNAUTHORIZED' }); // 401
        }
        return next({
            // 看 create-d3-app 模版项目这么写的
            // 根本没有必要,既然ctx中存在,没必要再扩展了
            // ctx: {
            //    session: { ...ctx.session }
            // }
        });
    })
    .meta({
        authRequired: true,
        role: 'user',
    });
// Merge Default Meta: { authRequired: true, role: 'user' }

// admin 用户专属
export const adminProcedure = authedProcedure
    .use(opts => {
        const { meta, next, ctx } = opts;
        if (ctx.session.user.role !== meta?.role) {
            throw new TRPCError({ code: 'FORBIDDEN' }); // 403
        }
        return next();
    })
    .meta({
        role: 'admin',
    });
    // Merge Default Meta: { authRequired: true, role: 'admin' }

// 服务端内部调用
// export const createCaller = t.createCaller;
// createCaller 在 trpc v11 中已经废弃
// @see https://trpc.io/docs/server/server-side-calls#create-caller
export const createCallerFactory = t.createCallerFactory;
上面的代码,我们使用了 trpc 的 meta 功能,用于个人感觉比较方便,meta 使用有两种方式:
「1. 提前设置好meta,然后根据不同的 meta 分别设置不同的 procedure,官方示例」: 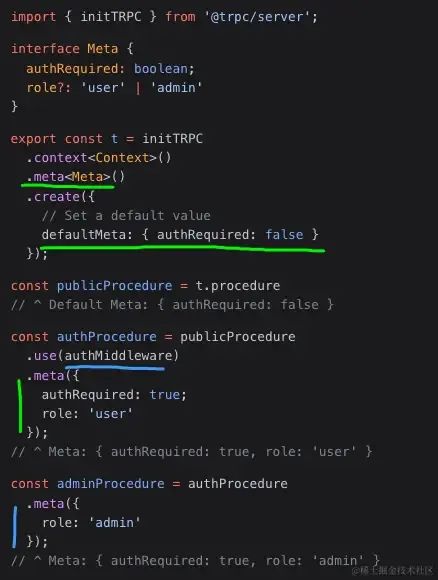
「2. 在具体使用procedure时,才加上 meta,官网示例:」 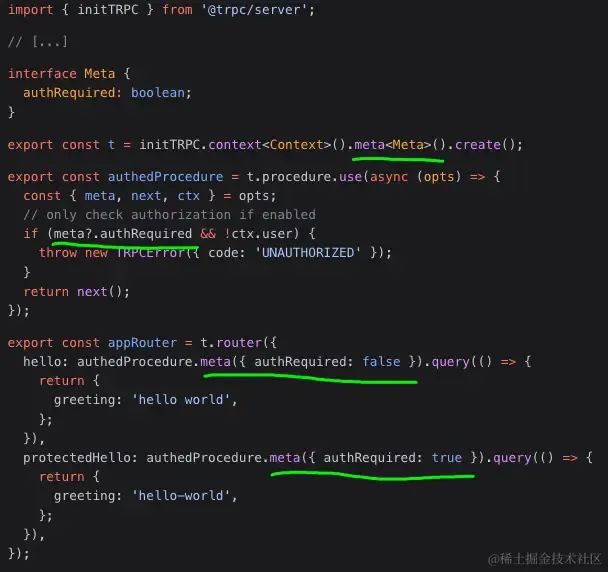
个人偏好第一种方式,根据业务需求选择不同的 procedure
3. 创建 trpcRouter
实际开发中,我们通常有多个业务接口,因此将不同业务分别设置不同的 namepsce,最后统一集成。(类似 vux、redux)
「良好的代码习惯,值得珍惜」
先分别创建两个业务router:user.ts 和 product.ts
// app/_trpc/routers/user.ts
import { TRPCError } from '@trpc/server';
import { publicProcedure, adminProcedure, router, authedProcedure, Meta } from '@/app/lib/trpc';
import { UserType } from '@/app/types/user';

export const User = router({
 getUserList: publicProcedure.query(async opts => {
  console.log(opts.ctx.session, (opts as any).meta);
  // { user: { id: 1, name: 'xfz', role: 'admin' } }
  // { authRequired: false, role: 'tourist' }

  // Get data from Database
  const users: UserType[] = [
   { id: 1, name: 'xfz', age: 20, role: 'admin' },
   { id: 2, name: 'xwb', age: 18, role: 'user' },
   { id: 3, name: 'zc', age: 22, role: 'user' },
   { id: 4, name: 'ssb', age: 25, role: 'user' },
  ];
  return {
   status: 200,
   data: users,
   message: 'success',
  };
 }),
 // 这里使用 adminProcedure,表示只只有 admin 才能创建用户
 createUser: adminProcedure
  .input(val => val)
  .mutation(async opt => {
   console.log(opt.input, opt.ctx.session, (opt as any).meta);
   // { id: 5, name: 'tmd', age: 100, role: 'user' }
   // { user: { id: 1, name: 'xfz', role: 'admin' } }
   // { authRequired: true, role: 'admin' }

   try {
    // Insert data into Database
    return {
     status: 200,
     data: null,
     message: 'Created Success',
    };
   } catch (e: any) {
    console.error(e.message);
    throw new TRPCError({
     code: 'INTERNAL_SERVER_ERROR',
     message: e.message,
    });
   }
  }),
 updateUser: authedProcedure
  .input(val => val)
  .mutation(async opt => {
   console.log(opt.input);
  }),
});
// app/_trpc/routers/product.ts
import { publicProcedure, router } from '@/app/lib/trpc';
export const Prodcut = router({
getAllProducts: publicProcedure.query(async opts => {
return {
status: 200,
data: [],
message: 'success',
};
}),
getProductById: publicProcedure.input(val => val).query(async opts => {
return {
status: 200,
data: {},
message: 'success',
};
}),
});role 可以通过 opts.meta 或 opts.ctx 中获取
调用服务,传参数需要 .input(val => val).query | mutation
引入上面两个 router并集合
// app/_trcp/index.ts
import { router } from '@/app/lib/trpc';
import { User } from './routers/user';
import { Prodcut } from './routers/product';

/**
 * 每个 router 有自己的 namespace,下面的 User 和 Product 就是 namespace
 * trpcClient.User.getUserList
 * trpcClient.Prodcut.getAllProducts
 */
export const trpcRouter = router({
 User,
 Prodcut,
});

/**
 * 如果想要 UserRouter 与 ProductRouter 合并,并在同一 namespace 下
 * trpcClient.getUserList
 * rpcClient.getAllProducts
 */
// export const trpcRouter = t.mergeRouters(User, Product);

export type TRPCRouter = typeof trpcRouter;
4.创建 trpcClient
trpcClient 用在客户端组件发起请求,替代 fetch/axios 请求
// app/_trpc/trpcClient.ts
import { createTRPCClient, httpBatchLink } from '@trpc/client';
import type { TRPCRouter } from '.';
import { getBaseUrl } from '@/app/lib/utils';

export const trpcClient = createTRPCClient<TRPCRouter>({
    links: [
        // 设置 trpc 请求唯一地址,对应api路由
        httpBatchLink({
            url: `${getBaseUrl()}/api/trpc`,
            // http://localhost:3000/api/trpc
        }),
    ],
});

// app/lib/utils.ts
export const getBaseUrl = () => {
    if (typeof window !== 'undefined')
        // browser should use relative path
        return '';
    if (process.env.VERCEL_URL)
        // reference for vercel.com
        return `https://${process.env.VERCEL_URL}`;
    if (process.env.RENDER_INTERNAL_HOSTNAME)
        // reference for render.com
        return `http://${process.env.RENDER_INTERNAL_HOSTNAME}:${process.env.PORT}`;
    // assume localhost
    return `http://localhost:${process.env.PORT ?? 3000}`;
};
5.将 trpcRouter 集成到 nextjs 的 API 路由
目录:app/api/trpc/[...trpc]/route.ts
/api/trpc 与 trpcClient 设置的httpBatchLink 相对应
例如:trpcClient.User.getUserList.query()
客户端实际发起 network:http://localhost:3000/api/trpc/User.getUserList?batch=1&input=%7B%7D
// app/api/trpc/[...trpc]/route.ts
import { NextRequest } from 'next/server';
import { fetchRequestHandler } from '@trpc/server/adapters/fetch';
import { trpcRouter } from '@/app/_trpc';
import { createTRPCContext } from '@/app/lib/trpc/context';

function handler(req: NextRequest) {
    return fetchRequestHandler({
        // 请求端点地址,与 app/api/trpc 目录是对应的
        endpoint: '/api/trpc',
        req,
        router: trpcRouter,
        createContext: createTRPCContext as any,
    });
}
export { handler as GET, handler as POST };
6.1 客户端组件调用 trpc 发起请求
// app/(pages)/page.tsx
'use client';

import { useEffect, useState } from 'react';
import { trpcClient } from '@/app/_trpc/trpcClient';
import { UserType } from '@/app/types/user';

export default function HomePage() {
    const [userList, setUserList] = useState<UserType[]>([]);

    const getUserList = async () => {
        // trpcClient.User.getUserList.query().then(({ data }) => setUserList(data));
        try {
            const { data } = await trpcClient.User.getUserList.query();
            setUserList(data);
        } catch (e) {
            console.error(e)
        }
    }

    useEffect(() => {
        getUserList();
    }, []);

    const create = async () => {
        trpcClient.User.createUser.mutate({
                id: 5,
                name: 'tmd',
                age: 100,
                role: 'user'
        });
    }

    return (
        <section>
            <section>{JSON.stringify(userList)}</section>
            <button onClick={create)>create</button>
            <button onClick={update}>update</button>
        </section>
    );
}
访问 http://localhost:300011
6.2 输入数据校验
首先,procedure 获取参数,需要用 input 进行获取,input 相当于一个中间件,因此,需要将获取的参数(可根据业务进行加工处理)返回给后面的操作,如 query 或 mutation,否则 query 或 mutation 中的 opts.input 获取不到数据
// 调用
await trpcClient.Product.getProductById
    .query({ id: 1 })

// 服务
getProductById: publicProcedure
    .input(val => {
        // 加工数据...
        // const id = 'id_' + val.id;
        return val; // {id: 1}
    })
    .query(async opts => {
        // typescript Error:获取不到 input 的类型
        const { id } = opts.input;
    })
「选用 zod 对 input 进行校验」,例如
getProductById: publicProcedure
    .input(
        z.object({
            id: z.number(),
        })
    )
    .query(async opts => {
        // 通过 zod,类型提示也来啦,🎉
        const { id } = opts.input;
    }
「如果我要对校验好的数据进行再加工,咋办啊?」 Take it easy. 在 input() 后面接上 .use(opts => {}) 中间件,进行处理
getProductById: publicProcedure
    .input(
        z.object({
            id: z.number(),
        })
    )
    .use(opts => {
        const { input } = opts;
        const newInput = { ...input, id: `_id_` + input.id };
        return opts.next({
            input: newInput,
        });
    })
    .query(async opts => {
        console.log(opts.input); // { id: '_id_1'
    });
7.1 服务端组件调用 tRPC
先说结论: 「在服务端组件里不能使用 trpcClient 调用服务,一定要注意这一点」
原则上,服务端组件直接调用服务端的 service 即可,没必要在 Server Side 侧,调用服务还要发起 http 请求,但假如我们的 service 都写在了 trpc router 里了,那么该怎么办呢?
我们先用 trcpClient 在服务端组件上调用 tRPC,看看效果如何
import { trpcClient } from '@/app/_trpc/trpcClient';

export default async function Home() {
 const userList = await trpcClient.User.getUserList.query();

 return <section>{JSON.stringify(userList)}</section>;
}
在开发环境,发现是可以使用的,但如果修改后端返回数据,发现页面内容是不变的,因为 NextJs14 默认GET请求是缓存的,即使路由设置 dynamic = 'force-dynamic' 也无济于事,
同时,npm run build 时,会发生连接服务器失败的错误
因此,我们需要找到 server component 在 server 内部 调用 trpc 的方法,好在,@trpc/server 提供了内部调用的方案
7.2 Server Side Calls
在 v11 之前,通过
t.createCaller可以实现内部调用从 V11 开始,
t.createCaller,由 t.createCallerFactory 实现
「1. 创建内部调用工厂函数 trpcCaller」
// app/lib/trpc/index.ts
// ....

export const createCallerFactory = t.createCallerFactory;

// app/_trpc/trpcCaller.ts
import { createCallerFactory } from '@/app/lib/trpc';
import { trpcRouter } from '.';

// 根据 trpcRouter 创建 caller
const createCaller = createCallerFactory(trpcRouter);

export const trpcCaller = createCaller(
    {
        session: {
            user: {
                id: 1,
                name: 'xfz',
                role: 'admin',
            },
        }
    },
    {
        onError: opts => {
            console.error('An error occurred', opts.error);
        },
    }
);
「在服务端组件上使用」
import { trpcCaller } from '@/app/_trpc/trpcCaller';

export default async function Home() {
    const { data } = await trpcClient.User.getUserList.query();
    return ...
}
现在 npm run build,不再报错了,但生成的页面,仍旧是 SSG
7.3 SSR
根据之前所学 Cache 部分,我们只需在页面设置 export const dynamic = 'force-dynamic' 即可
7.4 trpcCaller 如何注入 session
在 7.2 中,我们注入的 session 方式有问题,无法获取真实的 session,那么,我们改造一下 trpcCaller 这个文件
❌ 千万不要这么做,在后面有说明
const createCaller = createCallerFactory(trpcRouter);

let trpcCaller = null;

export const getTrpcCaller = async () => {
    if (trpcCaller) {
        return trpcCaller;
    }
    // 获取 session
    // const session = await getServerSession();
    const session = {
        user: {
            id: 1,
            name: 'xfz',
            role: 'admin',
        },
    };

    if (!session) {
        throw new Error('Unauthorized');
    }

    trpcCaller = createCaller({ session });
    return trpcCaller;
};
import { getTrpcCaller } from '@/app/_trpc/trpcCaller';
export const dynamic = 'force-dynamic';
export default async function Home() {
const trpcCaller = await getTrpcCaller();
const { data } = await trpcCaller.getTime();
return <section>{data}</section>;
}「上面代码,虽然成功向 trpcCaller 注入了 session,但是存在重大bug,原因如下:」
「会话可能会过期」:会话通常是短暂的,缓存一个会话对象可能会导致在会话过期后继续使用过期的会话。
「多用户环境」:如果你的应用是多用户环境,缓存一个会话对象可能会导致安全问题,因为不同用户的请求可能会共享同一个会话
还是老实地,每次调用 getTrpcCaller 时,再重新获取 session 吧,这坑踩的我,好尴尬...
export const getTrpcCaller = async () => {
    // 获取 session
    // const session = await getServerSession(authOptions);
    const { session } = await createTRPCContext();

    if (!session) {
        throw new Error('Unauthorized');
    }

    return createCaller({ session });
};
为了安全性和唯一性,最好将 session 直接存数据库中,创建一个专门用于 session 管理的表,实在嫌麻烦,那就在用户表加一个 session 字段吧
8.tRPC middleware
trpc 的 middleware,通过
procedure.use(middleware)实现「注意:中间件最后必须要
return opts.next(),否则,后面操作无法进行」use() 只能在 query 或 mutation 前使用
procedure.use(中间件) => newProcedure
前置中间件5
「先处理,再执行 next()」
import { publicProcedure, router } from '@/app/lib/trpc';

export const appRouter = router({
    test: publicProcedure
        .use(opts => {
            // opts: { ctx: { session ...}, next }
            console.log('--- 中间件 --- 前置处理');
            // 注意:中间件最有一定要 return opts.next()
            return opts.next();
        })
        .query(async opts => {
            console.log(‘query...’);
            return 'test';
        }),
});
输出结果:
--- 中间件 --- 前置处理
query...根据此特点,可以在前置中间件中做身份校验
t.procedure
    .use(opts => {
        if (!opts.ctx.session?.user) {
            throw new TRPCError({ code: 'FORBIDDEN' });
        }
        return opts.next();
    })
    .query(opts => {})
后置中间件5
「先执行 next(),再处理」
import { publicProcedure, router } from '@/app/lib/trpc';

export const appRouter = router({
    test: publicProcedure
        .use(opts ={
            const result = await opts.next();
            console.log('--- 中间件 --- 后置处理');
            return result;
        })
        .use(opts => {
            console.log('--- 中间件 --- 前置处理');
            return opts.next();
        })
        .query(async opts => {
            console.log(‘query...’);
            return 'test';
        }),
});
输出结果:
--- 中间件 --- 前置处理
query...
--- 中间件 --- 后置处理ctx 扩展5
export const appRouter = router({
    test: publicProcedure
        .use(opts => {
            console.log('1', opts.ctx);
            return opts.next({
                // 如果 ctx 之前不存在 test,则会添加 test,并包含之前ctx的所有信息
                // 如果 ctx 之前存在 test,则会覆盖 test
                ctx: { test: 123 } // 之前ctx的信息不会丢失,这里相当于 merge 了
            });
        })
        .query(async opts => {
            console.log('2', opts.ctx);
            return 'test';
        }),
});
输出结果:
1, { session: { user: { id: 1, name: 'xfz', role: 'admin' } } }
2, { session: { user: { id: 1, name: 'xfz', role: 'admin' } }, test: 123 }抽离中间件 - t.middleware5
实际开发中,可以将 use 里面的回调函数抽离出来,const mid = t.middleware(fn),然后再由 procedure.use(mid) 连接这样便于代码维护
import { publicProcedure, router, middleware } from '@/app/lib/trpc';

const mid1 = middleware(async opts => {
    console.log('--- 抽离中间件1 ---');
    return opts.next();
});
const mid2 = middleware(async opts => {
    console.log('--- 抽离中间件2 ---');
    return opts.next();
});

export const appRouter = router({
    test: publicProcedure
        .use(mid1)
        .use(mid2)
        .query(opts => {})
合并中间件 merge middleware5
上面的 mid1 和 mid2 合并,然后挂在 procedure 上
import { publicProcedure, router, middleware } from '@/app/lib/trpc';

const mid1 = middleware(async opts => {
    console.log('--- 抽离中间件1 ---');
    return opts.next();
});
const mid2 = middleware(async opts => {
    console.log('--- 抽离中间件2 ---');
    return opts.next();
});

const mid1And2 = mid1.unstable_pipe(mid2);

export const appRouter = router({
    test: publicProcedure
        //.use(mid1)
        //.use(mid2)
        .use(mid1And2)
        .query(opts => {})
知识扩展:合并procedure5
proc1.unstable_concat(proc2) => newProc
9. tRPC 错误码对照表
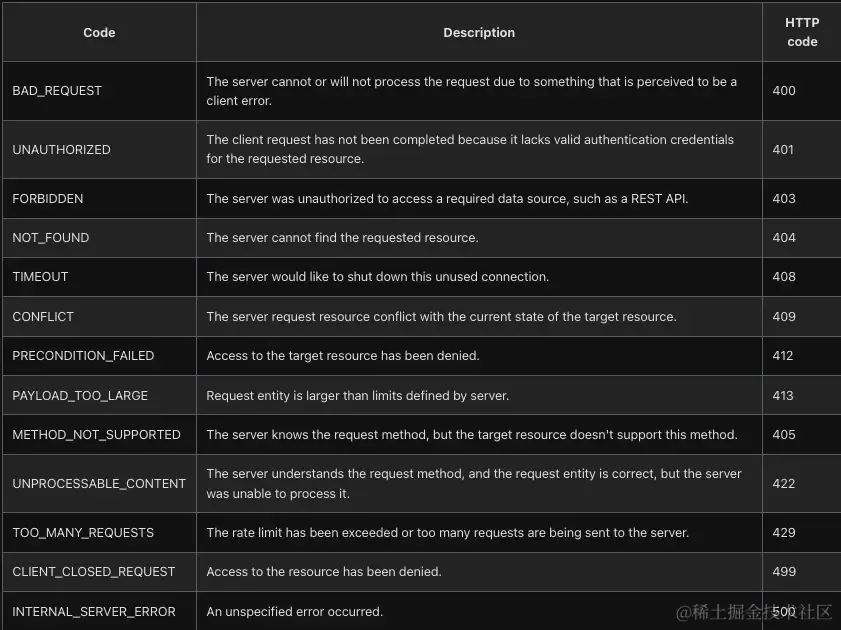
import { initTRPC, TRPCError } from '@trpc/server';

const t = initTRPC.create();
const appRouter = t.router({
    hello: t.procedure.query(() => {
        try {
            alert(111);
        } catch (e) {
            console.error(e.message);
            throw new TRPCError({
                code: 'INTERNAL_SERVER_ERROR',
                message: e.message,
                // 可选项
                cause: e,
            });
        }
    })
});
打印错误
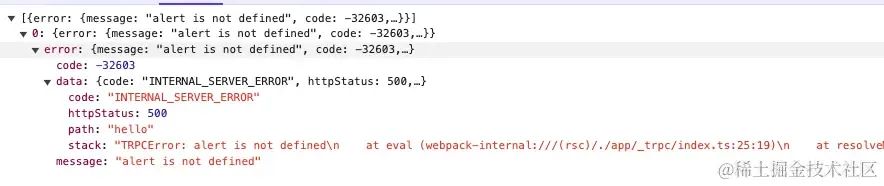
总结
通过上面的学习,已经了解了如何在 NextJs 14 中如何使用 trpc,多加练习,相信你的开发效率会有质的飞跃,相比于REST API,统一的类型,简化的通信机制,使开发更加便捷,
部署
既可以可以在 vercel 或 cloudfare 上部署,也可以在自己购买的云服务器上部署
「部署注意事项」:
服务器保证有 node 环境,
DNS准备(域名)
数据库准备
配置服务端连接数据库白名单
如果部署在云服务器上,要配置环境变量(.env信息)
第一次部署项目,如果使用了 prisma,要先
prisma generate
prisma generate && next build
结语
不觉间,就写了这么多,烟都干没了几包,哈哈~
希望本篇文章能够帮助到你。
在实际项目开发中,踩了不少坑,费了不少烟,尤其是 Server Component 与 Client Component 部分,花了大量时间看文档和调试bug,终于搞明白咋回事儿了,
最后,NextJs 15 也快来了,等以后有时间,咱们再续前缘~
补充
t3-app12 企业级NextJS模版13
参考资料
[1]
NextJs 从入门放弃:https://juejin.cn/post/7265210595912581159
[2]
bun:https://bun.sh/
[3]
github.com/vercel/next…:https://github.com/vercel/next.js/tree/canary/examples/with-styled-jsx-scss
[4]
[NextJs 14] Summarize data fetching architecture:https://juejin.cn/post/7385061036830031872
[5]
supabase:https://supabase.com/
[6]
MongoDB:https://www.mongodb.com/atlas
[7]
vercel:https://vercel.com/
[8]
参考方案:https://reacthustle.com/blog/how-to-chain-multiple-middleware-functions-in-nextjs
[9]
cleark:https://clerk.com/
[10]
my.com/:http://my.com/
[11]
my.com/:http://my.com/
[12]
http://localhost:3000:http://localhost:3000/
[13]
t3-app:https://create.t3.gg/
[14]
企业级NextJS模版:https://github.com/Blazity/next-enterprise
Node 社群


我组建了一个氛围特别好的 Node.js 社群,里面有很多 Node.js小伙伴,如果你对Node.js学习感兴趣的话(后续有计划也可以),我们可以一起进行Node.js相关的交流、学习、共建。下方加 考拉 好友回复「Node」即可。

   “分享、点赞、在看” 支持一波👍


 1532
1532

 被折叠的 条评论
为什么被折叠?
被折叠的 条评论
为什么被折叠?
 到【灌水乐园】发言


