


自定义【Spring Security】实现多种认证方式
概述
Spring Security是一个功能强大且高度可定制的Java安全框架,用于保护基于Spring的应用程序。它重点提供认证(Authentication)和授权(Authorization),并且通过使用Spring的依赖注入(DI)特性,使得安全配置变得灵活和集中。
Spring Security的灵活性和强大功能使其成为保护Spring应用程序的首选安全解决方案。正是由于其高度可配置性,我想引入一组自定义认证器到Rdtalk来适配企业框架多认证诉求。
引言
企业框架通常需要实现多种认证方式,比如用户名密码、手机验证码、邮箱、企业微信等等。Spring Security可以通过自定义认证器AuthenticationProvider 来实现不同的认证方式。接下来咱们就来探索一下Spring Security具体如何来实现多种认证方式。
实践
最近项目上有对接企业微信需求,所以我们以用户名密码、企业微信登录两种方式来进行实践,其他一些登录方式扩展即可loginType即可。
自定义认证器AuthenticationProvider
首先我们可以通用的AuthenticationProvider,以及对应的认证信息Authentication,实际场景中这两个一般是配套使用。认证器AuthenticationProvider有一个认证方法authenticate(),我们需要实现该认证方法,认证成功之后返回认证信息Authentication。
1.CustomerAuthenticationProvider
package com.rdtalk.framework.security.provider;

import java.util.ArrayList;
import java.util.Map;

import javax.annotation.PostConstruct;

import com.rdtalk.common.exception.ServiceException;
import com.rdtalk.common.utils.MessageUtils;
import com.rdtalk.framework.security.model.CustomOAuth2AuthenticationInfo;
import com.rdtalk.framework.web.exception.BusinessException;
import com.rdtalk.framework.web.service.OAuth2AuthenService;
import org.springframework.beans.BeansException;
import org.springframework.context.ApplicationContext;
import org.springframework.context.ApplicationContextAware;
import org.springframework.security.authentication.AuthenticationProvider;
import org.springframework.security.authentication.UsernamePasswordAuthenticationToken;
import org.springframework.security.core.Authentication;
import org.springframework.security.core.AuthenticationException;


import lombok.extern.slf4j.Slf4j;

/**
 * 通用AuthenticationProvider
 *
 * @author rdtalk
 */
@Slf4j
public class CustomAuthenticationProvider implements AuthenticationProvider, ApplicationContextAware {

    private ApplicationContext context;

    private OAuth2AuthenService service;

    @PostConstruct
    public void initAuth2AuthenService() {
        service = context.getBean(OAuth2AuthenService.class);
    }

    @Override
    public Authentication authenticate(Authentication arg0) throws AuthenticationException {
        try {

            @SuppressWarnings("unchecked")
            Map<String, String> map = (Map<String, String>) arg0.getDetails();
            if (map == null) {
                throw new ServiceException(MessageUtils.message("user.auth.error"));
            }

            CustomOAuth2AuthenticationInfo authInfo = new CustomOAuth2AuthenticationInfo();
            authInfo.setAuthType(map.get("authType"));
            authInfo.setEquipinfo(map.get("equipinfo"));
            authInfo.setLoginName(map.get("username"));
            authInfo.setPassword(arg0.getCredentials() == null? "":arg0.getCredentials().toString());
            authInfo.setClientIp(map.get("clientIp"));
            authInfo.setClientId(map.get("client_id"));
            authInfo.setLoginType(map.get("loginType"));

            authInfo.setRequestParams(map);
            //initAuth2AuthenService();
            Object obj = this.service.auth(authInfo);
            UsernamePasswordAuthenticationToken o = new UsernamePasswordAuthenticationToken(obj,
                    arg0.getCredentials(), new ArrayList<>());
            o.setDetails(obj);
            return o;
        } catch (BusinessException e) {
            log.warn("authenticate faild..BusinessException:", e.getCause());
//            throw new BusinessException(ResultCode.UNAUTHORIZED_DATA.getCode(), e.getMessage());
            throw new ServiceException(e.getMessage());
        }catch (Exception e) {
            log.warn("authenticate faild..Exception:", e.getCause());
            throw new ServiceException(e.getMessage());
           // throw new BusinessException(ResultCode.UNAUTHORIZED_DATA.getCode(), e.getMessage());
        }
    }

    @Override
    public boolean supports(Class<?> arg0) {
        return true;
    }

    protected Authentication createSuccessAuthentication(Object principal, Authentication authentication) {
        if (principal == null) {
            return null;
        }
        UsernamePasswordAuthenticationToken result = new UsernamePasswordAuthenticationToken(principal,
                authentication.getCredentials(), new ArrayList<>());
        result.setDetails(authentication.getDetails());
        return result;
    }

    @Override
    public void setApplicationContext(ApplicationContext arg0) throws BeansException {
        context = arg0;
    }

}
注意这里的OAuth2AuthenService,是实现多种认证方式的关键,认证管理器AuthenticationManager会通过authenticate方法查找当前需要使用哪一种认证方式。
2.编写OAuth2AuthenService入口实现类
package com.rdtalk.framework.web.service.impl;

import java.util.Date;
import java.util.Map;
import java.util.Objects;
import java.util.concurrent.ConcurrentHashMap;

import javax.annotation.PostConstruct;

import com.rdtalk.common.exception.ServiceException;
import com.rdtalk.common.utils.MessageUtils;
import com.rdtalk.framework.security.model.CustomOAuth2AuthenticationInfo;
import com.rdtalk.framework.web.exception.BusinessException;
import com.rdtalk.framework.web.service.OAuth2AuthenService;
import org.springframework.beans.BeansException;
import org.springframework.beans.factory.annotation.Autowired;
import org.springframework.context.ApplicationContext;
import org.springframework.context.ApplicationContextAware;
import org.springframework.context.annotation.Primary;
import org.springframework.stereotype.Service;
import com.google.common.collect.Maps;

import lombok.extern.slf4j.Slf4j;

@Primary
@Service
@Slf4j
public class OAuth2AuthenServiceImpl implements OAuth2AuthenService, ApplicationContextAware {

    private static String LOGIN_KEY = "LOGIN_KEY_";


    private Map<String, OAuth2AuthenService> authMap = new ConcurrentHashMap<>();

    @PostConstruct
    public void init() {
        Map<String, OAuth2AuthenService> map = applicationContext.getBeansOfType(OAuth2AuthenService.class);
        map.forEach((x, y) -> {
            String[] s = y.authloginType();
            for (String string : s) {
                authMap.put(string, y);
                log.info("authMap: key:{},class: {}", string, y.getClass().getName());
            }
        });
    }

    @Override
    public Object auth(CustomOAuth2AuthenticationInfo info) {
        Map<String, Object> loginResult = Maps.newHashMap();
        try {
            loginResult.put("loginResult", "S");

            OAuth2AuthenService s = authMap.get(info.getLoginType());

            if(Objects.isNull(s))
            {
                log.info("不支持的认证方式", "");
                throw new ServiceException(MessageUtils.message("user.auth.typerror"));
            }
            return s.auth(info);
        } catch (BusinessException e) {
            loginResult.put("loginResult", "F");
            loginResult.put("loginMsg", e.getMessage());

            throw new BusinessException("ERROR_AUTH", e.getMessage());
        }
    }

    private ApplicationContext applicationContext;

    @Override
    public void setApplicationContext(ApplicationContext applicationContext) throws BeansException {
        this.applicationContext = applicationContext;
    }

}
到这认证通过loginType 基本锁定是用哪种方式,假设当前loginType为WX,下面来构造微信的验证方法
3.以微信登录验证为例编写OAuth2AuthenService实现类
package com.rdtalk.framework.web.service.impl;

import com.google.common.collect.Maps;
import com.rdtalk.common.core.domain.entity.SysUser;
import com.rdtalk.common.core.domain.model.LoginUser;
import com.rdtalk.common.enums.UserStatus;
import com.rdtalk.common.exception.ServiceException;
import com.rdtalk.common.utils.MessageUtils;
import com.rdtalk.common.utils.StringUtils;
import com.rdtalk.framework.security.model.CustomOAuth2AuthenticationInfo;
import com.rdtalk.framework.web.exception.BusinessException;
import com.rdtalk.framework.web.service.OAuth2AuthenService;
import com.rdtalk.framework.web.service.SysPasswordService;
import com.rdtalk.framework.web.service.SysPermissionService;
import com.rdtalk.framework.web.service.UserDetailsServiceImpl;
import com.rdtalk.system.service.ISysUserService;
import lombok.extern.slf4j.Slf4j;
import org.slf4j.Logger;
import org.slf4j.LoggerFactory;
import org.springframework.beans.BeansException;
import org.springframework.beans.factory.annotation.Autowired;
import org.springframework.context.ApplicationContext;
import org.springframework.context.ApplicationContextAware;
import org.springframework.context.annotation.Primary;
import org.springframework.security.core.userdetails.UserDetails;
import org.springframework.stereotype.Service;

import javax.annotation.PostConstruct;
import java.util.Map;
import java.util.Objects;
import java.util.concurrent.ConcurrentHashMap;

@Service
@Slf4j
public class OAuth2AuthenServiceImpl4WX implements OAuth2AuthenService {

    @Autowired
    private ISysUserService userService;
    @Autowired
    private SysPasswordService passwordService;
    @Autowired
    private SysPermissionService permissionService;
    @Override
    public Object auth(CustomOAuth2AuthenticationInfo info) {
        String username = info.getLoginName();
        SysUser user = userService.selectUserByUserName(username);
        if (StringUtils.isNull(user))
        {
            log.info("登录用户:{} 不存在.", username);
            throw new ServiceException(MessageUtils.message("user.not.exists"));
        }
        else if (UserStatus.DELETED.getCode().equals(user.getDelFlag()))
        {
            log.info("登录用户:{} 已被删除.", username);
            throw new ServiceException(MessageUtils.message("user.password.delete"));
        }
        else if (UserStatus.DISABLE.getCode().equals(user.getStatus()))
        {
            log.info("登录用户:{} 已被停用.", username);
            throw new ServiceException(MessageUtils.message("user.blocked"));
        }

//        passwordService.validate(user);
        System.out.println("sadasdas");
        return createLoginUser(user);

    }

    public UserDetails createLoginUser(SysUser user)
    {
        return new LoginUser(user.getUserId(), user.getDeptId(), user, permissionService.getMenuPermission(user));
    }

    public String[] authloginType() {
        return new String[] {"WX"};
    }


}
4.增加多类型验证
只需要cp OAuth2AuthenServiceImpl4WX即可,完成多种方式验证。
5.配置器SecurityConfig
/**
     * 定义认证管理器AuthenticationManager
     * @return
     */
    @Bean
    public AuthenticationManager authenticationManager() {
        List authenticationProviders = new ArrayList();
        authenticationProviders.add(customAuthenticationProvider());
        ProviderManager authenticationManager = new ProviderManager(authenticationProviders);
//        authenticationManager.setEraseCredentialsAfterAuthentication(false);
        return authenticationManager;

    }


    @Bean
    public CustomAuthenticationProvider customAuthenticationProvider() {
        CustomAuthenticationProvider customAuthenticationProvider = new CustomAuthenticationProvider();
        return customAuthenticationProvider;
    }
主要手动增加customAuthenticationProvider,并将customAuthenticationProvider加入到认证管理器
到这里实现多种认证方式基本就结束了。
验证
编写controller
  @GetMapping("/login_test")
    public AjaxResult login_test(String username)
    {
        logger.error("user",username);
        AjaxResult ajax = AjaxResult.success();
        // 生成令牌
        String token = loginService.login4WX(username);
        ajax.put(Constants.TOKEN, token);
        return ajax;
    }
模拟企业微信返回userid,传入登录验证方法 返回如下
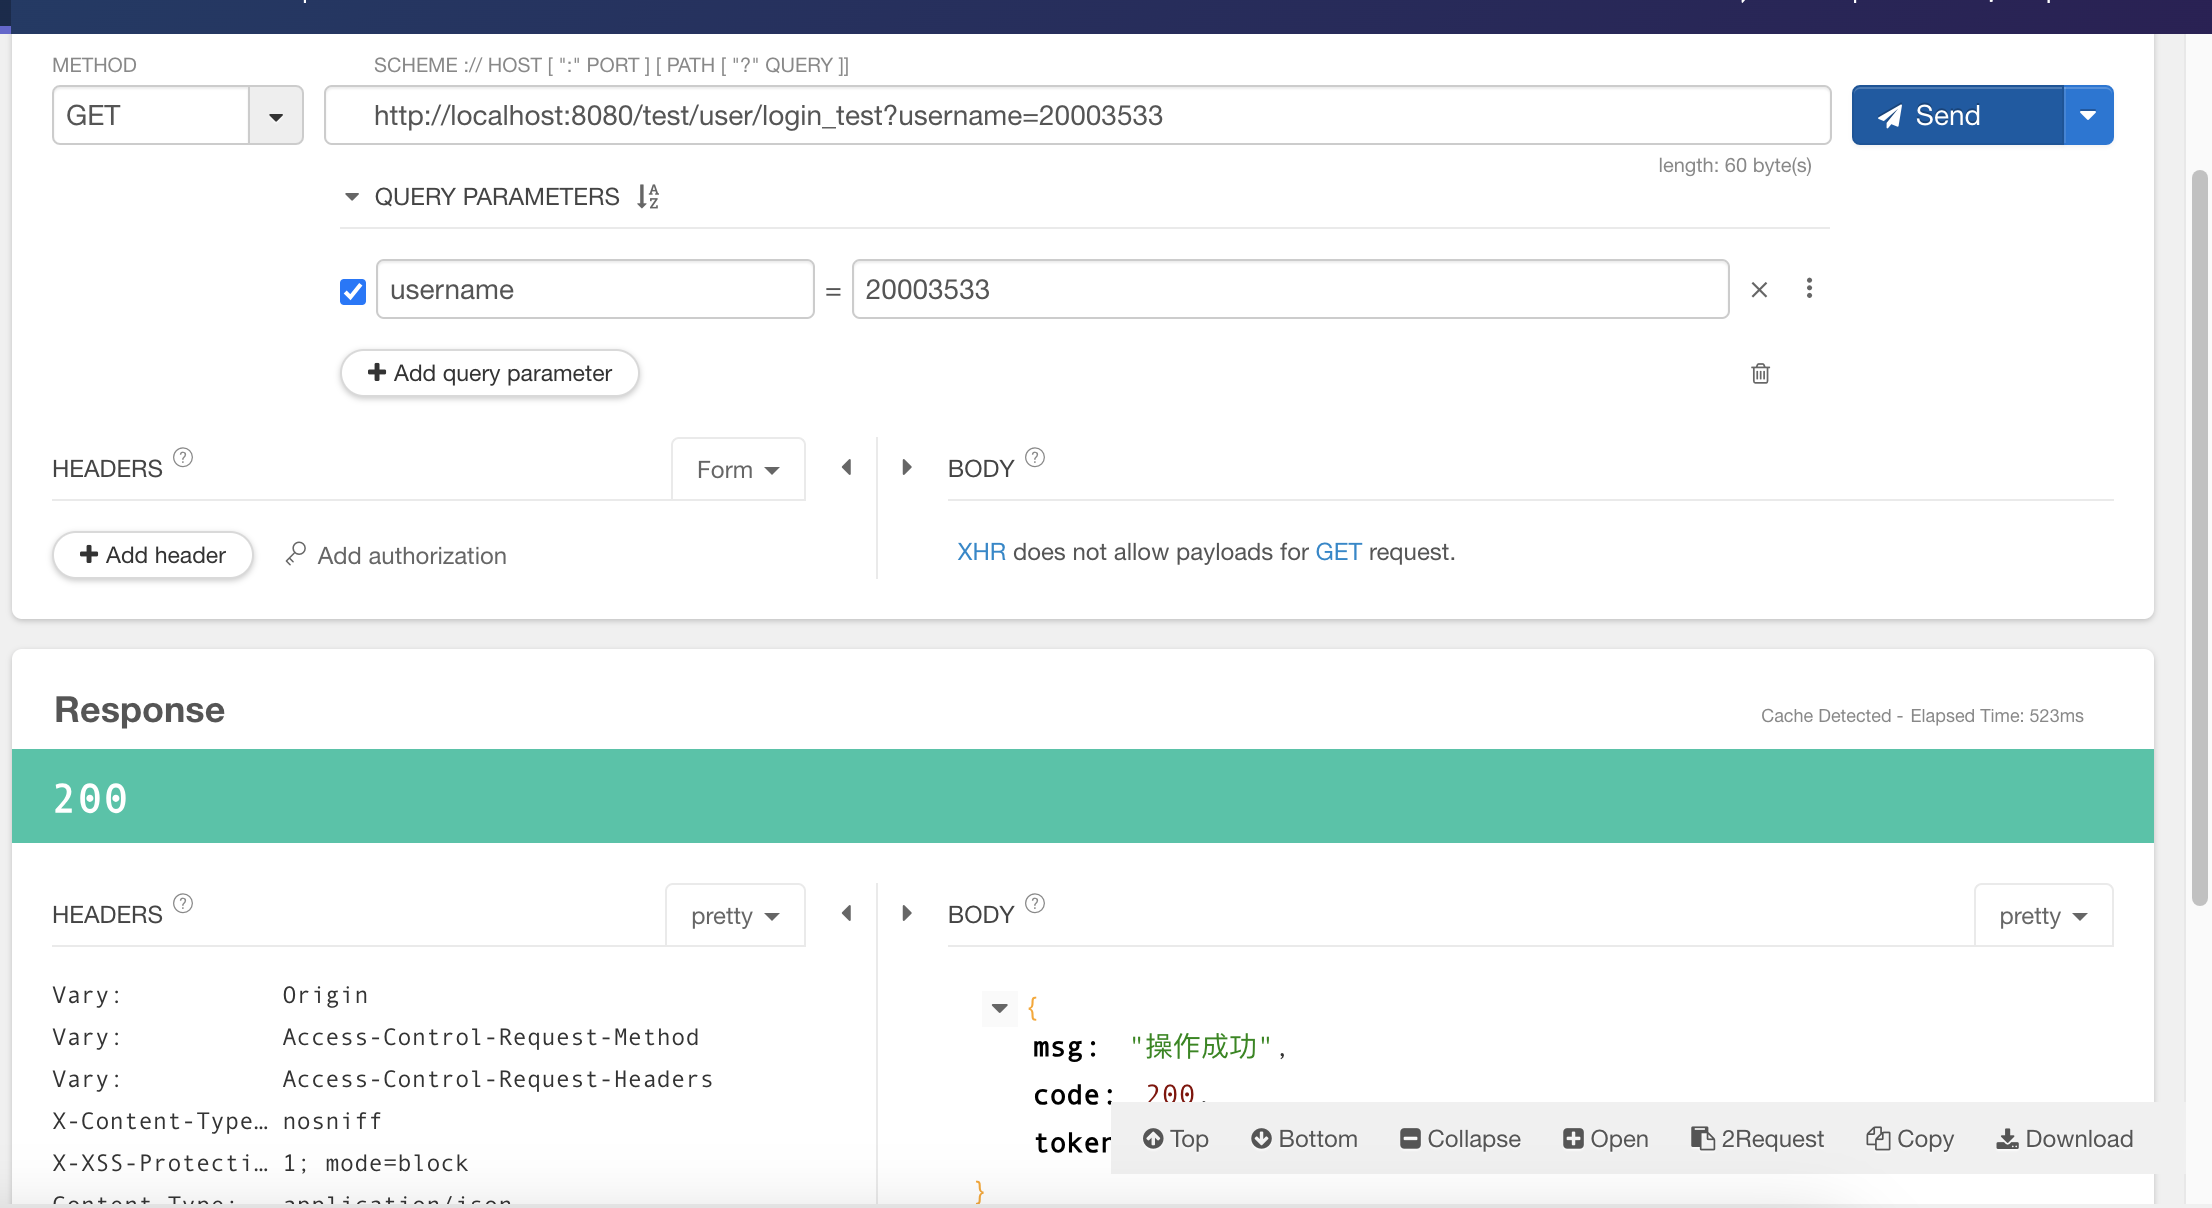
到这里Spring Security实现多种认证方式就结束了,如有错误,感谢指正。


 2716
2716

 被折叠的 条评论
为什么被折叠?
被折叠的 条评论
为什么被折叠?
 到【灌水乐园】发言


