


本人刚接触springboot并进行整理,如有错误欢迎纠正
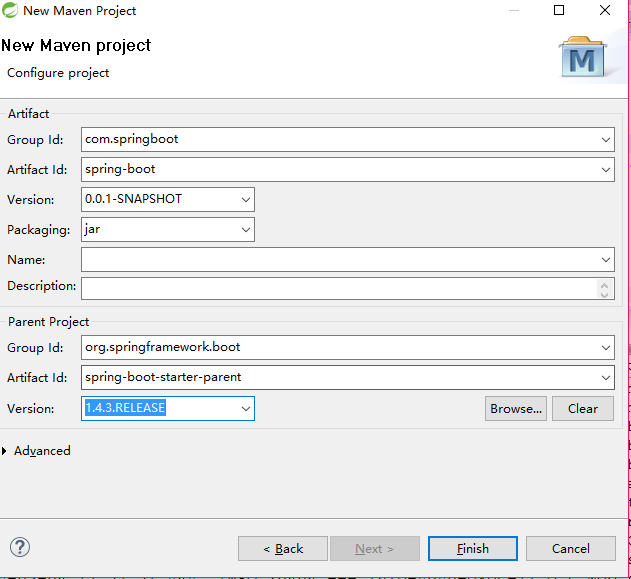
创建maven工程,jar和web工程都支持
maven的pom文件指定JDK版本
<!-- 指定JDK的版本 -->
  <properties>
  	<java.version>1.8</java.version>
  </properties>
  <dependencies>
添加web项目的依赖
 <dependency>
  	<groupId>org.springframework.boot</groupId>
  	<artifactId>spring-boot-starter-web</artifactId>
  </dependency>
配置入门引导类
启动main方法springboot的应用就可以启动,也可以使用spring-boot的插件启动,不做演示
/**
 *
 */
package com.springboot.guide;

import org.springframework.boot.Banner.Mode;
import org.springframework.boot.SpringApplication;
import org.springframework.boot.autoconfigure.SpringBootApplication;
import org.springframework.context.annotation.ComponentScan;

/**
 * @Description:SpringBoot的引导类创建
 * @author:tuizhi-cai
 * @time:2018年3月4日 下午5:34:05
 */
@SpringBootApplication
//配置扫描包可以使用:basePackageClasses={},basePackages={}
@ComponentScan(basePackages={"com.springboot.controller","com.springboot.web"})
//@EnableAutoConfiguration  //支持自动配置
//@EnableConfigurationProperties  //支持配置properties文件
public class GuideClass {

	/**
	 * @Author:tuzhi-cai
	 * @Description: main方法进行入门
	 * @time:2018年3月4日下午5:34:55
	 */
	public static void main(String[] args) {

		//第一种方式使用sping-boot的插件启动:spring-boot:run
	    //第二种方式,配置启动入门程序
		//SpringApplication.run(Demo.class,args); //main入门方法的启动方式
		SpringApplication application = new SpringApplication(GuideClass.class);
		//application.setBannerMode(Mode.OFF); //关闭spring的入门图标
		application.run(args);  //启动springboot
	}

}
编写Controller类,
springboot的默认controller扫描包在引导类的包路径下,需要手动更改包扫描的位置,上面有注解演示;@RestController是@ReponseBody和@Controller的整合,可以直接返回json数据
/**
 *
 */
package com.springboot.controller;

import org.springframework.web.bind.annotation.RequestMapping;
import org.springframework.web.bind.annotation.RestController;

/**
 * @Description:
 * @author:tuizhi-cai
 * @time:2018年3月4日 下午5:51:29
 */
@RestController
public class DemoController {

	/**
	 * @Author:tuzhi-cai
	 * @Description: 测试Springboot的默认扫描包的位置
	 * @time:2018年3月4日下午5:51:56
	 */
	@RequestMapping("/test2")
	public String test(){

		return "扫描到";
	}
}
读取核心properties的配置文件
springboot的默认配置文件在src/main/resources下的application.properties文件;
在application.properties中加入下配置
name=\u4F20\u667A\u64AD\u5BA2
url=www.baidu.com
在controller中使用@Resourcre注解可以加载到 ,也可以使用@Value注解加载到
    /**
 *
 */
package com.springboot.controller;

import javax.annotation.Resource;

import org.springframework.core.env.Environment;
import org.springframework.web.bind.annotation.RequestMapping;
import org.springframework.web.bind.annotation.RestController;

/**
 * @Description:
 * @author:tuizhi-cai
 * @time:2018年3月4日 下午5:51:29
 */
@RestController
public class DemoController {

	//加载配置文件
	@Resource
	private Environment env;
        @Value("${name}")  private String name;
	/**
	 * @Author:tuzhi-cai
	 * @Description: 测试Springboot的默认扫描包的位置
	 * @time:2018年3月4日下午5:51:56
	 */
	@RequestMapping("/test2")
	public String test(){
		System.out.println(env.getProperty("name"));
		System.out.println(env.getProperty("url"));
		return "扫描到";
	}
}
读取自定义的properties配置文件
在resouce下新建文件夹mail.properties,加入如下测试内容
mail.post=www.baidu.com
mail.port=25
mail.username=caizhanpeng
mail.password=123456
在springboot的扫描包下配置属性名与peoperties键名一致的javabean并指定注解位置
/**
 *
 */
package com.springboot.pojo;

import org.springframework.boot.context.properties.ConfigurationProperties;
import org.springframework.context.annotation.Configuration;

/**
 * @Description:对应propertie文件的javabean
 * @author:tuizhi-cai
 * @time:2018年3月4日 下午6:16:43
 */
@Configuration  //指定是对应的src下的配置文件,底层会自动将值封装进来
@ConfigurationProperties(locations="classpath:mail.properties",prefix="mail")
public class MailProperties {

	private String post;
	private Integer port;
	private String username;
	private String password;
	public String getPost() {
		return post;
	}
	public void setPost(String post) {
		this.post = post;
	}
	public Integer getPort() {
		return port;
	}
	public void setPort(Integer port) {
		this.port = port;
	}
	public String getUsername() {
		return username;
	}
	public void setUsername(String username) {
		this.username = username;
	}
	public String getPassword() {
		return password;
	}
	public void setPassword(String password) {
		this.password = password;
	}


}
在controller中直接注入JavaBean就可以调用get方法就可以获取值
	@Autowired
	private MailProperties mailProperties;

        @RequestMapping("propertiesGet")
	public String getProperties(){
		String fanhuizhi = mailProperties.getUsername()+mailProperties.getPassword();
		return fanhuizhi+"applicationName为"+applicationName;
	}
热部署
我们在开发中反复修改类、页面等资源,每次修改后都是需要重新启动才生效,这样每次启动都很麻烦,浪费了大量的时间。
能不能在我修改代码后不重启就能生效呢?可以,由于Spring Boot应用只是普通的Java应用,所以JVM热交换(hot-swapping)也能开箱即用。不过JVM热交换能替换的字节码有限制,想要更彻底的解决方案可以使用Spring Loaded项目或JRebel。 spring-boot-devtools 模块也支持应用快速重启(restart)。在maven加入依赖可以快速启动
<groupId>org.springframework.boot</groupId>
<artifactId>spring-boot-devtools</artifactId>
SpringBoot整合Mybatis
加入maven依赖
<!-- MyBatis启动器 -->
	<dependency>
		<groupId>org.mybatis.spring.boot</groupId>
		<artifactId>mybatis-spring-boot-starter</artifactId>
		<version>1.1.1</version>
	</dependency>

	<!-- MySQL连接驱动 -->
	<dependency>
		<groupId>mysql</groupId>
		<artifactId>mysql-connector-java</artifactId>
	</dependency>
</dependencies>
在application.properties下配置数据库的连接配置
spring.datasource.data-password=1234
spring.datasource.data-username=root
spring.datasource.url=jdbc:mysql://127.0.0.1:3306/springboot
spring.datasource.driver-class-name=com.mysql.jdbc.Driver
简单整合编写mapper,对应数据库测试表我已创建
/**
 *
 */
package com.springboot.mapper;

import java.util.List;

import org.apache.ibatis.annotations.Mapper;
import org.apache.ibatis.annotations.Select;

import com.springboot.pojo.User;

/**
 * @Description:spirngboot的mapper文件
 * @author:tuizhi-cai
 * @time:2018年3月4日 下午6:39:38
 */
@Mapper   //声明mapper接口
public interface UserMapper {

	@Select("select * from user where name like '%${value}%'")
	public List<User> queryUserByName(String name);
}
编写service
/**
 *
 */
package com.springboot.service;

import java.util.List;

import org.springframework.beans.factory.annotation.Autowired;
import org.springframework.stereotype.Service;
import org.springframework.transaction.annotation.Transactional;

import com.springboot.mapper.UserMapper;
import com.springboot.pojo.User;

/**
 * @Description:
 * @author:tuizhi-cai
 * @time:2018年3月4日 下午6:45:09
 */
@Service
@Transactional
public class UserServiceImpl implements UserService{

	//注入mapper的代理类
	@Autowired
	UserMapper userMapper;


	/**
	 * @Author:tuzhi-cai
	 * @Description: 根据用户名模糊查询的方法
	 * @time:2018年3月4日下午6:45:19
	 */
	@Override
	public List<User> selectUserByName(String name) {
		return userMapper.queryUserByName(name);
	}

}
编写Controller
/**
	 * springboot整合Mybatis查询数据库的方法
	 */
	@RequestMapping("/queryUser")
	public List<User> queryUserByName(){
		List<User> list = userService.selectUserByName("李");
		return  list;
	}
并在入门引导类中添加mybatis的mapper扫描包位置

可以进行测试-且测试成功
整合通用mapper和分页助手(可能会对以上配置做出修改)
在application.properties加入下文件
#spring集成Mybatis环境
#pojo别名扫描包
mybatis.type-aliases-package=cn.itcast.info.pojo
#加载Mybatis核心配置文件
mybatis.mapper-locations=classpath:mapper/*Mapper.xml
mybatis.config-location=classpath:mybatis/SqlMapConfig.xml
#配置连接池,还需要在pom.xml中加入该连接池的依赖
#spring.datasource.type=com.jolbox.bonecp.BoneCPDataSource
maven引入依赖
	<dependency>
		<groupId>com.github.pagehelper</groupId>
		<artifactId>pagehelper</artifactId>
		<version>3.7.5</version>
	</dependency>
	<dependency>
	 	<groupId>com.github.jsqlparser</groupId>
		<artifactId>jsqlparser</artifactId>
		<version>0.9.1</version>
	</dependency>
  	<dependency>
  		<groupId>org.springframework.boot</groupId>
  		<artifactId>spring-boot-configuration-processor</artifactId>
  		<optional>true</optional>
  	</dependency>
  </dependencies>
在src/main/resource/mapper下加入userMapper文件
<?xml version="1.0" encoding="UTF-8" ?>
<!DOCTYPE mapper PUBLIC "-//mybatis.org//DTD Mapper 3.0//EN" "http://mybatis.org/dtd/mybatis-3-mapper.dtd" >
<mapper namespace="com.springboot.UserMapper">
	<select id="queryAll" resultType="user">
		select * from user
	</select>
</mapper>
在src/main/resource/mybatis下加入sqlMapConfi文件,引入分页插件助手和通用mapper接口
<?xml version="1.0" encoding="UTF-8" ?>
<!DOCTYPE configuration
  PUBLIC "-//mybatis.org//DTD Config 3.0//EN"
  "http://mybatis.org/dtd/mybatis-3-config.dtd">
<configuration>
	<!-- 分页助手 -->
	<plugins>
		<plugin interceptor="com.github.pagehelper.PageHelper">
			<property name="dialect" value="mysql" />
			<!-- 该参数默认为false -->
			<!-- 设置为true时,使用RowBounds分页会进行count查询 -->
			<property name="rowBoundsWithCount" value="true" />
		</plugin>

		<!-- 通用Mapper -->
		<plugin interceptor="com.github.abel533.mapperhelper.MapperInterceptor">
			<!--主键自增回写方法,默认值MYSQL,详细说明请看文档 -->
			<property name="IDENTITY" value="MYSQL" />
			<!--通用Mapper接口,多个通用接口用逗号隔开 -->
			<property name="mappers" value="com.github.abel533.mapper.Mapper" />
		</plugin>
	</plugins>
</configuration>
此时mapper接口需要继承通用mapper
/**
 * @Description:spirngboot的mapper文件
 * @author:tuizhi-cai
 * @time:2018年3月4日 下午6:39:38
 */
//需要继承githup提供的通用接口
@Mapper   //声明mapper接口
public interface UserMapper extends com.github.abel533.mapper.Mapper<User>{

	@Select("SELECT * FROM USER WHERE NAME LIKE '%${value}%'")
	public List<User> queryUserByName(String value);

	public List<User> queryAll();
}
编写service和controller,controller代码
/**
	 * 以下两个接口为通用mapper和分页插件的测试方法
	 */
	@RequestMapping("listAll")
	public List<User> queryAll(){
		List<User> users = userService.queryAll();
		return users;
	}

	@RequestMapping("listPage/{page}/{total}")
	public List<User> queryPage(@PathVariable("page")Integer page,@PathVariable("total")Integer total){
		List<User> users = userService.queryPage(page,total);
		return users;
	}
service代码
	/**
	 * @Author:tuzhi-cai
	 * @Description:
	 * @time:2018年3月4日下午10:11:53
	 */
	@Override
	public List<User> queryAll() {
		return userMapper.queryAll();
	}


	/**
	 * @Author:tuzhi-cai
	 * @Description: 查询时所有的方法
	 * @time:2018年3月4日下午10:11:53
	 */
	@Override
	public List<User> queryPage(Integer page, Integer total) {
		PageHelper.startPage(page, total);
		return userMapper.queryAll();
	}
localhost:8080/listPage/1/2查询结果第一页第2条

springboot整合Redis添加缓存(以后更新)
maven添加依赖
<!-- 配置使用redis启动器 -->
<dependency>
	<groupId>org.springframework.boot</groupId>
	<artifactId>spring-boot-starter-redis</artifactId>
</dependency>
在引导类添加注解@EnableCaching注解

对需要进行缓存的对象实现序列换接口

修改UserServiceImpl,
添加@Cacheable注解实现缓存添加
添加@CacheEvict注解实现缓存删除

设置完成后执行queryAll方法就会使用缓存,如果没有缓存就会添加缓存,使用query'Page方法就会清理缓存,参数value是这个缓存的名字,在进行添加和删除操作时都会根据这个名字进行操作;参数key默认情况下是空串,是一种Spel表达语言;可以随意指定但是注意要加''号
Redis的深入使用
直接操作Redis,redis除了进行缓存外,还有其他的作用;如利用Redis的单线程获取唯一数,或者存储登录等其他数据信息等;官网提供了三种接口RedisConnectionFactory,StringRedisTemplate 和 RedisTemplate,我们可以直接注入或者自己实现其他的实现类,来直接操作redis。我们这里使用RedisTemplate来操作Redis。
--我们只需在需要的地方直接注入RedisTemplate,即可以对Redis的五种数据类型进行操作
	@Autowired  //注入redisTemplate
	private RedisTemplate<String,String> redisTemplate;


	@Override
	@Cacheable(value="userCache",key="'user.queryAll'") //添加缓存
	public List<User> queryAll() {
		System.out.println("从mysql查询");
		//保存数据
		redisTemplate.boundValueOps("redis").set("Hello Redis!");
		//设置有效时间
		redisTemplate.boundHashOps("redis").expire(100l,TimeUnit.SECONDS); //100秒过期
		//给redis每次进行加1操作
		redisTemplate.boundValueOps("count").increment(1l);
		return userMapper.queryAll();
	}
设置redis链接属性,在application.properties配置单机版
#Redis
spring.redis.host=xxx.xx.xxx.xx
spring.redis.port=6379
集群版将单机版替换为下列就行
#Redis
#spring.redis.host=xxx.xxx.xx.xxx
#spring.redis.port=6379
#Redis Cluster
spring.redis.cluster.nodes=xxx.xxx.xx.xxx:7001,xxx.xxx.xx.xxx:7002,xxx.xxx.xx.xxx:7003,xxx.xxx.xx.xxx:7004
访问contorller,测试成功

SpringBoot整合ActiveMQ
添加Maven依赖
	<!-- 配置ActiveMQ启动器 -->
		<dependency>
			<groupId>org.springframework.boot</groupId>
			<artifactId>spring-boot-starter-activemq</artifactId>
		</dependency>

编写contoller
/**
 *
 */
package com.springboot.controller;

import javax.jms.Destination;
import org.springframework.beans.factory.annotation.Autowired;
import org.springframework.jms.core.JmsTemplate;
import org.springframework.web.bind.annotation.PathVariable;
import org.springframework.web.bind.annotation.RequestMapping;
import org.springframework.web.bind.annotation.RestController;

/**
 * @Description:
 * @author:tuizhi-cai
 * @time:2018年3月5日 下午10:01:17
 */
@RestController
public class QueueController {

	//直接注入发送消息的对象
	@Autowired
	private JmsTemplate jmsTemplate;

	//消息队列
	@Autowired
	private Destination destination;

	@RequestMapping("/send/{message}")
	public String sendMessage(@PathVariable("message")String message){
		jmsTemplate.convertAndSend(destination,message);
		return "发送消息成功,消息内容"+message;
	}

}
编写Bean接收消息,使用@Compent注解加入Spring管理
/**
 *
 */
package com.springboot.controller;

import org.springframework.jms.annotation.JmsListener;
import org.springframework.stereotype.Component;

/**
 * @Description:
 * @author:tuizhi-cai
 * @time:2018年3月5日 下午10:07:18
 */
@Component
public class Consumer {

	@JmsListener(destination="springboot.queue")
	public void readMessage(String text){
		System.out.println("接收到消息:"+text);
	}
}
测试成功

在spring中内置类ActiveMQ服务所以可以直接使用
使用外部服务器的ActiveMQ

在application.properties加入activemq的服务地址配置
#ActiveMQ
spring.activemq.broker-url=tcp://192.168.25.134:61616
整合Junit,添加Maven依赖
<!-- SpringBoot整合Junit 配置测试启动器 -->
	<dependency>
		<groupId>org.springframework.boot</groupId>
		<artifactId>spring-boot-starter-test</artifactId>
		<scope>test</scope>
</dependency>/**
*
*/
package com.springboot.test;
import javax.jms.Destination;
import org.junit.Test;
import org.junit.runner.RunWith;
import org.springframework.beans.factory.annotation.Autowired;
import org.springframework.boot.test.context.SpringBootTest;
import org.springframework.jms.core.JmsTemplate;
import org.springframework.test.context.junit4.SpringJUnit4ClassRunner;
import com.springboot.guide.GuideClass;
/**
* @Description:
* @author:tuizhi-cai
* @time:2018年3月5日 下午10:37:19
*/
@RunWith(SpringJUnit4ClassRunner.class)
@SpringBootTest(classes=GuideClass.class) //指定入门引导类的位置
public class ActiveMQTest {
//注入消息队列
@Autowired
private Destination destination;
//注入activemq的消息模板
@Autowired
private JmsTemplate jmsTemplate;
@Test
public void test(){
System.out.println("我发送消息了");
jmsTemplate.convertAndSend(destination,"我发送了什么");
}
}
测试结果,queue中接收到消息

SpringBoot整合Freemaker模板
添加Mavne依赖
	<!-- FreeMarker启动器 -->
	<dependency>
		<groupId>org.springframework.boot</groupId>
		<artifactId>spring-boot-starter-freemarker</artifactId>
	</dependency>
编写controller
/**
 *
 */
package com.springboot.controller;

import java.util.Date;

import org.springframework.stereotype.Controller;
import org.springframework.ui.Model;
import org.springframework.web.bind.annotation.RequestMapping;

/**
 * @Description:Freemaker测试Controller
 * @author:tuizhi-cai
 * @time:2018年3月5日 下午10:48:50
 */
@Controller
@RequestMapping("fm")
public class FreeMakerController {

	@RequestMapping
	public String fm(Model model ){
		model.addAttribute("name", "张三");
		model.addAttribute("date", new Date());
		return "template";
	}

}
在application.properties加入如下配置
#指定模板的位置
spring.freemarker.template-loader-path=classpath:/templates
#指定静态文件的位置比如js,css,图片
spring.mvc.static-path-pattern=/static/**
在src/main/resource/templates新建freemaker模板template.ftl
hello!${name}
当前时间是
${date?datetime}
测试访问结果,成功获取到

SpringBoot整合Solr实现高级搜索
加入Maven依赖
<!-- solr启动器 -->
<dependency>
	<groupId>org.springframework.boot</groupId>
	<artifactId>spring-boot-starter-data-solr</artifactId>
</dependency>


 443
443


 被折叠的 条评论
为什么被折叠?
被折叠的 条评论
为什么被折叠?
 到【灌水乐园】发言


