


项目源码下载地址:http://download.csdn.net/detail/xiangxingrui1024/9720951
一、特别注意事项
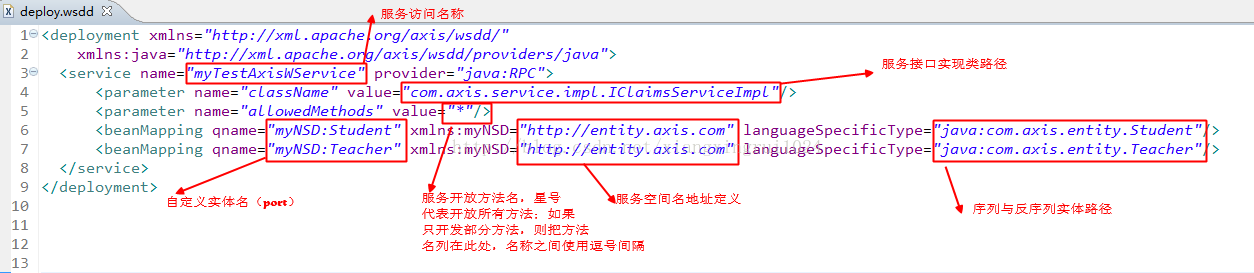
1、webservice axis1.4在请求与响应参数方面,不支持List类型,但可以支持数组;如List<Student> 可以修改成Student[]写法;否则虽然服务可以提供,但具体使用调用时会报参数类型方面异常。
2、在提供的服务接口中,如有自定义实体bean、数组等复杂类型时,需要对其实体对象进行序列化和反序列化,虽然axis1.4支持绝大多数常用类型;如果未对自定义的实体Bean进行序列和反序列,在调用服务时,会报参数实体类型不匹配等异常错误。
二、实例项目结构图
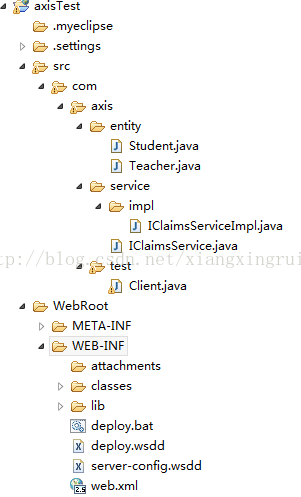
1、目录说明:
entity:接口涉及到的实体Bean对象
service:服务接口
test:服务接口测试
2、文件说明:
deploy.bat:执行生成服务端配置的命令文件
deploy.wsdd:描述生成服务端配置文件
server-config.wsdd:服务端接口描述文件
3、操作步骤:
1)、创建project并导入axis1.4所需jar包;
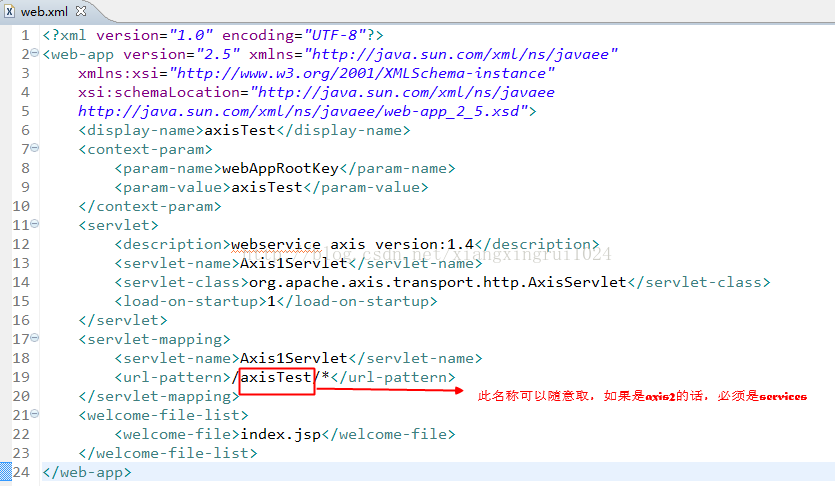
2)、在web.xml配置axis;
3)、编程接口;
4)、配置deploy.wsdd文件;
5)、配置deploy.bat文件;
6)、启动项目,再执行deploy.bat文件,生成server-config.wsdd文件;
三、贴代码文件
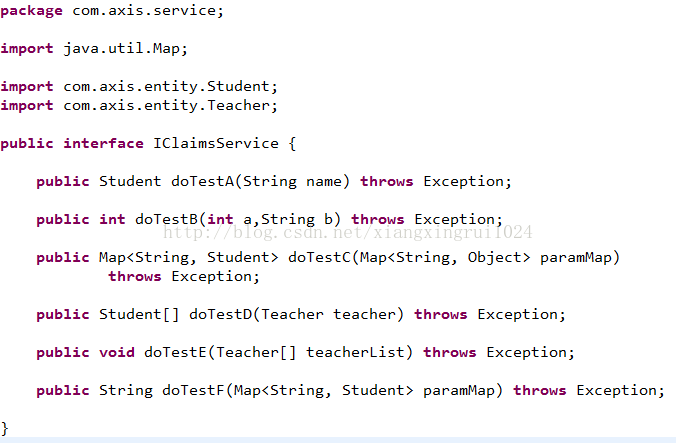
1、IClaimsService.java代码
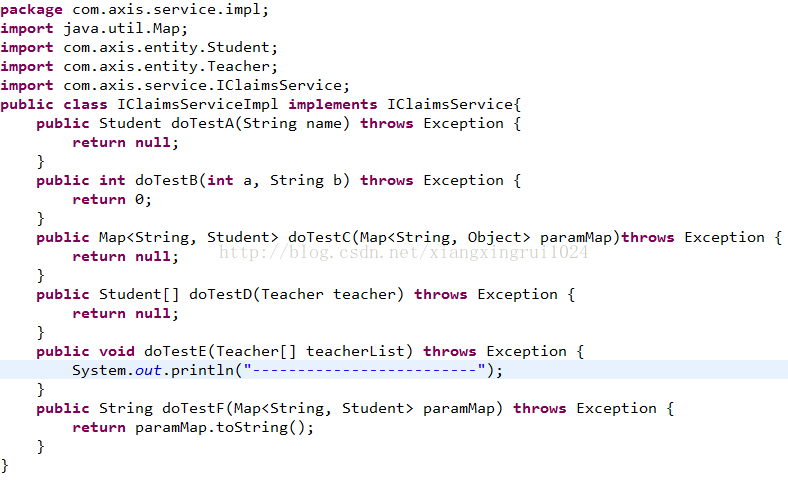
2、IClaimsServiceImpl.java代码
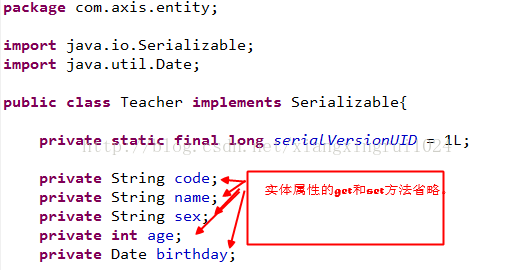
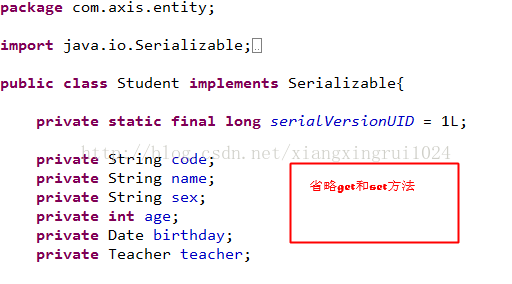
3、Teacher.java代码
4、Student.java代码
5、deploy.bat文件

6、deploy.wsdd文件
7、web.xml
8、server-config.wsdd文件(由于代码多,就不截图了,直接上代码)
<?xml version="1.0" encoding="UTF-8"?>
<deployment xmlns="http://xml.apache.org/axis/wsdd/" xmlns:java="http://xml.apache.org/axis/wsdd/providers/java">
<globalConfiguration>
<parameter name="sendMultiRefs" value="true"/>
<parameter name="disablePrettyXML" value="true"/>
<parameter name="adminPassword" value="admin"/>
<parameter name="attachments.Directory" value="E:\workspace\myeclipse\axisTest\WebRoot\WEB-INF\attachments"/>(自定生成时,会有该东东,实际使用中必须删除该元素!!!)
<parameter name="dotNetSoapEncFix" value="true"/>
<parameter name="enableNamespacePrefixOptimization" value="false"/>
<parameter name="sendXMLDeclaration" value="true"/>
<parameter name="sendXsiTypes" value="true"/>
<parameter name="attachments.implementation" value="org.apache.axis.attachments.AttachmentsImpl"/>
<requestFlow>
<handler type="java:org.apache.axis.handlers.JWSHandler">
<parameter name="scope" value="session"/>
</handler>
<handler type="java:org.apache.axis.handlers.JWSHandler">
<parameter name="scope" value="request"/>
<parameter name="extension" value=".jwr"/>
</handler>
</requestFlow>
</globalConfiguration>
<handler name="URLMapper" type="java:org.apache.axis.handlers.http.URLMapper"/>
<handler name="LocalResponder" type="java:org.apache.axis.transport.local.LocalResponder"/>
<handler name="Authenticate" type="java:org.apache.axis.handlers.SimpleAuthenticationHandler"/>
(通过deploy.wsdd文件自动生成的server-config.wsdd文件,下列红色元素为接口服务方法描述)
<service name="myTestAxisWService" provider="java:RPC">
<parameter name="allowedMethods" value="*"/>
<parameter name="className" value="com.axis.service.impl.IClaimsServiceImpl"/>
<beanMapping languageSpecificType="java:com.axis.entity.Student" qname="ns1:Student" xmlns:ns1="http://entity.axis.com"/>
<beanMapping languageSpecificType="java:com.axis.entity.Teacher" qname="ns2:Teacher" xmlns:ns2="http://entity.axis.com"/>
</service>
<service name="AdminService" provider="java:MSG">
<parameter name="allowedMethods" value="AdminService"/>
<parameter name="enableRemoteAdmin" value="false"/>
<parameter name="className" value="org.apache.axis.utils.Admin"/>
<namespace>http://xml.apache.org/axis/wsdd/</namespace>
</service>
<service name="Version" provider="java:RPC">
<parameter name="allowedMethods" value="getVersion"/>
<parameter name="className" value="org.apache.axis.Version"/>
</service>
<transport name="http">
<requestFlow>
<handler type="URLMapper"/>
<handler type="java:org.apache.axis.handlers.http.HTTPAuthHandler"/>
</requestFlow>
<parameter name="qs:list" value="org.apache.axis.transport.http.QSListHandler"/>
<parameter name="qs:wsdl" value="org.apache.axis.transport.http.QSWSDLHandler"/>
<parameter name="qs.list" value="org.apache.axis.transport.http.QSListHandler"/>
<parameter name="qs.method" value="org.apache.axis.transport.http.QSMethodHandler"/>
<parameter name="qs:method" value="org.apache.axis.transport.http.QSMethodHandler"/>
<parameter name="qs.wsdl" value="org.apache.axis.transport.http.QSWSDLHandler"/>
</transport>
<transport name="local">
<responseFlow>
<handler type="LocalResponder"/>
</responseFlow>
</transport>
</deployment>
四、最终获得的wsdl文件内容
 最低0.47元/天 解锁文章


 835
835


 被折叠的 条评论
为什么被折叠?
被折叠的 条评论
为什么被折叠?
 到【灌水乐园】发言


