


Android 四大组件
android四大组件分别是:Activity, service,content provider,broadcast receiver
一、Activity
1、概念:
android 中,Activity 相当于一个页面,可以在Activity中添加Button、CheckBox 等控件,一个android 程序有多个Activity组成。
2、生命周期:
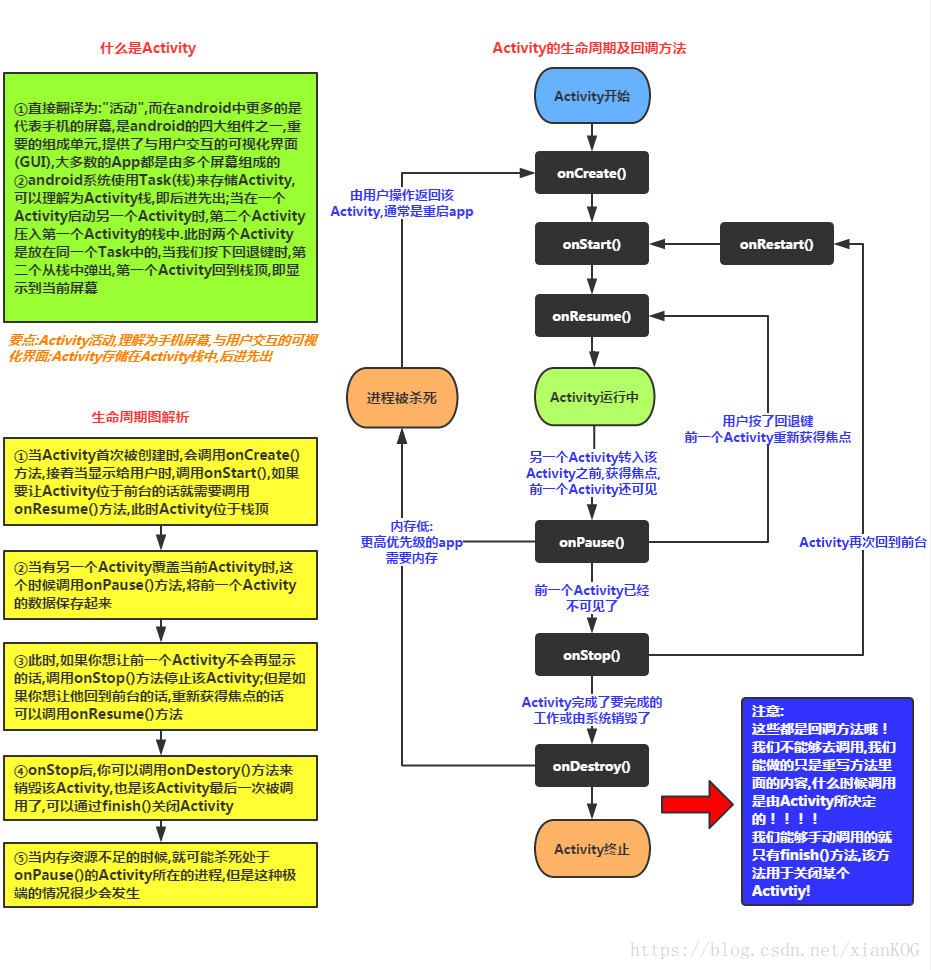
3、四中启动模式
Standard 模式 : standard 模式是android 的默认启动模式,在这种模式下,activity可以有多个实例,每次启动Activity,无论任务栈中是否已经存在这个activity的实例,系统都会创建一个新的activity实例。
SingleTop 模式: 栈顶模式,当一个singleTop模式的activity 已经位于栈顶时,再去启动它时,不在创建实例,如果不在栈顶,就会创建实例。
SingleTask 模式 : 单任务模式,如果启动的activity 已经存在于 任务栈中,则会将activity移动到栈顶,并将上面的activity出栈,否则创建新的实例
SingleInstance 模式 :单实例模式,一个activity 一个栈。
4、三种跳转方式
显示启动 :
Intrent 内部直接声明要启动的activity所对应的的class
Intent intent = new Intent(MainActivity.this, SecondActivity.class);
startActivity(intnet);
隐式启动
进行三个匹配,一个是activity,一个是category,一个是data,全部或者部分匹配,应用于广播原理
- 清单文件中 里配置activity属性,activity的名字要和跳转内容一样
<activity
	android:name="com.exanple.android.tst.secondActivity"
	android:label = @string/title>
	<intent=filter>
		<action android:name="com.exanple.android.tst.secondActivity/>
		<category android:name="android.intent.category.DEFAULT"/>
	<intent-filter/>
</activity>
- 在需要跳转的地方
Intent intent = new Intent("com.example.android.tst.secondActivity");
startActivity(intnet);
跳转后再返回,能获取返回值
Intent in = new Intent(MainActivity.this,OtehrActivity.class);
in.putExtra("a",a);
startActivityForResult(in,1000);
在OTherActivity中设置返回值
Intent int = new Intent();
int.putExtra("c",c);
setResult(1001,int);
finish();
在MainActivity中获取返回值
@Override
protected void onActivityResult(int requestCode, int resultCode	,Intent data) {
	super.onActivityResult(requestCode,resultCode,data);
	if(requestCode == 1000){
		if(resultCode == 1001){
			int c = data.getExtra("c",0);
		}
	}
}
Service
定义一个Server
项目内Server包 右键 --> New --> Service --> Service 或者直接创建Class类,继承Service并重写IBinder方法
public class MyService extends Service{

	public MyService(){

	}

	@Override
	public IBinder onBind(Intent intent) {
		return null;
	}

	@Override
	public void onCreate() {
		super.onCreate();
	}

	@Override
	public int onStartCommand(Intent intent, int flags, int startId) {
		return super.onStartCommand(intent, flags, startId);
	}

	@Override
	public void onDestroy() {
		// TODO Auto-generated method stub
		super.onDestroy();
	}
}
重写Service的 onCreate()、onStartCommand()和onDestory()方法。其中 onCreate() 方法在服务创建的时候调用、onStartCommand() 方法会在每次服务启动的时候调用、onDestory() 方法会在服务销毁的时候调用。
通常情况下,如果我们希望服务一旦启动就立刻去执行任务,就可以将逻辑卸载onStartCommand() 方法里。
另外需要注意的是,每个服务都需要在Androidmanifest.xml 中进行注册才能生效:
<application
	....>
	...
	<service
		android:name=".MyService"
		android:enabled="true"
		android:exported="true">
	</service>
</application>
启动和停止服务
启动服务:
Intent startIntent = new Intent(this, MyService.class);
startService(startIntent); //启动服务
停止服务:
Intent stopIntent = new Intent(this, MyService.class);
stopService(stopIntent); //停止服务
使用前台服务
前台服务与普通服务的最大区别在于,它会一直有一个正在运行的图标在系统的状态栏中,下拉状态栏后可以看到更加详细的内容,非常类似于通知的效果。
public class MyService extends Service{
	Intent intent = new Intent(this, MainActivity.class);
	PendingIntent pi = PendingIntent.getActivity(this, 0 , intent, 0);
	Notification notification  = new NotificationCompat.Builder(this)
		.setContentTitle(" this is content titile")
		.setContentText("this is content text")
		.setWhen(System.currentTimeMillis())
		.setSmallIcon(R.mipmap.ic_launcher);
		.setLargeIcon(BitmapFactory.decodeResource(getResource(),
			R.mipmap.ic_launcher))
		.setContentIntent(pi)
		.build();
	startForeground(1,notification);
}
构造一个Notification对象后并没有使用NotificationManager 来讲通知显示出来,而是调用了startForeground()方法,该方法会将MyService变成一个前台服务,并在系统状态栏中显示出来。
使用IntentService
服务中的代码都默认运行在主线程中,如果直接在服务中执行耗时操作很容易出现ANR(Application not Responding)
所以这个时候需要用到Android多线程编程技术,我们应该在服务的每个具体的方法里启动一个子线程,然后在这里去处理那些耗时的操作:
public class MyService extends Service{
	...
	@Override
	public int onStartCommand(Intent intent , int flags, int startId){
		new Thread(new Runnable(){
			public void run(){
				//处理具体的逻辑
			}
		}).start();
		return super.onStartCommand(intent, flags, startId);
	}
}
但是,这种服务一旦启动之后,就会一直处于运行状态,必须调用stopService()或者stopSelf()方法才能让服务停止下来,所以,如果想要实现让一个服务在执行完毕后自动停止的功能,就可以这样写:
public class MySerivce extends Servcie{
	...
	@Override
	public int onStartCommand(Intent intent, int flats , int startId){
		new Thread(new Runnable(){
			public void run(){
				//处理具体的逻辑
				stopSelf();
			}
		});
	}
}
虽说这样的写法并不复杂,但是总会有一些程序员忘记开启线程或者忘记调用stopSelf() 方法。为了简单创建一个异步、会自动停止的服务。Android专门提供了一个IntentService类
public class MyIntentService extends IntentService{
	public MyIntentService(){
		super("MyIntentService");  //调用父类的有参构造方法
	}
	@Override
	protected void onHandleIntent(Intent intent){
		//打印当前的线程ID
		Log.e("mylog","Thread id is” + Thread.cuttentThread().getId();
	}
	@Override
	public void onDestory(){
		super.onDestory();
		Log.e("mylog","on Destory executed");
	}
}
首先这里提供一个无参的构造方法,并且必须在其内部调用父类的有参构造方法。然后要在子类中去实现onHandleIntent() 这个抽象方法,在这个方法中可以去处理一些逻辑,而且不用担心ANR,因为这个方法已经是在子线程中运行了。
IntentService线程的调用:
Intent intent = new Intent(this, MyIntentService.class);
startServcie(intent);
如此,线程就会自动启动并执行逻辑,执行完毕后自动关闭。这就是IntentService 的好处,能够自动开启和关闭;
Content Provider
对于每一个应用程序来说,如果想要访问内容提供器中共享的数据,就一定要借助ContentResolver 类,可以通过Context中的getContentResolver() 方法获取该类的实例。ContentResolver中提供了一系列的方法用于对数据进行CRUD操作,其中insert() 方法用于添加数据,update() 方法用于更新数据,delete() 方法用于删除数据,query() 方法用于查询数据。
不同于SQLiteDatabase,ContentResolver 中的增删改查都是接收一个URl参数,这个参数被称为内容URL。内容URL给内容提供器中的数据建立了唯一标识符,它主要由两部分组成:authority 和 path 。authority 是用于对不同的应用程序做区分的,一般为了避免冲突,都会采用程序包名的方式进行命名。path则是用于对同一应用程序中不同的表做区分,通常都会添加到authority后面:
content://com.example.app.provider/table1
content://com.example.app.provider/table2
在使用内容URL作为参数的时候,需要将URL转换成URL对象:
Uri uri = Uri.parse("content://com.example.app.provider/table1")
现在我们就可以使用这个uri对象来查询talbe1表中的数据了:
Cursor cursor = getContentResolver().query(
	uri,
	projection,
	selection,
	selectionArgs,
	sortOrder
);
对应参数的解释:
| query()方法参数 | 对应SQL部分 | 描述 |
|---|---|---|
| uri | from table_name | 指定查询某个应用程序下的某个表 |
| projection | select column1, column2 | 指定查询的列名 |
| selection | where column=value | 指定where约束条件 |
| selectArgs | - | 为where中的占位符提供具体的值 |
| orderBy | order by column1, column2 | 指定查询结果的排序方式 |
查询完之后,就可以从游标中取值了:
if(cursor != null){
	while(cursor.moveToNext()) {
		String column1 = cursor.getString(cursor.getColumnIndex("column1"));
		int column2 = cursor.getInt(cursor.getColumnIndex("column2"));
	}
	cursor.close();
}
增删改查
添加数据
ContentValues values = new ContentValues();
values.put(“column1”, "text");
values.put("column2", 1);
getContentResolver().insert(uri, values);
更新数据
ContentValues valuse = new ContentValues();
valuse.put("column1", "");
getContentResolver().update(uri, values, "column1 = ? and column2 = ?", new String[]{"text", 1});
删除数据
getContentResolver().delete(uri , "column2 = ?", new String[]{ "1"});
实例.
读取系统联系人
读取系统联系人需要声明权限,如果系统是6.0以后的,需要申请运行时权限
if(ContextCompat.checkSelfPermission(this, Manifest.permission.READ_CONTACTS)
	!= PackageManager.PERMISSION_GRANTED) {
		ActivityCompat.requestPermissions(this, new String[]{Manifest.permission.READ_CONTACTS}, 1);
	}else {
		readContacts();  //读取联系人
	}
private void readContacts(){
	Cursor cursor = null;
	try{
		//查询联系人数据
		cursor = getContentResolver().query(ContactsContract.CommonDataKinds.Phone.CONTENT_URI,null,null,null,null);
		if(cursor!=null){
			while(cursor.moveToNext()){
				//获取联系人姓名
				String name = cursor.getString(cursor.getColumnIndex(ContactsContract.CommonDataKinds.Phone.DISPLAY_NAME));
				//获取联系人电话号码
				String number = cursor.getString(cursor.getColumnIndex(ContactsContract.CommonDataKinds.Phone.NUMBER));
				list.add(name+"\n"+number);
			}
		}
	}catch(Exception e){
		e.printStackTrace()
	}finally{
		if(cursor != null){
			cursor.close();
		}
	}
}

@Override
public void onRequestPermissionResult(int requestCode, String[] permissions, int[] grantResults){
	switch(requestCode){
		case 1:
			if(grantResults.length >0 && grantResults[0] == PackageManager.PERMISSION_GRANTED){
				readContacts();
			}else {
				//您拒绝了权限
			}
	}
}
创建自己的内容提供器
创建自己的内容提供器,需要去继承 ContentProvider 类,ContentProvider 类中有6个抽象方法,我们在使用子类继承它的时候,需要将这6个方法全部重写。
public class MyProvider extends ContentProvider{
	@Override
	public boolean onCreate() {
		return false;
	}
	@Override
	public Cursor query(Uri uri, String[] projection, Stirng selection, String[] selectionArgs, String sortOrder){
		return null;
	}
	@Overrride
	public Uri insert(Uri uri , ContentValues values){
		return null;
	}
	@Override
	public int update(Uri uri, ContentValuse values, String selection, String[] selectionArgs){
		return 0;
	}
	@Override
	public int delete(Uri uri, String selection, String[] selectionArgs){
		return 0;
	}
	@Override
	public String getType(Uri uri){
		return null;
	}
}
URI 的主要格式有以下两种
content://com.example.app.provider/table1
content://com.example.app.provider/table1/1

* : 表示匹配任意长度的任意字符
# : 表示匹配任意长度的数字

//一个能够匹配任意表的内容URI格式就可以写成:
content://com.example.app.provider/*
//一个能够匹配表中任意一行数据的内容URI格式就可以写成:
content://com.example.app.provider/table1/#
Broadcast Receiver
android 广播分为两个角色:广播发送者、广播接收者
android 广播:
1),用于不同组件间的通信(含:应用内/不同应用之间)
2),用于多线程通信
3),与android系统的通信
自定义广播接收者
- 继承BroadcastReceive 基类
- 必须重写抽象方法onReceive()方法
1,广播接收器收到相应广播后,会自动调用onReceive() 方法
2,一般情况下,onReceive方法会会涉及与其他组件之间的交互,如 发送Notiotification,启动server等
3,默认情况下,广播接收器运行在UI线程,因此,onReceive方法不能执行耗时操作,否则将导致ANR
广播接收器注册
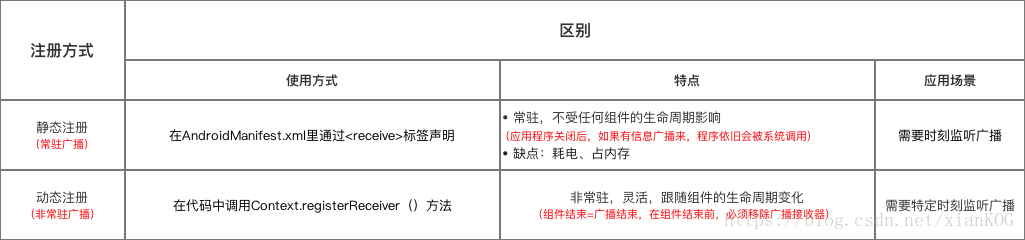
注册的方式有两种:静态注册、动态注册
静态注册
- 注册方式:在AndroidManifest.xml 里通过<receive 标签声明
- 属性说明
<receiver
	android:enable="true"/"false"
	//此broadcastReceiver 是否接受其他应用发出的广播
	//默认值时由receiver 中d有无inter-filter决定,如果有,默认true,否则默认false
	android:exported="true"/"false"
	android:icon="drawable resource"
	android:label="string resource"
	//继承BroadcastReceiver子类的类名
    android:name=".mBroadcastReceiver"
//具有相应权限的广播发送者发送的广播才能被此BroadcastReceiver所接收;
    android:permission="string"
//BroadcastReceiver运行所处的进程
//默认为app的进程,可以指定独立的进程
//注:Android四大基本组件都可以通过此属性指定自己的独立进程
    android:process="string" >

//用于指定此广播接收器将接收的广播类型
//本示例中给出的是用于接收网络状态改变时发出的广播
 <intent-filter>
	<action android:name="android.net.conn.CONNECTIVITY_CHANGE" />
 </intent-filter>
 </receiver>
注册示例:
<receiver
    //此广播接收者类是mBroadcastReceiver
    android:name=".mBroadcastReceiver" >
    //用于接收网络状态改变时发出的广播
    <intent-filter>
        <action android:name="android.net.conn.CONNECTIVITY_CHANGE" />
    </intent-filter>
</receiver>
当此APP首次启动时,系统会自动实例化mBroadcastReceiver类,并注册到系统中。
动态注册
- 注册方式:在代码中调用Context.registerReceiver() 方法
- 具体代码如下:
	// 1. 实例化BroadcastReceiver子类 &  IntentFilter
     mBroadcastReceiver mBroadcastReceiver = new mBroadcastReceiver();
     IntentFilter intentFilter = new IntentFilter();

    // 2. 设置接收广播的类型
    intentFilter.addAction(android.net.conn.CONNECTIVITY_CHANGE);

    // 3. 动态注册:调用Context的registerReceiver()方法
     registerReceiver(mBroadcastReceiver, intentFilter);


//动态注册广播后,需要在相应位置记得销毁广播
unregisterReceiver(mBroadcastReceiver);
特别注意
动态广播最好在onResume中注册, onPause注销
原因:
1,对于动态广播,有注册必然得有注销,否则会导致内存泄漏
2,onPause在App死亡前一定会被执行,从而保证app死亡前一定会被注销,从而防止内存泄漏
两种注册方式的区别
广播的发送
广播的发送 = 广播发送者 将此广播的意图(intent)通过 sendBroasdcast() 方法发送出去
广播的类型
- 普通广播 系统广播 有序广播 粘性广播 App 应用内广播
特别注意:
对于不同注册方式的广播接收器回调OnReceive(Context context,Intent intent)中的context返回值是不一样的:
- 对于静态注册(全局+应用内广播),回调onReceive(context,
intent)中的context返回值是:ReceiverRestrictedContext; - 对于全局广播的动态注册,回调onReceive(context, intent)中的context返回值是:Activity
Context; - 对于应用内广播的动态注册(LocalBroadcastManager方式),回调onReceive(context,
intent)中的context返回值是:Application Context。 - 对于应用内广播的动态注册(非LocalBroadcastManager方式),回调onReceive(context,
intent)中的context返回值是:Activity Context;
Android 五大存储
SharedPreferences 方式
SharedPreferences 是使用键值对的方式进行存储数据的。
想要使用SharedPreferences 来存储数据,首先主要获取到SharedPreferences 对象。Android提供了三种方法用于获取SharedPreferences对象:
1,Context类中的getSharedPreferences()方法
//此方法接收两个参数,一个参数用于指定SharedPreferences文件的名称,如果指定的文件不存在则会创建一个,SharedPreferences文件都是存放在/data/data/<package name>/shared_prefs/目录下
//第二个参数用于指定操作模式,目前只有MODE_PRIVATE这种模式,和直接传入0效果相同
SharedPreferences.Editor editor = getSharedPreferences("data",MODE_PRIVATE).edit();
editor.putString("name", "Tom");
editor.putInt("age",13);
editor.putBoolean("married",false);
editor.apply();
2,Activity类中的getPreferences()方法
//这个方法和Context中的getSharedPreferences()方法很类似,不过它只接收一个操作模式,因为使用这个方法时会自动将当前活动的类名作为SharedPreferences的文件名
3,PreferencesManager类中的getDefaultSharedPreferences()方法
//这是一个静态方法,它接收一个Context参数,并自动使用当前应用程序的包名作为前缀来命名SharedPreferences文件
得到了SharedPreferences对象后, 就可以开始想SharedPreferences文件中存储数据了,主要可以分为三步:
(1)调用SharedPreferences对象的edit()方法来获取一个SharedPreferences.Editor对象
(2)向SharedPreferences.Editor 对象中添加数据,比如添加一个布尔值,可以使用putBoolean() 方法
(3)调用apply()方法的添加的数据提交,从而完成数据存储操作
SharedPreferences中读取数据
SharedPreferences pref = getSharedPreferences("data",MODE_PRIVATE	);
String name = pref.getString("name","");
int age = pref.getInt("age",0);
boolean married = pref.getBoolean("married", false);
文件存储方式
SQList 存储方式
Android 为了让我们能够更加方便的管理数据库,专门提供了一个SQLiteOpenHelper 帮助类,借助这个类可以非常简单的将数据库进行创建好升级。
SQLiteOpenHelper 中有两个非常重要的实例方法,getReadableDatabase() 和 getWritableDatabase() 。这两个方法可以创建或者打开一个现有的数据库(如果数据库存在则直接打开,否则创建一个新的数据库),并返回一个可对数据库进行读写操作的对象。不同的是,当数据库不可写入(如磁盘空间已满),getReadableDatabase方法返回的对象将以只读的方式打开数据库,而getWeitableDatabase则出现异常
例子(在指定路径下创建数据库文件 .db )
public class MainActivity extends Activity {
	public static final String PATH_ONE = "KogBill";
	public static final String PATH_NAME = "KogBill.db";
	private SQLiteDatabase db;    //声明SQLiteDatabase ,该对象可以操作数据库

	String path = Environment.getExternalStorageDirectory().getAbsolutePath();
	String path1 = path + File.separator + PATH_ONE;   //需要创建的路径
	String path2 = path + File.separator + PATH_ONE +
			File.separator + PATH_NAME;  							//需要创建的文件

	@Override
	protected void onCreate(Bundle savedInstanceState){
		super.onCreate(savedInstanceState);
		setContentView(R.layout.activity_main);
		File f = new File(path1);
		if( !f.exists()){  //创建数据库文件路径
			f.mkdirs();
		}
		//实例化MySQLiteHelper ,创建指定目录下数据库文件,并创建表
		MySQLiteHelper mSQL = new MySQLiteHelper(MainActivity.this, path2);
		db = mSQL.getWritableDatabase();
	}

	class MySQLiteHelper extends SQLiteOpenHelper{
			private static final int DATABASE_VERSION = 1;//数据库版本号
			private static final String CREATE_TABLE = "create table kog_bill ("
		            + "_id integer primary key autoincrement,"
		            + "date text, "
		            + "breakfast text, "
		            + "lunch text,"
		            + "dinner text,"
		            + "happy text,"
		            + "other text,"
		            + "spare text)";

			//方便创建实例,简化构造方法,方法内调用4参数构造方法
			//参数 name 可以是 数据库名称,也可以数据库文件路径(即可以指定数据库文件路径)
			public MySQLiteHelper(Context context, String name) {
				this(context, name, null, DATABASE_VERSION);
			}
			//必须要实现的方法
			public MySQLiteHelper(Context context, String name, CursorFactory factory, int version) {
				super(context, name, factory, version);
			}

			@Override
			public void onCreate(SQLiteDatabase db) {
				// 第一次创建数据库时 才会调用
				Log.e("mylog", "创建数据库表");
				db.execSQL(CREATE_TABLE);
			}

			@Override
			public void onUpgrade(SQLiteDatabase db, int oldVersion, int newVersion) {
			}

		}
}
根据上述代码,便获得db对象,通过db(SQLiteDatabase)可进行数据库的操作,如 db.query() db.delete()
如果我们想在创建一个数据库表,参照上述代码,可以在SQLiteOpenHelper的onCreate方法中加入语句:
@Override
public void onCreate(SQLiteDatebase db) {
	db.execSQL(CREATE_TABLE);
	db.execSQL(CREATE_BOOK);  //新创建一个数据库表
}
然后重新运行一下,发现并没有创建成功,因为KogBill.db数据库已经存在,所以MySQLiteHelper 中的onCreate方法都不会执行,解决这个办法的方法很简单,只需要将db文件删除,重新运行,便可成功,但是原来数据库中的数据都会被删除。所以需要用到MySQLiteHelper中的update方法。
class MySQLiteHelper extends SQLiteOpenHelper{
	.....
	@Override
	public void onUpgrade(SQLiteDatabase db, int oldVersion, int newVersion){
		db.execSQL("drop table if exists book");  //如果已经存在就删除,防止重复创建
		onCreate(db);  // 再次执行onCreate 方法
	}
}
但是onUpgrade方法默认是不执行的,如何让onUpgrade方法执行,需要用到MySQLiteHelper 构造参数中的版本号:
private static final int DATABASE_VERSION = 1;// 将版本号 由 1 改为2
这里将数据库版本号由1改为2,表示对数据库的升级
数据库的增删改查
添加数据
ContentValues values = new ContentValues();
	values.put("date", str1.isEmpty()?"0.0":str1);
	values.put("breakfast", ""+str2);
	values.put("lunch", ""+str3);
	values.put("dinner", ""+str4);
	values.put("happy", ""+str5);
	values.put("other", ""+str6);
	values.put("spare", ""+str7);
	long ii = db.insert("kog_bill", "", values);
	values.clear();
	if(ii != -1) {
		Utils.showToast("保存成功!", MainActivity.this);
	}else {
		Utils.showToast("保存失败!", MainActivity.this);
	}
更新数据
ContentValues valus = new ContentValues();
valuse.put("other","12");
db.update("kogBill", values, "_id=?",new String[]{id});
删除数据
db.delete("kogBill", "_id=?",new String[]{id});
查询数据
db.query("kog_bill", new String[]{"_id","date","breakfast","lunch","dinner","happy","other","spare"}
		, null, null, null, null, "date desc");
使用SQL操作数据库
虽然Android 已经给我们提供了非常方便的API用于操作数据库,不过总会有些人不习惯去使用这些辅助行的方法,而是更加青睐于直接使用SQL来操作数据库,当然Android也是提供的。
添加数据
db.execSQL("insert into kogBill ("date","breakfest","lunch","dinner","happy","other","spare") values (?,?,?,?,?,?,?)", new String[]{"1921-1-1",“123”,“1”,“1”,“11”,“2”,“3”});
更新数据
db.execSQL("update kogBill set other = ? where _id = ? ", new String[]{"12",id});
删除数据
db.execSQL("delete from kogBill where _id = ?”, new String[]{id});
使用 LitePal 操作数据库
假设编译环境为AndroidStudio。
1,引进包
dependencies{
	compile fileTree(dir:'libs', include:['*.jar'])
	compile 'com.android.support:appcompat-v7:23.2.0'
	testCompile 'junt:junt:4.12'
	compile 'org.litepal.android:core:1.3.2'   //引入litepal包
}
2,配置litepal.xml 文件
右键app/src/main 目录->New -> Directory ,创建一个assets目录,然后在 assets目录下再新建一个litepal.xml 文件,接着编辑文件中的内容
<?xml version='1.0' encoding="utf-8"?>
<litepal>
	<dbname value = "BookStore"></dbname>
	<version value="1"></version>
	<list></list>
</listepal>
其中,<dbname 标签用来指定数据库名,<version 用来指定数据库版本号,<list 标签用来指定所有映射模型。
最后还需要在配置以下 LitePalApplication, 修改AndroidManifest.xml 中的代码
<manifest xmlns:android="http://schemas.android.com/apk/res/android"
	package="com.example.litepaltest" >
	<application
		android:name="org.litepal.LitePalApplication"  //配置 LitePalApplication
		android:allowBackup="true"
		.....
	</application>
</manifest>
以上,LitePal的配置工作已经结束了,接下来使用LitePal。
首先将需要实现 javabean类 对应 数据库表.
然后将javabean类添加到映射模型列表中,修改litepal.xml 中的代码
<litepal>
	<dbname value="kogBill" ></dbname>
	<version value="1"></version>
	<list>
		<mapping class="com.example.litepaltest.book"></mapping>  //javabean类的路径
	</list>
这样所有工作就已经完成,现在只要进行任意一次数据库的操作,数据库db文件就会自动创建,比如:
Connector.getDatabase();
操作数据
如果需要对某个表进行数据操作,需要让其对应的javaBean类继承DataSupport
public class Book extends DataSupport { //让对应的类继承DataSupport
	...
}
接下来,进行添加数据的操作:
Book book = new Book();
book.setName("...");
book.setAuthor("...");
book.setPages(234);
book.setPrice(12,21);
book.setPress("unkow");
book.save();  //执行sava 就可以插入数据了
执行更新数据:
Book book = new Book();
book.setPrice(11.11);
book.setPress("Anchor");
book.updateAll("name = ?  and authro = ?","..","...");
删除数据:
DataSupport.deleteAll(Book.class, "price<?","13");
查询数据:
//查询所有
List<Book> books = DataSupport.findAll(Book.class);
// 查询第一条
List<Book> books = DataSupport.findFirst(Book.class);
//查询最后一条
List<Book> books = DataSupport.findLast(Book.class);
//查询那几列的数据
List<Book> books = DataSupport.select("name","author).find(Book.class);
//条件查询, 页面大于400
List<Book> books = DataSupport.where("pages >?","400").find(Book.class);
//将 price 降序排序
List<Book> books = DataSupport.order(price desc").find(Book.class);
//查询前3条
List<Book> books = DataSupport.limit(3).find(Book.class);
//从下表1开始,往后查询3条
List<Book> boods = DataSupport.limit(3).offset(1),find(Book.class)
当然这些方法也可以组合起来使用:
List<Book> books = DataSupport.select("name","author","pages")
															.where("pages>?”,"400")
															.order("pages")
															.limit(10)
															.offset(10)
															.find(Book.class);
如果有些特殊查询,使用上述方法无法查询时,可以使用如下语句:
Cursor c  = DataSupport.findBySQL("select * from Book where pages > ? and price < ?”,
		"400","20”);
内容提供器(Conent Provider)方式
网络存储方式
Android 七大布局
ConstraintLayout 约束布局
最新的AndroidStudio创建的项目,都默认为 ConstraintLayout 布局
优点:好用,简单
约束布局
LinearLayout 线性布局
线性布局,如名字所描述的那样,这个布局将它所包含的控件在线性方向上一次排列,方向分为 水平方向和数值方向。
属性 android:orientation = “vertical” | “horizontal” 竖直或水平,默认水平
属性 android:layout_gravity = “top” | “center” | “bottom” 内部的布局方式
属性 android:gravity = “top”|"center”|“bottom” 相对于父容器的对齐方式
属性 android:layout_weidht 使用比例方式执行控件的大小,在手机屏幕适配方面起到非常重要的作用
TableLayout 表格布局
表格布局与HTML中的table td tr标签类似
<table>
	<tr><td></td></tr>
</table>
如何确定行与列
- 如果在TableLayout下添加组件,这个组件会占满整行
- 如果想把多个组件放在同一行,需要添加TableRow的容器,然后把组件放进去
- TableRow中的组件个数决定的该行的列数,而列的宽度由列中最宽的单元格决定
- TableRow嗯layout_width属性默认是fill-parent,修改无效。但是layout_height默认是wrapcontent,可以修改
- 整个表格的宽度取决于父容器的宽度(占满父容器)
重要的属性:
- android:collapaseColumns:设置需要被隐藏的列的序号
- android:shrinkColumns:设置允许被收缩的列的序号
- android:stretchCoumns:设置运行被拉伸嗯列的序号
这三个属性都是从0开始算的
shrinkColumns= "2" //对应第三行
shrinkColumns = '"0,2" //设置多个都生效
shrinkColumns = "" //所有列都生效
- android:layout_column=“2”: 表示跳过第二个,直接显示第三个,从1开始
- android:layout_span=“4”:表示合并*4个单元格,也就说这个组件占4个单元格
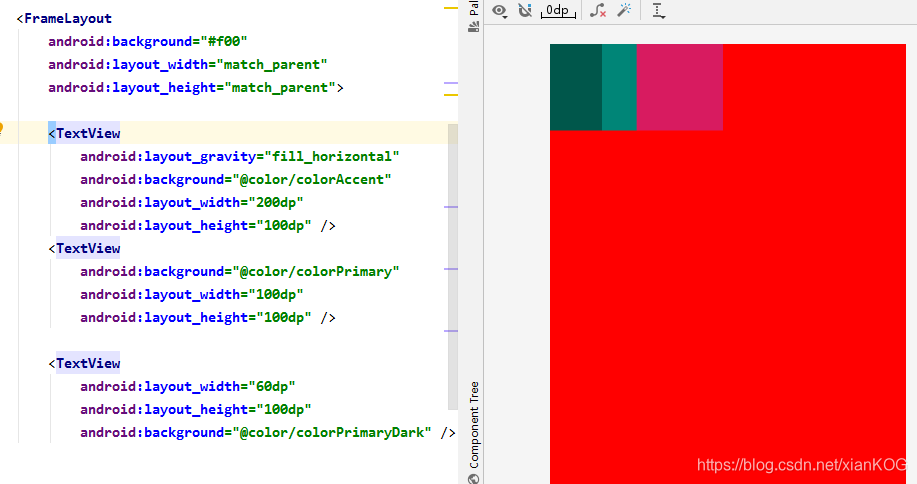
FrameLayout 帧布局
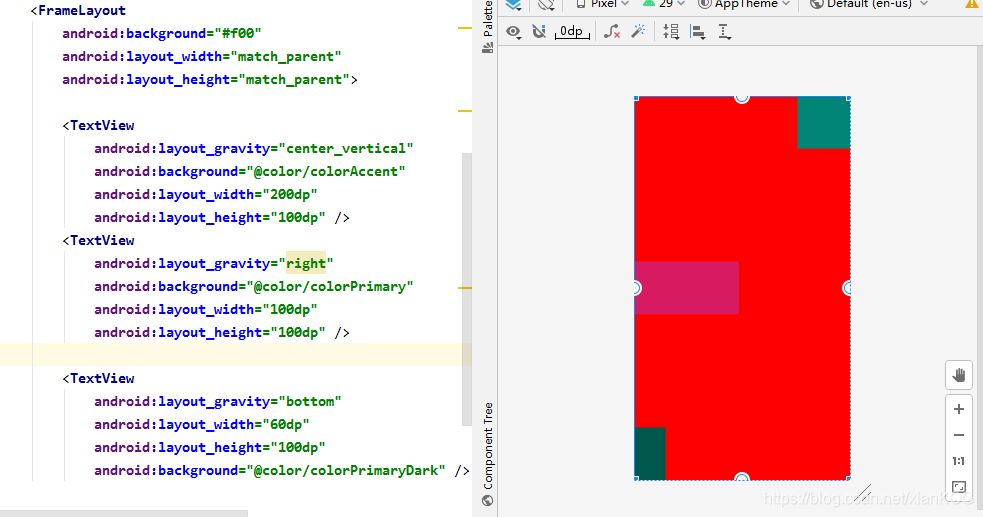
FrameLayout布局在不使用layout_gravity属性的情况下,布局中的多项元素会在父容器的左上角重叠,使用layout_gravity 属性,可以设置不同的位置。
重要属性
- top、bottom、left、right:将对象放在其容器的上、下、左、右的位置
- center、center_vertical、center_horizontal:讲对象居中、水平居中、竖直居中
注意 :区分 “android:gravity” 和 “android:layout_gravity”- android:gravity :是对控件本身而言,控制控件自身的内容在控件中的位置
- android:layout_gravity:是相对于控件父容器而言,设置该控件在其父容器中的位置
RelativeLayout 相对布局
相对布局是用的比较多的一种布局。因为布局套用越多,布局加载越慢,如果使用相对布局,紧紧只需要一次布局。一般使用布局都是相对布局+线性布局使用。
相对布局主要记住重要的属性

此图来自:https://www.runoob.com/w3cnote/android-tutorial-relativelayout.html
注意:margin 和 padding 的区别
* margin:代表的是偏移,是相对于父容器而言
* padding:代表的是填充,是本组件内部而言
GridLayout 网格布局
网格布局与TableLayout(表格布局)类似,不过网格布局功能更多,也更好用。
- 可以设置布局中组件的排列方式
- 可以设置网格布局有几行几列
- 可以直接设置组件的位置,位于某行某列
- 可以直接设置组件占多少行多少列
使用网格布局,需要先设置排列方式、对齐方式、行数、列数。然后对布局中的子组件进行行列设置。
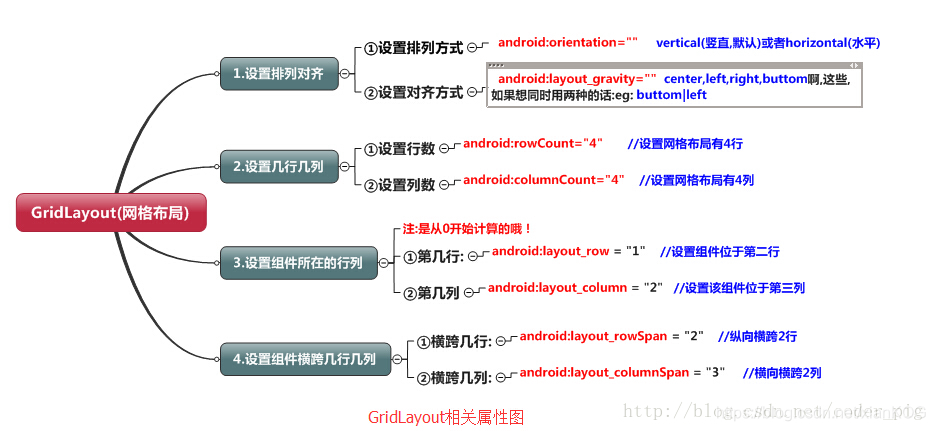
图片来自:https://blog.csdn.net/wangmx1993328/article/details/82770910
下例是计算器布局:

<GridLayout
        android:layout_width="fill_parent"
        android:layout_height="wrap_content"
        android:columnCount="4"
        android:orientation="horizontal"
        android:rowCount="6">
        <TextView
            android:layout_columnSpan="4"
            android:layout_marginLeft="5dp"
            android:layout_marginRight="5dp"
            android:background="#ffcccccc"
            android:text="0"
            android:textSize="50sp"
            android:layout_gravity="fill" />
        <Button
            android:layout_columnSpan="1"
            android:text="1"
            android:layout_gravity="fill" />
        <Button
            android:text="2"
            android:layout_gravity="fill" />
        <Button
            android:text="3"
            android:layout_gravity="fill" />
        <Button
            android:text="+"
            android:layout_gravity="fill" />

        <Button
            android:layout_columnSpan="1"
            android:text="4"
            android:layout_gravity="fill" />
        <Button
            android:text="5"
            android:layout_gravity="fill" />
        <Button
            android:text="6"
            android:layout_gravity="fill" />
        <Button
            android:text="-"
            android:layout_gravity="fill" />
        <Button
            android:layout_columnSpan="1"
            android:text="7"
            android:layout_gravity="fill" />
        <Button
            android:text="8"
            android:layout_gravity="fill" />
        <Button
            android:text="9"
            android:layout_gravity="fill" />
        <Button
            android:text="*"
            android:layout_gravity="fill" />
        <Button
            android:layout_columnSpan="1"
            android:text=""
            android:layout_gravity="fill" />
        <Button
            android:text="0"
            android:layout_gravity="fill" />
        <Button
            android:text="="
            android:layout_gravity="fill" />
        <Button
            android:text="/"
            android:layout_gravity="fill" />
    </GridLayout>
AbsoluteLayout 绝对布局
绝对布局放在最后,是因为绝对布局基本上是不使用的。一般布局需要适配不同机型,如果使用绝对布局,在不同尺寸的手机上显示会变形。
重要属性
- android:layout_x:设置组件的x坐标
- android:layout_y:设置组件的y坐标

<AbsoluteLayout
        android:layout_width="match_parent"
        android:layout_height="match_parent">

        <Button
            android:id="@+id/button1"
            android:layout_width="wrap_content"
            android:layout_height="wrap_content"
            android:layout_x="50dp"
            android:layout_y="100dp"
            android:text="=" />

        <Button
            android:id="@+id/button2"
            android:layout_width="wrap_content"
            android:layout_height="wrap_content"
            android:layout_x="150dp"
            android:layout_y="100dp"
            android:text="=" />

        <Button
            android:id="@+id/button3"
            android:layout_width="wrap_content"
            android:layout_height="wrap_content"
            android:layout_x="100dp"
            android:layout_y="120dp"
            android:text="." />

    </AbsoluteLayout>


 791
791


 被折叠的 条评论
为什么被折叠?
被折叠的 条评论
为什么被折叠?
 到【灌水乐园】发言


