


centos7结合NFS服务搭建FTP服务
前言
如果单独在一台服务器搭建FTP服务,非常简单只需要将vsftpd包下载下来,安装然后通过配置即可完成搭建,但是单独一台服务器的磁盘空间有限,极限也就100多T,如果有超过PB级别数据需要通过FTP存储,显然这点空间不够的,所以想了一个办法,通过NFS将多台服务器的磁盘整合起来构成一个FTP服务。当然目前也有通过超融合软件的方式将服务器组建为资源池的实现方式(vSphere+vSan),这里就不详细描述了
ftp服务架构图
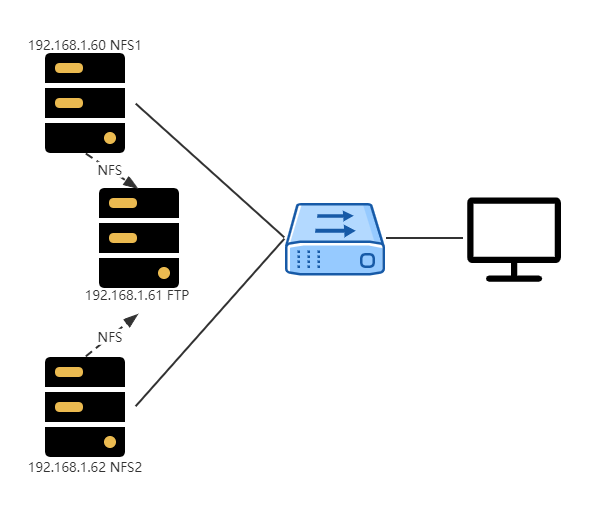
ftp服务器规划
使用3台服务器作为实验,构建大容量FTP服务
| IP | 服务类型 |
|---|---|
| 192.168.88.60 | NFS 服务器 |
| 192.168.88.61 | NFS 客户端+FTP服务器 |
| 192.168.88.62 | NFS 服务器 |
NFS服务搭建
对于需要整合磁盘资源的服务器都安装NFS服务,并配置导出目录
https://blog.csdn.net/xiaobai_gongzi/article/details/124897390
在61服务器部署FTP服务
vsftpd 是在 Linux 上被广泛使用的 FTP 服务器,根据其[官网介绍][https://security.appspot.com/vsftpd.html],它可能是 UNIX-like 系统下最安全和快速的 FTP 服务器软件。
这里需要关闭防火墙,并配置selinux=disabled
- 安装vsftpd
yum install -y vsftpd
- 启动vsftpd
systemctl start vsftpd
- 查看21端口,检查是否启动
netstat -nltp | grep 21
将所有ftp使用的目录挂载到ftp根目录下
ftp服务默认文件目录为/var/ftp,这里使用自定义目录/ftpdata作为ftp服务的根目录
- 新建文件夹ftpdata
mkdir /ftpdir
- 在/ftpdir下新建文件夹f1,f2,3
cd /ftpdata
mkdir f1 f2 f3
f1用来挂载60服务器导出的目录,f2用来挂载61服务器本地目录,f3用来挂载62服务器导出目录
- 将相关导出目录挂载到f1,f3目录下
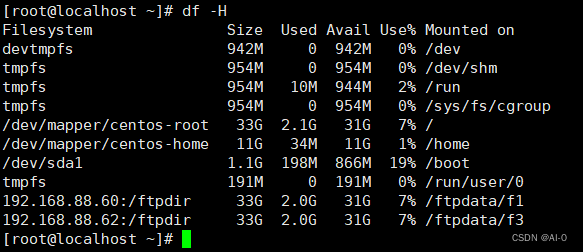
mount -t nfs  192.168.88.60:/ftpdir/ /ftpdata/f1/
mount -t nfs  192.168.88.62:/ftpdir/ /ftpdata/f3/
- 将本地指定目录挂载到f2目录下,也可以不用挂载本地目录直接使用本地磁盘空间主目录作为ftp服务的根目录即可
mount -B /ftpdir/ /ftpdata/f2/
- 挂载结果
访问ftp服务
- ftp地址:ftp://192.168.88.61/
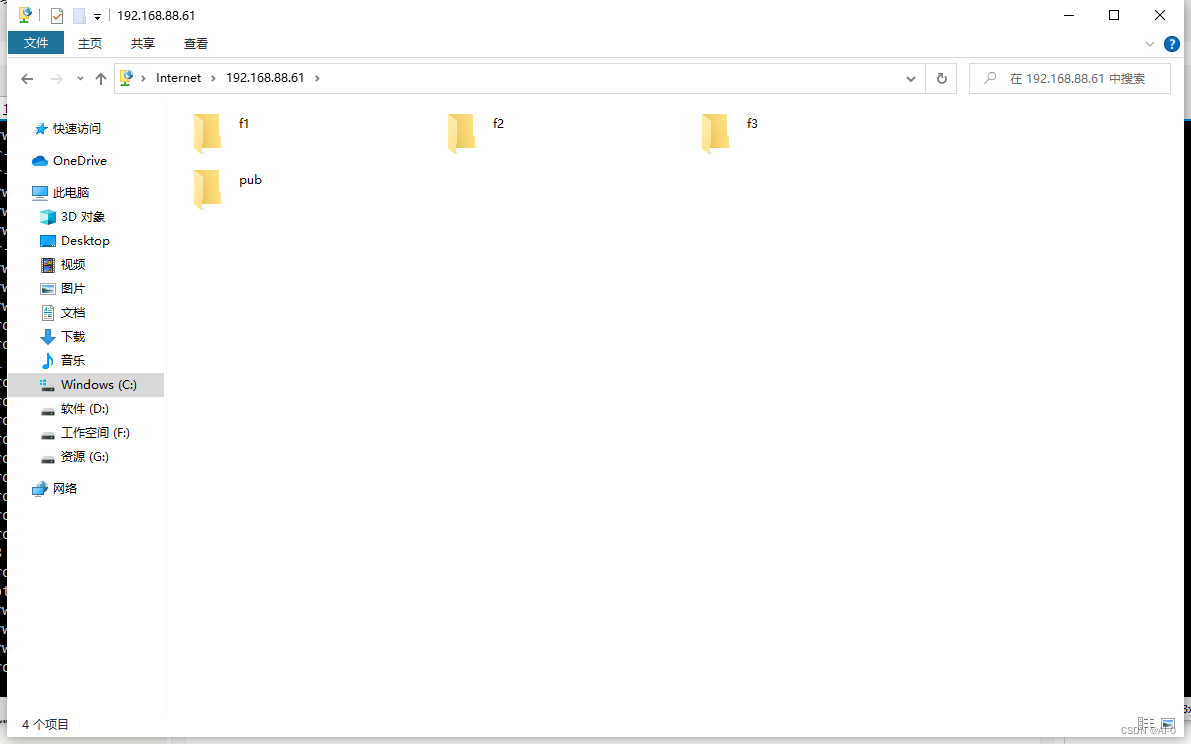
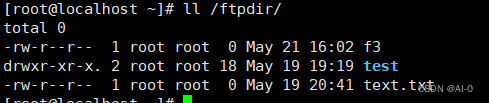
- 在62服务器/var/ftp/目录下各挂载目录新建得文件,在个节点也可以看到相应的文件内容


这样就可以使得各服务器所有硬盘资源都可以通过FTP访问,如果有新的服务器还可以再进行扩展
ftp用户及权限配置
以上内容实现了磁盘资源的整合并搭建了ftp服务,但是对于ftp服务的访问用户,读写权限等都没有配置,因此还需继续完善
vsftpd配置目录为/etc/vsftpd,包含以下内容
-rw-------. 1 root root  125 Jun 10  2021 ftpusers
-rw-------. 1 root root  361 Jun 10  2021 user_list
-rw-------. 1 root root 5116 Jun 10  2021 vsftpd.conf
-rwxr--r--. 1 root root  338 Jun 10  2021 vsftpd_conf_migrate.sh
- 配置权限
编辑/etc/vsftpd/vsftpd.conf配置文件,并重启vsftpd服务
# Example config file /etc/vsftpd/vsftpd.conf
#
# The default compiled in settings are fairly paranoid. This sample file
# loosens things up a bit, to make the ftp daemon more usable.
# Please see vsftpd.conf.5 for all compiled in defaults.
#
# READ THIS: This example file is NOT an exhaustive list of vsftpd options.
# Please read the vsftpd.conf.5 manual page to get a full idea of vsftpd's
# capabilities.
#
# Allow anonymous FTP? (Beware - allowed by default if you comment this out).
anonymous_enable=NO
#
# Uncomment this to allow local users to log in.
# When SELinux is enforcing check for SE bool ftp_home_dir
local_enable=YES
#
# Uncomment this to enable any form of FTP write command.
write_enable=YES
#
# Default umask for local users is 077. You may wish to change this to 022,
# if your users expect that (022 is used by most other ftpd's)
local_umask=022
#
# Uncomment this to allow the anonymous FTP user to upload files. This only
# has an effect if the above global write enable is activated. Also, you will
# obviously need to create a directory writable by the FTP user.
# When SELinux is enforcing check for SE bool allow_ftpd_anon_write, allow_ftpd_full_access
#anon_upload_enable=YES
#
# Uncomment this if you want the anonymous FTP user to be able to create
# new directories.
#anon_mkdir_write_enable=YES
#
# Activate directory messages - messages given to remote users when they
# go into a certain directory.
dirmessage_enable=YES
#
# Activate logging of uploads/downloads.
xferlog_enable=YES
#
# Make sure PORT transfer connections originate from port 20 (ftp-data).
connect_from_port_20=YES
#
# If you want, you can arrange for uploaded anonymous files to be owned by
# a different user. Note! Using "root" for uploaded files is not
# recommended!
#chown_uploads=YES
#chown_username=whoever
#
# You may override where the log file goes if you like. The default is shown
# below.
#xferlog_file=/var/log/xferlog
#
# If you want, you can have your log file in standard ftpd xferlog format.
# Note that the default log file location is /var/log/xferlog in this case.
xferlog_std_format=YES
#
# You may change the default value for timing out an idle session.
#idle_session_timeout=600
#
# You may change the default value for timing out a data connection.
#data_connection_timeout=120
#
# It is recommended that you define on your system a unique user which the
# ftp server can use as a totally isolated and unprivileged user.
#nopriv_user=ftpsecure
#
# Enable this and the server will recognise asynchronous ABOR requests. Not
# recommended for security (the code is non-trivial). Not enabling it,
# however, may confuse older FTP clients.
#async_abor_enable=YES
#
# By default the server will pretend to allow ASCII mode but in fact ignore
# the request. Turn on the below options to have the server actually do ASCII
# mangling on files when in ASCII mode. The vsftpd.conf(5) man page explains
# the behaviour when these options are disabled.
# Beware that on some FTP servers, ASCII support allows a denial of service
# attack (DoS) via the command "SIZE /big/file" in ASCII mode. vsftpd
# predicted this attack and has always been safe, reporting the size of the
# raw file.
# ASCII mangling is a horrible feature of the protocol.
#ascii_upload_enable=YES
#ascii_download_enable=YES
#
# You may fully customise the login banner string:
#ftpd_banner=Welcome to blah FTP service.
#
# You may specify a file of disallowed anonymous e-mail addresses. Apparently
# useful for combatting certain DoS attacks.
#deny_email_enable=YES
# (default follows)
#banned_email_file=/etc/vsftpd/banned_emails
#
# You may specify an explicit list of local users to chroot() to their home
# directory. If chroot_local_user is YES, then this list becomes a list of
# users to NOT chroot().
# (Warning! chroot'ing can be very dangerous. If using chroot, make sure that
# the user does not have write access to the top level directory within the
# chroot)
#chroot_local_user=YES
#chroot_list_enable=YES
# (default follows)
#chroot_list_file=/etc/vsftpd/chroot_list
#
# You may activate the "-R" option to the builtin ls. This is disabled by
# default to avoid remote users being able to cause excessive I/O on large
# sites. However, some broken FTP clients such as "ncftp" and "mirror" assume
# the presence of the "-R" option, so there is a strong case for enabling it.
#ls_recurse_enable=YES
#
# When "listen" directive is enabled, vsftpd runs in standalone mode and
# listens on IPv4 sockets. This directive cannot be used in conjunction
# with the listen_ipv6 directive.
listen=NO
#
# This directive enables listening on IPv6 sockets. By default, listening
# on the IPv6 "any" address (::) will accept connections from both IPv6
# and IPv4 clients. It is not necessary to listen on *both* IPv4 and IPv6
# sockets. If you want that (perhaps because you want to listen on specific
# addresses) then you must run two copies of vsftpd with two configuration
# files.
# Make sure, that one of the listen options is commented !!
listen_ipv6=YES

pam_service_name=vsftpd
userlist_enable=YES
tcp_wrappers=YES
#ftp根目录
local_root=/ftpdata/
systemctl restart vsftpd
- 创建用户
添加用户并修改密码
useradd ftpuser
passwd ftpuser
- 限制用户只能通过ftp访问,不能登录服务器
usermod -s /sbin/nologin ftpuser
设置了用户的登录权限需要修改/etc/pam.d/vsftpd,否则无法登录
将auth required pam_shells.so注释掉,因为用户为ftp用户,限制了以shell的方式登录系统
#%PAM-1.0
session    optional     pam_keyinit.so    force revoke
auth       required     pam_listfile.so item=user sense=deny file=/etc/vsftpd/ftpusers onerr=succeed
#auth       required    pam_shells.so
auth       include      password-auth
account    include      password-auth
session    required     pam_loginuid.so
session    include      password-auth
-
为用户分配主目录
为用户 ftpuser 创建[主目录]并约定:
/ftpdata 为主目录,可上传下载 -
将文件所有者改为ftp用户ftpuser
chown -R ftpuser /ftpdata/
- 设置用户登录目录
usermod -d /ftpdata/ ftpuser
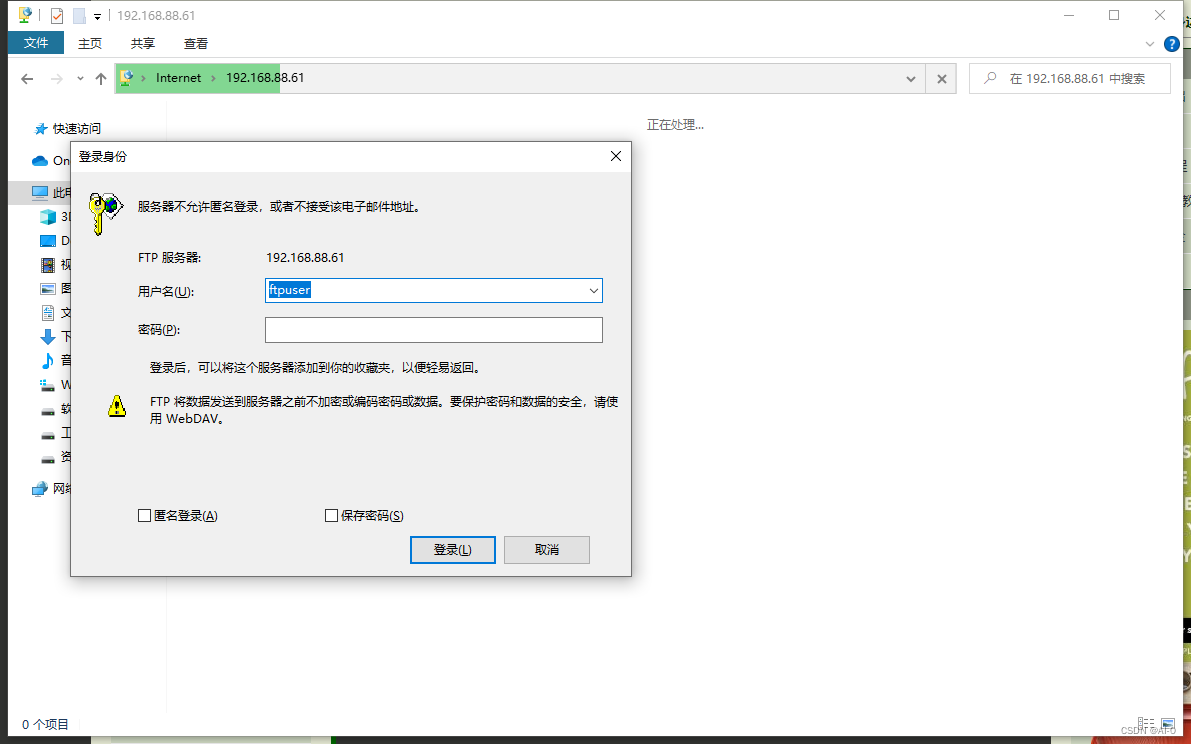
再次测试登录
再次登录就会有登录限制了,使用新建的用户ftpuser即可登录
重启自动挂载脚本
对于客户端挂载的磁盘即61挂载的60,62的磁盘,在服务器断电重启后会自动取消挂载,因此需要添加服务器启动自动挂载脚本
#!/bin/bash

#chkconfig:2345 20 90
#description:nfs auto mount
#processname:automount
#服务器列表
IPS=('kafka01' 'kafka02' 'kafka03')
#检查所有服务器是否启动
while true
do
tag=0
for ip in ${IPS[@]}
do
ping -c 2 $ip > /dev/null 2>&1

if [ $? -ne 0 ];then
tag=1
echo $ip is power off please try to start the machine
break;
else
echo $ip is power on
fi;

done;

if [ $tag -eq 0 ];then
echo 'all of the machine in this cluster is power on!'
break;
fi;
done;

#等待30秒,防止个服务的rpcbind,nfs服务没启动,导致挂载失败
sleep 30

#执行挂载命令
mount -t nfs kafka01:/ftpdir/ /ftpdata/f1/
if [ $? -eq 0 ];then
echo 'kafka01 is mount success';
else
echo 'kafka01 is mount fail';
fi
mount -t nfs kafka03:/ftpdir/ /ftpdata/f3/
if [ $? -eq 0 ];then
echo 'kafka02 is mount success';
else
echo 'kafka02 is mount fail';
fi


 528
528


 被折叠的 条评论
为什么被折叠?
被折叠的 条评论
为什么被折叠?
 到【灌水乐园】发言


