


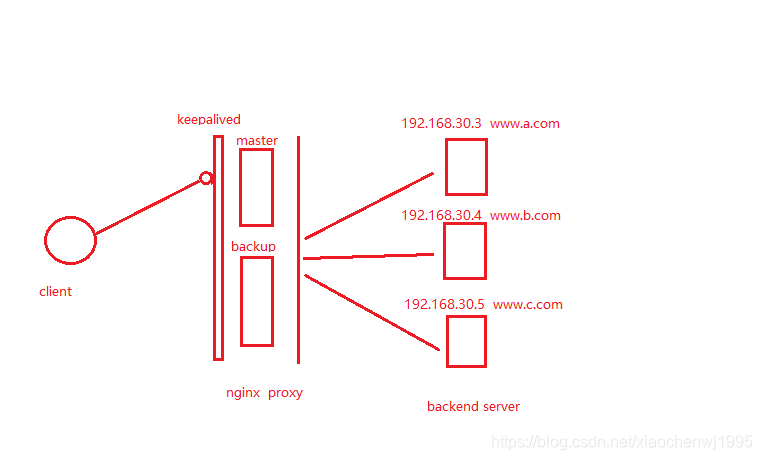
keepalived高可用nginx得调用外部脚本来实现,通过外部脚本监控nginx进程从而判断服务器的健康状态,决定地址转移到健康的nginx服务器上,继续提供服务。
这里的nginx服务器作为反向代理服务器提供服务。
单主 模型
一、先配置后端的web服务器,为了方便这里使用httpd的虚拟主机模拟后台的多台服务器。
编辑虚拟主机配置文件
[root@centos7 ~]# yum install httpd
[root@centos7 conf.d]# vim  /etc/httpd/conf.d/vhosts.conf

<Directory /var/www/html/>
  require all granted
</Directory>
<VirtualHost 192.168.30.3:80>
  DocumentRoot "/var/www/html/sitea"
  ServerName www.a.com
</VirtualHost>
<VirtualHost 192.168.30.4:80>
  DocumentRoot "/var/www/html/siteb"
  ServerName www.b.com
</VirtualHost>
<VirtualHost 192.168.30.5:80>
  DocumentRoot "/var/www/html/sitec"
  ServerName www.c.com
</VirtualHost>
创建站点页面
[root@centos7 html]# mkdir -v site{a,b,c}
mkdir: 已创建目录 "sitea"
mkdir: 已创建目录 "siteb"
mkdir: 已创建目录 "sitec"
[root@centos7 html]# ls
index.html  sitea  siteb  sitec
[root@centos7 html]# echo "<h1>vhost a</h1>" > ./sitea/index.html
[root@centos7 html]# echo "<h1>vhost b</h1>" > ./siteb/index.html
[root@centos7 html]# echo "<h1>vhost c</h1>" > ./sitec/index.html
二、两台主机安装nginx服务,配置反向代理功能。
两台nginx主机配置相同。
[root@centos7 ~]# yum install nginx
[root@centos7 nginx]# vim  nginx.conf
http {  //在http中添加以下内容
    upstream websrvs {
	server 192.168.30.3:80;
	server 192.168.30.4:80;
	server 192.168.30.5:80;
    }

    server {   //在server中添加以下内容
        location / {
		proxy_pass http://websrvs;
        }
    }
}
三、配置keepalived,定义监控脚本
分两步:(1) 先定义一个脚本;(2) 调用此脚本;
		vrrp_script <SCRIPT_NAME> {
			script ""  //脚本的位置,也可以是外部脚本的路径
			interval INT  //每隔多长时间监控脚本就执行一次
			weight -INT //如果失败则当前节点减去的权重值,确保减去的结果小于备用节点
		}

		track_script {  //调用脚本,在VRRP实例中调用
			SCRIPT_NAME_1
			SCRIPT_NAME_2
			...
		}
控制keepalived的脚本内容如下。
vrrp_script chk_down {
    script "[[ -f /etc/keepalived/down ]] && exit 1 || exit 0"
    interval 2
    weight -5
    fall 1
    rise 1
}
监控nginx的脚本内容如下。
vrrp_script chk_nginx {
    script "/usr/bin/killall -0 nginx && exit 0 || exit 1"
    interval 2
    weight -5
    fall 2
    rise 1
}
邮件通知触发脚本内容如下(在脚本中添加了控制nginx服务启动的功能,只要外部条件触发改变keepalived节点的状态,就执行相应的操作,这里无论主备都要把nginx服务开启)
[root@centos7 keepalived]# cat notify_nginx.sh
#!/bin/bash
#
contact='root@localhost'    ##定义接收用户,联系人
notify() {  ##邮件通知函数
	local mailsubject="$(hostname) to be $1, vip floating"  ##邮件标题
	local mailbody="$(date +'%F %T'): vrrp transition, $(hostname) changed to be $1"  ##邮件正文
	echo "$mailbody" | mail -s "$mailsubject" $contact
}
case $1 in
	master)
		systemctl start nginx
		notify master
		;;
	backup)
		systemctl start nginx
		notify backup
		;;
	fault)
		systemctl stop nginx
		notify fault
		;;
	*)
		echo "Usage: $(basename $0) {master|backup|fault}"
		exit 1
		;;
esac
编辑keepalived的配置文件。
主节点
[root@centos7 keepalived]# vim keepalived.conf
! Configuration File for keepalived

global_defs {
   notification_email {
	root@localhost
   }
   notification_email_from keepalived@localhost
   smtp_server 127.0.0.1
   smtp_connect_timeout 30
   router_id node128
   vrrp_mcast_group4 224.0.100.19
}
vrrp_script chk_down {
    script "[[ -f /etc/keepalived/down ]] && exit 1 || exit 0"
    interval 2
    weight -10
    fall 1
    rise 1
}
vrrp_script chk_nginx {
    script "/usr/bin/killall -0 nginx && exit 0 || exit 1"
    interval 2
    weight -10
    fall 2
    rise 3
}

vrrp_instance VI_1 {
    state MASTER
    interface ens33
    virtual_router_id 51
    priority 100
    advert_int 2
    authentication {
        auth_type PASS
        auth_pass cafNzHqV
    }
    virtual_ipaddress {
        192.168.239.98/24 dev ens33 label ens33:1
    }
    track_script {
	chk_down
	chk_nginx
    }
    notify_master "/etc/keepalived/notify_nginx.sh master"
    notify_backup "/etc/keepalived/notify_nginx.sh backup"
    notify_fault "/etc/keepalived/notify_nginx.sh fault"
}
备节点
[root@centos7 keepalived]# vim keepalived.conf
! Configuration File for keepalived

global_defs {
   notification_email {
	root@localhost
   }
   notification_email_from keepalived@localhost
   smtp_server 127.0.0.1
   smtp_connect_timeout 30
   router_id node130
   vrrp_mcast_group4 224.0.100.19
}
vrrp_script chk_down {
    script "[[ -f /etc/keepalived/down ]] && exit 1 || exit 0"
    interval 2
    weight -10
    fall 1
    rise 1
}
vrrp_script chk_nginx {
    script "killall -0 nginx && exit 0 || exit 1"
    interval 2
    weight -10
    fall 2
    rise 3
}

vrrp_instance VI_1 {
    state BACKUP
    interface ens33
    virtual_router_id 51
    priority 95
    advert_int 2
    authentication {
        auth_type PASS
        auth_pass cafNzHqV
    }
    track_script {
        chk_down
        chk_nginx
    }
    virtual_ipaddress {
        192.168.239.98/24 dev ens33 label ens33:1
    }
    notify_master "/etc/keepalived/notify_nginx.sh master"
    notify_backup "/etc/keepalived/notify_nginx.sh backup"
    notify_fault "/etc/keepalived/notify_nginx.sh fault"
}
四、测试
1、先启动备节点,这里只要我们把keepalived服务启动起来,就会触发启动nginx服务。
[root@centos7 keepalived]# systemctl start keepalived.service
[root@centos7 keepalived]# ps aux|grep nginx
root      29488  0.0  0.1 118708  2120 ?        Ss   22:45   0:00 nginx: master process /usr/sbin/nginx
nginx     29489  0.0  0.2 121272  4000 ?        S    22:45   0:00 nginx: worker process
nginx     29490  0.0  0.2 121272  4000 ?        S    22:45   0:00 nginx: worker process
root      34308  0.0  0.0 112676   980 pts/0    R+   23:32   0:00 grep --color=auto nginx
[root@centos7 keepalived]# ifconfig
ens33: flags=4163<UP,BROADCAST,RUNNING,MULTICAST>  mtu 1500
        inet 192.168.239.130  netmask 255.255.255.0  broadcast 192.168.239.255
        inet6 fe80::20c:29ff:fe65:a88f  prefixlen 64  scopeid 0x20<link>
        ether 00:0c:29:65:a8:8f  txqueuelen 1000  (Ethernet)
        RX packets 143696  bytes 16314912 (15.5 MiB)
        RX errors 0  dropped 0  overruns 0  frame 0
        TX packets 144221  bytes 12051760 (11.4 MiB)
        TX errors 0  dropped 0 overruns 0  carrier 0  collisions 0

ens33:1: flags=4163<UP,BROADCAST,RUNNING,MULTICAST>  mtu 1500
        inet 192.168.239.98  netmask 255.255.255.0  broadcast 0.0.0.0
        ether 00:0c:29:65:a8:8f  txqueuelen 1000  (Ethernet)
2、客户端访问


3、启动主节点,地址就会转移到主节点上,同时nginx服务也会被触发启动,这时由主节点提供反向代理服务。
[root@centos7 keepalived]# systemctl start keepalived
[root@centos7 keepalived]# ifconfig
ens33: flags=4163<UP,BROADCAST,RUNNING,MULTICAST>  mtu 1500
        inet 192.168.239.128  netmask 255.255.255.0  broadcast 192.168.239.255
        inet6 fe80::20c:29ff:fe60:4537  prefixlen 64  scopeid 0x20<link>
        ether 00:0c:29:60:45:37  txqueuelen 1000  (Ethernet)
        RX packets 125654  bytes 15316720 (14.6 MiB)
        RX errors 0  dropped 0  overruns 0  frame 0
        TX packets 161697  bytes 13672263 (13.0 MiB)
        TX errors 0  dropped 0 overruns 0  carrier 0  collisions 0

ens33:1: flags=4163<UP,BROADCAST,RUNNING,MULTICAST>  mtu 1500
        inet 192.168.239.98  netmask 255.255.255.0  broadcast 0.0.0.0
        ether 00:0c:29:60:45:37  txqueuelen 1000  (Ethernet)
[root@centos7 keepalived]# ps aux | grep nginx
root      34315  0.0  0.1 118704  2252 ?        Ss   18:32   0:00 nginx: master process nginx
nginx     34316  0.0  0.2 121260  3996 ?        S    18:32   0:00 nginx: worker process
nginx     34317  0.0  0.2 121260  3996 ?        S    18:32   0:00 nginx: worker process
root      41719  0.0  0.0 112676   984 pts/0    R+   23:35   0:00 grep --color=auto nginx
4、把主节点的nginx进程停掉,这时地址转就移到备节点,由备节点提供服务。
[root@centos7 keepalived]# killall nginx && systemctl start httpd  //这里关闭nginx进程并启动httpd才能完成关闭nginx进程
[root@centos7 keepalived]# ps aux | grep nginx
root      45891  0.0  0.0 112676   984 pts/1    S+   19:55   0:00 grep --color=auto nginx
[root@centos7 keepalived]# systemctl status keepalived.service  //查看keepalived的状态
● keepalived.service - LVS and VRRP High Availability Monitor
   Loaded: loaded (/usr/lib/systemd/system/keepalived.service; disabled; vendor preset: disabled)
   Active: active (running) since 四 2019-11-07 20:35:12 CST; 9min ago
  Process: 48247 ExecStart=/usr/sbin/keepalived $KEEPALIVED_OPTIONS (code=exited, status=0/SUCCESS)
 Main PID: 48248 (keepalived)
   CGroup: /system.slice/keepalived.service
           ├─48248 /usr/sbin/keepalived -D
           ├─48249 /usr/sbin/keepalived -D
           └─48250 /usr/sbin/keepalived -D

11月 07 20:44:13 centos7.cwj.com Keepalived_vrrp[48250]: /usr/bin/killall -0 nginx && exit 0 || exit 1 exited with status 1
11月 07 20:44:15 centos7.cwj.com Keepalived_vrrp[48250]: /usr/bin/killall -0 nginx && exit 0 || exit 1 exited with status 1
11月 07 20:44:17 centos7.cwj.com Keepalived_vrrp[48250]: /usr/bin/killall -0 nginx && exit 0 || exit 1 exited with status 1
11月 07 20:44:19 centos7.cwj.com Keepalived_vrrp[48250]: /usr/bin/killall -0 nginx && exit 0 || exit 1 exited with status 1
11月 07 20:44:21 centos7.cwj.com Keepalived_vrrp[48250]: /usr/bin/killall -0 nginx && exit 0 || exit 1 exited with status 1
11月 07 20:44:23 centos7.cwj.com Keepalived_vrrp[48250]: /usr/bin/killall -0 nginx && exit 0 || exit 1 exited with status 1
11月 07 20:44:25 centos7.cwj.com Keepalived_vrrp[48250]: /usr/bin/killall -0 nginx && exit 0 || exit 1 exited with status 1
11月 07 20:44:27 centos7.cwj.com Keepalived_vrrp[48250]: /usr/bin/killall -0 nginx && exit 0 || exit 1 exited with status 1
11月 07 20:44:29 centos7.cwj.com Keepalived_vrrp[48250]: /usr/bin/killall -0 nginx && exit 0 || exit 1 exited with status 1
11月 07 20:44:31 centos7.cwj.com Keepalived_vrrp[48250]: /usr/bin/killall -0 nginx && exit 0 || exit 1 exited with status 1
地址转移到了备节点
[root@centos7 keepalived]# ifconfig
ens33: flags=4163<UP,BROADCAST,RUNNING,MULTICAST>  mtu 1500
        inet 192.168.239.130  netmask 255.255.255.0  broadcast 192.168.239.255
        inet6 fe80::20c:29ff:fe65:a88f  prefixlen 64  scopeid 0x20<link>
        ether 00:0c:29:65:a8:8f  txqueuelen 1000  (Ethernet)
        RX packets 147752  bytes 16636357 (15.8 MiB)
        RX errors 0  dropped 0  overruns 0  frame 0
        TX packets 146446  bytes 12340208 (11.7 MiB)
        TX errors 0  dropped 0 overruns 0  carrier 0  collisions 0

ens33:1: flags=4163<UP,BROADCAST,RUNNING,MULTICAST>  mtu 1500
        inet 192.168.239.98  netmask 255.255.255.0  broadcast 0.0.0.0
        ether 00:0c:29:65:a8:8f  txqueuelen 1000  (Ethernet)

ens37: flags=4163<UP,BROADCAST,RUNNING,MULTICAST>  mtu 1500
        inet 192.168.30.10  netmask 255.255.255.0  broadcast 192.168.30.255
        ether 00:0c:29:65:a8:99  txqueuelen 1000  (Ethernet)
        RX packets 50339  bytes 13308782 (12.6 MiB)
        RX errors 0  dropped 0  overruns 0  frame 0
        TX packets 6209  bytes 447531 (437.0 KiB)
        TX errors 0  dropped 0 overruns 0  carrier 0  collisions 0
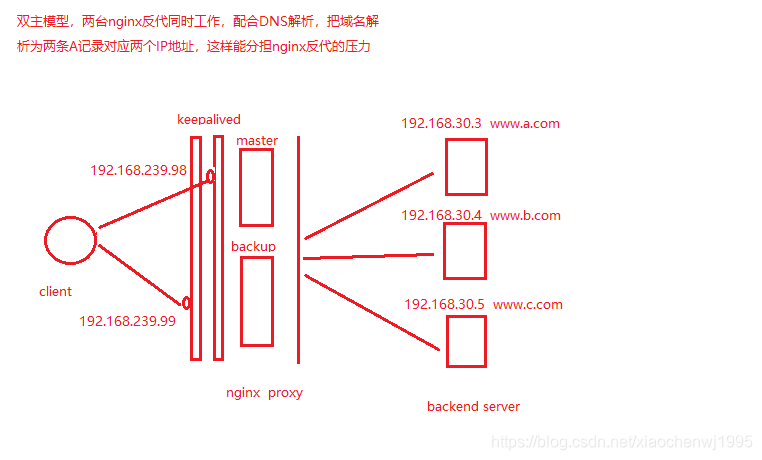
双主模型
一、在上面的实验的基础上,再加一个VRRP实例,这样就成为了双主模型。主节点上第二个VRRP实例设为BACKUP,相反备节点的第二个VRRP实例设为MASTER。
主节点
[root@centos7 keepalived]# cat keepalived.conf
! Configuration File for keepalived

global_defs {
   notification_email {
	root@localhost
   }
   notification_email_from keepalived@localhost
   smtp_server 127.0.0.1
   smtp_connect_timeout 30
   router_id node128
   vrrp_mcast_group4 224.0.100.19
}
vrrp_script chk_down {
    script "[[ -f /etc/keepalived/down ]] && exit 1 || exit 0"
    interval 2
    weight -10
    fall 1
    rise 1
}
vrrp_script chk_nginx {
    script "/usr/bin/killall -0 nginx && exit 0 || exit 1"
    interval 2
    weight -10
    fall 2
    rise 3
}

vrrp_instance VI_1 {
    state MASTER
    interface ens33
    virtual_router_id 51
    priority 100
    advert_int 2
    authentication {
        auth_type PASS
        auth_pass cafNzHqV
    }
    virtual_ipaddress {
        192.168.239.98/24 dev ens33 label ens33:1
    }
    track_script {
	chk_down
	chk_nginx
    }
    notify_master "/etc/keepalived/notify_nginx.sh master"
    notify_backup "/etc/keepalived/notify_nginx.sh backup"
    notify_fault "/etc/keepalived/notify_nginx.sh fault"
}

vrrp_instance VI_2 {
    state BACKUP
    interface ens33
    virtual_router_id 15
    priority 95
    advert_int 2
    authentication {
        auth_type PASS
        auth_pass cafnzHqV
    }
    virtual_ipaddress {
        192.168.239.99/24 dev ens33 label ens33:2
    }
    track_script {
        chk_down
        chk_nginx
    }
    notify_master "/etc/keepalived/notify_nginx.sh master"
    notify_backup "/etc/keepalived/notify_nginx.sh backup"
    notify_fault "/etc/keepalived/notify_nginx.sh fault"
}
备节点
[root@centos7 keepalived]# cat keepalived.conf
! Configuration File for keepalived

global_defs {
   notification_email {
	root@localhost
   }
   notification_email_from keepalived@localhost
   smtp_server 127.0.0.1
   smtp_connect_timeout 30
   router_id node130
   vrrp_mcast_group4 224.0.100.19
}
vrrp_script chk_down {
    script "[[ -f /etc/keepalived/down ]] && exit 1 || exit 0"
    interval 2
    weight -10
    fall 1
    rise 1
}
vrrp_script chk_nginx {
    script "killall -0 nginx && exit 0 || exit 1"
    interval 2
    weight -10
    fall 2
    rise 3
}

vrrp_instance VI_1 {
    state BACKUP
    interface ens33
    virtual_router_id 51
    priority 95
    advert_int 2
    authentication {
        auth_type PASS
        auth_pass cafNzHqV
    }
    track_script {
        chk_down
        chk_nginx
    }
    virtual_ipaddress {
        192.168.239.98/24 dev ens33 label ens33:1
    }
    notify_master "/etc/keepalived/notify_nginx.sh master"
    notify_backup "/etc/keepalived/notify_nginx.sh backup"
    notify_fault "/etc/keepalived/notify_nginx.sh fault"
}

vrrp_instance VI_2 {
    state MASTER
    interface ens33
    virtual_router_id 15
    priority 100
    advert_int 2
    authentication {
        auth_type PASS
        auth_pass cafnzHqV
    }
    track_script {
        chk_down
        chk_nginx
    }
    virtual_ipaddress {
        192.168.239.99/24 dev ens33 label ens33:2
    }
    notify_master "/etc/keepalived/notify_nginx.sh master"
    notify_backup "/etc/keepalived/notify_nginx.sh backup"
    notify_fault "/etc/keepalived/notify_nginx.sh fault"
}
二、测试
1、先启动一个节点,这时两个地址都在一个节点上。
[root@centos7 keepalived]# ifconfig
ens33: flags=4163<UP,BROADCAST,RUNNING,MULTICAST>  mtu 1500
        inet 192.168.239.130  netmask 255.255.255.0  broadcast 192.168.239.255
        inet6 fe80::20c:29ff:fe65:a88f  prefixlen 64  scopeid 0x20<link>
        ether 00:0c:29:65:a8:8f  txqueuelen 1000  (Ethernet)
        RX packets 149065  bytes 16771257 (15.9 MiB)
        RX errors 0  dropped 0  overruns 0  frame 0
        TX packets 148074  bytes 12551656 (11.9 MiB)
        TX errors 0  dropped 0 overruns 0  carrier 0  collisions 0

ens33:1: flags=4163<UP,BROADCAST,RUNNING,MULTICAST>  mtu 1500
        inet 192.168.239.98  netmask 255.255.255.0  broadcast 0.0.0.0
        ether 00:0c:29:65:a8:8f  txqueuelen 1000  (Ethernet)

ens33:2: flags=4163<UP,BROADCAST,RUNNING,MULTICAST>  mtu 1500
        inet 192.168.239.99  netmask 255.255.255.0  broadcast 0.0.0.0
        ether 00:0c:29:65:a8:8f  txqueuelen 1000  (Ethernet)

ens37: flags=4163<UP,BROADCAST,RUNNING,MULTICAST>  mtu 1500
        inet 192.168.30.10  netmask 255.255.255.0  broadcast 192.168.30.255
        ether 00:0c:29:65:a8:99  txqueuelen 1000  (Ethernet)
        RX packets 50434  bytes 13319532 (12.7 MiB)
        RX errors 0  dropped 0  overruns 0  frame 0
        TX packets 6299  bytes 460105 (449.3 KiB)
        TX errors 0  dropped 0 overruns 0  carrier 0  collisions 0
2、客户端访问
访问192.168.239.99


访问192.168.239.98


3、启动另一个节点,这时地址就会分散在两个节点上,两个节点同时提供服务。能分担nginx服务的一些压力。
节点1
[root@centos7 keepalived]# ifconfig
ens33: flags=4163<UP,BROADCAST,RUNNING,MULTICAST>  mtu 1500
        inet 192.168.239.128  netmask 255.255.255.0  broadcast 192.168.239.255
        inet6 fe80::20c:29ff:fe60:4537  prefixlen 64  scopeid 0x20<link>
        ether 00:0c:29:60:45:37  txqueuelen 1000  (Ethernet)
        RX packets 131518  bytes 15832865 (15.0 MiB)
        RX errors 0  dropped 0  overruns 0  frame 0
        TX packets 166725  bytes 14355297 (13.6 MiB)
        TX errors 0  dropped 0 overruns 0  carrier 0  collisions 0

ens33:1: flags=4163<UP,BROADCAST,RUNNING,MULTICAST>  mtu 1500
        inet 192.168.239.98  netmask 255.255.255.0  broadcast 0.0.0.0
        ether 00:0c:29:60:45:37  txqueuelen 1000  (Ethernet)

ens37: flags=4163<UP,BROADCAST,RUNNING,MULTICAST>  mtu 1500
        inet 192.168.30.8  netmask 255.255.255.0  broadcast 192.168.30.255
        inet6 fe80::20c:29ff:fe60:4541  prefixlen 64  scopeid 0x20<link>
        ether 00:0c:29:60:45:41  txqueuelen 1000  (Ethernet)
        RX packets 76271  bytes 52219916 (49.8 MiB)
        RX errors 0  dropped 0  overruns 0  frame 0
        TX packets 15615  bytes 1156588 (1.1 MiB)
        TX errors 0  dropped 0 overruns 0  carrier 0  collisions 0
节点2
[root@centos7 keepalived]# ifconfig
ens33: flags=4163<UP,BROADCAST,RUNNING,MULTICAST>  mtu 1500
        inet 192.168.239.130  netmask 255.255.255.0  broadcast 192.168.239.255
        inet6 fe80::20c:29ff:fe65:a88f  prefixlen 64  scopeid 0x20<link>
        ether 00:0c:29:65:a8:8f  txqueuelen 1000  (Ethernet)
        RX packets 149187  bytes 16784407 (16.0 MiB)
        RX errors 0  dropped 0  overruns 0  frame 0
        TX packets 148482  bytes 12584564 (12.0 MiB)
        TX errors 0  dropped 0 overruns 0  carrier 0  collisions 0

ens33:2: flags=4163<UP,BROADCAST,RUNNING,MULTICAST>  mtu 1500
        inet 192.168.239.99  netmask 255.255.255.0  broadcast 0.0.0.0
        ether 00:0c:29:65:a8:8f  txqueuelen 1000  (Ethernet)

ens37: flags=4163<UP,BROADCAST,RUNNING,MULTICAST>  mtu 1500
        inet 192.168.30.10  netmask 255.255.255.0  broadcast 192.168.30.255
        ether 00:0c:29:65:a8:99  txqueuelen 1000  (Ethernet)
        RX packets 50492  bytes 13325994 (12.7 MiB)
        RX errors 0  dropped 0  overruns 0  frame 0
        TX packets 6357  bytes 468559 (457.5 KiB)
        TX errors 0  dropped 0 overruns 0  carrier 0  collisions 0


 888
888


 被折叠的 条评论
为什么被折叠?
被折叠的 条评论
为什么被折叠?
 到【灌水乐园】发言


