


一、Varnish介绍
Varnish是一款高性能、开源的反向代理服务器和缓存服务器。Varnish使用内存缓 存文件来减少响应时间和网络带宽消耗。但是varnish在高并发的情况下,资源消耗较高,而且varnish服务进程一旦崩溃,重启,内存中的缓存数据将全部丢失。
Varnish与一般服务器软件类似,就是一个web缓存代理服务器,分为master(management)进程和child(woker,主要做cache的工作)进程。master进程读入命令,进行一些初始化,然后fork并监控child进程。child进程分配若干线程 进行工作,主要包括一些管理线程和很多woker线程。
当把Varnish部署上之后,web请求的处理过程会有一些变化。客户端的请求将首先被Varnish接受。Varnish将分析接收的请求,并将其转发到后端的web服务器上。后端的web服务器对请求进行常规的处理,并将依次将处理结果返回给Varnish。
但Varnish的功能并非仅限于此。Varnish的核心功能是将后端web服务器返回的结果缓存起来,如果发现后续有相同的请求,Varnish将不会将这个请求转发到web服务器,而是返回缓存中的结果。这将有效的降低web服务器的负载,提升响应速度,并且每秒可以响应更多的请求。Varnish速度很快的另一个主要原因是其缓存全部都是放在内存里的,这比放在磁盘上要快的多。诸如此类的优化措施使得Varnish的相应速度超乎想象。但考虑到实际的系统中内存一般是有限的,所以需要手工配置一下缓存的空间限额,同时避免缓存重复的内容。
处理缓存的顺序:接受到请求 –- 分析请求(分析你的URL,分析你的首部) – hash计算 – 查找缓存 – 新鲜度检测 — 访问源 — 缓存 – 建立响应报文 – 响应并记录日志。
监听端口6081,管理进程management,子进程child/cache
varnish与squid的区别:
varnish和squid在中小规模的应用上,varnish足够轻量级,足够好用,但是在巨大的并发请求来说,单个varnish所能承载的并发 访问量大概在5000个连接请求左右,超出5000个可能就不稳定了,而在这里squid就能表现出良好的性能了,并且squid拥有邻居功能,因此在大规模的企业级应用中仍然是以squid居多,而在中小规模的自己公司的反向代理缓存中varnish居多。
相同点:
都是一个反向代理服务器;
都是开源软件;
Varnish相较于Squid的优点:
Varnish的稳定性很高,两者在完成相同负荷的工作时,Squid服务器发生故障的几率要高于Varnish,因为使用Squid要经常重启;
Varnish访问速度更快,Varnish采用了“Visual Page Cache”技术,所有缓存数据都直接从内存读取,而Squid是从硬盘读取,因此Varnish在访问速度方面会更快;
Varnish可以支持更多的并发连接,因为Varnish的TCP连接释放要比Squid快,所以在高并发连接情况下可以支持更多TCP连接;
Varnish可以通过管理端口,使用正则表达式批量的清除部分缓存,而Squid是做不到的;
Squid属于是单进程使用单核CPU,但Varnish是通过fork形式打开多进程来做处理,所以是合理的使用所有核来处理相应的请求;
Varnish相较于Squid的缺点:
Varnish在高并发状态下CPU、I/O和内存等资源开销都高于Squid;
Varnish进程一旦Hang(挂起)、Crash(崩溃)或者重启,缓存数据都会从内存中完全释放,此时所有请求都会发送到后端服务器,在高并发情况下,会给后端服务器造成很大压力;
在Varnish使用中如果单个url的请求通过HA/F5(负载均衡)每次请求不同的varnish服务器中,被请求varnish服务器都会被穿透到后端,而且同样的请求会在多台服务器上缓存,也会造成Varnish的缓存的资源浪费,也会造成性能下降。
vcl简介
Varnish Configuration Language(VCL)是varnish配置缓存策略的工具,它是一种基于“域”的简单变成语言,它支持有限的算术运算和逻辑运算操作、允许使用正则表达是进行字符串匹配、允许用户使用set自定义变量、支持if判断语句,也有内置的函数和变量等。使用VCL编写的缓存策略通常保存至.vcl文件中,其需要编译成二进制的格式后才能由varnish调用
二、安装配置varnish
[root@centos7 ~]# yum install -y varnish
相关配置文件
[root@centos7 ~]# rpm -ql varnish
/etc/logrotate.d/varnish
/etc/varnish
/etc/varnish/default.vcl
/etc/varnish/varnish.params
/run/varnish.pid
/usr/bin/varnishadm
/usr/bin/varnishhist
/usr/bin/varnishlog
/usr/bin/varnishncsa
/usr/bin/varnishstat
/usr/bin/varnishtest
/usr/bin/varnishtop
/usr/lib/systemd/system/varnish.service
/usr/lib/systemd/system/varnishlog.service
/usr/lib/systemd/system/varnishncsa.service
/usr/sbin/varnish_reload_vcl
/usr/sbin/varnishd
/usr/share/doc/varnish-4.0.5
/usr/share/doc/varnish-4.0.5/LICENSE
/usr/share/doc/varnish-4.0.5/README
/usr/share/doc/varnish-4.0.5/builtin.vcl
/usr/share/doc/varnish-4.0.5/changes.rst
/usr/share/doc/varnish-4.0.5/example.vcl
/usr/share/man/man1/varnishadm.1.gz
/usr/share/man/man1/varnishd.1.gz
/usr/share/man/man1/varnishhist.1.gz
/usr/share/man/man1/varnishlog.1.gz
/usr/share/man/man1/varnishncsa.1.gz
/usr/share/man/man1/varnishstat.1.gz
/usr/share/man/man1/varnishtest.1.gz
/usr/share/man/man1/varnishtop.1.gz
/usr/share/man/man3/vmod_directors.3.gz
/usr/share/man/man3/vmod_std.3.gz
/usr/share/man/man7/varnish-cli.7.gz
/usr/share/man/man7/varnish-counters.7.gz
/usr/share/man/man7/vcl.7.gz
/usr/share/man/man7/vsl-query.7.gz
/usr/share/man/man7/vsl.7.gz
/var/lib/varnish
/var/log/varnish
varnish的程序环境:
        /etc/varnish/varnish.params: 配置varnish服务进程的工作特性,例如监听的地址和端口,缓存机制;
            Unit File: EnvironmentFile=""
		/etc/varnish/default.vcl:配置各Child/Cache线程的缓存策略;
            VCL: dsl, subroutines, 子例程
		主程序:
			/usr/sbin/varnishd
		CLI interface:
			/usr/bin/varnishadm
		Shared Memory Log交互工具:
			/usr/bin/varnishhist
			/usr/bin/varnishlog
			/usr/bin/varnishncsa
			/usr/bin/varnishstat
			/usr/bin/varnishtop
		测试工具程序:
			/usr/bin/varnishtest
		VCL配置文件重载程序:
			/usr/sbin/varnish_reload_vcl
		Systemd Unit File:
			/usr/lib/systemd/system/varnish.service
				varnish服务
			/usr/lib/systemd/system/varnishlog.service
			/usr/lib/systemd/system/varnishncsa.service
				日志持久的服务;
varnish配置测试(缓存、自定义非缓存、purge更新缓存、按需调度、负载均衡、健康状态检查)
[root@centos7 ~]# vim /etc/varnish/varnish.params

# Varnish environment configuration description. This was derived from
# the old style sysconfig/defaults settings

# Set this to 1 to make systemd reload try to switch VCL without restart.
RELOAD_VCL=1

# Main configuration file. You probably want to change it.
VARNISH_VCL_CONF=/etc/varnish/default.vcl

# Default address and port to bind to. Blank address means all IPv4
# and IPv6 interfaces, otherwise specify a host name, an IPv4 dotted
# quad, or an IPv6 address in brackets.
# VARNISH_LISTEN_ADDRESS=192.168.1.5
VARNISH_LISTEN_PORT=6081

# Admin interface listen address and port
VARNISH_ADMIN_LISTEN_ADDRESS=127.0.0.1
VARNISH_ADMIN_LISTEN_PORT=6082

# Shared secret file for admin interface
VARNISH_SECRET_FILE=/etc/varnish/secret

# Backend storage specification, see Storage Types in the varnishd(5)
# man page for details.
VARNISH_STORAGE="file,/data/varnish/cache,1G"  ##把缓存机制改为file

# User and group for the varnishd worker processes
VARNISH_USER=varnish
VARNISH_GROUP=varnish

# Other options, see the man page varnishd(1)
#DAEMON_OPTS="-p thread_pool_min=5 -p thread_pool_max=500 -p thread_pool_timeout=300"
创建缓存文件夹
[root@centos7 ~]# chown -R varnish.varnish /data/varnish/cache
[root@centos7 ~]# ll -d /data/varnish/cache
drwxr-xr-x 2 varnish varnish 6 May  7 15:42 /data/varnish/cache
varnish的缓存存储机制( Storage Types):
-s [name=]type[,options]
		· malloc[,size]
			默认,内存存储,[,size]用于定义空间大小;重启后所有缓存项失效;一般4G较合适,内存空间有限,且内存碎片会大大影响性能
		· file[,path[,size[,granularity]]]
			磁盘文件存储,黑盒;重启后所有缓存项失效;
		· persistent,path,size
			文件存储,黑盒;重启后所有缓存项有效;实验状态;
注意:缓存处于稳态很难,即缓存热身时间很长,因此不建议经常重启varnish服务
启动服务
[root@centos7 ~]# systemctl start varnish
[root@centos7 ~]# ss -ntl
State       Recv-Q Send-Q                                        Local Address:Port                                                       Peer Address:Port
LISTEN      0      128                                                       *:3307                                                                  *:*
LISTEN      0      128                                                       *:111                                                                   *:*
LISTEN      0      128                                                       *:80                                                                    *:*
LISTEN      0      128                                                       *:22                                                                    *:*
LISTEN      0      128                                                       *:9527                                                                  *:*
LISTEN      0      100                                               127.0.0.1:25                                                                    *:*
LISTEN      0      128                                               127.0.0.1:6010                                                                  *:*
LISTEN      0      128                                               127.0.0.1:6011                                                                  *:*
LISTEN      0      128                                                       *:6081                                                                  *:*
LISTEN      0      10                                                127.0.0.1:6082                                                                  *:*
LISTEN      0      128                                                      :::111                                                                  :::*
LISTEN      0      128                                                      :::22                                                                   :::*
LISTEN      0      100                                                     ::1:25                                                                   :::*
LISTEN      0      128                                                     ::1:6010                                                                 :::*
LISTEN      0      128                                                     ::1:6011                                                                 :::*
LISTEN      0      128                                                      :::6081                                                                 :::*
编辑VCL,定义后端服务器
[root@centos7 varnish]# vim  /etc/varnish/default.vcl

vcl 4.0;

# Default backend definition. Set this to point to your content server.
backend default {
    .host = "192.168.147.132";
    .port = "80";
}
重载VCL配置文件
[root@centos7 varnish]# varnish_reload_vcl
Loading vcl from /etc/varnish/default.vcl
Current running config name is
Using new config name reload_2020-05-07T15:59:30
VCL compiled.
VCL 'reload_2020-05-07T15:59:30' now active
available       0 boot
active          0 reload_2020-05-07T15:59:30

Done

还可以通过CLI interface交互式进行管理
[root@centos7 varnish]# varnishadm -S /etc/varnish/secret -T 127.0.0.1:6082
200
-----------------------------
Varnish Cache CLI 1.0
-----------------------------
Linux,3.10.0-693.el7.x86_64,x86_64,-sfile,-smalloc,-hcritbit
varnish-4.0.5 revision 07eff4c29

Type 'help' for command list.
Type 'quit' to close CLI session.

help
200
help [<command>]
ping [<timestamp>]
auth <response>
quit
banner
status
start
stop
vcl.load <configname> <filename>
vcl.inline <configname> <quoted_VCLstring>
vcl.use <configname>
vcl.discard <configname>
vcl.list
param.show [-l] [<param>]
param.set <param> <value>
panic.show
panic.clear
storage.list
vcl.show [-v] <configname>
backend.list [<backend_expression>]
backend.set_health <backend_expression> <state>
ban <field> <operator> <arg> [&& <field> <oper> <arg>]...
ban.list
输入一些命令,进行简单操作
ping
200
PONG 1588839300 1.0
vcl.list
200
available       0 boot
active          0 reload_2020-05-07T15:59:30

status
200
Child in state running
vcl.show reload_2020-05-07T15:59:30
200
vcl 4.0;

# Default backend definition. Set this to point to your content server.
backend default {
    .host = "192.168.147.132";
    .port = "80";
}
······
查看线程池数量
param.show thread_pools
200
thread_pools
        Value is: 2 [pools] (default)
        Default is: 2
        Minimum is: 1

        Number of worker thread pools.

        Increasing number of worker pools decreases lock contention.

        Too many pools waste CPU and RAM resources, and more than one
        pool for each CPU is probably detrimal to performance.

        Can be increased on the fly, but decreases require a restart to
        take effect.

        NB: This parameter may take quite some time to take (full)
        effect.

        NB: We do not know yet if it is a good idea to change this
        parameter, or if the default value is even sensible.  Caution
        is advised, and feedback is most welcome.
设置线程池数量
param.set thread_pools 4
200
列出存储信息、列出后端主机
storage.list
200
Storage devices:
	storage.Transient = malloc
	storage.s0 = file

backend.list
200
Backend name                   Refs   Admin      Probe
default(127.0.0.1,,8080)       1      probe      Healthy (no probe)
default(192.168.147.132,,80)   1      probe      Healthy (no probe)
自定义VCL(可以在default ACL上修改)
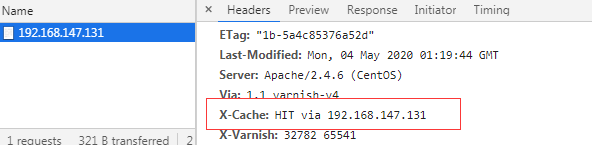
示例:自定义响应头部信息
sub vcl_deliver {
    # Happens when we have all the pieces we need, and are about to send the
    # response to the client.
    #
    # You can do accounting or modifying the final object here.
    if (obj.hits>0) {
        set resp.http.X-Cache = "HIT via" + " " + server.ip; ##设置响应报文头部
    } else {
        set resp.http.X-Cache = "MISS from " + server.ip;
    }
}
重新装载配置文件
[root@centos7 varnish]# varnishadm -S /etc/varnish/secret -T 127.0.0.1:6082
200
-----------------------------
Varnish Cache CLI 1.0
-----------------------------
Linux,3.10.0-693.el7.x86_64,x86_64,-sfile,-smalloc,-hcritbit
varnish-4.0.5 revision 07eff4c29

Type 'help' for command list.
Type 'quit' to close CLI session.

vcl.load test1 default.vcl
200
VCL compiled.
vcl.list
200
available       0 boot
active          0 reload_2020-05-07T15:59:30
available       0 test1

vcl.use test1
200
VCL 'test1' now active
varnish> vcl.list
200
available       0 boot
available       0 reload_2020-05-07T15:59:30
active          0 test1
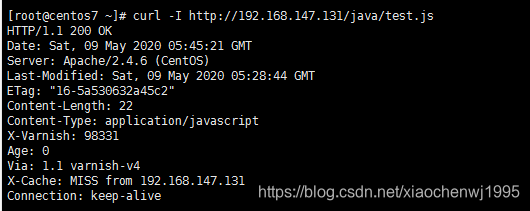
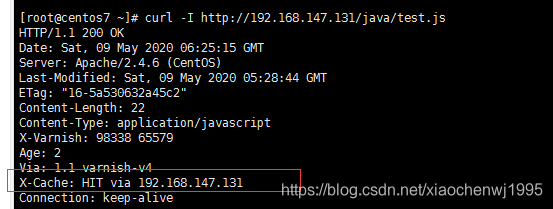
第一次访问没命中缓存

再次刷新显示命中缓存
示例:强制对某类型资源的请求不检查缓存。
sub vcl_recv {
    # Happens before we check if we have this in cache already.
    #
    # Typically you clean up the request here, removing cookies you don't need,
    # rewriting the request, etc.
   if (req.url ~ "(?i)^/(login|admin)") {
        return(pass);
   }
}
重载装载配置文件。
vcl.load test2 default.vcl
200
VCL compiled.
vcl.list
200
available       0 boot
available       0 reload_2020-05-07T15:59:30
active          2 test1
available       0 test2

vcl.use test2
200
VCL 'test2' now active
显示一直都是,没有命中状态

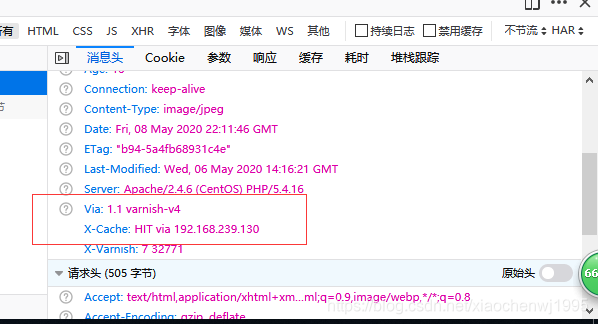
示例:对于特定类型的资源,例如公开的图片等,取消其私有标识,并强行设定其可以由varnish缓存的时长; 定义在vcl_backend_response中;
sub vcl_backend_response {
    # Happens after we have read the response headers from the backend.
    #
    # Here you clean the response headers, removing silly Set-Cookie headers
    # and other mistakes your backend does.
    if (beresp.http.cache-control !~ "(?i)s-maxage") {##如果后端服务器的响应报文首部cache-control的值没有匹配到s-maxage(公共缓存最大生命周期)
        if (bereq.url ~ "(?i)\.(jpg|jpeg|png|gif|css|js)$") { ##把后端服务器的响应报文首部的cookie信息去除
            unset beresp.http.Set-Cookie;
            set beresp.ttl = 3600s; ##设置缓存时长为3600秒
        }
    }
}
示例:定义在vcl_recv中;后端主机接收到客户端地址
sub vcl_recv {
    # Happens before we check if we have this in cache already.
    #
    # Typically you clean up the request here, removing cookies you don't need,
    # rewriting the request, etc.
    if (req.restarts == 0) {
        if (req.http.X-Forwarded-For) {
            set req.http.X-Forwarded-For = req.http.X-Forwarded-For + "," + client.ip;
        } else {
            set req.http.X-Forwarded-For = client.ip;
        }
    }
}
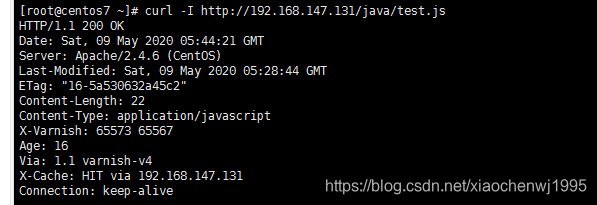
查看后端服务器的日志信息
[root@centos7 ~]# tail -f /var/log/httpd/access_log
192.168.239.1 - - [09/May/2020:06:29:35 +0800] "GET / HTTP/1.1" 200 25 "-" "Mozilla/5.0 (Windows NT 10.0; Win64; x64; rv:72.0) Gecko/20100101 Firefox/72.0"
192.168.239.1 - - [09/May/2020:06:32:09 +0800] "GET /coffee.jpg HTTP/1.1" 200 3467 "-" "Mozilla/5.0 (Windows NT 10.0; Win64; x64; rv:72.0) Gecko/20100101 Firefox/72.0"
实例:定义在vcl_recv中,拒绝curl请求
sub vcl_recv {
   if (req.http.User-Agent ~ "(?i)curl"){
        return(synth(403));
    }
}
通过curl命令方式访问被拒绝。
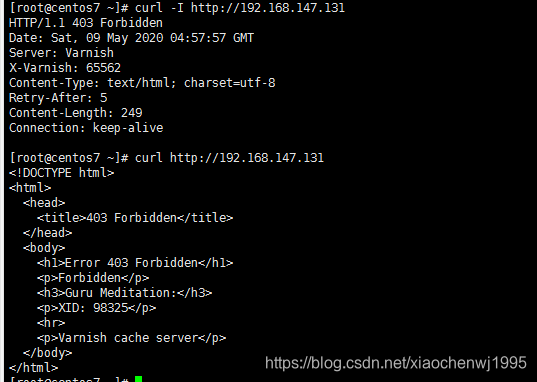
浏览器可以正常访问

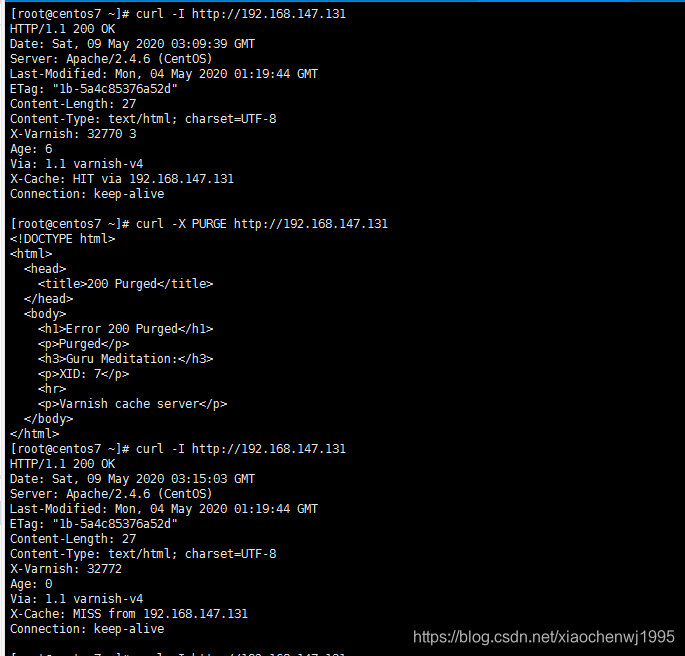
缓存对象的修剪:purge, ban
		(1) 能执行purge操作
			sub vcl_purge {
				return (synth(200,"Purged"));
			}

		(2) 何时执行purge操作
			sub vcl_recv {
				if (req.method == "PURGE") {
					return(purge);
				}
				...
			}

		添加此类请求的访问控制法则:
			acl purgers {  //先定义后使用
				"127.0.0.0"/8;
				"10.1.0.0"/16;
			}

			sub vcl_recv {
				if (req.method == "PURGE") {
					if (!client.ip ~ purgers) {  ##如果客户端IP不是purgers这个acl定义的则采取以下操作
						return(synth(405,"Purging not allowed for " + client.ip));
					}
					return(purge);
				}
				...
			}

			curl -X PURGE http://172.16.0.6/index.html  //curl -X自定义访问方法,PURGE修剪缓存,如果缓存能命中就清除这项缓存
sub vcl_recv {
   if (req.method == "PURGE") {
      return(purge);
   }
}
第一次访问还能命中缓存,执行PURGE操作后再次访问,就显示无法命中缓存,说明缓存修剪成功。
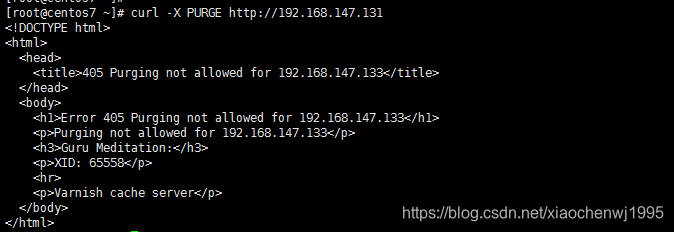
一般此类型操作比较危险,不建议经常执行,同时还要控制执行的权限,因此,这里通过ACL控制执行修剪缓存的用户权限。注意:ACL先定义后使用
acl  purgers {
    "127.0.0.0"/8;
}
sub vcl_recv {

   if (req.method == "PURGE") {
      if (client.ip !~ purgers){
        return(synth(405,"Purging not allowed for "+client.ip));
      }
      return(purge);
   }
其他客户端再次访问此时显示405。
禁用缓存项,可用于临时禁用某些缓存项。
(1) varnishadm。建议使用的方法
				ban <field> <operator> <arg>  //在命令行中使用,一般用于临时清除

				示例:
					ban req.url ~ ^/javascripts  //当请求的url是javascripts,就清除缓存
ban req.url ~ ^/java
200
注意:ban req.url == /此操作是清空所有缓存,慎重使用
ban req.url == / && req.http.host ~ “ilinux.io” 清空某个域的缓冲
执行ban操作后,再次访问显示没有命中缓存,重复几次情况都是如此。
(2) 在配置文件中定义,使用ban()函数;
示例:
if (req.method == "BAN") {
ban("req.http.host == " + req.http.host + " && req.url == " + req.url);
# Throw a synthetic page so the request won't go to the backend.
return(synth(200, "Ban added"));
}
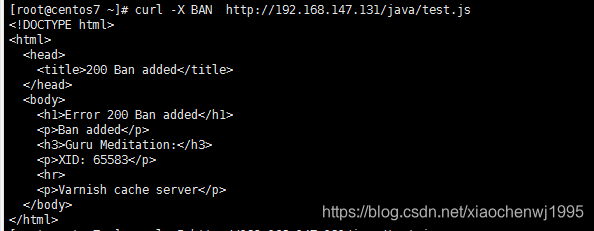
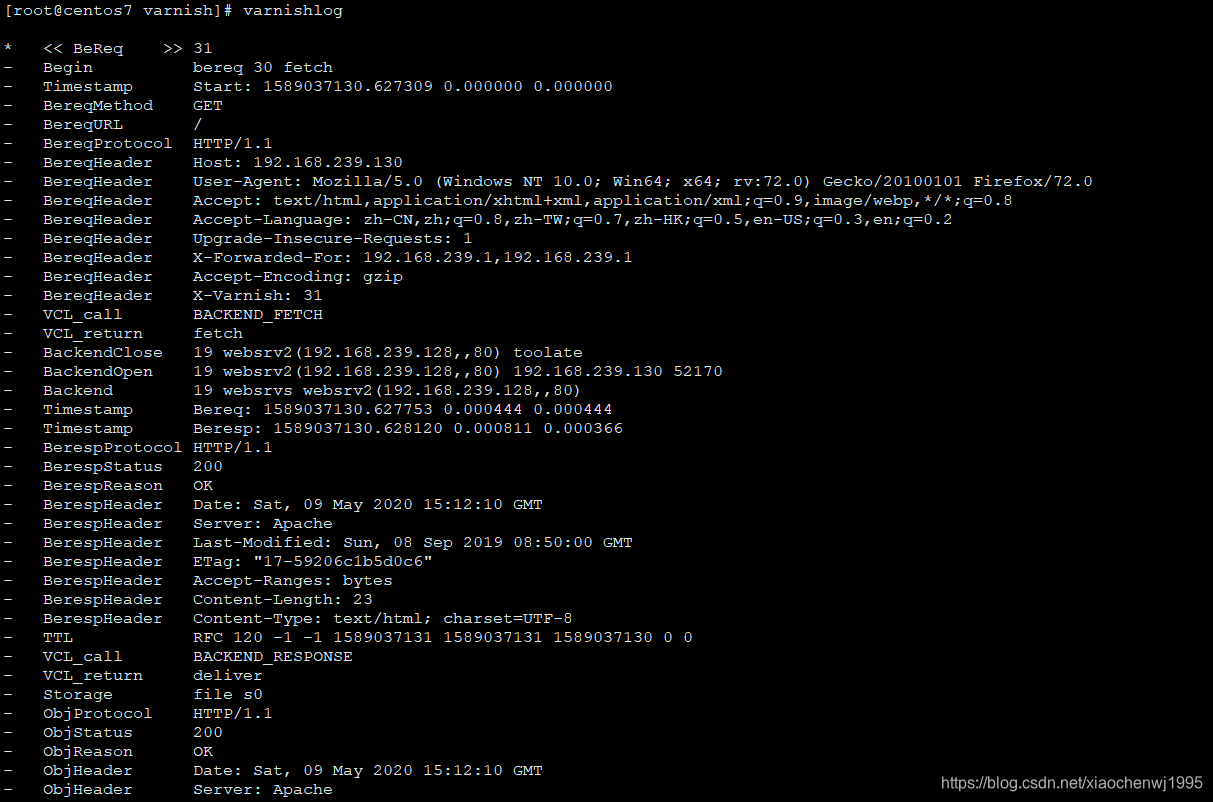
此函数等价于在命令行中输入 ban req.http.host == 192.168.147.131 && req.url == /java/test.js
注意:此处也要定义ACL限制执行ban操作的用户,这里省略了
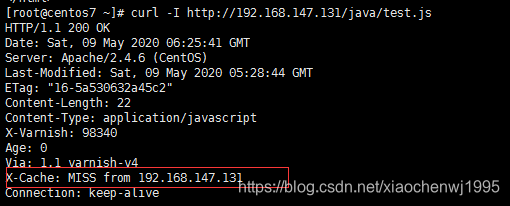
执行ban之前访问一次,显示命中缓存
执行ban操作
再次访问,显示没有命中缓存项,说明ban成功了
代理时使用多个后端主机。
		使用前需要导入:
				import directors;
			(1)先定义后端主机
			(2)把后端主机定义成组
			(3)调用组
			import directors;    # load the directors

			backend server1 {  ##指明后端的主机及端口
				.host =
				.port =
			}
			backend server2 {
				.host =
				.port =
			}

			sub vcl_init {  //初始化,把后端主机定义成组
				new GROUP_NAME = directors.round_robin();//调用轮询方法,并定义变量,轮询不支持权重
				GROUP_NAME.add_backend(server1);
				GROUP_NAME.add_backend(server2);
			}

			sub vcl_recv {
				# send all traffic to the bar director:
				set req.backend_hint = GROUP_NAME.backend();
			}
vcl 4.0;
import directors;
# Default backend definition. Set this to point to your content server.
backend websrv1 {
    .host = "192.168.239.132";
    .port = "80";
}

backend websrv2 {
    .host = "192.168.239.128";
    .port = "80";
}
sub vcl_init {
    new websrvs = directors.round_robin();
    websrvs.add_backend(websrv1);
    websrvs.add_backend(websrv2);
}
sub vcl_recv {
    set req.backend_hint = websrvs.backend();
}
第一次访问测试
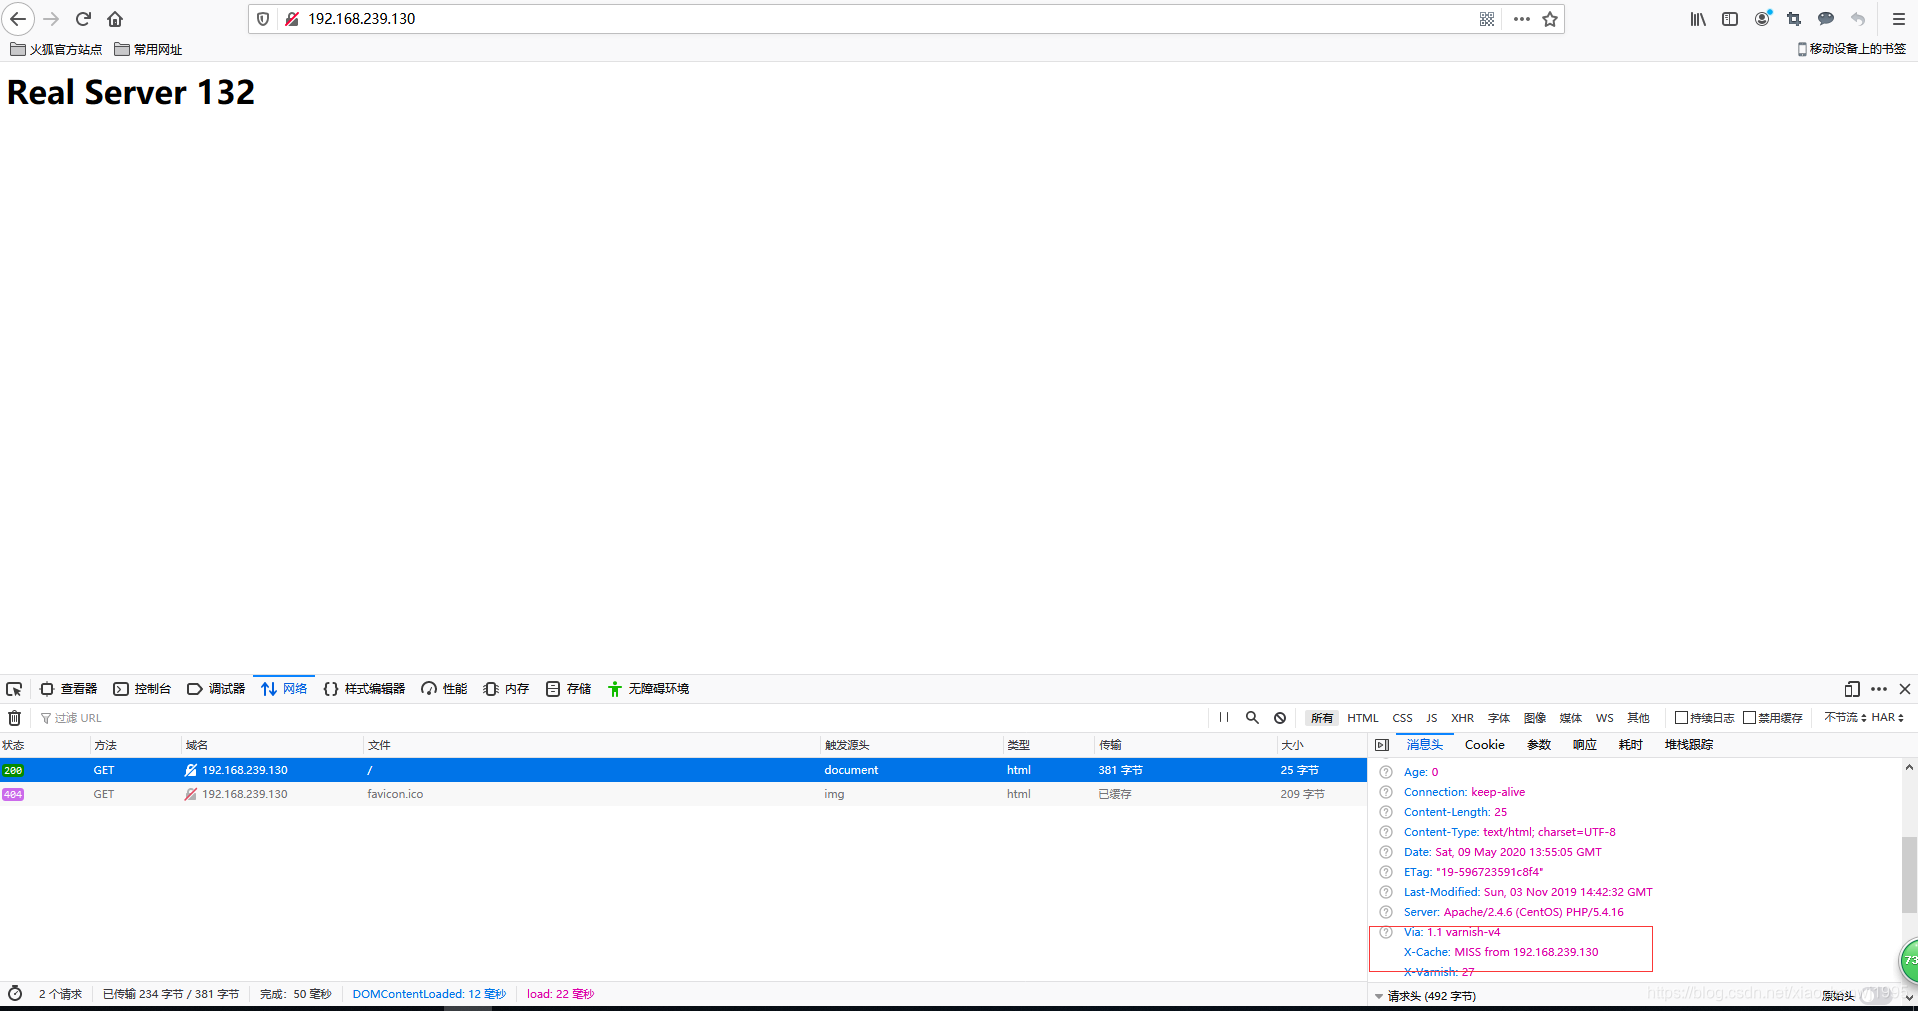
由于默认页面会被缓存,因此这里需要修剪缓存项,才能显示出轮询的效果。
[root@centos7 ~]# varnishadm -S /etc/varnish/secret -T 127.0.0.1:6082
...
ban req.http.host == 192.168.239.130
200
...
再次访问
 实现动静分离
健康状态监测
 backend BE_NAME {
			.host =
			.port =
			.probe = {
				.url=   //对哪个URL发起请求
				.timeout=  //超时时长
				.interval=  //发起请求的时间间隔
				.window=   //基于最近几次判断
				.threshold=   //最近几次判断有几次成功才是健康的
			}
		}

		.probe:定义健康状态检测方法;
			.url:检测时要请求的URL,默认为”/";   ##.url与.request使用一种就行
			.request:发出的具体请求;
				.request =
					"GET /.healthtest.html HTTP/1.1"
					"Host: www.magedu.com"
					"Connection: close"    //关闭长连接,短连接
			.window:基于最近的多少次检查来判断其健康状态;
			.threshold:最近.window中定义的这么次检查中至少有.threshhold定义的次数是成功的;##配合.window使用
			.interval:检测频度;
			.timeout:超时时长;
			.expected_response:期望的响应码,默认为200;

		健康状态检测的配置方式:
			方式一:(1) probe PB_NAME  { }
			                 backend NAME = {
				 .probe = PB_NAME;
				 ...
			                 }

			方式二:(2) backend NAME  {
				         .probe = {
					     ...
				          }
				  }
vcl 4.0;
import directors;
# Default backend definition. Set this to point to your content server.
probe www_probe {
    .url = "/index.html";
    .interval = 3s;
    .timeout = 5s;
    .window =8;
    .threshold = 5;
}
backend websrv1 {
    .host = "192.168.239.132";
    .port = "80";
    .prebe = {
            .url = "/index.html";
            .interval = 3s;
            .timeout = 5s;
            .window =8;
            .threshold = 5;
    }
}

backend websrv2 {
    .host = "192.168.239.128";
    .port = "80";
    .probe = www_probe;
}
sub vcl_init {
    new websrvs = directors.round_robin();
    websrvs.add_backend(websrv1);
    websrvs.add_backend(websrv2);
}
sub vcl_recv {
    set req.backend_hint = websrvs.backend();
列出后端服务器健康状态监测状况
backend.list
200
Backend name                   Refs   Admin      Probe
websrv1(192.168.239.132,,80)   2      probe      Healthy 8/8
websrv2(192.168.239.128,,80)   2      probe      Healthy 8/8
也可实现手动健康检测(但一般会设置为机器检测状态)
backend.set_health SERVER sick | healthy | auto
varnish> backend.set_health websrv2 sick
200

backend.list
200
Backend name                   Refs   Admin      Probe
websrv1(192.168.239.132,,80)   2      probe      Healthy 8/8
websrv2(192.168.239.128,,80)   2      sick       Healthy 8/8
backend.set_health websrv2 healthy
200
backend.list
200
Backend name                   Refs   Admin      Probe
websrv1(192.168.239.132,,80)   2      probe      Healthy 8/8
websrv2(192.168.239.128,,80)   2      healthy    Healthy 8/8
三、varnish优化与管理、监控记录命令
在线程池内部,其每一个请求由一个线程来处理; 其worker线程的最大数决定了varnish的并发响应能力;
thread_pools:Number of worker thread pools. 最好小于或等于CPU核心数量;
thread_pool_max:The maximum number of worker threads in each pool. 每线程池的最大线程数;
thread_pool_min:The minimum number of worker threads in each pool. 额外意义为“最大空闲线程数”;
最大并发连接数 = thread_pools * thread_pool_max
thread_pool_timeout:Thread idle threshold. Threads inexcess of thread_pool_min, which have been idle for at least this long,
will be destroyed.
thread_pool_add_delay:Wait at least this long after creating a thread.
thread_pool_destroy_delay:Wait this long after destroying a thread.
设置方式:
vcl.param
临时生效:
param.set thread_pools 4
param.show thread_pools 可查看
永久有效的方法:
vim /etc/varnish/varnish.params 最后一行
DEAMON_OPTS="-p PARAM1=VALUE -p PARAM2=VALUE"
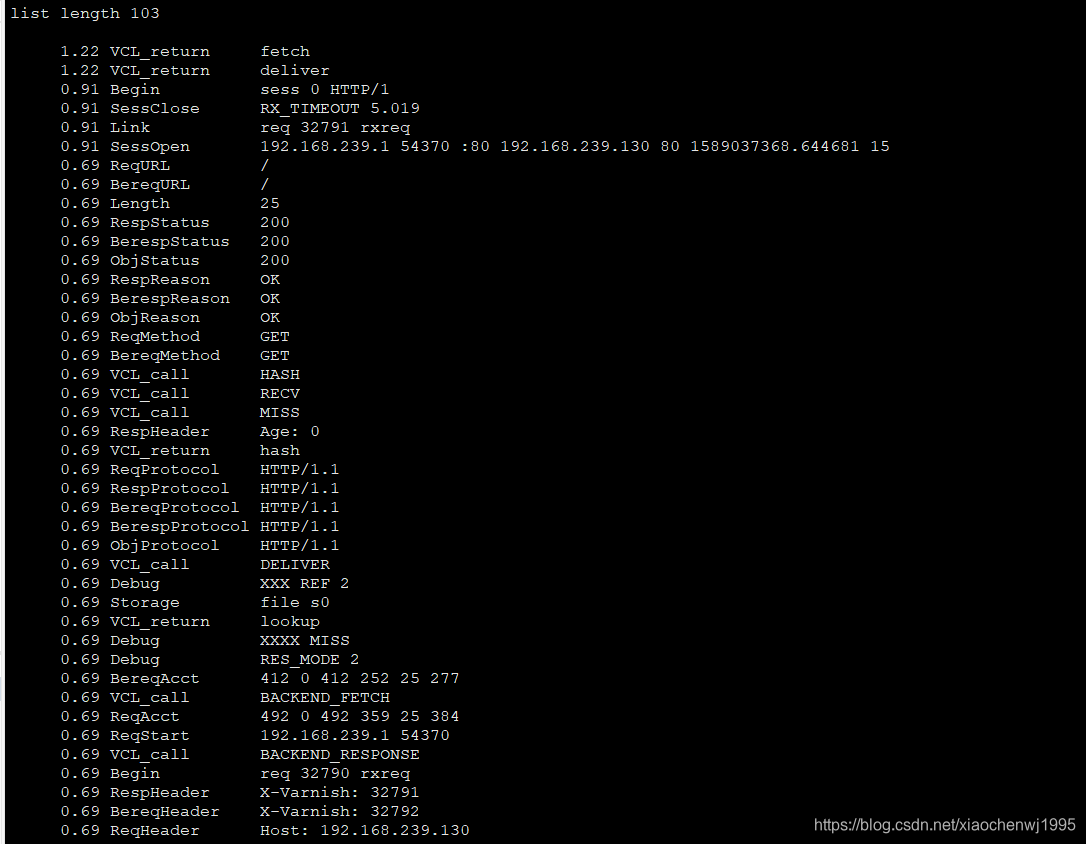
varnish的几个命令行工具
varnishlog把每一个请求拆开详细显示
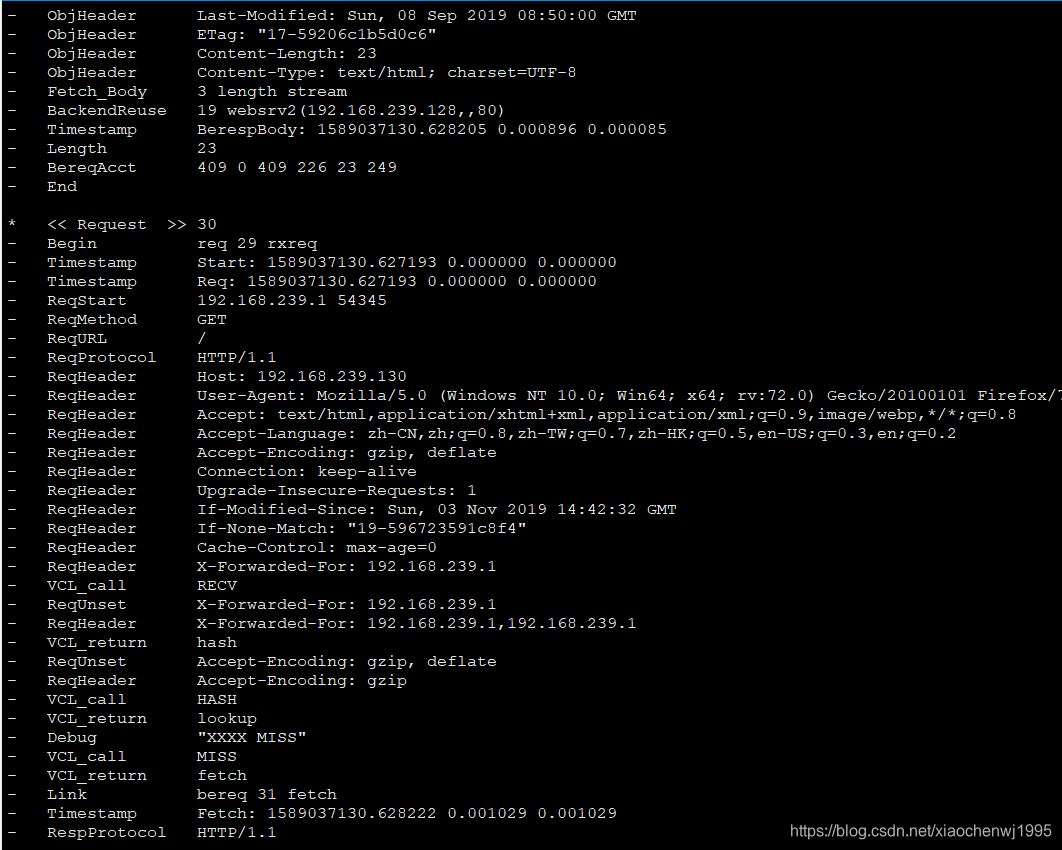
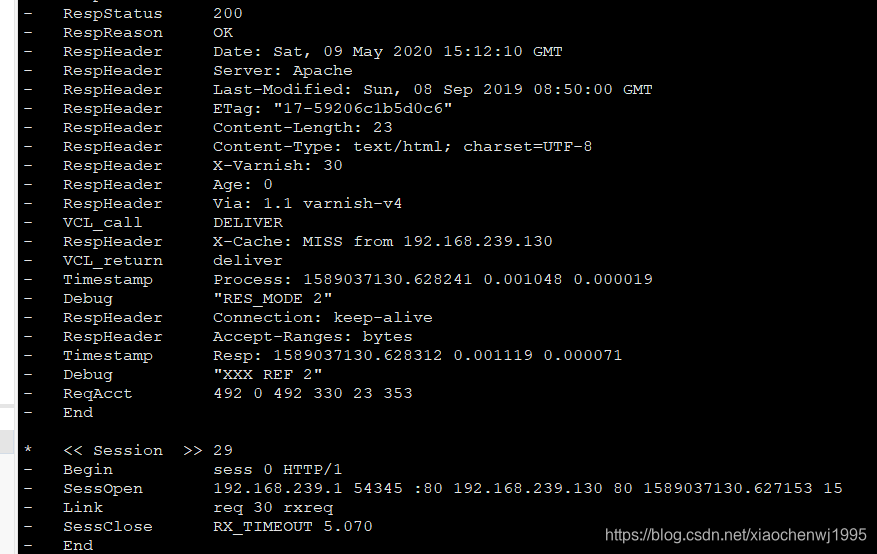
varnishtop (Varnish log entry ranking) 则会把varnishlog把请求method按照速率做一个简单排序
-1 Instead of a continously updated display, print the statistics once and exit.
-i taglist,可以同时使用多个-i选项,也可以一个选项跟上多个标签;
-I <[taglist:]regex> 正则表达式匹配值
-x taglist:排除列表
-X <[taglist:]regex>
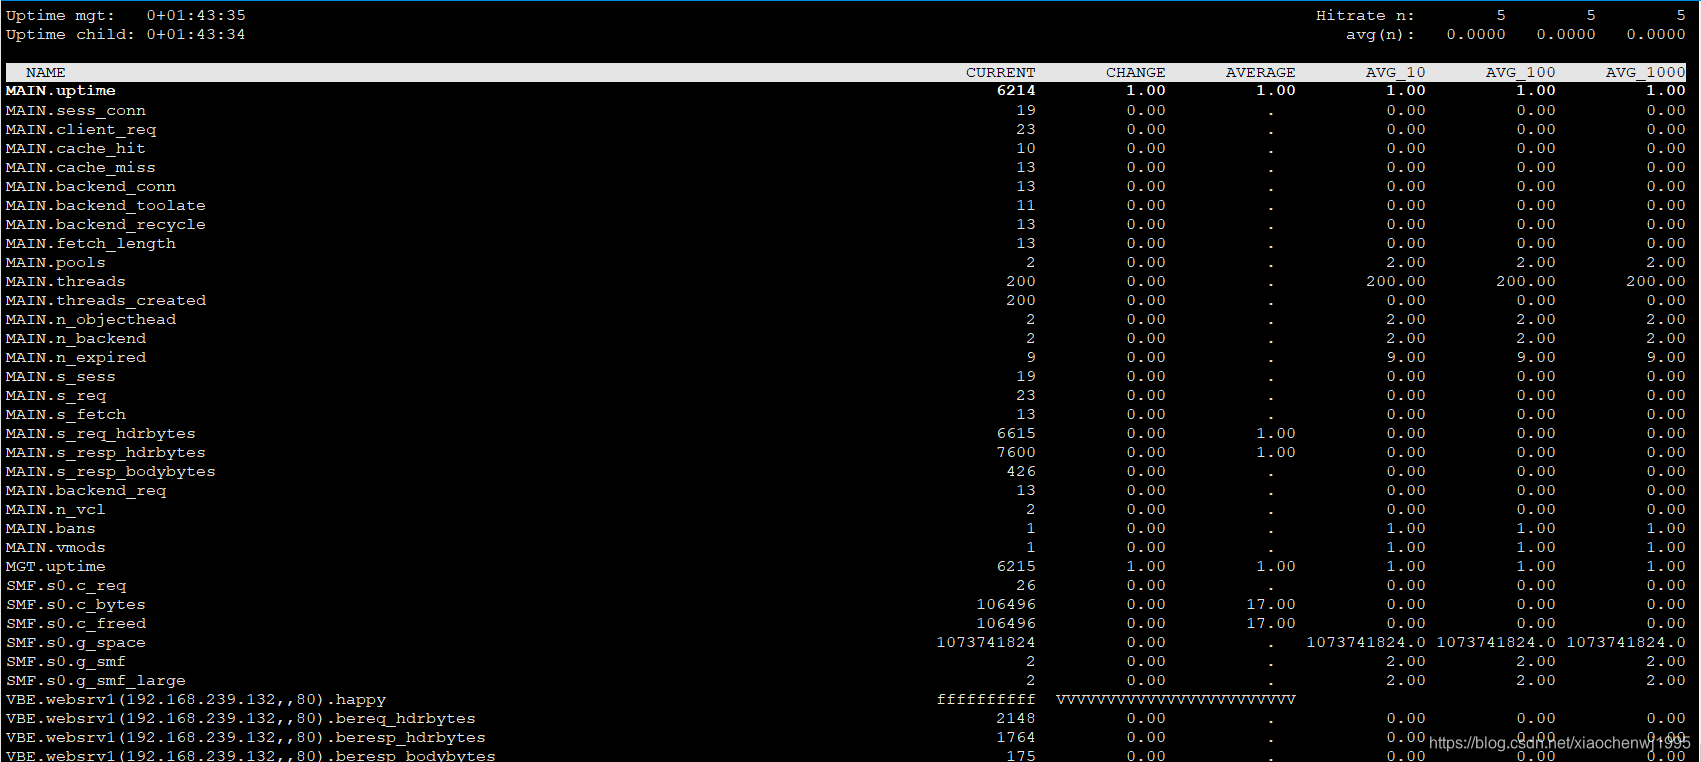
varnishstat则会动态显示(varnishstat - Varnish Cache statistics)
-1 -f FILED_NAME 只显示特定项一次
-l:可用于-f选项指定的字段名称列表;
MAIN.cache_hit 和MAIN.cache_miss是最常要看的参数
varnishstat -1 -f MAIN.cache_hit -f MAIN.cache_miss显示指定参数的当前统计数据;
varnishstat -l -f MAIN -f MEMPOOL 列出指定配置段的每个参数的意义;
 varnishncsa ( Display Varnish logs in Apache / NCSA combined log format)按照ncsa格式显示日志

varnish的访问日志一般在内存中,容量大概只有80-90M,用不了多久就会被覆盖,如果不想别覆盖,可以把varnishncsa当日志服务启动
systemctl start varnishncsc.service
此时会在/var/log/varnish/目录下生成varnishncsa文件,此时访问即可被记录,但尽量不要开启这个日志功能!因为作用不是很大,且容易产生干扰信息,有专门的日志监控服务完成。
四、总结
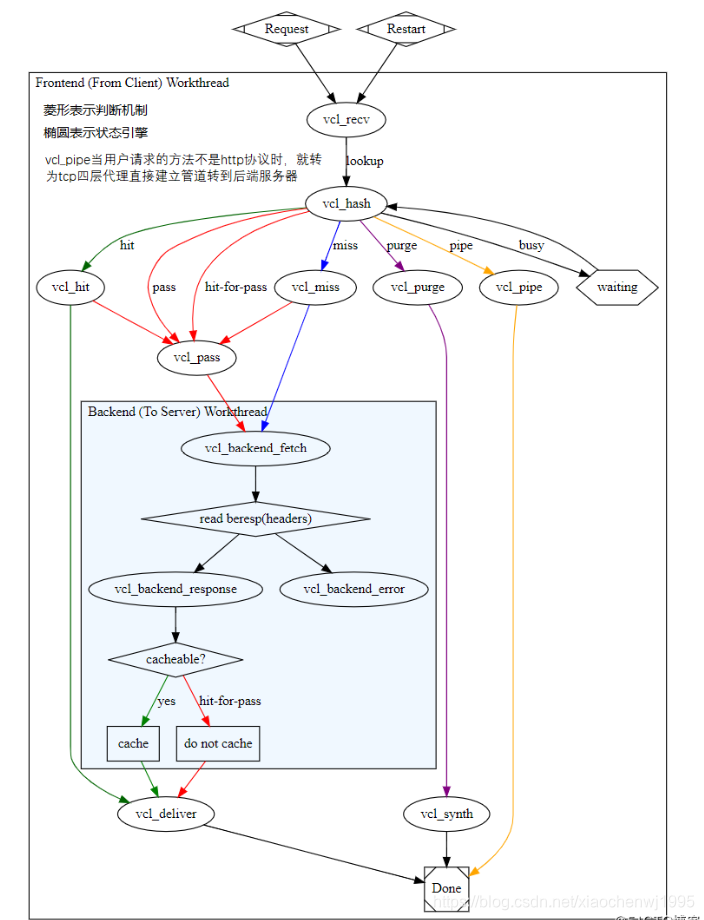
varnish的有限状态机:
 varnish: state engine, vcl
		varnish 4.0:
			vcl_init
			vcl_recv
			vcl_hash
			vcl_hit
			vcl_pass
			vcl_miss
			vcl_pipe
			vcl_waiting
			vcl_purge
			vcl_deliver
			vcl_synth
			vcl_fini

			vcl_backend_fetch
			vcl_backend_response
			vcl_backend_error

		sub VCL_STATE_ENGINE {
			...
		}
		backend BE_NAME {}
		probe PB_NAME {}
		acl ACL_NAME {}


 97
97


 被折叠的 条评论
为什么被折叠?
被折叠的 条评论
为什么被折叠?
 到【灌水乐园】发言


