


1.1 Spring是什么
结合struts 和hibernate来说,struts是 web 框架,接管了jsp/action/actionfrom
hibernate 是 orm框架,对象和关系映射的框架,处于持久层。
spring 是容器框架,用于管理和配置bean,并维护bean之间关系的框架 。
bean的概念:Java中的任何一个对象,可以时javabean/service/action/数据源./DAO。
IOC(控制反转 inverseof control) ,DI( dependency injection 依赖注入)。
Spring可以接管struts 和hibernate,DAO层,Service层,数据源层和持久层。
1.2 Spring框架组成部分

图1-1 Spring框架
1.Core封装包是框架的最基础部分,提供IoC和依赖注入特性。这里的基础概念是BeanFactory,它提供对Factory模式的经典实现来消除对程序性单例模式的需要,并真正地允许你从程序逻辑中分离出依赖关系和配置。
2. Context(上下文) 封装包构筑于Core封装包的坚固基础上:它提供了用一种框架风格的方式来访问对象,有些像JNDI注册表。Context封装包继承了beans包的功能,还增加了国际化,事件传播,资源装载,以及透明创建上下文,例如通过servlet容器。
3.DAO 提供了JDBC的抽象层,它可消除冗长的JDBC编码和解析数据库厂商特有的错误代码。 并且,JDBC 封装包还提供了一种比编程性更好的声明性事务管理方法,不仅仅是实现了特定接口,而且对所有的POJOs(简单Java对象)都适用。
4.ORM 封装包提供了常用的“对象/关系”映射APIs的集成层。 其中包括JPA、JDO、Hibernate 和 iBatis 。利用ORM封装包,可以混合使用所有Spring提供的特性进行“对象/关系”映射。
5.Spring的 AOP 封装包提供了符合 AOP Alliance规范的面向方面的编程(aspect-oriented programming)实现,让你可以定义,例如方法拦截器(method-interceptors)和切点(pointcuts),从逻辑上讲,从而减弱代码的功能耦合,清晰的被分离开。
6. Spring中的 Web 包提供了基础的针对Web开发的集成特性,例如多方文件上传,利用Servlet listeners进行IoC容器初始化和针对Web的application context。当与WebWork或Struts一起使用Spring时,这个包使Spring可与其他框架结合。
7. Spring中的 MVC 封装包提供了Web应用的Model-View-Controller(MVC)实现。Spring的MVC框架并不是仅仅提供一种传统的实现,它提供了一种 清晰的 分离模型,在领域模型代码和web form之间。
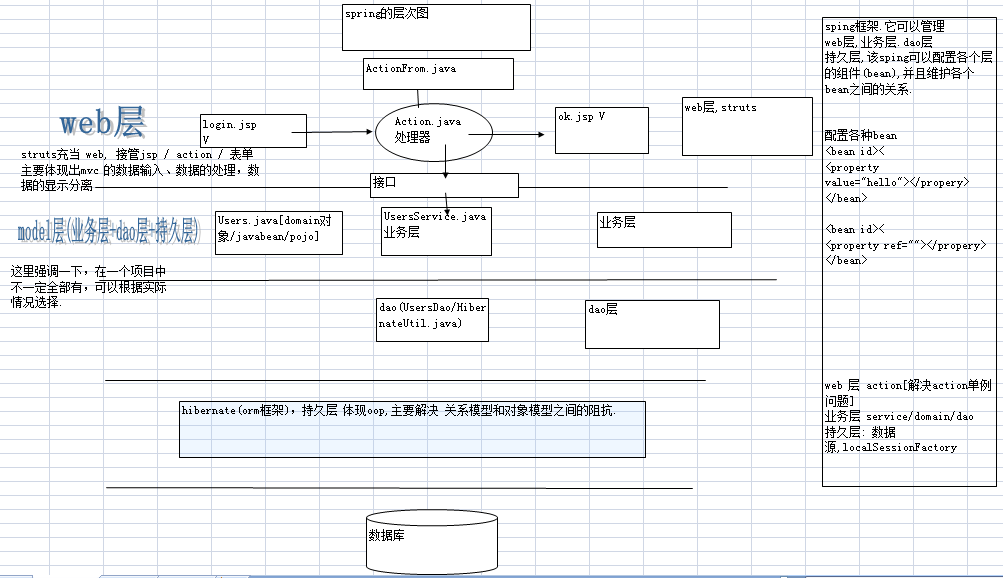
图1-2 Spring所处的位置
1.3 开发一个简单的spring项目
1、引入spring的开发包(最小配置spring.jar该包把常用的jar都包括, 还要写日志包 common-logging.jar
2、创建spring的一个核心文件applicationContext.xml(也可以使用其他的名字), [hibernate有核心 hibernate.cfg.xmlstruts核心文件 struts-config.xml], 该文件一般放在src目录下,该文件中引入 xsd文件,如下:
<?xml version="1.0"encoding="utf-8"?>
<beans xmlns="http://www.springframework.org/schema/beans"
      xmlns:xsi="http://www.w3.org/2001/XMLSchema-instance"
      xmlns:context="http://www.springframework.org/schema/context"
      xmlns:tx="http://www.springframework.org/schema/tx"
      xsi:schemaLocation="http://www.springframework.org/schema/beanshttp://www.springframework.org/schema/beans/spring-beans-2.5.xsd
            http://www.springframework.org/schema/contexthttp://www.springframework.org/schema/context/spring-context-2.5.xsd
            http://www.springframework.org/schema/txhttp://www.springframework.org/schema/tx/spring-tx-2.5.xsd">

</beans>
3、配置bean
<!-- 在容器文件中配置bean(service/dao/domain/action/数据源) -->
<!-- bean元素的作用是,当我们的spring框架加载时候,spring就会自动的创建一个bean对象,并放入内存
<bean id="userService" class="com.service.UserService">
	<property name="name">
		<value>lisi</value>
	</property>
	<property name="byeService" ref="byService"/>
</bean>
/**
	 * @param args
	 */
	public static void main(String[] args) {
		// TODO Auto-generated method stub
		//我们现在使用spring来完成上面的任务
		//1.得到spring 的applicationContext对象(容器对象)
		ApplicationContext ac=new ClassPathXmlApplicationContext("applicationContext.xml");
		UserService us=(UserService) ac.getBean("userService");
		us.sayHello();

	}
1.4 小结
1、使用spring ,没有new 对象,我们把创建对象的任务交给spring框架
2、ioc是什么?
答:ioc(inverse of controll ) 控制反转: 所谓控制反转就是把创建对象(bean),和维护对象(bean)的关系的权利从程序中转移到spring的容器(applicationContext.xml),而程序本身不再维护。
3、DI是什么?
答: di(dependency injection) 依赖注入: 实际上di和ioc是同一个概念,spring设计者认为di更准确表示spring核心技术。
HelloWorld完整程序
BybService.java
package com.service;
public class BybService {
private String name;
public String getName() {
return name;
}
public void setName(String name) {
this.name = name;
}
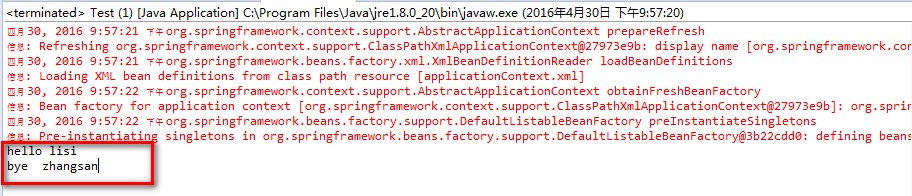
public void sayBye(){
System.out.println("bye "+name);
}
}
package com.service;

public class UserService {

	private String name;

	private BybService byeService;

	public BybService getByeService() {
		return byeService;
	}

	public void setByeService(BybService byeService) {
		this.byeService = byeService;
	}

	public String getName() {
		return name;
	}

	public void setName(String name) {
		this.name = name;
	}

	public void sayHello(){
		System.out.println("hello "+name );
		byeService.sayBye();
	}

}
bean装配文件 applicationContext.xml
<?xml version="1.0" encoding="utf-8"?>
<beans xmlns="http://www.springframework.org/schema/beans"
		xmlns:xsi="http://www.w3.org/2001/XMLSchema-instance"
		xmlns:context="http://www.springframework.org/schema/context"
		xmlns:tx="http://www.springframework.org/schema/tx"
		xsi:schemaLocation="http://www.springframework.org/schema/beans http://www.springframework.org/schema/beans/spring-beans-2.5.xsd
				http://www.springframework.org/schema/context http://www.springframework.org/schema/context/spring-context-2.5.xsd
				http://www.springframework.org/schema/tx http://www.springframework.org/schema/tx/spring-tx-2.5.xsd">
<bean id="byService" class="com.service.BybService">
	<property name="name">
		<value>zhangsan</value>
	</property>
</bean>

<bean id="userService" class="com.service.UserService">
	<property name="name">
		<value>lisi</value>
	</property>
	<property name="byeService" ref="byService"/>
</bean>
</beans>
测试程序Test.java
package com.test;

import org.springframework.context.ApplicationContext;
import org.springframework.context.support.ClassPathXmlApplicationContext;

import com.service.BybService;
import com.service.UserService;
import com.util.ApplicaionContextUtil;

public class Test {

	/**
	 * @param args
	 */
	public static void main(String[] args) {
		// TODO Auto-generated method stub
		//1.得到spring 的applicationContext对象(容器对象)
		ApplicationContext ac=new ClassPathXmlApplicationContext("applicationContext.xml");
		UserService us=(UserService) ac.getBean("userService");
		us.sayHello();
	}

}
运行结果:


 1841
1841

 被折叠的 条评论
为什么被折叠?
被折叠的 条评论
为什么被折叠?
 到【灌水乐园】发言


