


文章目录
- 1、配置文件
- 2、YAML语法:
- 3、配置文件值注入
- 3.1 `@ConfigurationProperties` 读取 application.yml 的配置
- 3.2、`@Value` 读取 application.properties
- 3.3、 `@Value` 和 `@ConfigurationProperties` 比较
- 3.4、`@PropertySource()` 与 `@ConfigurationProperties()` 配合使用,加载指定的配置文件
- 3.5、`@ImportResource(locations={"classpath:beans.xml"})` 添加组件 (不推荐)
- 3.6、`@Configuration` 和 `@Bean` 添加组件 (推荐)
- 4、配置文件占位符 `${}`
- 5、Profile
- 6、配置文件加载位置
1、配置文件
SpringBoot 中核心思想是 约定 > 配置 > 编码。
SpringBoot使用一个全局的配置文件,配置文件名是固定的;
- application.properties
- application.yml
配置文件的作用:修改SpringBoot自动配置的默认值;SpringBoot在底层都给我们自动配置好;
2、YAML语法:
2.1、什么是YAML
YAML的全称(YAML Ain’t Markup Language)
YAML A Markup Language:是一个标记语言;
YAML isn’t Markup Language:不是一个标记语言;
以前的配置文件,大多都使用的是 xxxx.xml文件;
YAML:以数据为中心,比 json、xml等更适合做配置文件;
YAML 以数据为中心,没有太多的基他配置
server:
  port: 8081
XML 大量的数据用于标签配置,如下面的例子,
<server>必须是一对标签,配置一个端口号都要一对(两个)<port>标签
<server>
	<port>8081</port>
</server>
2.2、基本语法
格式:
k:(空格)v 表示一对键值对(值前面的空格必须有)
层级关系
使用缩进表示层级关系。
只允许用空格的缩进来控制层级关系;不允许使用Tab键。
空格的数量
空格的数量是不限定的。只要左对齐即可,都是同一个层级的
示例:
server:
    port: 8081
    path: /hello
大小写敏感度:
属性和值是大小写敏感的。
2.2、YAML的写法
2.2.1、字面量
字面量 就是单个的、不可再分的普通的值 ,包括 数字,字符串,布尔。
写法:k: v
字符串 默认 不用加上 单引号 或者 双引号 。
2.2.2、对象、Map(属性和值)(键值对):
k: v:在下一行来写对象的属性和值的关系;注意缩进。
对象还是k: v的方式
friends:
  lastName: zhangsan
  age: 20
行内写法:
friends: {lastName: zhangsan,age: 18}
2.2.3、数组(List、Set):
用- 值表示数组中的一个元素
pets:
 - cat
 - dog
 - pig
行内写法
pets: [cat,dog,pig]
2.3 YAML中 单引号 和 双引号的区别
2.3.1、双引号(按照特殊字符串的原义输出)
双引号: 不会转义字符串里面的特殊字符。特殊字符会作为本身想表示的意思显示出来。
示例:
name: "zhangsan \n lisi"
输出:
zhangsan
 lisi
2.3.2、单引号(原样,按字符串输出)
单引号:会转义特殊字符。特殊字符被转换成一个普通的字符串。
示例:
name: 'zhangsan \n lisi'
输出:
zhangsan \n lisi
3、配置文件值注入
3.1 @ConfigurationProperties 读取 application.yml 的配置
@ConfigurationProperties 注解 说明:
1、将配置文件中配置的每一个属性的值,映射到这个组件中。
2、只能加载全局配置文件(application.yml、application.properties), 绑定属性值。
3、支持 数据校验。如不能为空,长度,正则等校验;
4、支持复杂的数据类型;
5、支持松散语法,如@Value("${person.lastName}") 与 @Value("${person.last-name}") 二者效果一样 。
3.1.1、示例
<!--导入配置文件处理器,配置文件进行绑定就会有提示-->
<dependency>
	<groupId>org.springframework.boot</groupId>
	<artifactId>spring-boot-configuration-processor</artifactId>
	<optional>true</optional>
</dependency>
application.yml :
person:
    lastName: hello
    age: 18
    boss: true
    birth: 2017/12/12
    maps: {k1: v1,k2: 12}
    lists:
      - lisi
      - zhaoliu
    dog:
      name: 小狗
      age: 12
Person.java
@Component  //必须是容器时,@ConfigurationProperties 注解才生效
@ConfigurationProperties(prefix = "person")
public class Person {

    private String lastName;
    private Integer age;
    private Boolean boss;
    private Date birth;

    private Map<String,Object> maps;
    private List<Object> lists;
    private Dog dog;

	//...getter/setter...
}
Dog.java
public class Dog {

	private String name;
	private Integer age;
	//...getter/setter...
}
说明:
@ConfigurationProperties:告诉SpringBoot将本类中的所有属性和配置文件中相关的配置进行绑定;prefix = "person":指定配置文件中person下面的所有属性进行一一映射@Component:只有这个组件是容器中的组件,才能容器提供的@ConfigurationProperties功能。
测试:
import org.junit.Test;
import org.junit.runner.RunWith;
import org.springframework.beans.factory.annotation.Autowired;
import org.springframework.boot.test.context.SpringBootTest;
import org.springframework.test.context.junit4.SpringRunner;

@RunWith(SpringRunner.class)
@SpringBootTest(classes = {SpringBoot02ConfigApplication.class})
public class SpringBoot02ConfigApplicationTests {

	@Autowired
	Person person;

	@Test
	public void contextLoads() {
		System.out.println(person.toString());
	}
}
运行结果:
Person [lastName=zhangsan, age=18, boss=true, birth=Sun Dec 03 00:00:00 CST 2017, maps={k1=v1, k2=v2}, lists=[lisi, zhaoliu], dog=Dog [name=小狗, age=12]]
3.1.2、将 application.yml 改写 application.properties
application.yml :
person:
    lastName: hello
    age: 18
    boss: true
    birth: 2018/5/14
    maps: {k1: v1,k2: 12}
    dog:
      name: 小毛
      age: 3
application.yml 的内容 等价于 application.properties 配置,如下 :
application.properties :
person.lastName=张三
person.age=18
person.boss=true
person.birth=2018/5/14
person.maps.k1=v1
person.maps.k2=v2
person.dog.name=小毛
person.dog.age=3
除了 application.properties 配置不一样外,基他代码与yml完全相同。
测试:
运行结果:
Person [lastName=zhangsan, age=18, boss=true, birth=Sun Dec 03 00:00:00 CST 2017, maps={k1=v1, k2=v2}, lists=[lisi, zhaoliu], dog=Dog [name=小狗, age=12]]
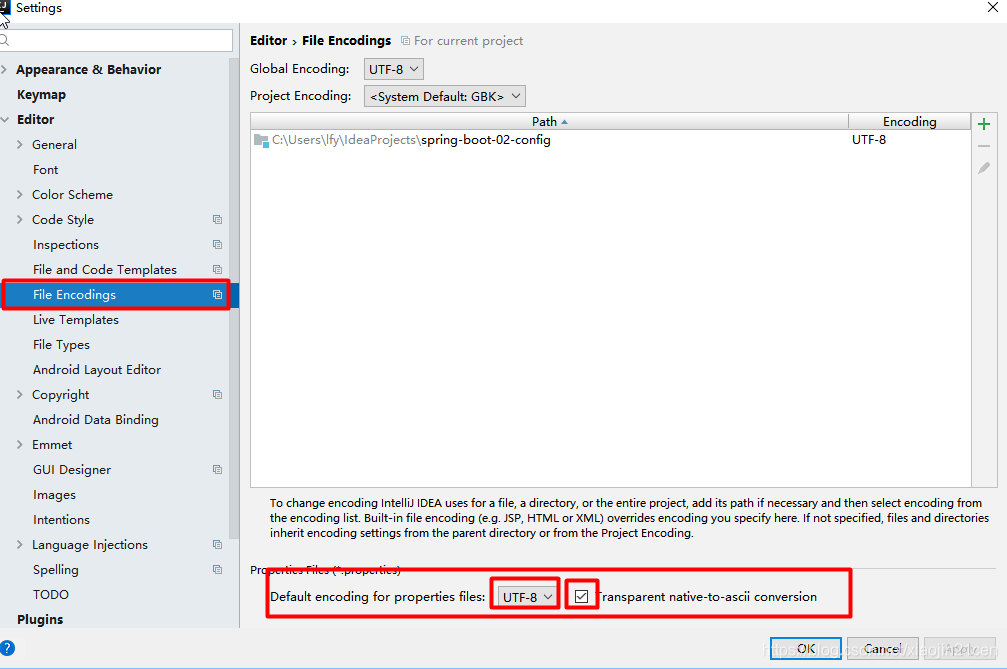
3.1.3、application.properties 乱码的解决方法
application.properties 配置时,打印显示内容是乱码的解决如下:
设置 properties的默认编码为 utf-8,如图:
3.2、@Value 读取 application.properties
说明:
@Value 支持表达式 、 支持 布尔值。
import java.util.Date;
import java.util.List;
import java.util.Map;

import org.springframework.beans.factory.annotation.Value;
import org.springframework.stereotype.Component;

@Component
public class Person {

	@Value("${person.lastName}")
	private String lastName;

	@Value("#{3*7}")     //支持表达式 @Value("#{  }")
	private Integer age;

	@Value("${person.boss}")   //支持 布尔值
	private Boolean boss;

	private Date birth;

	private Map<String, Object> maps;
	private List<Object> lists;
	private Dog dog;
application.properties 内容与上面一致。
测试
运行结果:
Person [lastName=张三, age=21, boss=true, birth=null, maps=null, lists=null, dog=null]
3.3、 @Value 和 @ConfigurationProperties 比较
3.3.1、@ConfigurationProperties和@Validated 的数据校验
import java.util.Date;
import java.util.List;
import java.util.Map;

import javax.validation.constraints.Email;

import org.hibernate.validator.constraints.Length;
import org.springframework.beans.factory.annotation.Value;
import org.springframework.boot.context.properties.ConfigurationProperties;
import org.springframework.stereotype.Component;
import org.springframework.validation.annotation.Validated;

@Component
@ConfigurationProperties(prefix="person")
@Validated
public class Person {

	@Length(min=14,max=20)
	private String lastName;

	private Integer age;
	private Boolean boss;
	private Date birth;

	private Map<String, Object> maps;
	private List<Object> lists;
	private Dog dog;
测试
运行结果:
***************************
APPLICATION FAILED TO START
***************************

Description:

Binding to target org.springframework.boot.context.properties.bind.BindException: Failed to bind properties under 'person' to com.atguigu.springboot.bean.Person failed:

    Property: person.lastName
    Value: 张三
    Origin: class path resource [application.properties]:1:17
    Reason: 长度需要在14和20之间
说明:
@Component:只有这个组件是容器中的组件,才能容器提供的@ConfigurationProperties功能。@Validated:数据校验的注解@Length(min=14,max=20)校验规则
3.3.2、@ConfigurationProperties 与 @Value 比较
| 功能 | @ConfigurationProperties | @Value |
|---|---|---|
| 批量注入配置 | 一个注解就实现值的批量注入 | 一个个指定属性的值 |
| 松散绑定(松散语法) | @Value("${person.lastName}") 与 @Value("${person.last-name}") 二者效果一样 | 不支持 |
| SpEL | 不支持 | 支持 @Value("#{3*7}") |
| JSR303数据校验 | 支持(是否为空,长度,格式等校验) | 不支持 |
| 复杂类型封装 | 支持 | 不支持 |
3.3.3、使用 yml, 还是 properties 配置文件 ?
如果说,我们只是在某个业务逻辑中需要获取一下配置文件中的某一项值,使用@Value;
如果说,我们专门编写了一个 JavaBean 来和 配置文件进行映射 ,我们就直接使用 @ConfigurationProperties 。
3.4、@PropertySource() 与 @ConfigurationProperties() 配合使用,加载指定的配置文件
@ConfigurationProperties 的缺点:只能加载全局配置文件(application.properties、application.yml), 绑定属性值。
@PropertySource 的优势:
- 加载指定的配置文件(如 person.properties );
@PropertySource(value = {"classpath:person.properties"})中 value 是个数组,可以加载多个文件。
@PropertySource() 与 @ConfigurationProperties() 如何绑定值?
@PropertySource(value = {"classpath:person.properties"})加载指定的配置文件到容器中 ;@ConfigurationProperties(prefix="person")通过 prefix 指定对应的配置信息,将键值绑定到对应的属性上。
注意:
只能加载 xxx.properties ,不加加载 xxx.yml 。
依赖:
<dependency>
	<groupId>org.springframework.boot</groupId>
	<artifactId>spring-boot-starter-test</artifactId>
	<scope>test</scope>
</dependency>
person.properties :
person.lastName=李四
person.age=18
person.boss=true
person.birth=2018/5/14
person.maps.k1=v1
person.maps.k2=v2
person.dog.name=小毛
person.dog.age=3
Person.java
import java.util.Date;
import java.util.List;
import java.util.Map;

import org.springframework.boot.context.properties.ConfigurationProperties;
import org.springframework.context.annotation.PropertySource;
import org.springframework.stereotype.Component;

@Component
@PropertySource(value = {"classpath:person.properties"})
@ConfigurationProperties(prefix="person")
public class Person {

	private String lastName;
	private Integer age;
	private Boolean boss;
	private Date birth;

	private Map<String, Object> maps;
	private List<Object> lists;
	private Dog dog;

	// getter/setter 省略
}
测试:
import org.junit.Test;
import org.junit.runner.RunWith;
import org.springframework.beans.factory.annotation.Autowired;
import org.springframework.boot.test.context.SpringBootTest;
import org.springframework.test.context.junit4.SpringRunner;

import com.atguigu.springboot.bean.Person;

@RunWith(SpringRunner.class)
//@SpringBootTest
@SpringBootTest(classes = {SpringBoot02ConfigApplication.class})
public class SpringBoot02ConfigApplicationTests {

	@Autowired
	Person person;

	@Test
	public void contextLoads() {
		System.out.println(person.toString());
	}
}
运行结果:
Person [lastName=李四, age=18, boss=true, birth=Mon May 14 00:00:00 CST 2018, maps={k2=v2, k1=v1}, lists=null, dog=Dog [name=小毛, age=3]]
3.5、@ImportResource(locations={"classpath:beans.xml"}) 添加组件 (不推荐)
Spring Boot 里面没有 Spring 的配置文件,我们自己编写的配置文件(如 beans.xml),也不能自动识别;
@ImportResource 可以加载Spring 的配置文件,使其生效。
参数 locations 是个数组,用于指定具体路径下的多个文件。
HelloSevice.java :
package com.xxx.springboot.service;

public class HelloService {

}
beans.xml :
<?xml version="1.0" encoding="UTF-8"?>
<beans xmlns="http://www.springframework.org/schema/beans"
       xmlns:xsi="http://www.w3.org/2001/XMLSchema-instance"
       xsi:schemaLocation="http://www.springframework.org/schema/beans
       http://www.springframework.org/schema/beans/spring-beans.xsd">

    <bean id="helloService" class="com.xxx.springboot.service.HelloService"></bean>
</beans>
SpringBoot02ConfigApplication.java :
@ImportResource(locations = {"classpath:beans.xml"})
@SpringBootApplication
public class SpringBoot02ConfigApplication {

	public static void main(String[] args) {
		SpringApplication.run(SpringBoot02ConfigApplication.class, args);
	}
}
说明:
增加 @ImportResource(locations = {"classpath:beans.xml"}) 注解到 Application 类上面
测试:
SpringBoot02ConfigApplicationTests.java
import org.junit.Test;
import org.junit.runner.RunWith;
import org.springframework.beans.factory.annotation.Autowired;
import org.springframework.boot.test.context.SpringBootTest;
import org.springframework.context.ApplicationContext;
import org.springframework.test.context.junit4.SpringRunner;

import com.atguigu.springboot.bean.Person;

@RunWith(SpringRunner.class)
@SpringBootTest(classes = {SpringBoot02ConfigApplication.class})
public class SpringBoot02ConfigApplicationTests {
	@Autowired
	ApplicationContext ioc;
	@Test
	public void testHelloService() {
		boolean b = ioc.containsBean("helloService");
		System.out.println(b);
	}
}
运行结果:
true
3.6、@Configuration 和 @Bean 添加组件 (推荐)
SpringBoot 推荐给容器中添加组件的方式;推荐使用全注解的方式:
@Configuration:指明当前类是一个配置类,就是来替代之前的 Spring配置文件(如:bean.xml、applicationContext.xml)@Bean相当于配置文件中用标签添加组件
MyAppConfig.java
import org.springframework.context.annotation.Bean;
import org.springframework.context.annotation.Configuration;

import com.atguigu.springboot.service.HelloService;

@Configuration
public class MyAppConfig {

	/**
	 * 将方法的返回值HelloService 添加到容器中;容器中这个组件默认的id就是方法名
	 * @return
	 */
	@Bean
    public HelloService helloService02(){
        System.out.println("配置类@Bean给容器中添加组件了...");
        return new HelloService();
    }
}
SpringBoot02ConfigApplication.java 恢复原状,即删除上一步配置的@ImportResource:
@SpringBootApplication
public class SpringBoot02ConfigApplication {

	public static void main(String[] args) {
		SpringApplication.run(SpringBoot02ConfigApplication.class, args);
	}
}
测试:
import org.junit.Test;
import org.junit.runner.RunWith;
import org.springframework.beans.factory.annotation.Autowired;
import org.springframework.boot.test.context.SpringBootTest;
import org.springframework.context.ApplicationContext;
import org.springframework.test.context.junit4.SpringRunner;

import com.atguigu.springboot.bean.Person;

@RunWith(SpringRunner.class)
@SpringBootTest(classes = {SpringBoot02ConfigApplication.class})
public class SpringBoot02ConfigApplicationTests {

	@Autowired
	Person person;

	@Autowired
	ApplicationContext ioc;

	@Test
	public void testHelloService() {
		boolean b = ioc.containsBean("helloService02");
		System.out.println(b);
	}

	@Test
	public void contextLoads() {
		System.out.println(person.toString());
	}
}
运行结果:
配置类@Bean给容器中添加组件了...
true
4、配置文件占位符 ${}
4.1、随机数
${random.value}、${random.int}、${random.long}
${random.int(10)}、${random.int[1024,65536]}
4.2、占位符获取之前配置的值,如果没有可以是用:指定默认值
application.properties
person.lastName=张三${random.uuid}
person.age=${random.int}
person.boss=true
person.birth=2018/5/14
person.maps.k1=v1
person.maps.k2=v2
person.dog.name=${person.lastName}的小毛
person.dog.age=3
Person.java :
import org.springframework.boot.context.properties.ConfigurationProperties;
import org.springframework.stereotype.Component;

@Component
@ConfigurationProperties(prefix="person")
public class Person {

	private String lastName;
	private Integer age;

	private Boolean boss;
	private Date birth;

	private Map<String, Object> maps;
	private List<Object> lists;
	private Dog dog;
	// getter/setter
}
测试:
import org.junit.Test;
import org.junit.runner.RunWith;
import org.springframework.beans.factory.annotation.Autowired;
import org.springframework.boot.test.context.SpringBootTest;
import org.springframework.context.ApplicationContext;
import org.springframework.test.context.junit4.SpringRunner;

import com.atguigu.springboot.bean.Person;

@RunWith(SpringRunner.class)
@SpringBootTest(classes = {SpringBoot02ConfigApplication.class})
public class SpringBoot02ConfigApplicationTests {

	@Autowired
	Person person;

	@Test
	public void contextLoads() {
		System.out.println(person.toString());
	}
}
运行结果:
Person [lastName=张三5aeeb6ca-e5ee-4963-99be-9368a7ebdae3, age=-1326736404, boss=true, birth=Mon May 14 00:00:00 CST 2018, maps={k1=v1, k2=v2}, lists=null, dog=Dog [name=张三2bb05743-b207-4ad5-b84a-55705c4bed60的小毛, age=3]]
设置默认值:
${person.hello:myHello} 如果 ${person.hello} 读取值为空时,使显示默认值 myHello
person.lastName=张三${random.uuid}
person.age=${random.int}
person.boss=true
person.birth=2018/5/14
person.maps.k1=v1
person.maps.k2=v2
person.dog.name=${person.hello:myHello}的小毛
person.dog.age=3
运行结果:
Person [lastName=张三b0242aff-b42d-4d5f-a61a-2570c152c5d1, age=-248246130, boss=true, birth=Mon May 14 00:00:00 CST 2018, maps={k1=v1, k2=v2}, lists=null, dog=Dog [name=myHello的小毛, age=3]]
5、Profile
5.1、使用properties,多个Profile文件
1、全局配置文件 application.properties 配置 spring.profiles.active=prod,指定active(激活)的配置文件。
2、副配置文件的文件名格式是 application-{profile}.properties/yml。如: application-dev.properties、application-prod.properties等。
application.properties :
spring.profiles.active=prod
application-dev.properties:
server.port=8082
application-prod.properties :
server.port=8083
测试:
启动,查看控制台日志
2018-12-15 20:28:39.286 INFO 2752 --- [ main] o.s.b.w.embedded.tomcat.TomcatWebServer : Tomcat started on port(s): 8083 (http) with context path ''
使用 8083 端口,说明 prod 环境已被激活生效。
5.2、yml内支持多文档块方式
yml内支持多文档块,在每个块内做不同的配置。
yml内第一块表示全局配置。 其他块表示某环境配置,要属性 spring.profiles 指定。
application.yml:
server:
  port: 8081
spring:
  profiles:
    active: prod  # 指定具体激活哪个环境配置

---
server:
  port: 8083
spring:
  profiles: dev   # 指定环境配置的名称


---

server:
  port: 8084
spring:
  profiles: prod  # 指定环境配置的名称
测试
--------省略-----------
5.3、激活指定profile
1、在配置文件(application.properties/yml)中指定 spring.profiles.active=dev
2、命令行:
java -jar spring-boot-02-config-0.0.1-SNAPSHOT.jar --spring.profiles.active=dev
可以直接在测试的时候,配置传入命令行参数
3、虚拟机参数;
-Dspring.profiles.active=dev
6、配置文件加载位置
springboot 启动会扫描以下位置的application.properties或者application.yml文件作为Spring boot的默认配置文件
–file:./config/        # 外部文件,离得越远,优先级最高

–file:./

–classpath:/config/

–classpath:/        # 内部文件,离得越近,优先级最低
优先级由高到底,高优先级的配置会覆盖低优先级的配置;
SpringBoot会从这四个位置全部加载主配置文件;互补配置;
我们还可以通过spring.config.location来改变默认的配置文件位置
项目打包好以后,我们可以使用命令行参数的形式,启动项目的时候来指定配置文件的新位置;指定配置文件和默认加载的这些配置文件共同起作用形成互补配置;
java -jar spring-boot-02-config-02-0.0.1-SNAPSHOT.jar --spring.config.location=G:/application.properties


 3674
3674


 被折叠的 条评论
为什么被折叠?
被折叠的 条评论
为什么被折叠?
 到【灌水乐园】发言


