


转载:
相信做过服务端开发的应该都知道Redis的大名,它是一个开源的使用ANSI C语言编写、支持网络、可基于内存亦可持久化的日志型、Key-Value数据库,我们后台是用C++开发的,问了下他们,用的缓存框架有Redis,SSDB,今天看了几个帖子,简单了解Redis的用法。记录一下过程。
首先去官网下载最新的Redis源码
http://redis.io/
解压之后,进入目录编译
make
make test
sudo make install
cd deps/hiredis

make && make install ,该目录是redis的c++库
执行ldconfig之后,就能找到hiredis库了
在使用Redis时,开始就遇到了问题,客户端打不开,原因是需要先开启服务端,这需要先配置——
1.下载好redis安装包,解压安装之后,复制其配置文件redis.conf 到etc 文件夹下
cd /opt/redis-3.2.8
cp redis.conf /etc
2. 进入etc,找到redis.conf 并修改 daemonize no(第128行) 为 daemonize yes ,这样就可以默认启动就后台运行
3. 开启客户端要确保服务端启动
redis-server /etc/redis.conf
4.启动客户端不成功要退出再进行下一步
5.运行 redis-cli ,就能测试命令了 ,连接成功...
代码测试
新建一个临时目录
创建新文件redis.h
#ifndef _REDIS_H_
#define _REDIS_H_

#include <iostream>
#include <string.h>
#include <string>
#include <stdio.h>

#include <hiredis/hiredis.h>

class Redis
{
public:

    Redis(){}

    ~Redis()
    {
        this->_connect = NULL;
        this->_reply = NULL;
    }

    bool connect(std::string host, int port)
    {
        this->_connect = redisConnect(host.c_str(), port);
        if(this->_connect != NULL && this->_connect->err)
        {
            printf("connect error: %s\n", this->_connect->errstr);
            return 0;
        }
        return 1;
    }

    std::string get(std::string key)
    {
        this->_reply = (redisReply*)redisCommand(this->_connect, "GET %s", key.c_str());
        std::string str = this->_reply->str;
        freeReplyObject(this->_reply);
        return str;
    }

    void set(std::string key, std::string value)
    {
        redisCommand(this->_connect, "SET %s %s", key.c_str(), value.c_str());
    }

private:

    redisContext* _connect;
    redisReply* _reply;

};

#endif  //_REDIS_H_
redis.cpp 文件
#include "redis.h"
int main()
{
Redis *r = new Redis();
if(!r->connect("127.0.0.1", 6379))
{
printf("connect error!\n");
return 0;
}
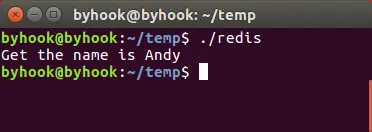
r->set("name", "Andy");
printf("Get the name is %s\n", r->get("name").c_str());
delete r;
return 0;
}
g++ redis.cpp -o redis -L/usr/local/lib/ -lhiredis运行如果出现找不到动态链接库
在/etc/ld.so.conf.d/目录下新建文件usr-libs.conf,内容是:/usr/local/lib最后执行


 1749
1749

 被折叠的 条评论
为什么被折叠?
被折叠的 条评论
为什么被折叠?
 到【灌水乐园】发言


