


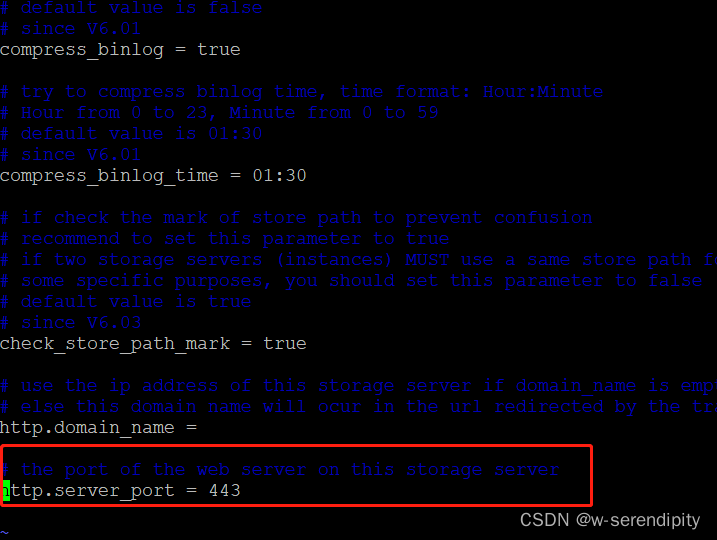
首先需要将FastDfs的相关配置文件中关于http.server_port配置的值改为443用于监听https访问
...
# the port of the web server on this storage server
http.server_port = 443
storage.conf配置文件
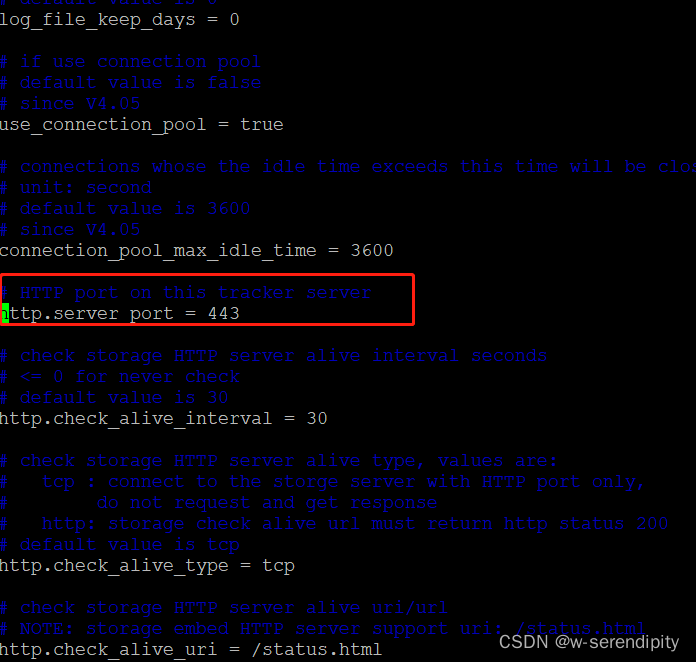
tracker.conf配置文件
nginx配置
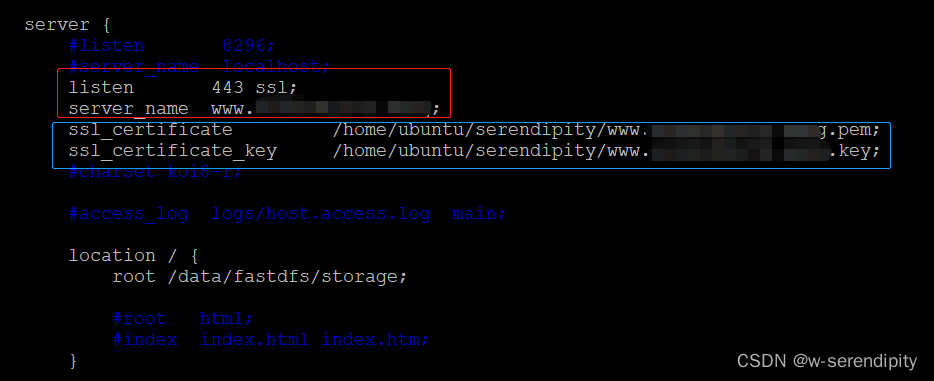
注意:上述蓝框中为域名ssl证书保存后的文件,一定要记得加否则在启动nginx时会出现如下错误
nginx: [emerg] no "ssl_certificate" is defined for the "listen ... ssl"
由于之前安装编译nginx时未添加ssl相关配置,因此启动nginx后出现如下错误
nginx: [emerg] the "ssl" parameter requires ngx_http_ssl_module in /usr/local/nginx/conf/nginx
不用重新编译nginx,按如下步骤操作即可:
# 1.切换到nginx源码包
cd /home/user/nginx-1.20.1
# 2.查看nginx原有的模块
/usr/local/nginx-fdfs/sbin/nginx -V
# 结果如下
configure arguments: --prefix=/usr/local/nginx-fdfs --add-module=/home/ubuntu/fastdfs-nginx-module-1.22/src
# 3.那么我们的新配置信息就应该这样写 (在原有基础上增加 --with-http_ssl_module):
./configure --prefix=/usr/local/nginx --with-pcre=/usr/local/zip/pcre-8.39 --with-http_stub_status_module --with-http_ssl_module
# 4.运行上面的命令即可,等配置完
# 配置完成后,运行命令
make
# 这里不要进行make install,否则就是覆盖安装
# 5.然后备份原有已安装好的nginx
cp /usr/local/nginx-fdfs/sbin/nginx /usr/local/nginx-fdfs/sbin/nginx.bak
# 6.然后将刚刚编译好的nginx覆盖掉原有的nginx(这个时候nginx要停止状态)
cp ./objs/nginx /usr/local/nginx-fdfs/sbin/
# 7.然后启动nginx,仍可以通过命令查看是否已经加入成功
/usr/local/nginx-fdfs/sbin/nginx -V
# --with-http_ssl_module出现则表示增加成功
configure arguments: --prefix=/usr/local/nginx-fdfs --add-module=/home/ubuntu/fastdfs-nginx-module-1.22/src --with-http_ssl_module
完成后尝试sudo /usr/local/nginx-fdfs/sbin/nginx -t,出现如下结果即表示运行成功
nginx: the configuration file /usr/local/nginx-fdfs/conf/nginx.conf syntax is ok
nginx: configuration file /usr/local/nginx-fdfs/conf/nginx.conf test is successful
如果在正式启动nginx的时候出现443端口被占用,
ubuntu@VM-20-16-ubuntu:~$ sudo /usr/local/nginx-fdfs/sbin/nginx
nginx: [emerg] bind() to 0.0.0.0:443 failed (98: Address already in use)
nginx: [emerg] bind() to 0.0.0.0:443 failed (98: Address already in use)
nginx: [emerg] bind() to 0.0.0.0:443 failed (98: Address already in use)
nginx: [emerg] bind() to 0.0.0.0:443 failed (98: Address already in use)
nginx: [emerg] bind() to 0.0.0.0:443 failed (98: Address already in use)
nginx: [emerg] still could not bind()
执行netstat -anon | grep 443查看具体占用,如果非重要进程,可通过sudo fuser -k 443/tcp将其杀掉,再启动nginx即启动成功。
友情提示: 本人nginx源码包解压后路径为/home/user/nginx-1.20.1,编译后路径为/usr/local/nginx-fdfs/这两处需根据自身情况进行替换。。。
至此即可通过https上传及查看fastdfs。
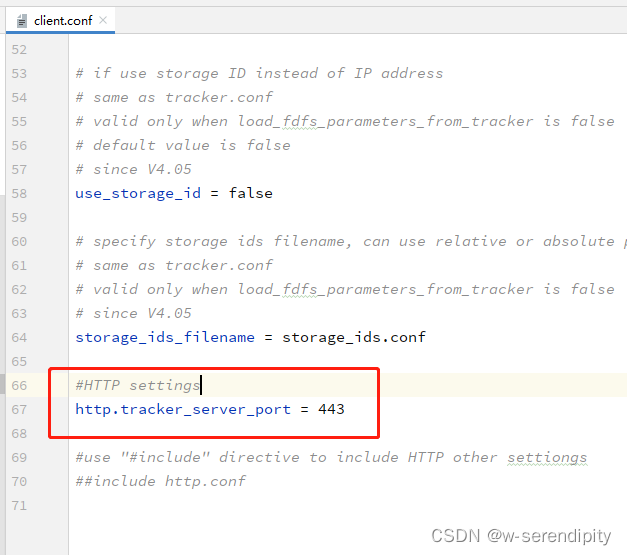
相关出错: 如果将fastdfs结合到项目中,那么相关client.conf配置文件内的内容也需要更改,否则会出现[-] Error: while writting to socket: (32, 'Broken pipe')错误
相关参考:
https://www.likecs.com/show-204253886.html
http://t.zoukankan.com/victorcode-p-10901322.html
https://www.fujieace.com/nginx/443-failed.html


 1343
1343


 被折叠的 条评论
为什么被折叠?
被折叠的 条评论
为什么被折叠?
 到【灌水乐园】发言


