


- SDK还是java,kotlin也需要编译成为java运行;
- Java语言应用不仅仅在Android,就是在后台开发中也是一个最流行的语言;
- 大公司面试都要求我们有扎实的Java语言基础。
1 注解
1.1 注解声明
1.1.1 声明一个注解类型
package java.lang.annotation;

public interface Annotation {
    boolean equals(Object var1);

    int hashCode();

    String toString();

    Class<? extends Annotation> annotationType();
}public @interface Donny {
}
1.1.2 元注解
@Target
- ElementType.ANNOTATION_TYPE 可以应用于注解类型。
- ElementType.CONSTRUCTOR 可以应用于构造函数。
- ElementType.FIELD 可以应用于字段或属性。
- ElementType.LOCAL_VARIABLE 可以应用于局部变量。
- ElementType.METHOD 可以应用于方法级注解。
- ElementType.PACKAGE 可以应用于包声明。
- ElementType.PARAMETER 可以应用于方法的参数。
- ElementType.TYPE 可以应用于类的任何元素。
@Retention
- RetentionPolicy.SOURCE - 标记的注解仅保留在源级别中,并被编译器忽略。
- RetentionPolicy.CLASS - 标记的注解在编译时由编译器保留,但 Java 虚拟机(JVM)会忽略。
- RetentionPolicy.RUNTIME - 标记的注解由 JVM 保留,因此运行时环境可以使用它。
@Retention 三个值中 SOURCE < CLASS < RUNTIME,即CLASS包含了SOURCE,RUNTIME包含SOURCE、CLASS。下文会介绍他们不同的应用场景。
package com.coy.annotationdemo;
import java.lang.annotation.ElementType;
import java.lang.annotation.Retention;
import java.lang.annotation.RetentionPolicy;
import java.lang.annotation.Target;
// @Target(ElementType.TYPE) 只能在类上标记该注解
@Target({ElementType.FIELD, ElementType.TYPE}) // 允许在类与类属性上标记该注解
@Retention(RetentionPolicy.SOURCE) // 注解保留在源码中
public @interface Donny {
}1.1.3 注解类型元素
package com.coy.annotationdemo;

import java.lang.annotation.ElementType;
import java.lang.annotation.Retention;
import java.lang.annotation.RetentionPolicy;
import java.lang.annotation.Target;

@Target({ElementType.FIELD, ElementType.TYPE})  // 允许在类与类属性上标记该注解
@Retention(RetentionPolicy.SOURCE) // 注解保留在源码中
public @interface Donny {
    String value(); // 无默认值
    int age() default 18; // 有默认值
}
注意:在使用注解时,如果定义的注解中的类型元素无默认值,则必须进行传值。
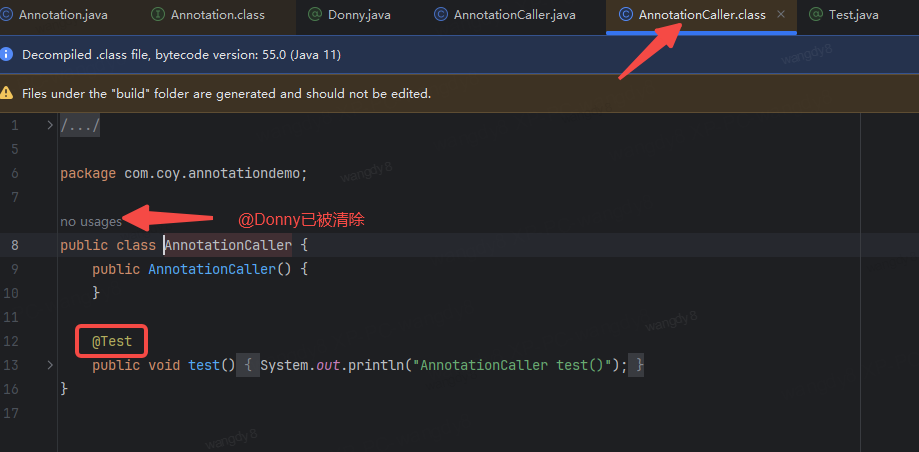
package com.coy.annotationdemo;

public class AnnotationCaller {
//    @Donny("痞帅") //如果只存在value元素需要传值的情况,则可以省略:元素名=
    @Donny(value = "痞帅", age = 24)
    int a = 1;
}
1.2 注解应用场景
根据注解的保留级别不同,对注解的使用自然存在不同场景。由注解的三个不同保留级别可知,注解作用于: 源码、字节码与运行时。按照@Retention 元注解定义的注解存储方式,注解可以被在三种场景下使用:
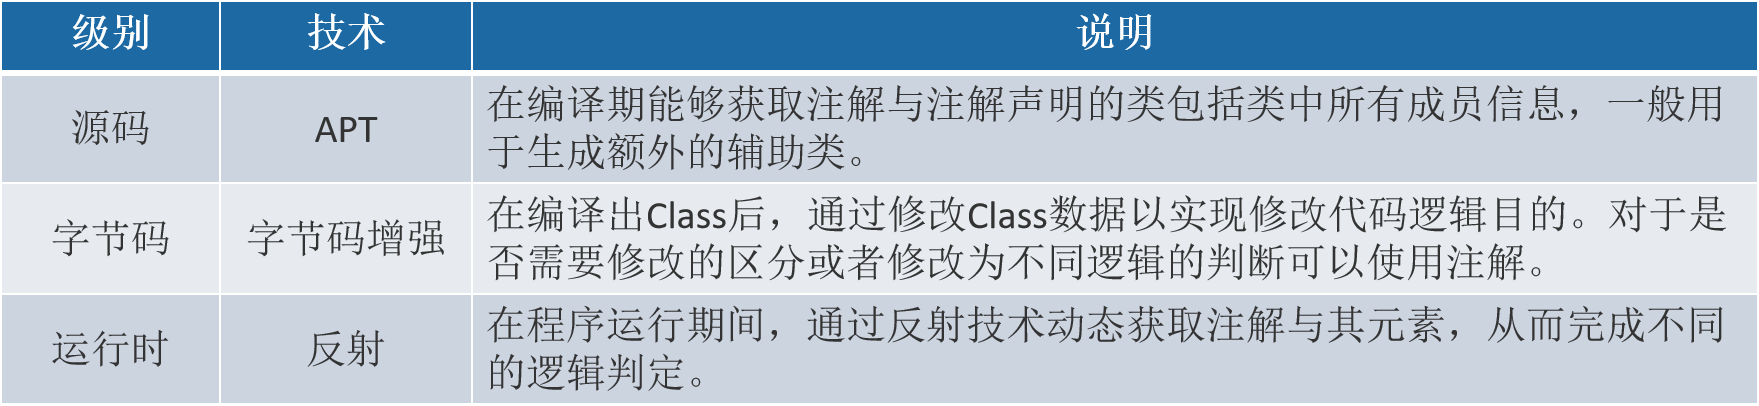
1.2.1 SOURCE
package com.coy.annotationdemo;

import java.lang.annotation.ElementType;
import java.lang.annotation.Retention;
import java.lang.annotation.RetentionPolicy;
import java.lang.annotation.Target;

@Target(ElementType.METHOD)
@Retention(RetentionPolicy.RUNTIME)
public @interface Test {
}package com.coy.annotationdemo;
@Donny()
public class AnnotationCaller {
@Test
public void test() {
System.out.println("AnnotationCaller test()");
}
}
IDE语法检查
@Retention(SOURCE) //源码级别注解
@Target({ANNOTATION_TYPE})
public @interface IntDef {
    /** Defines the constant prefix for this element */
    String[] prefix() default {};
    /** Defines the constant suffix for this element */
    String[] suffix() default {};

    /** Defines the allowed constants for this element */
    int[] value() default {};

    /** Defines whether the constants can be used as a flag, or just as an enum (the default) */
    boolean flag() default false;
}
Java中Enum(枚举)的实质是特殊单例的静态成员变量,在运行期所有枚举类作为单例,全部加载到内存中。比常量多5到10倍的内存占用。此注解的意义在于能够取代枚举,实现如方法入参限制。
package com.coy.annotationdemo;

package com.coy.annotationdemo;

public class TeacherEnum {
    public enum Teacher {
        TEACHER_MATH, TEACHER_ENGLISH
    }

    public void test(Teacher teacher) {
    }
}package com.coy.annotationdemo;
public class TeacherEnum {
public static final int TEACHER_MATH = 0;
public static final int TEACHER_ENGLISH = 1;
public static String getTeacherName(int teacher) {
switch (teacher) {
case TEACHER_MATH:
return "Math Teacher";
case TEACHER_ENGLISH:
return "English Teacher";
default:
return "Unknown Teacher";
}
}
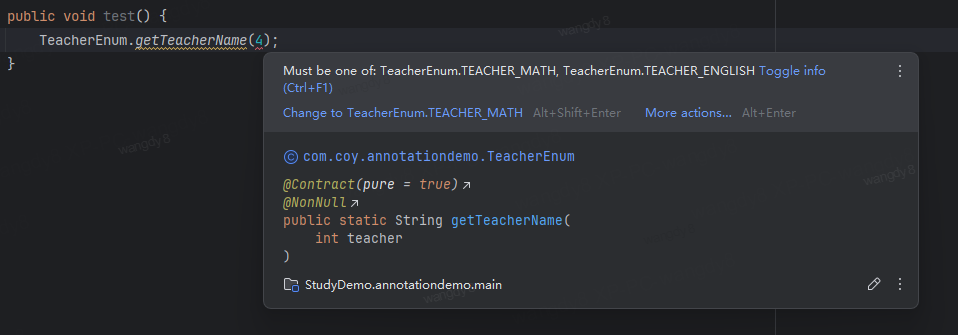
}public class AnnotationCaller {
public void test() {
TeacherEnum.getTeacherName(4); // 实际上我们只支持0和1也就是TEACHER_MATH和TEACHER_ENGLISH,但此时传入4我们没办法真实处理的
}
}package com.coy.annotationdemo;
import androidx.annotation.IntDef;
import java.lang.annotation.ElementType;
import java.lang.annotation.Retention;
import java.lang.annotation.RetentionPolicy;
import java.lang.annotation.Target;
@IntDef(value = {
TeacherEnum.TEACHER_MATH,
TeacherEnum.TEACHER_ENGLISH
}) // 限定为数学老师,英语老师
@Target(ElementType.PARAMETER) //作用于参数的注解
@Retention(RetentionPolicy.SOURCE) //注解在源代码中有效,编译后不保留
public @interface Teacher {
}然后修改方法:
package com.coy.annotationdemo;

public class TeacherEnum {
    public static final int TEACHER_MATH = 0;
    public static final int TEACHER_ENGLISH = 1;

    public static String getTeacherName(@Teacher int teacher) {
        switch (teacher) {
            case TEACHER_MATH:
                return "Math Teacher";
            case TEACHER_ENGLISH:
                return "English Teacher";
            default:
                return "Unknown Teacher";
        }
    }
}
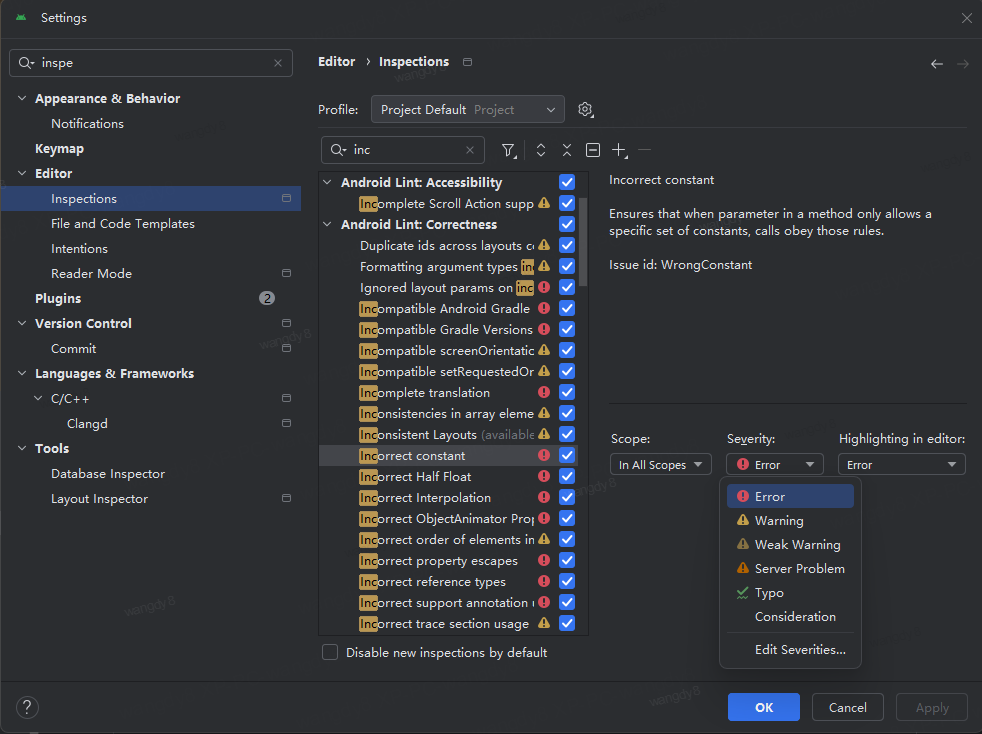
可以修改此类语法检查级别:
APT注解处理器
注解处理器是对注解应用最为广泛的场景。在Glide、EventBus3、Butterknifer、Tinker、ARouter等等常用框架中都有注解处理器的身影。但是你可能会发现,这些框架中对注解的定义并不是 SOURCE 级别,更多的是 CLASS 级别,别忘了:CLASS包含了SOURCE,RUNTIME包含SOURCE、CLASS。
这里先简单的介绍一下注解处理处理器如何简单实现:
首先我们要创建了注解,那么要想注解产生作用,那就要创建对应的注解处理器也就是APT:
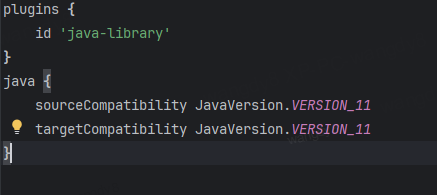
1. 首先我们创建一个lib库(一定要创建java lib库,否则引用不到相关的依赖),
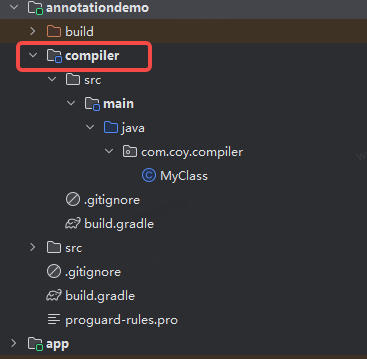
2. 创建Donny注解的处理器文件:
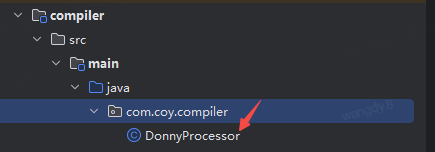
package com.coy.compiler;

import java.util.Set;

import javax.annotation.processing.AbstractProcessor;
import javax.annotation.processing.Messager;
import javax.annotation.processing.RoundEnvironment;
import javax.lang.model.element.TypeElement;
import javax.tools.Diagnostic;

public class DonnyProcessor extends AbstractProcessor {
    @Override
    public boolean process(Set<? extends TypeElement> set, RoundEnvironment roundEnvironment) {
        Messager messager = processingEnv.getMessager();
        // 打印log
        messager.printMessage(Diagnostic.Kind.NOTE, "================================");
        return false;
    }
}
AbstractProcessor是由JDK提供的,我们直接继承就可以,只有继承自AbstractProcessor,javac才认为是一个注解处理器。AbstractProcessor你可以理解android中的activity类。
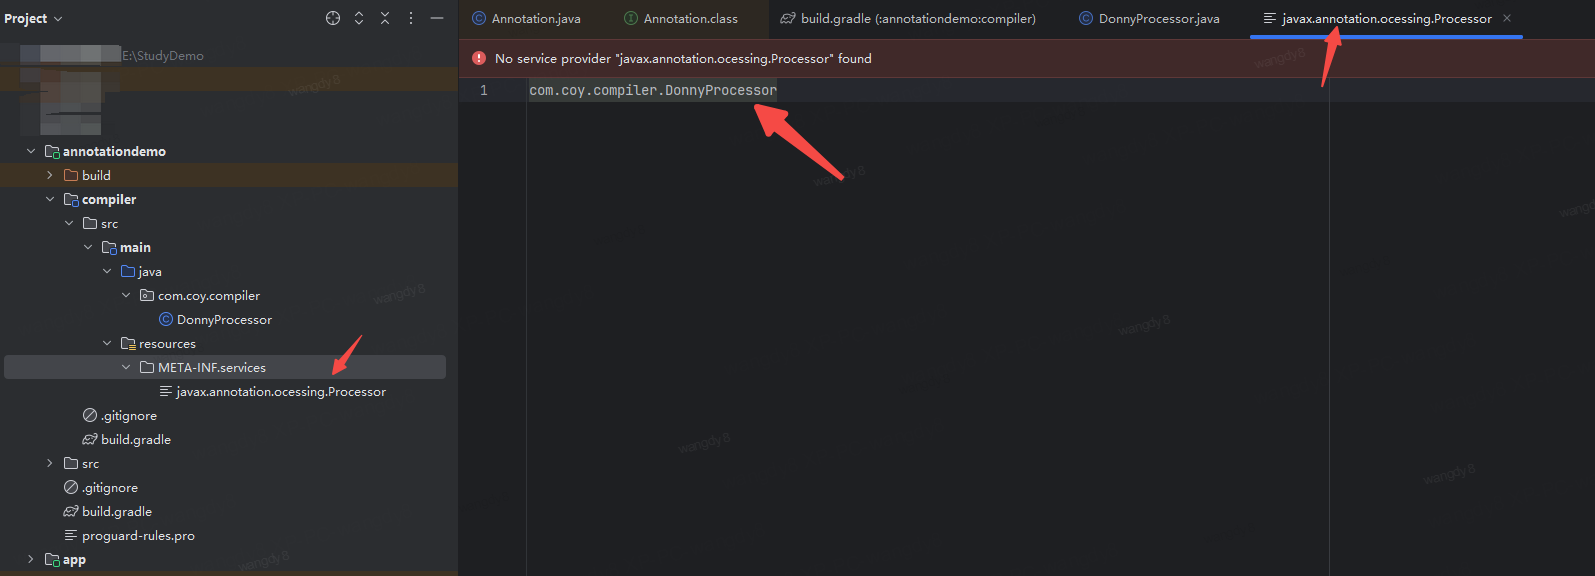
写好了这个处理器之后,需要我们需要声明DonnyProcessor,就像MainActivity继承了activity之后,我们的要到manifest文件中对MainActivity进行声明,不然MainActivity对于AMS来讲,AMS也不是认识MainActivity的。所以我们为了让javac能够认识DonnyProcessor需要做个声明:DonnyProcessor的声明的格式也比较固定就是在lib库的main目录下创建resources->META-INF->services->javax.annotation.ocessing.Processor,然后在javax.annotation.ocessing.Processor文件中写上注解处理程序的全类名:
3. 我们的程序中会有很多的注解,那么DonnyProcessor如何知道处理哪一个注解呢?那就需要我们在注解处理程序中进行指定,也就是说DonnyProcessor只处理我们指定的注解:
package com.coy.compiler;

import java.util.Set;

import javax.annotation.processing.AbstractProcessor;
import javax.annotation.processing.Messager;
import javax.annotation.processing.RoundEnvironment;
import javax.annotation.processing.SupportedAnnotationTypes;
import javax.lang.model.element.TypeElement;
import javax.tools.Diagnostic;

@SupportedAnnotationTypes("com.coy.annotationdemo.Donny") // 指定支持的注解类型
public class DonnyProcessor extends AbstractProcessor {
    @Override
    public boolean process(Set<? extends TypeElement> set, RoundEnvironment roundEnvironment) {
        Messager messager = processingEnv.getMessager();
        // 打印log
        messager.printMessage(Diagnostic.Kind.NOTE, "================================");

        // 省略具体注解处理逻辑.....
        return false;
    }
}
到此我们的注解处理程序已经写完了,那么接下里就是我们在模块中的引用了:
annotationProcessor project(':compiler')1.2.2 CLASS
package com.coy.annotationdemo.clazz;

import java.lang.annotation.ElementType;
import java.lang.annotation.Retention;
import java.lang.annotation.RetentionPolicy;
import java.lang.annotation.Target;

@Target(ElementType.METHOD)
@Retention(RetentionPolicy.CLASS)
public @interface Login {
}
package com.coy.annotationdemo;
import com.coy.annotationdemo.clazz.Login;
import com.coy.annotationdemo.source.Donny;
import com.coy.annotationdemo.source.TeacherEnum;
import com.coy.annotationdemo.source.Test;
public class AnnotationCaller {
@Login
public void jumpA() {
startActivity(new Intent(this,AActivity.class));
}
public void jumpB() {
startActivity(new Intent(this,BActivity.class));
}
}//Class字节码
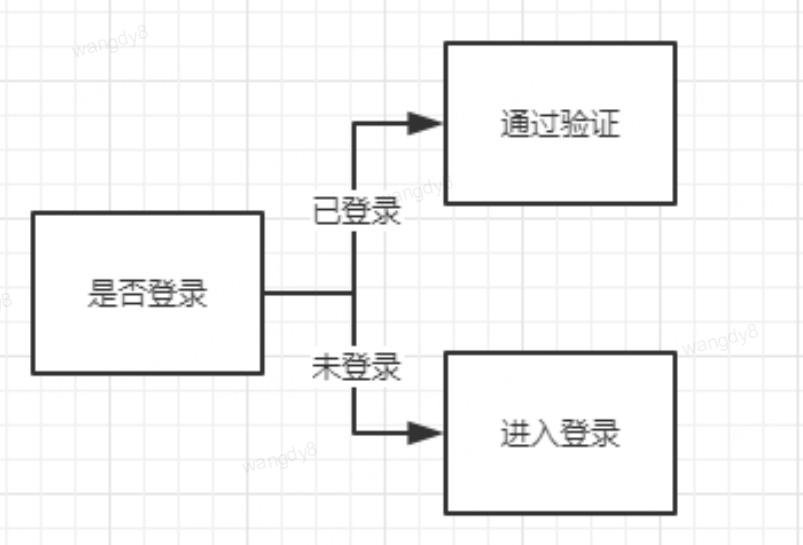
@Login
public void jumpA() {
if (this.isLogin) {
this.startActivity(new Intent(this, LoginActivity.class));
} else {
this.startActivity(new Intent(this, AActivity.class));
}
}
public void jumpB() {
startActivity(new Intent(this,BActivity.class));
}1.2.3 RUNTIME
2 反射
一般情况下,我们使用某个类时必定知道它是什么类,是用来做什么的,并且能够获得此类的引用。于是我们直接对这个类进行实例化,之后使用这个类对象进行操作。
反射则是一开始并不知道我要初始化的类对象是什么,自然也无法使用 new 关键字来创建对象了。这时候,我们使用 JDK 提供的反射 API 进行反射调用。反射就是在运行状态中,对于任意一个类,都能够知道这个类的所有属性和方法;对于任意一个对象,都能够调用它的任意方法和属性;并且能改变它的属性。是Java被视为动态语言的关键。
- 在运行时构造任意一个类的对象
- 在运行时获取或者修改任意一个类所具有的成员变量和方法
- 在运行时调用任意一个对象的方法(属性)
2.1 Class
2.2 获得 Class 对象
- 通过类名获取 类名.class
- 通过对象获取 对象名.getClass()
- 通过全类名获取 Class.forName(全类名) classLoader.loadClass(全类名)
- 使用 Class 类的 forName 静态方法
public static Class<?> forName(String className)- 直接获取某一个对象的 class
Class<?> klass = int.class;
Class<?> classInt = Integer.TYPE;- 调用某个对象的 getClass() 方法
StringBuilder str = new StringBuilder("123");
Class<?> klass = str.getClass();
3.3 判断是否为某个类的实例
public native boolean isInstance(Object obj);public boolean isAssignableFrom(Class<?> cls)3.4 创建实例
- 使用Class对象的newInstance()方法来创建Class对象对应类的实例。
Class<?> c = String.class;
Object str = c.newInstance();- 先通过Class对象获取指定的Constructor对象,再调用Constructor对象的newInstance()方法来创建实例。这种方法可以用指定的构造器构造类的实例。
//获取String所对应的Class对象
Class<?> c = String.class;
//获取String类带一个String参数的构造器
Constructor constructor = c.getConstructor(String.class);
//根据构造器创建实例
Object obj = constructor.newInstance("23333");
System.out.println(obj)
3.5 获取构造器信息
Constructor getConstructor(Class[] params) -- 获得使用特殊的参数类型的public构造函数(包括父类)
Constructor[] getConstructors() -- 获得类的所有公共构造函数
Constructor getDeclaredConstructor(Class[] params) -- 获得使用特定参数类型的构造函数(包括私有)
Constructor[] getDeclaredConstructors() -- 获得类的所有构造函数(与接入级别无关)public T newInstance(Object ... initargs)3.6 获取类的成员变量(字段)信息
Field getField(String name) -- 获得命名的公共字段
Field[] getFields() -- 获得类的所有公共字段
Field getDeclaredField(String name) -- 获得类声明的命名的字段
Field[] getDeclaredFields() -- 获得类声明的所有字段
3.7 调用方法
Method getMethod(String name, Class[] params) -- 使用特定的参数类型,获得命名的公共方法
Method[] getMethods() -- 获得类的所有公共方法
Method getDeclaredMethod(String name, Class[] params) -- 使用特写的参数类型,获得类声明的命名的方法
Method[] getDeclaredMethods() -- 获得类声明的所有方法public Object invoke(Object obj, Object... args)3.8 利用反射创建数组
public static Object newInstance(Class<?> componentType, int length);3.9 反射获取泛型真实类型
- TypeVariable 泛型类型变量。可以泛型上下限等信息;
-
ParameterizedType 具体的泛型类型,可以获得元数据中泛型签名类型 ( 泛型真实类型 )
-
GenericArrayType 当需要描述的类型是 泛型类的数组 时,比如 List[],Map[] ,此接口会作为 Type 的实现。
- WildcardType 通配符泛型,获得上下限信息;
3.9.1 TypeVariable
public class TestType <K extends Comparable & Serializable, V> {
    K key;
    V value;
    public static void main(String[] args) throws Exception {
// 获取字段的类型
        Field fk = TestType.class.getDeclaredField("key");
        Field fv = TestType.class.getDeclaredField("value");
        TypeVariable keyType = (TypeVariable)fk.getGenericType();
        TypeVariable valueType = (TypeVariable)fv.getGenericType();
// getName 方法
        System.out.println(keyType.getName()); // K
        System.out.println(valueType.getName()); // V
// getGenericDeclaration 方法
        System.out.println(keyType.getGenericDeclaration()); // class com.test.TestType
        System.out.println(valueType.getGenericDeclaration()); // class com.test.TestType
// getBounds 方法
        System.out.println("K 的上界:"); // 有两个
        for (Type type : keyType.getBounds()) { // interface java.lang.Comparable
            System.out.println(type); // interface java.io.Serializable
        }
        System.out.println("V 的上界:"); // 没明确声明上界的, 默认上界是 Object
        for (Type type : valueType.getBounds()) { // class java.lang.Object
            System.out.println(type);
        }
    }
}
3.9.2 ParameterizedType
public class TestType {
    Map<String, String> map;
    public static void main(String[] args) throws Exception {
        Field f = TestType.class.getDeclaredField("map");
        System.out.println(f.getGenericType()); // java.util.Map<java.lang.String,java.lang.String>
        ParameterizedType pType = (ParameterizedType) f.getGenericType();
        System.out.println(pType.getRawType()); // interface java.util.Map
        for (Type type : pType.getActualTypeArguments()) {
            System.out.println(type); // 打印两遍: class java.lang.String
        }
    }
}
3.9.3 GenericArrayType
public class TestType<T> {
    List<String>[] lists;
    public static void main(String[] args) throws Exception {
        Field f = TestType.class.getDeclaredField("lists");
        GenericArrayType genericType = (GenericArrayType) f.getGenericType();
        System.out.println(genericType.getGenericComponentType());
    }
}
3.9.4 WildcardType
public class TestType {
    private List<? extends Number> a; // 上限
    private List<? super String> b; //下限

    public static void main(String[] args) throws Exception {
        Field fieldA = TestType.class.getDeclaredField("a");
        Field fieldB = TestType.class.getDeclaredField("b");
        // 先拿到范型类型
        ParameterizedType pTypeA = (ParameterizedType) fieldA.getGenericType();
        ParameterizedType pTypeB = (ParameterizedType) fieldB.getGenericType();
        // 再从范型里拿到通配符类型
        WildcardType wTypeA = (WildcardType) pTypeA.getActualTypeArguments()[0];
        WildcardType wTypeB = (WildcardType) pTypeB.getActualTypeArguments()[0];
        // 方法测试
        System.out.println(wTypeA.getUpperBounds()[0]); // class java.lang.Number
        System.out.println(wTypeB.getLowerBounds()[0]); // class java.lang.String
        // 看看通配符类型到底是什么, 打印结果为: ? extends java.lang.Number
        System.out.println(wTypeA);
    }
}
3.9.5 Gson反序列化
static class Response<T> {
    T data;
    int code;
    String message;

    @Override
    public String toString() {
        return "Response{" + "data=" + data + ", code=" + code + ", message='" + message + '\'' + '}';
    }

    public Response(T data, int code, String message) {
        this.data = data;
        this.code = code;
        this.message = message;
    }
}

static class Data {
    String result;

    public Data(String result) {
        this.result = result;
    }

    @Override
    public String toString() {
        return "Data{" + "result=" + result + '}';
    }
}

public static void main(String[] args) {
    Response<Data> dataResponse = new Response(new Data("数据"), 1, "成功");
    Gson gson = new Gson();
    String json = gson.toJson(dataResponse);
    System.out.println(json);
    //为什么TypeToken要定义为抽象类?
    Response<Data> resp = gson.fromJson(json, new TypeToken<Response<Data>>() {
    }.getType());
    System.out.println(resp.data.result);
}3 动态代理原理
有动态代理,固然就有静态代理,循序渐进,先看一下静态代理:
3.1 静态代理
- 通过引入代理对象的方式来间接访问目标对象,防止直接访问目标对象给系统带来的不必要复杂性;
- 通过代理对象对访问进行控制;
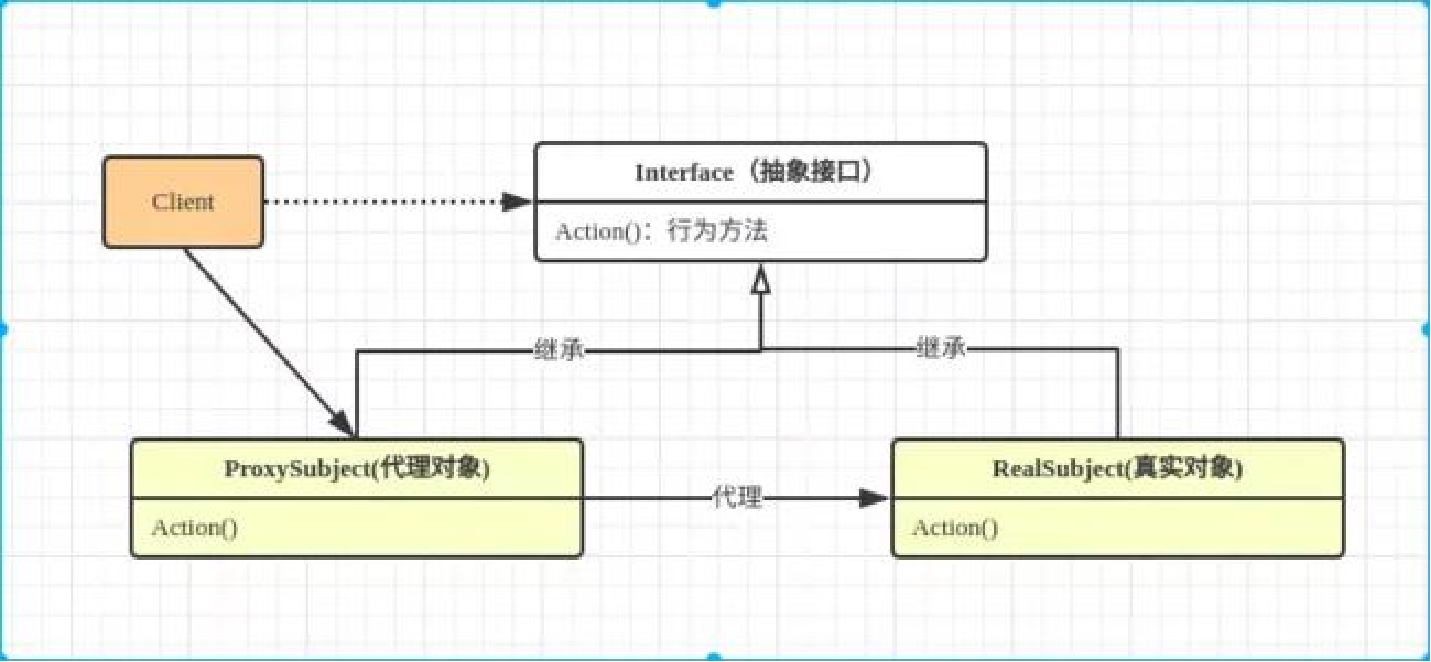
举个简单的例子:
现在一个房东有一个住宅和商铺需要出租,但是房东又不想自己去直接找客户,那就可以委托给中介进行操作,但实际上真正的操作还是房东在做,我们来看一下具体的实现:
整天看一下结构:
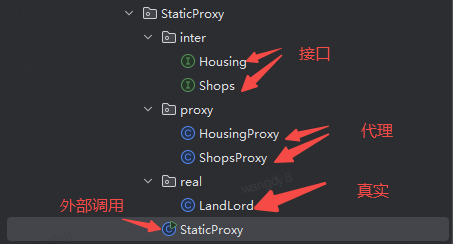
首先是2个接口类:
package com.coy.annotationdemo.StaticProxy.inter;

/**
 * 住宅接口
 */
public interface Housing {
    /**
     * 租房
     */
    void rent();

    /**
     * 退租
     */
    void back();

    /**
     * 装修
     */
    void decoration();

    /**
     * 维修
     */
    void repair();
}
package com.coy.annotationdemo.StaticProxy.inter;

/**
 * 商铺接口
 */
public interface Shops {
    /**
     * 商铺名称
     */
    String getName();

    /**
     * 商铺地址
     */
    String getAddress();

    /**
     * 商铺电话
     */
    String getPhone();

    /**
     * 商铺营业时间
     */
    String getOpenTime();

    /**
     * 商铺打折信息
     */
    String getDiscount();
}
接着就是代理对象:
package com.coy.annotationdemo.StaticProxy.proxy;

import com.coy.annotationdemo.StaticProxy.inter.Housing;

public class HousingProxy implements Housing {

    private Housing housing;

    public HousingProxy(Housing housing) {
        this.housing = housing;
    }

    @Override
    public void rent() {
        System.out.println("代理租房");
        housing.rent();
    }

    @Override
    public void back() {
        System.out.println("房屋代理人:房屋归还中...");
        housing.back();
        System.out.println("房屋代理人:房屋归还完成");
    }

    @Override
    public void decoration() {
        System.out.println("房屋代理人:房屋装修中...");
        housing.decoration();
        System.out.println("房屋代理人:房屋装修完成");
    }

    @Override
    public void repair() {
        System.out.println("房屋代理人:房屋维修中...");
        housing.repair();
        System.out.println("房屋代理人:房屋维修完成");
    }
}
package com.coy.annotationdemo.StaticProxy.proxy;

import com.coy.annotationdemo.StaticProxy.inter.Shops;

/**
 * 商铺代理类
 */
public class ShopsProxy implements Shops {

    private Shops shops;

    public ShopsProxy(Shops shops) {
        this.shops = shops;
    }

    @Override
    public String getName() {
        System.out.println("ShopsProxy getName");
        return shops.getName();
    }

    @Override
    public String getAddress() {
        System.out.println("ShopsProxy getAddress");
        return shops.getAddress();
    }

    @Override
    public String getPhone() {
        System.out.println("ShopsProxy getPhone");
        return shops.getPhone();
    }

    @Override
    public String getOpenTime() {
        System.out.println("ShopsProxy getOpenTime");
        return shops.getOpenTime();
    }

    @Override
    public String getDiscount() {
        System.out.println("ShopsProxy getDiscount");
        return shops.getDiscount();
    }
}
真实对象:
package com.coy.annotationdemo.StaticProxy.real;

import com.coy.annotationdemo.StaticProxy.inter.Housing;
import com.coy.annotationdemo.StaticProxy.inter.Shops;

public class LandLord implements Housing, Shops {
    @Override
    public void rent() {
        System.out.println("房东出租房子");
    }

    @Override
    public void back() {
        System.out.println("房东收回房子");
    }

    @Override
    public void decoration() {
        System.out.println("房东装修房子");
    }

    @Override
    public void repair() {
        System.out.println("房东维修房子");
    }

    @Override
    public String getName() {
        return "房东";
    }

    @Override
    public String getAddress() {
        return "房东地址";
    }

    @Override
    public String getPhone() {
        return "房东电话";
    }

    @Override
    public String getOpenTime() {
        return "房东营业时间";
    }

    @Override
    public String getDiscount() {
        return "房东折扣";
    }
}
调用者:
package com.coy.annotationdemo.StaticProxy;

import com.coy.annotationdemo.StaticProxy.proxy.HousingProxy;
import com.coy.annotationdemo.StaticProxy.proxy.ShopsProxy;
import com.coy.annotationdemo.StaticProxy.real.LandLord;

public class StaticProxy {
    public static void main(String[] args) {
        // 创建住宅对象
        LandLord realSubject = new LandLord();
        // 创建住宅代理对象
        HousingProxy proxySubject = new HousingProxy(realSubject);
        // 调用代理方法
        proxySubject.rent();

        // 创建商铺对象
        LandLord realShop = new LandLord();
        // 创建商铺代理对象
        ShopsProxy proxyShop = new ShopsProxy(realShop);
        // 调用代理方法
        proxyShop.getAddress();

    }
}
从上面这个简单的例子就可以看出来,有一个接口就会多一个对应的代理对象,从而形成一对一的关系,导致代码量偏大,那你可能就会问了,那代理能不能代理多个接口呢?答案当然是可以的,使用动态代理就可以代理多个接口。
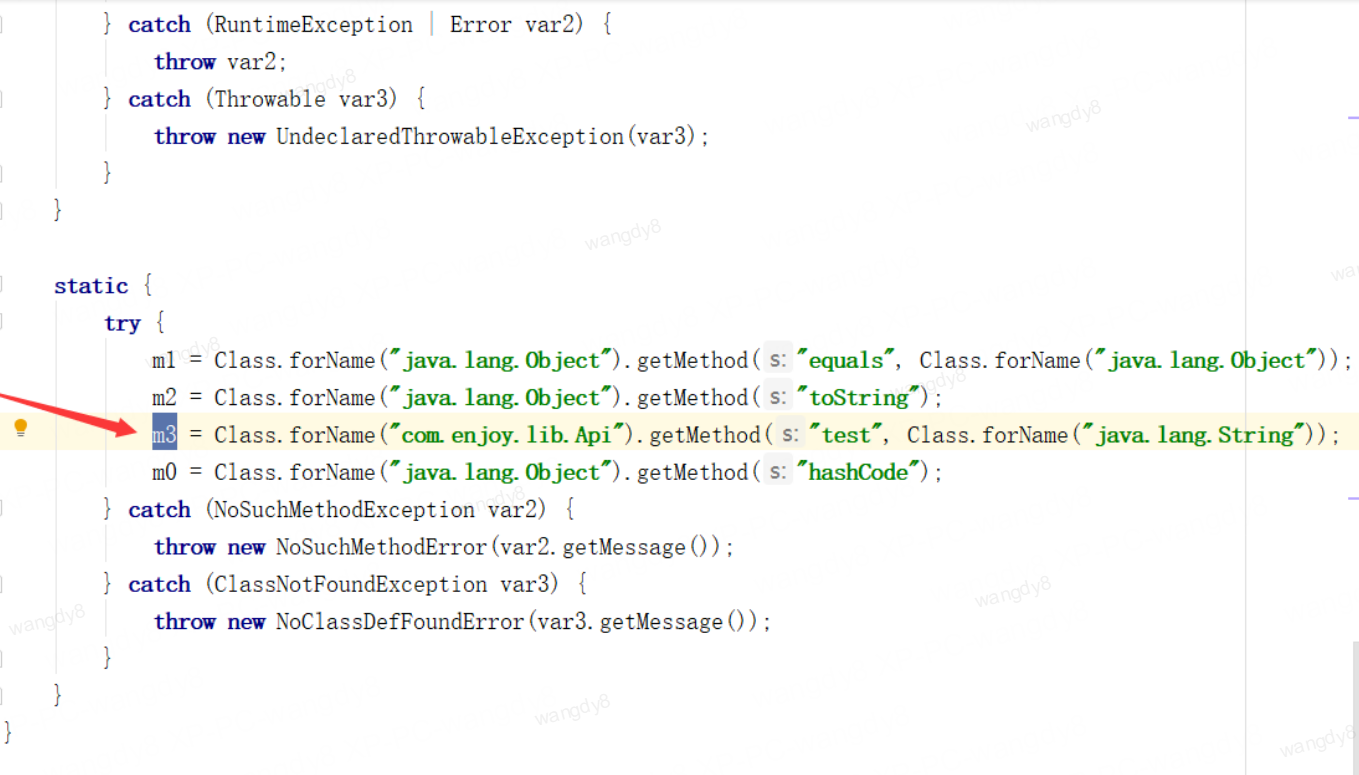
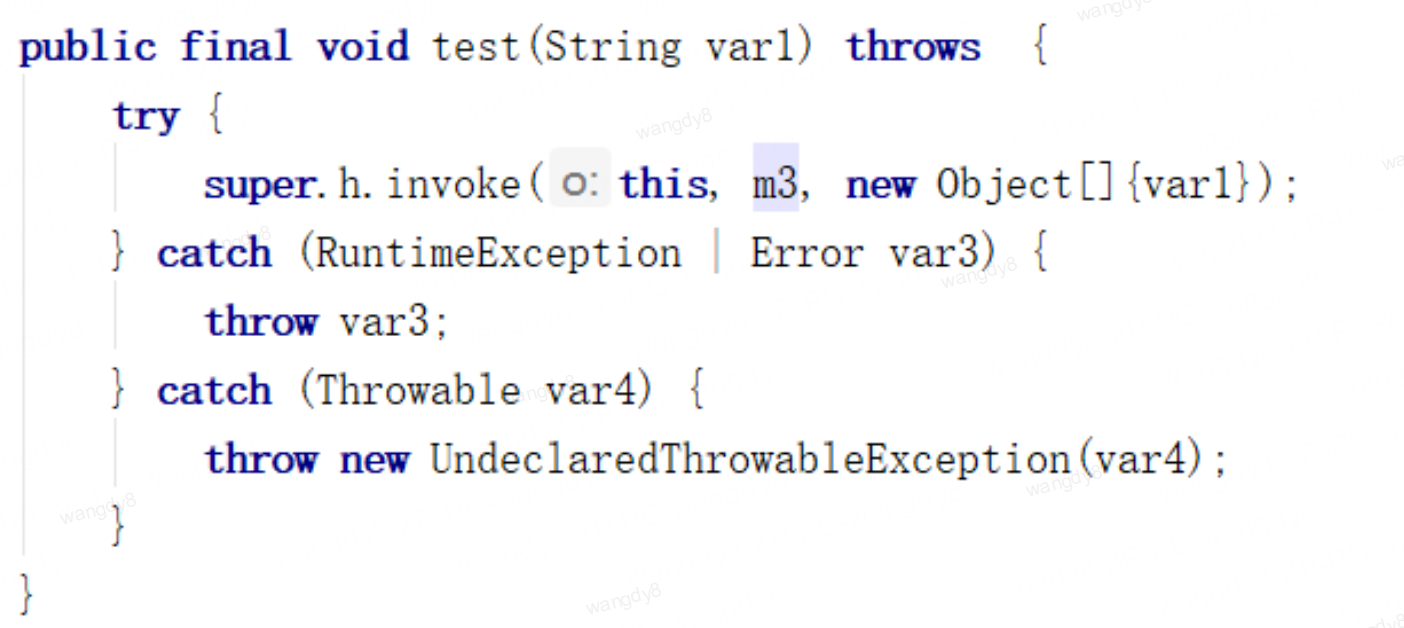
3.2 动态代理
//抽象角色
interface Api {
    void test(String a);
}

//真实角色
class ApiImpl {
    @Override
    public void test(String a) {
        System.out.println("真实实现:" + a);
    }
}

//创建真实角色实例
ApiImpl api = new ApiImpl();
//JDK动态代理:
Proxy.newProxyInstance(getClass().getClassLoader(),new Class[]{Api.class}/*JDK实现只能代理接口*/, new InvocationHandler() {
    @Override
    public Object invoke (Object proxy, Method method, Object[]args) throws Throwable {
        //执行真实对象方法
        return method.invoke(api, args);
    }
});private static void proxy() throws Exception {
String name = Api.class.getName() + "$Proxy0"; // Api为接口类,你的接口类是什么,这个位置就可以替换成什么
//生成代理指定接口的Class数据
byte[] bytes = ProxyGenerator.generateProxyClass(name, new Class[]{Api.class});
FileOutputStream fos = new FileOutputStream("lib/" + name + ".class");
fos.write(bytes);
fos.close();
}


 被折叠的 条评论
为什么被折叠?
被折叠的 条评论
为什么被折叠?
 到【灌水乐园】发言


