


第一、前言
本文主要介绍jquery.validate+jquery.form实现表单验证,然后用Ajax方式异步提交。本文重在介绍前端技术,故省略和数据库交互部分。后端仅提供Controller代码来模拟效果。
第二、场景
用户注册时,录入个人信息后,做表单验证,然后提交。
第三、代码示例
1、新建web Project,命名:Examination1,引入Spring MVC相关jar包。下面仅提供jar包截图,请读者自行下载,若个人无法自行下载,可在文章下留言向本人索要相关jar包。
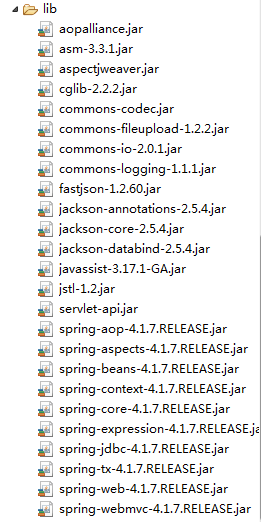
2、引入jquery.validate+jquery.form开发工具包
下载地址:jquery.validate+jquery.form.rar
3、修改web.xml
<?xml version="1.0" encoding="UTF-8"?>
<web-app version="2.5"
	xmlns="http://java.sun.com/xml/ns/javaee"
	xmlns:xsi="http://www.w3.org/2001/XMLSchema-instance"
	xsi:schemaLocation="http://java.sun.com/xml/ns/javaee
	http://java.sun.com/xml/ns/javaee/web-app_2_5.xsd">
  <display-name>Examination1</display-name>
  <!-- Spring 配置文件 -->
  <context-param>
    <param-name>contextConfigLocation</param-name>
    <param-value>classpath:applicationContext.xml</param-value>
  </context-param>
  <listener>
    <listener-class>org.springframework.web.context.ContextLoaderListener</listener-class>
  </listener>
  <!-- Spring MVC 配置文件 -->
  <servlet>
    <servlet-name>Examination1</servlet-name>
    <servlet-class>org.springframework.web.servlet.DispatcherServlet</servlet-class>
    <init-param>
      <param-name>contextConfigLocation</param-name>
      <param-value>classpath:mvc-servlet.xml</param-value>
    </init-param>
    <!-- 自启动 -->
    <load-on-startup>1</load-on-startup>
  </servlet>
  <servlet-mapping>
    <servlet-name>Examination1</servlet-name>
    <url-pattern>/</url-pattern>
  </servlet-mapping>
  <welcome-file-list>
    <welcome-file>index.jsp</welcome-file>
  </welcome-file-list>
</web-app>
4、新建applicationContext.xml
<?xml version="1.0" encoding="UTF-8"?>
<beans xmlns="http://www.springframework.org/schema/beans"
    xmlns:xsi="http://www.w3.org/2001/XMLSchema-instance"
    xmlns:aop="http://www.springframework.org/schema/aop"
    xmlns:tx="http://www.springframework.org/schema/tx"
    xmlns:context="http://www.springframework.org/schema/context"
    xsi:schemaLocation="
        http://www.springframework.org/schema/beans http://www.springframework.org/schema/beans/spring-beans.xsd
        http://www.springframework.org/schema/aop http://www.springframework.org/schema/aop/spring-aop.xsd
        http://www.springframework.org/schema/tx http://www.springframework.org/schema/tx/spring-tx.xsd
        http://www.springframework.org/schema/context http://www.springframework.org/schema/context/spring-context.xsd">
   <!-- spring容器扫描指定包下的所有类,如果类上有注解  那么根据注解产生相应bean对象已经映射信息 -->
	<context:component-scan base-package="com.exam"/>
</beans>
5、新建mvc-servlet.xml
<?xml version="1.0" encoding="UTF-8"?>
<beans xmlns="http://www.springframework.org/schema/beans"
    xmlns:xsi="http://www.w3.org/2001/XMLSchema-instance"
    xmlns:p="http://www.springframework.org/schema/p"
    xmlns:context="http://www.springframework.org/schema/context"
    xmlns:mvc="http://www.springframework.org/schema/mvc"
    xsi:schemaLocation="
        http://www.springframework.org/schema/beans
        http://www.springframework.org/schema/beans/spring-beans.xsd
        http://www.springframework.org/schema/context
        http://www.springframework.org/schema/context/spring-context.xsd
        http://www.springframework.org/schema/mvc
        http://www.springframework.org/schema/mvc/spring-mvc.xsd">
    <!-- 配置视图渲染器 -->
	<bean id="jspViewResolver" class="org.springframework.web.servlet.view.InternalResourceViewResolver">
	    <property name="viewClass" value="org.springframework.web.servlet.view.JstlView"/>
	    <!-- 渲染后视图的后缀 -->
	    <property name="suffix" value=".jsp"/>
	</bean>
	<!-- spring容器扫描指定包下的所有类,如果类上有注解  那么根据注解产生相应bean对象已经映射信息 -->
	<context:component-scan base-package="com.exam"/>
	<mvc:annotation-driven></mvc:annotation-driven>
	<!-- 静态资源 -->
	<mvc:resources location="/js/" mapping="/js/**"></mvc:resources>
	<mvc:resources location="/script/" mapping="/script/**"></mvc:resources>
	<mvc:resources location="/style/" mapping="/style/**"></mvc:resources>
</beans>
6、新建com.exam.dto.UserDTO
import java.io.Serializable;
/**
 * 用户实体
 * @author shixiangcheng
 * 2020-08-08
 */
public class UserDTO implements Serializable{
	private static final long serialVersionUID = -5905162223331046615L;
	private String loginName;//登录名
	private String name;//姓名
	private String password;//密码
	private String email;//邮箱
	private String phone;//手机号
	public String getLoginName() {
		return loginName;
	}
	public void setLoginName(String loginName) {
		this.loginName = loginName;
	}
	public String getPassword() {
		return password;
	}
	public void setPassword(String password) {
		this.password = password;
	}
	public String getEmail() {
		return email;
	}
	public void setEmail(String email) {
		this.email = email;
	}
	public String getPhone() {
		return phone;
	}
	public void setPhone(String phone) {
		this.phone = phone;
	}
	public String getName() {
		return name;
	}
	public void setName(String name) {
		this.name = name;
	}
}
7、新建com.exam.controller.UserController
import java.net.URLDecoder;
import java.util.HashMap;
import java.util.Map;
import javax.servlet.http.HttpServletRequest;
import javax.servlet.http.HttpServletResponse;
import org.springframework.stereotype.Controller;
import org.springframework.util.StringUtils;
import org.springframework.web.bind.annotation.RequestMapping;
import org.springframework.web.bind.annotation.ResponseBody;
import com.exam.dto.UserDTO;
/**
 * 用户信息管理
 * @author shixiangcheng
 * 2020-08-08
 */
@Controller
@RequestMapping("/user")
public class UserController {
	//增加用户
	@RequestMapping(value="/add")
	@ResponseBody
	public Map<String,Object> add(UserDTO userDTO,HttpServletRequest request,HttpServletResponse response)throws Exception{
		userDTO.setName(URLDecoder.decode(userDTO.getName(),"UTF-8").trim());
		//调用Service方法保存数据
		Map<String,Object> map=new HashMap<String,Object>();
		map.put("status", "success");
		return map;
	}
	//校验用户名是否存在
	@RequestMapping(value="/verifyLoginName")
	@ResponseBody
	public boolean verifyLoginName(HttpServletRequest request,HttpServletResponse response){
		String loginName=request.getParameter("loginName");
		if(StringUtils.isEmpty(loginName)) {
			return false;
		}
		//调用Service方法判断用户名是否存在,此处简写
		if("admin".equals(loginName)) {
			return false;
		}
		return true;
	}
}
8、新建index.jsp
<%@ page contentType="text/html;charset=UTF-8"%>
<%@taglib prefix="c" uri="http://java.sun.com/jsp/jstl/core" %>
<!DOCTYPE HTML PUBLIC "-//W3C//DTD HTML 4.01 Transitional//EN">
<html>
<head>
<title>用户注册</title>
<script type="text/javascript" src="<%=request.getContextPath()%>/script/jquery.js"></script>
<script type="text/javascript" src="<%=request.getContextPath()%>/script/jquery_validate/jquery.metadata.js"></script>
<script type="text/javascript" src="<%=request.getContextPath()%>/script/jquery_validate/jquery.validate.js"></script>
<script type="text/javascript" src="<%=request.getContextPath()%>/script/jquery_validate/jquery.form.js"></script>
<script type="text/javascript">
$(function(){
	//得到校验规则的返回值,确保校验规则都通过后再提交
	var validator=$("#form1").validate({
		rules: {
			loginName:{required:true,minlength:3,maxlength:15,
			remote: {
		        url: '<%=request.getContextPath()%>/user/verifyLoginName',
		        type: 'post',
		        data: {
		           "loginName": function () {return $("#loginName").val()},
		        }
            }
			},
			 name:{required:true},
			 phone:{required:true,number:true},
			 email:{email:true},
			 password:{required:true,minlength:5,maxlength:20},
			 password2:{required:true,minlength:5,maxlength:20,equalTo:"#password"},
	     },
		messages:{
			loginName:{required:"请填写登录名!",minlength:"登录名至少为3个字符",maxlength:"登录名至多为15个字符",remote: "登录名已经存在!"},
			name:{required:"请填写姓名!"},
			phone:{required:"请填写手机号!",number:"手机号必须是数字!"},
			email:{email:"请填写正确的E-mail!"},
			password:{required:"请填写密码!",minlength:"密码长度不能小于5个字符",maxlength:"密码长度不能大于20个字符"},
			password2:{required:"请再次输入密码!",minlength:"密码长度不能小于5个字符",maxlength:"密码长度不能大于20个字符",equalTo:"两次输入的新密码不一致"},
		}
	});
	$("#form1").click(function(){
		//保证校验规则都通过后再提交
		if(validator.form()){
			addUser();
		}
	});
});
//Ajax异步提交保存用户信息
function addUser(){
	var v_loginName=$("#loginName").val();
	var v_name=encodeURI($("#name").val(),"UTF-8");
	var v_phone=$("#phone").val();
	var v_email=$("#email").val();
	var v_password=$("#password").val();
	$.ajax({
		url:'<%=request.getContextPath()%>/user/add',
		data:{loginName:v_loginName,name:v_name,phone:v_phone,email:v_email,password:v_password},
		type:'post',
		async:false,
		dataType:'json',
		success:function(data){
			alert("注册成功!");
		},
		error:function(data,type, err){
			alert("请联系系统管理员!");
		}
	});
	return false;
}
</script>
</head>
<body>
<form id="form1" method="post">
	<table cellpadding="0" cellspacing="0" align="center">
		<caption>用户注册</caption>
 		<tr>
 		  <td>登录名<font color="red">*</font></td>
          <td><input type="text" name="loginName" id="loginName"/>(登录名要唯一)</td>
        </tr>
         <tr>
           <td>姓名<font color="red">*</font></td>
           <td><input type="text" name="name" id="name"/></td>
         </tr>
         <tr>
           <td>手机号<font color="red">*</font></td>
           <td><input type="text" name="phone" id="phone"/></td>
         </tr>
         <tr>
           <td>E-mail</td>
           <td><input type="text" name="email" id="email"/></td>
         </tr>
         <tr>
		   <td>密码<font color="red">*</font></td>
		   <td><input type="password" name="password" id="password"/></td>
		 </tr>
		 <tr>
		   <td>再次输入密码<font color="red">*</font></td>
		   <td><input type="password" name="password2" id="password2"/></td>
		 </tr>
		 <tr>
		   <td colspan="2" align="center"><input type="button" name="button"value="提交" /></td>
		 </tr>
</table>
</form>
</body>
</html>
9、运行
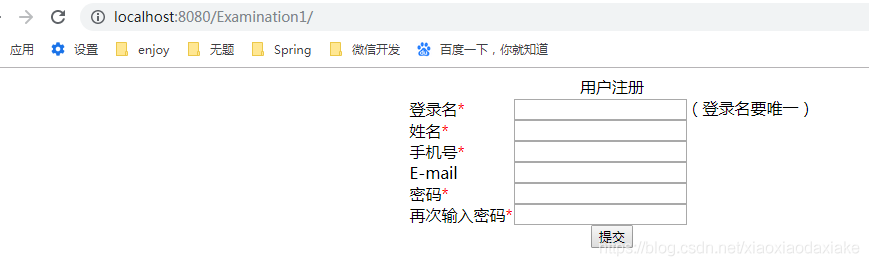
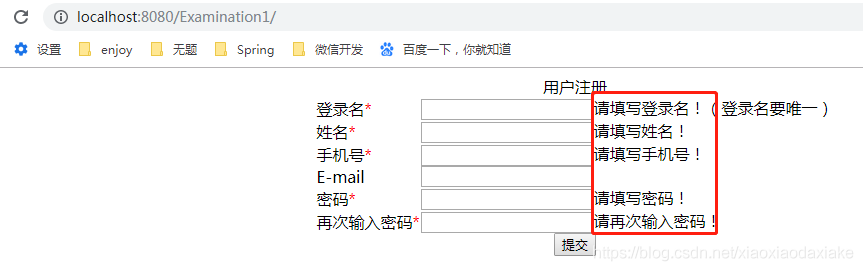
直接点提交,将会出发校验
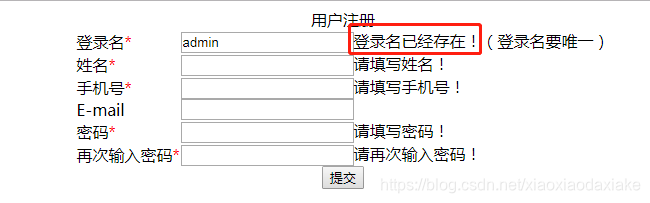
对登录名有唯一校验(异步)
录完信息后提交

欢迎大家积极留言交流学习心得,点赞的人最美丽,谢谢!


 1596
1596


 被折叠的 条评论
为什么被折叠?
被折叠的 条评论
为什么被折叠?
 到【灌水乐园】发言


