


Andsible
一.简介
Ansible是一种集成IT系统的配置管理、应用部署、执行特定任务的开源平台,是由Cobbler和Func的作者于2012年创立的AnsibleWorks公司名下的项目,于2015年被RedHat收购。
Ansible基于Python语言实现,由Paramiko和PyYAML两个关键模块构建。
具有如下特点:
(1) 部署简单,只需在主控端部署Ansible环境,被控端无需做任何操作;
(2) 默认使用SSH协议对设备进行管理;
(3) 主从集中化管理;
(4) 配置简单、功能强大、扩展性强;
(5) 支持API及自定义模块,可通过Python轻松扩展;
(6) 通过Playbooks来定制强大的配置、状态管理
(7) 对云计算平台、大数据都有很好的支持;
Ansible的架构图:

ansible core : ansible 自身核心模块
host inventory: 主机库,定义可管控的主机列表
connection plugins: 连接插件,一般默认基于 ssh 协议连接
modules:core modules ( 自带模块 ) 、 custom modules ( 自定义模块 )
playbooks :剧本,按照所设定编排的顺序执行完成安排任务
Ansible与Saltstack和puppet的最大区别是Ansible无需在被控端部署任何客户端代理,默认直接通过SSH通道进行远程命令的执行或下发配置;相同点都是具备功能强大、灵活的的系统管理、状态配置,都使用YAML格式来描述配置,都具有丰富的模板及API。
Ansible提供了一个在线的Playbook分享平台,地址是:https://galaxy.ansible.com/,该平台汇聚了各类常用功能的角色,找到适合自己的Role(角色)后,只需要运行“ansible-galaxy install 作者id.角色包名称”就可以安装到本地。
如安装一个角色:
在这里可以执行命令
[root@lewis63 ~]# ansible-galaxy install bennojoy.mysql
- downloading role 'mysql', owned by bennojoy
- downloading role from https://github.com/bennojoy/mysql/archive/master.tar.gz
- extracting bennojoy.mysql to /etc/ansible/roles/bennojoy.mysql
- bennojoy.mysql was installed successfully
[root@lewis63 ~]# ls /etc/ansible/roles/bennojoy.mysql/
defaults/ handlers/ meta/ README.md tasks/ templates/ vars/
二.Ansible安装
安装Ansible,Python版本为2.6以上
2.1 yum安装
先安装yum的epel源
yum -y install epel-release
yum makecache
yum list | grep ansible
ansible.noarch 2.1.1.0-1.el6 epel
ansible-inventory-grapher.noarch 1.0.1-2.el6 epel
ansible-lint.noarch 2.0.1-1.el6 epel
ansible1.9.noarch 1.9.6-2.el6.1 epel
yum install -y ansible1.9.noarch
[root@lewis63 ~]# ls /etc/ansible/
ansible.cfg hosts roles
2.2 源码安装
从github下载好源码https://github.com/ansible/ansible/tree/v2.7.0上传至服务器
[root@lewis63 ~]# unzip ansible-2.7.0.zip
[root@lewis63 ~]# cd ansible-2.7.0
[root@lewis63 ansible-2.7.0]# python setup.py install

三.定义主机清单
源码安装需要新建目录/usr/local/ansible来存放ansible相应文件,yum安装位于/etc/ansible
[root@lewis63 ~]# mkdir /usr/local/ansible/
定义主机清单,新建hosts
[root@lewis63 ~]# cd /usr/local/ansible/
[root@lewis63 ansible]# vim hosts
[webservers] #定义主机组名
192.168.1.64 ansible_ssh_port=22 ansible_ssh_user=root ansible_ssh_pass=123456
192.168.1.65 #主机IP或主机名
ansible基于ssh连接inventory中指定的远程主机时,将以此处的参数指定的属性进行
ansible_ssh_port:指定 ssh 端口
ansible_ssh_user:指定 ssh 用户
ansible_ssh_pass:指定 ssh 用户登录是认证密码,明文密码不安全
ansible_sudo_pass:指明 sudo 时候的密码
四.测试主机的连通性
[root@lewis63 ansible]# ansible -i hosts webservers -m ping
192.168.1.64 | SUCCESS => {
"changed": false,
"ping": "pong"
}
192.168.1.65 | SUCCESS => {
"changed": false,
"ping": "pong"
}
-i 指定hosts文件位置,yum安装默认为/etc/ansible/hosts,不需要指定
一般来说,使用明文密码不安全,所以增加主机无密码访问
生成密钥对
[root@lewis63 ansible]# ssh-keygen -t rsa
拷贝密钥到lewis64和lewis65
[root@lewis63 ansible]# ssh-copy-id 192.168.1.64
[root@lewis63 ansible]# ssh-copy-id 192.168.1.65
五.Anisble命令
ansible [–i 主机文件] [-f 批次] [组名] [–m 模块名称] [–a 模块参数]
模块查询命令
ansible-doc -l 列出所有的模块列表
ansible-doc -s 查看指定模块的参数
六.自动化安装httpd软件
6.1 安装httpd软件
先查看lewis64和lewis65是否安装httpd
[root@lewis64 ~]# yum list installed | grep httpd
[root@lewis65 ~]# yum list installed | grep httpd
开始自动化安装httpd
[root@lewis63 ansible]# ansible -i hosts webservers -m yum -a "name=httpd state=present"
….
192.168.1.65 | CHANGED => {
"ansible_facts": {
"pkg_mgr": "yum"
},
"changed": true,
"msg": "",
"rc": 0,
"results": [
"Loaded plugins: fastestmirror\nLoading mirror speeds from cached hostfile\n * base: mirrors.aliyun.com\n * extras: mirrors.aliyun.com\n * updates: mirrors.aliyun.com\nResolving Dependencies\n--> Running transaction check\n---> Package httpd.x86_64 0:2.4.6-80.el7.centos.1 will be installed\n--> Finished Dependency Resolution\n\nDependencies Resolved\n\n================================================================================\n Package Arch Version Repository Size\n================================================================================\nInstalling:\n httpd x86_64 2.4.6-80.el7.centos.1 updates 2.7 M\n\nTransaction Summary\n================================================================================\nInstall 1 Package\n\nTotal download size: 2.7 M\nInstalled size: 9.4 M\nDownloading packages:\nRunning transaction check\nRunning transaction test\nTransaction test succeeded\nRunning transaction\n Installing : httpd-2.4.6-80.el7.centos.1.x86_64 1/1 \n Verifying : httpd-2.4.6-80.el7.centos.1.x86_64 1/1 \n\nInstalled:\n httpd.x86_64 0:2.4.6-80.el7.centos.1 \n\nComplete!\n"
]
}
在lewis64 lewis65查看是否已安装httpd
[root@lewis64 ~]# yum list installed | grep httpd
httpd.x86_64 2.4.6-80.el7.centos.1 @updates
httpd-tools.x86_64 2.4.6-80.el7.centos.1 @updates
[root@lewis65 ~]# yum list installed | grep httpd
httpd.x86_64 2.4.6-80.el7.centos.1 @updates
httpd-tools.x86_64 2.4.6-80.el7.centos.1 @updates
自动化安装成功!
查看模块的帮助
[root@lewis63 ansible]# ansible-doc -s yum
……
state: # Whether to install (`present' or `installed', `latest'), or remove (`absent' or `removed') a package. `present' and `installed' will simply ensure that a
desired package is installed. `latest' will update the specified package if it's not of the latest available version. `absent'
and `removed' will remove the specified package.
是否安装(“现在”或“已安装”,“最新”),或删除(“缺席”或“删除”)包。
present和installed将确保安装了所需的包。 如果不是最新版本,`latest'将更新指定的包。
absent 和removed将删除指定的包。
6.2启动httpd服务
[root@lewis63 ansible]# ansible webservers -m service -a "name=httpd state=started"
说明:
eloaded, restarted, started, stopped
enabled=yes #开机启动服务
查看service模块帮助
ansible-doc service
[root@lewis64 ~]# netstat -anput | grep 80
tcp6 0 0 :::80 :::* LISTEN 1951/httpd
[root@lewis65 ~]# netstat -anput | grep 80
tcp6 0 0 :::80 :::* LISTEN 1786/httpd
七.常用模块
7.1 ping模块
[root@lewis63 ansible]# ansible -i hosts webservers -m ping
192.168.1.64 | SUCCESS => {
"changed": false,
"ping": "pong"
}
192.168.1.65 | SUCCESS => {
"changed": false,
"ping": "pong"
}
7.2 command模块
command:作为ansible的默认模块,可以运行远程权限范围内的所有shell命令,command不支持特殊字符
script:是在远程主机上执行主控端存储的shell脚本,相当于scp+shell组合
shell:是执行远程主机上的shell脚本,shell模块可以特殊字符
例:查看远程机器内存
[root@lewis63 ansible]# ansible -i hosts webservers -m command -a "free -m"
192.168.1.64 | CHANGED | rc=0 >>
total used free shared buff/cache available
Mem: 636 103 330 4 202 412
Swap: 1999 0 1999
192.168.1.65 | CHANGED | rc=0 >>
total used free shared buff/cache available
Mem: 636 102 414 4 120 415
Swap: 1999 0 1999
7.3 copy模块
copy:实现主控端向目标主机拷贝文件,类似scp功能
例:复制本地文件到远程主机并对原文件进行备份
[root@lewis63 ansible]# ansible -i hosts webservers -m copy -a "src=./hosts dest=/tmp/ owner=root group=root mode=0755 backup=yes"
在lewis65查看
[root@lewis65 ~]# ll /tmp/hosts
-rwxr-xr-x 1 root root 39 Oct 13 19:55 /tmp/hosts
例:向远程主机的文件中写内容,会把原内容覆盖掉
[root@lewis63 ansible]# ansible -i hosts webservers -m copy -a "content='覆盖原内容\n' dest=/tmp/a.txt"
[root@lewis65 ~]# cat /tmp/a.txt
覆盖原内容
7.4 file模块
例:file:设置文件属性
[root@lewis63 ansible]# ansible -i hosts webservers -m file -a "path=/tmp/hosts mode=0644"

在lewis65验证
[root@lewis65 ~]# ll /tmp/hosts
-rw-r--r-- 1 root root 39 Oct 13 19:55 /tmp/hosts
例:新建一个文件
[root@lewis63 ansible]# ansible -i hosts webservers -m file -a 'path=/tmp/test.txt state=touch'
验证
[root@lewis65 ~]# ls /tmp/test.txt
/tmp/test.txt
7.5 stat模块
获取远程文件信息:stat
[root@lewis63 ansible]# ansible -i hosts webservers -m stat -a "path=/tmp/hosts"
192.168.1.64 | SUCCESS => {
"changed": false,
"stat": {
"atime": 1539431710.6070518,
"attr_flags": "",
"attributes": [],
"block_size": 4096,
"blocks": 8,
"charset": "us-ascii",
"checksum": "4c9d339fda9a331011fd8ac1f35af8b6c1a0ced4",
"ctime": 1539431936.099064,
"dev": 64768,
"device_type": 0,
"executable": false,
"exists": true,
"gid": 0,
"gr_name": "root",
"inode": 16853167,
"isblk": false,
"ischr": false,
"isdir": false,
"isfifo": false,
"isgid": false,
"islnk": false,
"isreg": true,
"issock": false,
"isuid": false,
"mimetype": "text/plain",
"mode": "0644",
"mtime": 1539431710.116052,
"nlink": 1,
"path": "/tmp/hosts",
"pw_name": "root",
"readable": true,
"rgrp": true,
"roth": true,
"rusr": true,
"size": 39,
"uid": 0,
"version": "18446744072662681060",
"wgrp": false,
"woth": false,
"writeable": true,
"wusr": true,
"xgrp": false,
"xoth": false,
"xusr": false
}
}
7.6 get_url模块
远程主机下载指定url到本地:get_url
[root@lewis63 ansible]# ansible -i hosts webservers -m get_url -a "url=http://mirrors.aliyun.com/repo/Centos-7.repo dest=/tmp mode=0644 force=yes"
lewis65验证
[root@lewis65 ~]# ls /tmp/Centos-7.repo
/tmp/Centos-7.repo
7.7 yum模块
软件包管理:yum
[root@lewis63 ansible]# ansible -i hosts webservers -m yum -a "name=tree state=latest"
验证:
[root@lewis65 ~]# tree -L 1 /tmp/
/tmp/
├── Centos-7.repo
├── hosts
├── ks-script-Dih3tH
├── systemd-private-dbc2873184cc43868b4f787a7c94c757-httpd.service-QSpTY2
├── systemd-private-dbc2873184cc43868b4f787a7c94c757-vgauthd.service-DLK8K7
├── systemd-private-dbc2873184cc43868b4f787a7c94c757-vmtoolsd.service-8bfhAL
├── tmpbXfePS
└── yum.log
7.8 cron模块
远程主机crontab配置:cron
[root@lewis65 ~]# cat hello.sh
#!/bin/bash
echo hello,world
[root@lewis65 ~]# chmod +x hello.sh
[root@lewis63 ansible]# ansible -i hosts webservers -m cron -a "name='say hello' minute=*/30 job='/root/hello.sh'"
验证:
[root@lewis65 ~]# crontab -l
#Ansible: say hello
*/30 * * * * /root/hello.sh
7.9 mount模块
远程主机自动挂载:mount
[root@lewis63 ansible]# ansible -i hosts webservers -m mount -a "name=/mnt src=/dev/sr0 fstype=iso9660 opts=rw state=present"
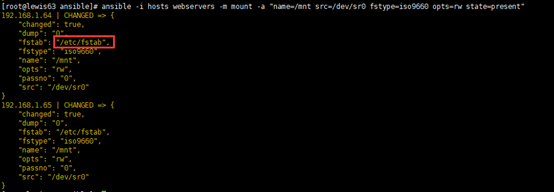
在远程主机/etc/fstab 验证
[root@lewis64 ~]# cat /etc/fstab
#
# /etc/fstab
# Created by anaconda on Sat Oct 13 15:27:22 2018
#
# Accessible filesystems, by reference, are maintained under '/dev/disk'
# See man pages fstab(5), findfs(8), mount(8) and/or blkid(8) for more info
#
/dev/mapper/centos-root / xfs defaults 0 0
UUID=de46ec2a-dd5c-43ed-9908-61800cd0ac3d /boot xfs defaults 0 0
/dev/mapper/centos-swap swap swap defaults 0 0
/dev/sr0 /mnt iso9660 rw 0 0
7.10 service模块
远程主机系统服务管理:service
[root@lewis63 ansible]# ansible -i hosts webservers -m service -a "name=httpd state=restarted"
lewis64验证:
[root@lewis64 ~]# ps aux | grep httpd
root 2282 0.0 0.7 226220 5136 ? Ss 20:27 0:00 /usr/sbin/httpd -DFOREGROUND
apache 2283 0.0 0.4 226220 3012 ? S 20:27 0:00 /usr/sbin/httpd -DFOREGROUND
7.11 user模块
远程主机用户管理:user
例:新增用户
[root@lewis63 ansible]# ansible -i hosts webservers -m user -a "name=test state=present"
[root@lewis64 ~]# id test
id: test: no such user
You have mail in /var/spool/mail/root
[root@lewis64 ~]# id test
uid=1001(test) gid=1001(test) groups=1001(test)
7.12 script模块
在远程主机上执行 ansible 管理主机上的脚本,也就是说,脚本一直存在于 ansible 管理主机本地,不需要手动拷贝到远程主机后再执行。
例:远程主机执行管理主机上的脚本
[root@lewis63 ~]# vim script.sh
#!/bin/bash
# test ansible script moudle
mkdir -p /opt/test/test.txt
[root@lewis63 ansible]# ansible -i hosts webservers -m script -a 'chdir=/root /root/script.sh'
验证:
[root@lewis64 ~]# tree /opt/
/opt/
└── test
└── test.txt
八.Playbook剧本
"ansible all -i /app/ansible-playbook/hosts -m ping” 这种执行方式被称为ad-hoc模式,即命令行或交互模式
ansbile-playbook是一系统ansible命令的集合,一种目录树结构的编排方式,其利用yaml 语言编写,运行过程,ansbile-playbook命令根据自上而下的顺序依次执行。
8.1 常见目录结构
[root@lewis63 ~]# tree /usr/local/ansible/
/usr/local/ansible/
├── ansible.cfg #配置文件
├── hosts #主机清单
├── nginx.retry
├── nginx.yml
└── roles
└── nginx #在nginx.yml主文件中指定的role
├── defaults #存放默认的变量, 可以通过jinja模板调用
│ └── main.yml
├── files #存放文件、软件包、脚本等内容,可以被copy、unarchive、script等模块调用
│ └── nginx-1.12.2.tar.gz
├── handlers #存放依赖任务,可以被notify关键字调用
│ └── main.yml
├── tasks #存放主任务,ansible会首先进行调用
│ ├── install.yml
│ └── main.yml
└── templates #存放模板文件,模板中可以使用jinja模板调用defaults中定义的变量,被templates模块调用
└── nginx.conf.j2
1.roles下子目录里必须要有main.yml文件,ansible会自动查询并执行。
2.roles目录和nginx.yml放在同一级目录中,或者在ansible.cfg中配置roles的查询路径。
8.2 安装nginx
nginx的源码安装过程包括创建用户/组、下载安装包、下载依赖包、编译安装、修改配置文件、测试、启动这些环节
defaults文件夹
[root@lewis63 nginx]# cat defaults/main.yml #定义默认变量
user: nginx
group: nginx
tarball_name: nginx-1.12.2.tar.gz
nginx_configuration: nginx.conf.j2
nginx_dir: nginx-1.12.2
nginx_port: 8080
files文件夹
nginx源码包放在files目录
templates文件夹
nginx.conf.j2 引用nginx配置文件的内容,修改端口使用{{ nginx_port }}会替换default默认变量替换到远程主机文件
handlers文件夹
[root@lewis63 nginx]# cat handlers/main.yml
---
- name: start nginx #notify下面指定的内容在name这里定义
command: /usr/local/{{ nginx_dir }}/sbin/nginx
tasks文件夹
[root@lewis63 nginx]# tree tasks/
tasks/
├── install.yml
└── main.yml
[root@lewis63 nginx]# cat tasks/main.yml
---
- import_tasks: install.yml
tasks/main.yml中加载install.yml
[root@lewis63 nginx]# cat handlers/main.yml
---
- name: start nginx #notify下面指定的内容在name这里定义
command: /usr/local/{{ nginx_dir }}/sbin/nginx
[root@lewis63 nginx]#
[root@lewis63 nginx]# tree tasks/
tasks/
├── install.yml
└── main.yml
0 directories, 2 files
[root@lewis63 nginx]# cat tasks/main.yml
---
- import_tasks: install.yml
[root@lewis63 nginx]# cat tasks/install.yml
---
- name: groupadd nginx   #创建组,存在则忽略,group模块   - name:说明
  group:
    name: "{{ group }}"
    gid: 888

- name: useradd nginx   #创建用户,存在则忽略,user模块
  user:
    name: "{{ user }}"
    group: "{{ group }}"
    uid: 888
    createhome: no
    shell: /sbin/nologin

- name: install gcc gcc-c++ #安装依赖,package模块
  package:
    name: gcc,gcc-c++
    state: latest
- name: install zlib-devel  #安装依赖,package模块
  package:
    name: zlib-devel
    state: latest
- name: install pcre-devel  #安装依赖,package模块
  package:
    name: pcre-devel
    state: latest

- name: install openssl-devel  #安装依赖,package模块
  package:
    name: openssl-devel
    state: latest

- name: copy and extract nginx tarball  #解压压缩包,unarchive模块
  unarchive:
    src: "{{ tarball_name }}"
    dest: /usr/local/src

- name: ./configure         #检查环境,command模块
  command: ./configure --user={{ user }} --group={{ group }} --prefix=/usr/local/{{ nginx_dir }} --with-http_dav_module --with-http_stub_status_module --with-http_addition_module --with-http_sub_module --with-http_flv_module --with-http_mp4_module --with-pcre
  args:
    chdir: /usr/local/src/{{ nginx_dir }}

- name: make    #编译,command模块
  command: make
  args:
    chdir: /usr/local/src/{{ nginx_dir }}

- name: make install    #安装,command模块
  command: make install
  args:
    chdir: /usr/local/src/{{ nginx_dir }}

- name: modify nginx configuration   #修改配置文件,template模块
  template:
    src: "{{ nginx_configuration }}"
    dest: /usr/local/{{ nginx_dir }}/conf/nginx.conf
      #tags: conf   #-------详见:ansible之tags使用

- name: test nginx   #测试nginx配置,command模块
  command: /usr/local/{{ nginx_dir }}/sbin/nginx -t
  notify:              #当command模块的命令执行完且不出错,然后调用handlers目录下的main.yml中的start nginx
- start nginx
执行playbook
nginx.yml主文件
[root@lewis63 ansible]# cat nginx.yml
---
- name: deploy nginx
hosts: all
remote_user: root
roles:
- { role: nginx, nginx_port: 8080 }
#hosts表示选择哪些主机进行部署
#remote_user表示选择哪个用户进行部署
#roles表示选择部署什么内容
进入ansible目录下,执行 ansible-playbook -i hosts nginx.yml 即可开始部署
-i 表示自行指定inventory文件
[root@lewis63 ansible]# ansible-playbook -i hosts nginx.yml
测试:
[root@lewis64 ~]# netstat -anput | grep 8080
tcp 0 0 0.0.0.0:8080 0.0.0.0:* LISTEN 10524/nginx: master
tcp 0 0 192.168.1.64:8080 192.168.1.11:62172 ESTABLISHED 10525/nginx: worker
tcp 0 0 192.168.1.64:8080 192.168.1.11:62171 ESTABLISHED 10525/nginx: worker


 1万+
1万+


 被折叠的 条评论
为什么被折叠?
被折叠的 条评论
为什么被折叠?
 到【灌水乐园】发言


