


文章目录
文章目录
1、案例四:实时监控目录下的多个追加文件(flume1.7.0才开始有)
1)、需求
使用Flume监听整个目录的实时追加文件,并上传至HDFS
2)、需求分析
![[外链图片转存失败,源站可能有防盗链机制,建议将图片保存下来直接上传(img-5zCBdkTp-1611758568625)(C:\Users\xiaoyoupei\AppData\Roaming\Typora\typora-user-images\image-20210124233518435.png)]](https://img-blog.csdnimg.cn/2021012722432590.png?x-oss-process=image/watermark,type_ZmFuZ3poZW5naGVpdGk,shadow_10,text_aHR0cHM6Ly9ibG9nLmNzZG4ubmV0L3hpYW95b3VwZWk=,size_16,color_FFFFFF,t_70)
3)、实现步骤
①、创建Flume Agent配置文件netcatsource_loggersink.conf
a1.sources = r1
a1.channels = c1
a1.sinks = k1

a1.sources.r1.type=TAILDIR
#该文件中记录了source读取到的内容的位置
#注意:一旦该文件丢失那么source后从该文件的开始位置重新读
a1.sources.r1.positionFile = /usr/local/soft/flume-1.6.0/taildir_position.json
a1.sources.r1.filegroups = f1 f2
a1.sources.r1.filegroups.f1 = /usr/local/soft/flume-1.6.0/demo1/123.log
a1.sources.r1.filegroups.f2 = /usr/local/soft/flume-1.6.0/demo1/456.log

#设置channel的类型和配置
a1.channels.c1.type = memory
a1.channels.c1.capacity = 1000

#设置sink的类型和配置
a1.sinks.k1.type = logger

a1.sources.r1.channels = c1
a1.sinks.k1.channel = c1
②、运行
flume-ng agent -n a1 -c conf/ -f datas/taildirsource_loggersink.conf -Dflume.root.logger=INFO,console
③、查看结果
taildir_position.json文件记录了source读取到的内容的位置,因此就算是a此gent挂了,往文件中追加数据,在agent重启后,还是会跟着读而不会从头读;
但是一旦taildir_position.json文件丢失那么source后从该文件的开始位置重新读。
补充:为什么不用案例二的exec?
因为如果agent挂了后,再次启动,exec会将文件里面的内容重新读一遍,而本案例中的Taildir Source会继续接着读不会去重复读之前读过的数据。
2、Flume事务
![[外链图片转存失败,源站可能有防盗链机制,建议将图片保存下来直接上传(img-XGsJ96hM-1611758568631)(C:\Users\xiaoyoupei\AppData\Roaming\Typora\typora-user-images\image-20210125214751547.png)]](https://img-blog.csdnimg.cn/20210127224349847.png?x-oss-process=image/watermark,type_ZmFuZ3poZW5naGVpdGk,shadow_10,text_aHR0cHM6Ly9ibG9nLmNzZG4ubmV0L3hpYW95b3VwZWk=,size_16,color_FFFFFF,t_70)
两个回滚:
①当putList去往Channel里传入数据的时候,发现channel内存不足,这个时候会回滚数据,putlist清空并抛出异常给source,请求source重发;
②当takelist往sink发送数据的过程中如果出现了异常takelist缓冲区的内容将回滚到channel内存,重新发送。
3、Flume Agent内部原理
![[外链图片转存失败,源站可能有防盗链机制,建议将图片保存下来直接上传(img-CQj1eEFX-1611758568632)(C:/Users/xiaoyoupei/AppData/Roaming/Typora/typora-user-images/image-20210125222827528.png)]](https://img-blog.csdnimg.cn/20210127224410461.png?x-oss-process=image/watermark,type_ZmFuZ3poZW5naGVpdGk,shadow_10,text_aHR0cHM6Ly9ibG9nLmNzZG4ubmV0L3hpYW95b3VwZWk=,size_16,color_FFFFFF,t_70)
1)、ChannelSelector
ChannelSelector的作用就是选出Event将要被发往哪个Channel。其共有两种类型,分别是Replicating(复制)和Multiplexing(多路复用)。ReplicatingSelector会将同一个Event发往所有的Channel,Multiplexing会根据相应的原则,将不同的Event发往不同的Channel。
2)、SinkProcessor
SinkProcessor共有三种类型,分别是DefaultSinkProcessor、LoadBalancingSinkProcessor和FailoverSinkProcessor
DefaultSinkProcessor对应的是单个的Sink,LoadBalancingSinkProcessor和FailoverSinkProcessor对应的是Sink Group,LoadBalancingSinkProcessor可以实现负载均衡的功能,FailoverSinkProcessor可以错误恢复的功能。
4、Flume拓扑结构
1)、简单串联
![[外链图片转存失败,源站可能有防盗链机制,建议将图片保存下来直接上传(img-mSGK8lLX-1611758568633)(C:/Users/xiaoyoupei/AppData/Roaming/Typora/typora-user-images/image-20210125225501693.png)]](https://img-blog.csdnimg.cn/20210127224426850.png?x-oss-process=image/watermark,type_ZmFuZ3poZW5naGVpdGk,shadow_10,text_aHR0cHM6Ly9ibG9nLmNzZG4ubmV0L3hpYW95b3VwZWk=,size_16,color_FFFFFF,t_70)
这种模式是将多个flume顺序连接起来了,从最初的source开始到最终sink传送的目的存储系统。此模式不建议桥接过多的flume数量, flume数量过多不仅会影响传输速率,而且一旦传输过程中某个节点flume宕机,会影响整个传输系统。
案例:
①、在test创建Flume Agent配置文件chuanlian.conf
#agent1(test)  netcatsource --> memorychannel --> arvosink
a1.sources = r1
a1.channels = c1
a1.sinks = k1

a1.sources.r1.type = netcat
a1.sources.r1.bind = test
a1.sources.r1.port = 22222

a1.channels.c1.type = memory
a1.channels.c1.capacity = 1000


a1.sinks.k1.type = avro
#hostname是将数据写到的那台机器
a1.sinks.k1.hostname = test1
a1.sinks.k1.port = 33333


a1.sources.r1.channels = c1
a1.sinks.k1.channel = c1
②、在test1创建Flume Agent配置文件chuanlian.conf
#agent2(test1) avrosource ---> memorychannel ----> loggersink
a1.sources = r1
a1.channels = c1
a1.sinks = k1

a1.sources.r1.type = avro
a1.sources.r1.bind = test1
a1.sources.r1.port = 33333

a1.channels.c1.type = memory
a1.channels.c1.capacity = 1000

a1.sinks.k1.type = logger

a1.sources.r1.channels = c1
a1.sinks.k1.channel = c1
③、先启动test1监听再启动test监听,再向test端口发送消息
//test1
flume-ng agent -n a1 -c conf/ -f datas2/chuanlian.conf -Dflume.root.logger=INFO,console

//test
flume-ng agent -n a1 -c conf/ -f datas2/chuanlian.conf -Dflume.root.logger=INFO,console

//向test22222端口发消息
nc test 22222
④、查看结果
![[外链图片转存失败,源站可能有防盗链机制,建议将图片保存下来直接上传(img-pPecmkZ8-1611758568634)(C:/Users/xiaoyoupei/AppData/Roaming/Typora/typora-user-images/image-20210127160028150.png)]](https://img-blog.csdnimg.cn/20210127224444399.png)
![[外链图片转存失败,源站可能有防盗链机制,建议将图片保存下来直接上传(img-5xPxRRv2-1611758568635)(C:/Users/xiaoyoupei/AppData/Roaming/Typora/typora-user-images/image-20210127160102544.png)]](https://img-blog.csdnimg.cn/20210127224500832.png?x-oss-process=image/watermark,type_ZmFuZ3poZW5naGVpdGk,shadow_10,text_aHR0cHM6Ly9ibG9nLmNzZG4ubmV0L3hpYW95b3VwZWk=,size_16,color_FFFFFF,t_70)
![[外链图片转存失败,源站可能有防盗链机制,建议将图片保存下来直接上传(img-ogJ1ilen-1611758568635)(C:/Users/xiaoyoupei/AppData/Roaming/Typora/typora-user-images/image-20210127160117992.png)]](https://img-blog.csdnimg.cn/20210127224514304.png?x-oss-process=image/watermark,type_ZmFuZ3poZW5naGVpdGk,shadow_10,text_aHR0cHM6Ly9ibG9nLmNzZG4ubmV0L3hpYW95b3VwZWk=,size_16,color_FFFFFF,t_70)
2)、复制和多路复用
![[外链图片转存失败,源站可能有防盗链机制,建议将图片保存下来直接上传(img-GtnM74ku-1611758568636)(C:/Users/xiaoyoupei/AppData/Roaming/Typora/typora-user-images/image-20210125225559595.png)]](https://img-blog.csdnimg.cn/202101272245298.png?x-oss-process=image/watermark,type_ZmFuZ3poZW5naGVpdGk,shadow_10,text_aHR0cHM6Ly9ibG9nLmNzZG4ubmV0L3hpYW95b3VwZWk=,size_16,color_FFFFFF,t_70)
Flume支持将事件流向一个或者多个目的地。这种模式可以将相同数据复制到多个channel中,或者将不同数据分发到不同的channel中,sink可以选择传送到不同的目的地。
3)、负载均衡和故障转移
![[外链图片转存失败,源站可能有防盗链机制,建议将图片保存下来直接上传(img-qwikxk6c-1611758568636)(C:/Users/xiaoyoupei/AppData/Roaming/Typora/typora-user-images/image-20210125225732874.png)]](https://img-blog.csdnimg.cn/20210127224543992.png?x-oss-process=image/watermark,type_ZmFuZ3poZW5naGVpdGk,shadow_10,text_aHR0cHM6Ly9ibG9nLmNzZG4ubmV0L3hpYW95b3VwZWk=,size_16,color_FFFFFF,t_70)
Flume支持使用将多个sink逻辑上分到一个sink组,sink组配合不同的SinkProcessor可以实现负载均衡和错误恢复的功能。
5、拦截器(interceptor)
案例:
①、创建Flume Agent配置文件netcatsource_interceptors_loggersource.conf
a1.sources = r1
a1.channels = c1
a1.sinks = k1

a1.sources.r1.type = netcat
a1.sources.r1.bind = test
a1.sources.r1.port = 44444
#设置一个拦截器(用来向headers中添加时间戳)
a1.sources.r1.interceptors = i1
a1.sources.r1.interceptors.i1.type = timestamp

a1.channels.c1.type = memory
a1.channels.c1.capacity = 1000


a1.sinks.k1.type = logger


a1.sources.r1.channels = c1
a1.sinks.k1.channel = c1
②、启动该agent监听端口
flume-ng agent -n a1 -c conf/ -f datas/netcatsource_interceptors_loggersource.conf -Dflume.root.logger=INFO,console
③、查看结果
![[外链图片转存失败,源站可能有防盗链机制,建议将图片保存下来直接上传(img-0hPDTkX4-1611758568637)(C:/Users/xiaoyoupei/AppData/Roaming/Typora/typora-user-images/image-20210127153541014.png)]](https://img-blog.csdnimg.cn/20210127224608174.png?x-oss-process=image/watermark,type_ZmFuZ3poZW5naGVpdGk,shadow_10,text_aHR0cHM6Ly9ibG9nLmNzZG4ubmV0L3hpYW95b3VwZWk=,size_16,color_FFFFFF,t_70)
![[外链图片转存失败,源站可能有防盗链机制,建议将图片保存下来直接上传(img-Hn4u2oza-1611758568637)(C:/Users/xiaoyoupei/AppData/Roaming/Typora/typora-user-images/image-20210127153514958.png)]](https://img-blog.csdnimg.cn/20210127224622408.png?x-oss-process=image/watermark,type_ZmFuZ3poZW5naGVpdGk,shadow_10,text_aHR0cHM6Ly9ibG9nLmNzZG4ubmV0L3hpYW95b3VwZWk=,size_16,color_FFFFFF,t_70)
6、复制和多路复用
1)复制案例
①、需求
使用Flume-1监控文件变动,Flume-1将变动内容传递给Flume-2,Flume-2负责存储到HDFS。同时Flume-1将变动内容传递给Flume-3,Flume-3负责输出到Local FileSystem。
②、需求分析
![[外链图片转存失败,源站可能有防盗链机制,建议将图片保存下来直接上传(img-VPhmVqGj-1611758568638)(C:/Users/xiaoyoupei/AppData/Roaming/Typora/typora-user-images/image-20210127185409963.png)]](https://img-blog.csdnimg.cn/20210127224644184.png?x-oss-process=image/watermark,type_ZmFuZ3poZW5naGVpdGk,shadow_10,text_aHR0cHM6Ly9ibG9nLmNzZG4ubmV0L3hpYW95b3VwZWk=,size_16,color_FFFFFF,t_70)
③、三台虚拟机(test、test1、test2)创建Flume Agent配置文件copytest.conf
#agent1(test)
a1.sources = r1
a1.channels = c1 c2
a1.sinks = k1 k2

a1.sources.r1.type = exec
a1.sources.r1.command = tail -F /usr/local/soft/flume-1.6.0/demo1/123.log
#配置channelSelector - replicating(复制-默认不配也可以)
a1.sources.select.type = replicating

a1.channels.c1.type = memory
a1.channels.c2.type = memory

a1.sinks.k1.type = avro
a1.sinks.k1.hostname = test1
a1.sinks.k1.port = 33333
a1.sinks.k2.type = avro
a1.sinks.k2.hostname = test2
a1.sinks.k2.port = 44444

#一个sources对接两个channel
a1.sources.r1.channels = c1 c2
a1.sinks.k1.channel = c1
a1.sinks.k2.channel = c2

--------------------------------

#agent2(test1)
a1.sources = r1
a1.channels = c1
a1.sinks = k1

a1.sources.r1.type = avro
a1.sources.r1.bind = test1
a1.sources.r1.port = 33333

a1.channels.c1.type = memory
a1.channels.c1.capacity = 1000

a1.sinks.k1.type = logger

a1.sources.r1.channels = c1
a1.sinks.k1.channel = c1

--------------------------------

#agent2(test2)
a1.sources = r1
a1.channels = c1
a1.sinks = k1

a1.sources.r1.type = avro
a1.sources.r1.bind = test2
a1.sources.r1.port = 44444

a1.channels.c1.type = memory
a1.channels.c1.capacity = 1000

a1.sinks.k1.type = logger
#将event数据存储到本地磁盘上
#a1.sinks.k1.type = file_roll
#event存放的目录
#a1.sinks.k1.sink.directory = /usr/local/soft/flume-1.6.0/copydemo
#多久时间滚动一个新文件(30秒)
#a1.sinks.k1.sink.rollInterval = 30

a1.sources.r1.channels = c1
a1.sinks.k1.channel = c1
④、启动监听(先启动test1、test2,再启动test)
//test1
flume-ng agent -n a1 -c conf/ -f datas2/copytest.conf -Dflume.root.logger=INFO,console

//test2
flume-ng agent -n a1 -c conf/ -f datas2/copytest.conf -Dflume.root.logger=INFO,console

//test
flume-ng agent -n a1 -c conf/ -f datas2/copytest.conf -Dflume.root.logger=INFO,console
⑤、查看结果(追加到123.log)
![[外链图片转存失败,源站可能有防盗链机制,建议将图片保存下来直接上传(img-KtWOL6Tk-1611758568638)(C:/Users/xiaoyoupei/AppData/Roaming/Typora/typora-user-images/image-20210127191534789.png)]](https://img-blog.csdnimg.cn/20210127224658755.png?x-oss-process=image/watermark,type_ZmFuZ3poZW5naGVpdGk,shadow_10,text_aHR0cHM6Ly9ibG9nLmNzZG4ubmV0L3hpYW95b3VwZWk=,size_16,color_FFFFFF,t_70)
![[外链图片转存失败,源站可能有防盗链机制,建议将图片保存下来直接上传(img-MfaunqjF-1611758568639)(C:/Users/xiaoyoupei/AppData/Roaming/Typora/typora-user-images/image-20210127191610418.png)]](https://img-blog.csdnimg.cn/20210127224713168.png?x-oss-process=image/watermark,type_ZmFuZ3poZW5naGVpdGk,shadow_10,text_aHR0cHM6Ly9ibG9nLmNzZG4ubmV0L3hpYW95b3VwZWk=,size_16,color_FFFFFF,t_70)
2)复用案例
①、修改test的agent的配置
和上述情况差不多只要修改test的agent的配置
#agent1(test)
a1.sources = r1
a1.channels = c1 c2
a1.sinks = k1 k2

a1.sources.r1.type = exec
a1.sources.r1.command = tail -F /usr/local/soft/flume-1.6.0/demo1/123.log
#配置channelSelector - replicating(复制-默认不配也可以)
a1.sources.select.type = replicating
#复用
a1.sources.r1.selector.type = multiplexing
#event(headers | body)根据headers中的key和value进行数据的发送
#state指的是headers,key的值
a1.sources.r1.selector.header = state
#CZ指的是key对应的value值那么就发送到c1
a1.sources.r1.selector.mapping.CZ = c1
#US指的是key对应的value值那么就发送到c2
a1.sources.r1.selector.mapping.US = c2

#需求:给event中的headers添加数据
#static拦截器可以给所有的eventheaders设置我们自定义的key和value
a1.sources.r1.interceptors = i1
a1.sources.r1.interceptors.i1.type = static
#设置key值
a1.sources.r1.interceptors.i1.key = state
#设置value值
a1.sources.r1.interceptors.i1.value = CZ

a1.channels.c1.type = memory
a1.channels.c2.type = memory

a1.sinks.k1.type = avro
a1.sinks.k1.hostname = test1
a1.sinks.k1.port = 33333
a1.sinks.k2.type = avro
a1.sinks.k2.hostname = test2
a1.sinks.k2.port = 44444

#一个sources对接两个channel
a1.sources.r1.channels = c1 c2
a1.sinks.k1.channel = c1
a1.sinks.k2.channel = c2
②、查看结果
![[外链图片转存失败,源站可能有防盗链机制,建议将图片保存下来直接上传(img-0d5vJhyT-1611758568639)(C:/Users/xiaoyoupei/AppData/Roaming/Typora/typora-user-images/image-20210127203324090.png)]](https://img-blog.csdnimg.cn/20210127224732775.png?x-oss-process=image/watermark,type_ZmFuZ3poZW5naGVpdGk,shadow_10,text_aHR0cHM6Ly9ibG9nLmNzZG4ubmV0L3hpYW95b3VwZWk=,size_16,color_FFFFFF,t_70)
7、故障转移和负载均衡
1)、故障转移案例
![[外链图片转存失败,源站可能有防盗链机制,建议将图片保存下来直接上传(img-FVms32fM-1611758568640)(C:/Users/xiaoyoupei/AppData/Roaming/Typora/typora-user-images/image-20210127213238174.png)]](https://img-blog.csdnimg.cn/20210127224746571.png?x-oss-process=image/watermark,type_ZmFuZ3poZW5naGVpdGk,shadow_10,text_aHR0cHM6Ly9ibG9nLmNzZG4ubmV0L3hpYW95b3VwZWk=,size_16,color_FFFFFF,t_70)
使用Flume1监控一个端口,其sink组中的sink分别对接Flume2和Flume3,采用FailoverSinkProcessor,实现故障转移的功能。
①、三台虚拟机(test、test1、test2)创建Flume Agent配置文件failover.conf
#agent1(test)
a1.sources = r1
a1.channels = c1
a1.sinks = k1 k2

a1.sources.r1.type = netcat
a1.sources.r1.bind = test
a1.sources.r1.port = 22222

#一个channel对应多个sink时要设置一个sinkgroups
a1.sinkgroups = g1
#该sink组有哪些sink的实例
a1.sinkgroups.g1.sinks = k1 k2
#配置sinkProcessor的类型①failover故障转移 ②load_balance负载均衡
a1.sinkgroups.g1.processor.type = failover
#配置sink的优先级数值越大优先级越高
a1.sinkgroups.g1.processor.priority.k1 = 5
a1.sinkgroups.g1.processor.priority.k2 = 10


a1.channels.c1.type = memory


a1.sinks.k1.type = avro
a1.sinks.k1.hostname = test1
a1.sinks.k1.port = 33333

a1.sinks.k2.type = avro
a1.sinks.k2.hostname = test2
a1.sinks.k2.port = 44444


a1.sources.r1.channels = c1
a1.sinks.k1.channel = c1
a1.sinks.k2.channel = c1

-----------------------------
#agent2(test1)
a1.sources = r1
a1.channels = c1
a1.sinks = k1

a1.sources.r1.type = avro
a1.sources.r1.bind = test1
a1.sources.r1.port = 33333

a1.channels.c1.type = memory
a1.channels.c1.capacity = 1000

a1.sinks.k1.type = logger

a1.sources.r1.channels = c1
a1.sinks.k1.channel = c1


--------------------------------
#agent3(test2)
a1.sources = r1
a1.channels = c1
a1.sinks = k1

a1.sources.r1.type = avro
a1.sources.r1.bind = test2
a1.sources.r1.port = 44444

a1.channels.c1.type = memory
a1.channels.c1.capacity = 1000

a1.sinks.k1.type = logger

a1.sources.r1.channels = c1
a1.sinks.k1.channel = c1
②、启动监听(先启动test1、test2,再启动test)
//test1
flume-ng agent -n a1 -c conf/ -f datas2/failover.conf -Dflume.root.logger=INFO,console

//test2
flume-ng agent -n a1 -c conf/ -f datas2/failover.conf -Dflume.root.logger=INFO,console

//test
flume-ng agent -n a1 -c conf/ -f datas2/failover.conf -Dflume.root.logger=INFO,console
③、查看结果
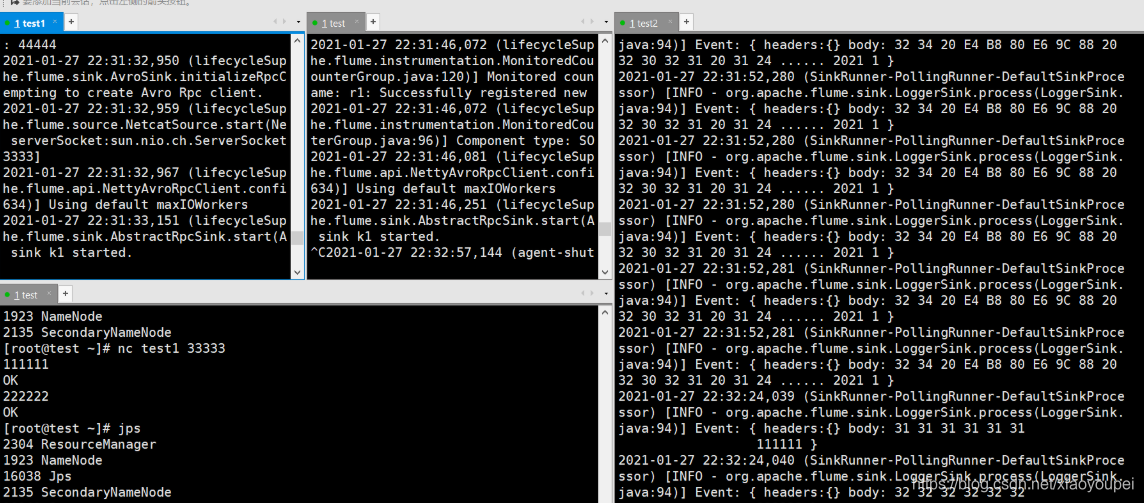
发出111的时候在test2打印出来,因为他的优先级高,人为杀死test2后,发出222、333,在test1打印出来,说明故障转移生效,又复活test2后,发出444在test2打印出来,说明机制完善
![[外链图片转存失败,源站可能有防盗链机制,建议将图片保存下来直接上传(img-XnyBbMyD-1611758568640)(C:/Users/xiaoyoupei/AppData/Roaming/Typora/typora-user-images/image-20210127214223592.png)]](https://img-blog.csdnimg.cn/20210127224808877.png?x-oss-process=image/watermark,type_ZmFuZ3poZW5naGVpdGk,shadow_10,text_aHR0cHM6Ly9ibG9nLmNzZG4ubmV0L3hpYW95b3VwZWk=,size_16,color_FFFFFF,t_70)
2)、负载均衡案例
①、三台虚拟机(test、test1、test2)创建Flume Agent配置文件load_balance.conf
#agent1(test)
a1.sources = r1
a1.channels = c1
a1.sinks = k1 k2

a1.sources.r1.type = netcat
a1.sources.r1.bind = test
a1.sources.r1.port = 22222

#定义一个sink组
a1.sinkgroups = g1
#指明sink组中的sink实例
a1.sinkgroups.g1.sinks = k1 k2
#设置sinkProcessor的类型(负载均衡)
a1.sinkgroups.g1.processor.type = load_balance
#①random-随机分配  ②round_robin-轮循
a1.sinkgroups.g1.processor.selector = random


a1.channels.c1.type = memory


a1.sinks.k1.type = avro
a1.sinks.k1.hostname = test1
a1.sinks.k1.port = 33333

a1.sinks.k2.type = avro
a1.sinks.k2.hostname = test2
a1.sinks.k2.port = 44444


a1.sources.r1.channels = c1
a1.sinks.k1.channel = c1
a1.sinks.k2.channel = c1

-----------------------------
#agent2(test1)
a1.sources = r1
a1.channels = c1
a1.sinks = k1

a1.sources.r1.type = avro
a1.sources.r1.bind = test1
a1.sources.r1.port = 33333

a1.channels.c1.type = memory
a1.channels.c1.capacity = 1000

a1.sinks.k1.type = logger

a1.sources.r1.channels = c1
a1.sinks.k1.channel = c1


--------------------------------
#agent3(test2)
a1.sources = r1
a1.channels = c1
a1.sinks = k1

a1.sources.r1.type = avro
a1.sources.r1.bind = test2
a1.sources.r1.port = 44444

a1.channels.c1.type = memory
a1.channels.c1.capacity = 1000

a1.sinks.k1.type = logger


a1.sources.r1.channels = c1
a1.sinks.k1.channel = c1
②、启动监听(先启动test1、test2,再启动test)
//test1
flume-ng agent -n a1 -c conf/ -f datas2/load_balance.conf -Dflume.root.logger=INFO,console

//test2
flume-ng agent -n a1 -c conf/ -f datas2/load_balance.conf -Dflume.root.logger=INFO,console

//test
flume-ng agent -n a1 -c conf/ -f datas2/load_balance.conf -Dflume.root.logger=INFO,console
③、查看结果
![[外链图片转存失败,源站可能有防盗链机制,建议将图片保存下来直接上传(img-YDY8UPqN-1611758568640)(C:/Users/xiaoyoupei/AppData/Roaming/Typora/typora-user-images/image-20210127220740472.png)]](https://img-blog.csdnimg.cn/20210127224833699.png?x-oss-process=image/watermark,type_ZmFuZ3poZW5naGVpdGk,shadow_10,text_aHR0cHM6Ly9ibG9nLmNzZG4ubmV0L3hpYW95b3VwZWk=,size_16,color_FFFFFF,t_70)
8、聚合
案例:
①、需求
test上的Flume-1监控文件/usr/local/soft/flume-1.6.0/logs
test1上的Flume-2监控某一个端口的数据流,
Flume-1与Flume-2将数据发送给test2上的Flume-3,Flume-3将最终数据打印到控制台。
②、需求分析
![[外链图片转存失败,源站可能有防盗链机制,建议将图片保存下来直接上传(img-PzW1KJBI-1611758568641)(C:/Users/xiaoyoupei/AppData/Roaming/Typora/typora-user-images/image-20210127221051409.png)]](https://img-blog.csdnimg.cn/20210127224847795.png?x-oss-process=image/watermark,type_ZmFuZ3poZW5naGVpdGk,shadow_10,text_aHR0cHM6Ly9ibG9nLmNzZG4ubmV0L3hpYW95b3VwZWk=,size_16,color_FFFFFF,t_70)
③、三台虚拟机(test、test1、test2)创建Flume Agent配置文件aggregation.conf
# test
# Name the components on this agent
a1.sources = r1
a1.sinks = k1
a1.channels = c1

# Describe/configure the source
a1.sources.r1.type = exec
a1.sources.r1.command = tail -F /usr/local/soft/flume-1.6.0/logs/flume.log

# Describe the sink
a1.sinks.k1.type = avro
a1.sinks.k1.hostname = test2
a1.sinks.k1.port = 44444

# Describe the channel
a1.channels.c1.type = memory
a1.channels.c1.capacity = 1000
a1.channels.c1.transactionCapacity = 100

# Bind the source and sink to the channel
a1.sources.r1.channels = c1
a1.sinks.k1.channel = c1

-----------------------------------
# test1
# Name the components on this agent
a2.sources = r1
a2.sinks = k1
a2.channels = c1

# Describe/configure the source
a2.sources.r1.type = netcat
a2.sources.r1.bind = test1
a2.sources.r1.port = 33333

# Describe the sink
a2.sinks.k1.type = avro
a2.sinks.k1.hostname = test2
a2.sinks.k1.port = 44444

# Use a channel which buffers events in memory
a2.channels.c1.type = memory
a2.channels.c1.capacity = 1000
a2.channels.c1.transactionCapacity = 100

# Bind the source and sink to the channel
a2.sources.r1.channels = c1
a2.sinks.k1.channel = c1
-----------------------------------
# test2
# Name the components on this agent
a3.sources = r1
a3.sinks = k1
a3.channels = c1

# Describe/configure the source
a3.sources.r1.type = avro
a3.sources.r1.bind = test2
a3.sources.r1.port = 44444

# Describe the sink
# Describe the sink
a3.sinks.k1.type = logger

# Describe the channel
a3.channels.c1.type = memory
a3.channels.c1.capacity = 1000
a3.channels.c1.transactionCapacity = 100

# Bind the source and sink to the channel
a3.sources.r1.channels = c1
a3.sinks.k1.channel = c1
④、启动监听(先启动test2,再启动test1、test2)
//test2
flume-ng agent -n a3 -c conf/ -f datas2/aggregation.conf -Dflume.root.logger=INFO,console

//test1
flume-ng agent -n a2 -c conf/ -f datas2/aggregation.conf -Dflume.root.logger=INFO,console

//test
flume-ng agent -n a1 -c conf/ -f datas2/aggregation.conf -Dflume.root.logger=INFO,console
⑤、查看结果
在test2的输出控制台可以看到先读取到了log文件的内容,随着test1端口的监听输入值,test2逐步输出这些监听值


 619
619


 被折叠的 条评论
为什么被折叠?
被折叠的 条评论
为什么被折叠?
 到【灌水乐园】发言


