


目录
一、定位流
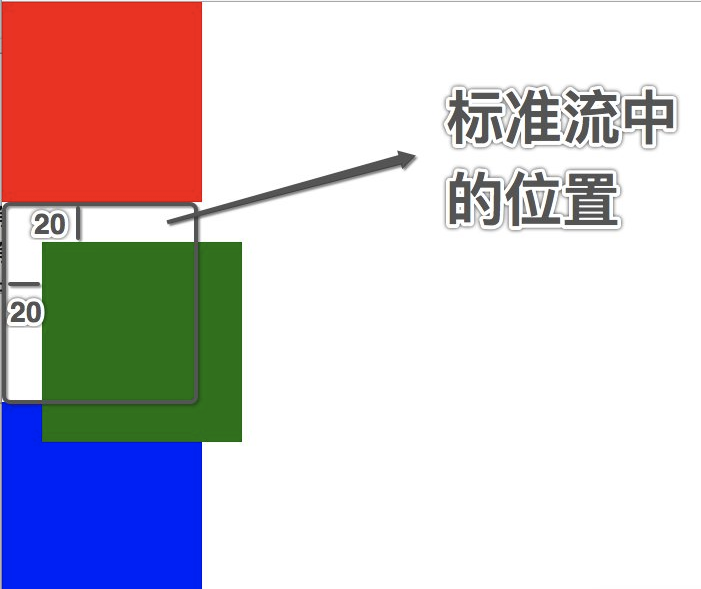
1.1、相对定位就是相对于自己以前在标准流中的位置来移动
格式:  position:relative

需要配合以下四个属性一起使用
        top:20px;
        left:30px;
        right:40px;
        bottom:50px;
<!DOCTYPE html>
<html lang="en">
<head>
    <meta charset="UTF-8">
    <title></title>

    <style>
        * {
            margin:0;
            padding:0;
        }

        div {
            width: 100px;
            height: 100px;
        }

        .box1 {
            background-color: red;
        }

        .box2 {
            background-color: green;
            position: relative;
            top: 20px;
            left: 20px;

        }

        .box3 {
            background-color: blue;
        }

    </style>
</head>
<body>

<div class="box1"></div>
<div class="box2"></div>
<div class="box3"></div>


</body>
</html>
1、相对定位的注意点
#1 在相对定位中同一个方向上的定位属性只能使用一个
top/bottom 只能用一个
left/right 只能用一个
#2 相对定位是不脱离标准流的,会继续在标准流中占用一份空间
#3 由于相对定位是不脱离标准流的,所以在相对定位中是区分块级、行内、行内块级元素的
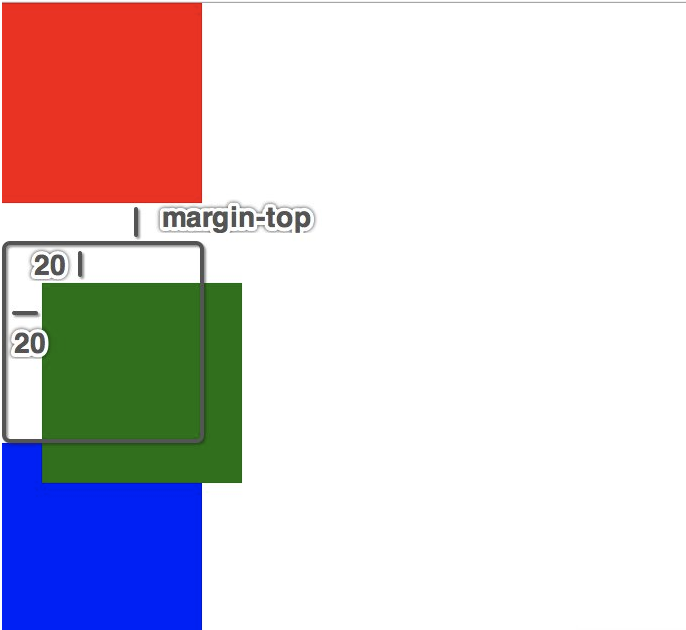
#4 由于相对定位是不脱离标准流的,并且相对定位的元素会占用标准流中的位置,所以当给相对定位的元素设置margin/padding
等属性时会影响到标准流的布局,即,给相对定位的标签设置marin或padding,是以该标签原来的位置为基础来进行偏移的
示范
<!DOCTYPE html>
<html lang="en">
<head>
    <meta charset="UTF-8">
    <title></title>

    <style>
        * {
            margin:0;
            padding:0;
        }

        div {
            width: 100px;
            height: 100px;
        }

        .box1 {
            background-color: red;
        }

        .box2 {
            background-color: green;
            position: relative;
            top: 20px;
            left: 20px;

            /*相对于该标签原来的位置进行偏移*/
            margin-top: 50px;

        }

        .box3 {
            background-color: blue;
        }

    </style>
</head>
<body>

<div class="box1"></div>
<div class="box2"></div>
<div class="box3"></div>


</body>
</html>
2、 相对对位的应用场景
#1、用于对元素进行微调
#2、配合后面学习的绝对定位来使用
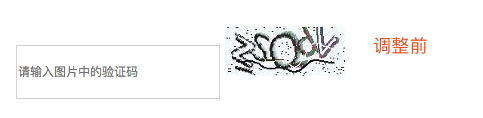

示范
<!DOCTYPE html>
<html lang="en">
<head>
    <meta charset="UTF-8">
    <title></title>

    <style>
        * {
            margin:0;
            padding:0;
        }

        input {
            width: 200px;
            height: 50px;
        }

        input:focus {
          outline: none;
          background-color: #eee;
        }

        img {
            height: 50px;
            position: relative;
            top: 20px;
        }
    </style>
</head>
<body>

<input type="text" name="call" placeholder="请输入图片中的验证码">
<img src="call.jpeg" alt="">


</body>
</html>
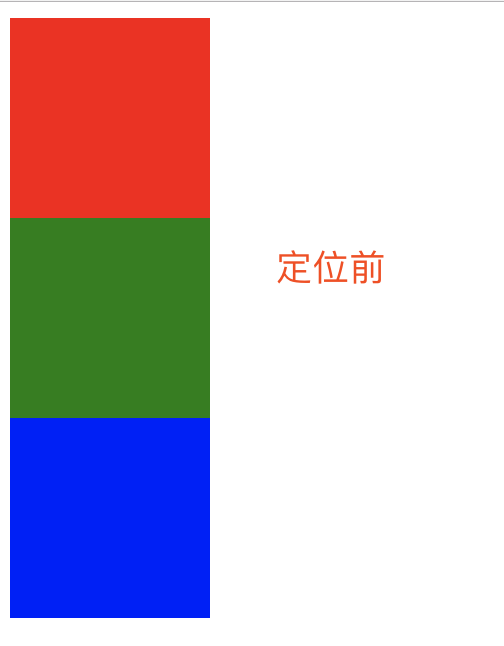
1.2、绝对定位就是相对于body或者某个定位流中的祖先元素来定位

<!DOCTYPE html>
<html lang="en">
<head>
    <meta charset="UTF-8">
    <title></title>
    <style>
        div {
            width: 100px;
            height: 100px;
        }

        .box1 {
            background-color: red;
        }
        .box2 {
            position: absolute;
            /*left: 0;*/
            /*top: 10px;*/
            background-color: green;

        }
        .box3 {
            background-color: blue;
        }
    </style>
</head>
<body>
<div class="box1"></div>
<div class="box2"></div>
<div class="box3"></div>

</body>
</html>
1 绝对定位的参考点
#1、默认情况下所有的绝对定位的元素,无论有无祖先元素,都会以body作为参考点

#2、如果一个绝对定位的元素有祖先元素,并且祖先元素也是定位流,那么这个绝对定位的元素就会以定位流的那个祖先元素作为参考点
2.1 只要是这个绝对定位元素的祖先元素都可以

2.2 祖先必须是定位流,此处的定位流指的是绝对定位、相对定位、固定定位(定位流中只有静态定位不行)

2.3、如果一个绝对定位的元素有祖先元素,而且祖先元素中有多个元素都是定位流,那么这个绝对定位的元素会以离它最近的那个定位流的祖先元素为参考点
默认情况下所有的绝对定位元素,无论有无祖先元素,都会以boby作为参考点
<!DOCTYPE html>
<html lang="en">
<head>
    <meta charset="UTF-8">
    <title></title>
    <style>

        * {
            margin: 0;
            padding: 0;
        }

        .box1 {
            width: 100px;
            height: 100px;
            background-color: red;

            position: absolute;
            right: 0;
            bottom: 0;

        }

        .box2 {
            width: 2000px;
            height: 100px;
            background-color: green;
        }

        .box3 {
            width: 100px;
            height: 2000px;
            background-color: blue;
        }


    </style>
</head>
<body>

<div class="box1"></div>
<div class="box2"></div>
<div class="box3"></div>


</body>
</html>
验证2的说法
<!DOCTYPE html>
<html lang="en">
<head>
    <meta charset="UTF-8">
    <title></title>
    <style>
        * {
            margin: 0;
            padding: 0;
        }

        .box1 {
            width: 300px;
            height: 300px;
            background-color: red;
            position: absolute;
            /*position: relative;*/
            /*position: fixed;*/
            /*position: static;*/
        }
        .box2 {
            width: 200px;
            height: 200px;
            background-color: green;
            /*position: absolute;*/
            /*position: relative;*/
            /*position: fixed;*/
            /*position: static;*/

            /*left: 200px;*/
            /*bottom: 200px;*/

        }

        .box3 {
            width: 100px;
            height: 100px;
            background-color: blue;
            position: absolute;
            right: 0;
            bottom: 0;

        }

    </style>
</head>
<body>

<div class="box1">
    <div class="box2">
        <div class="box3"></div>
    </div>
</div>


</body>
</html>
2 绝对定位的注意点
#1、绝对定位的元素是脱离标准流的,所以绝对定位的元素不区分块级元素/行内元素/行内块级元素
#2、如果一个绝对定位的元素是以body作为参考点, 那么其实是以网页首屏的宽度和高度作为参考点, 而不是以整个网页的宽度和高度作为参考点,会相对于body定位会随着页面的滚动而滚动
#3、一个绝对定位的元素会忽略祖先元素的padding
绝对定位的元素不区分块级元素/行内元素/行内块级元素
<!DOCTYPE html>
<html lang="en">
<head>
    <meta charset="UTF-8">
    <title></title>
    <style>

        * {
            margin: 0;
            padding: 0;
        }

        .box1 {
            width: 100px;
            height: 100px;
            background-color: red;

            position: absolute;


        }


    </style>
</head>
<body>

<span class="box1"></span>


</body>
</html>
绝对定位相对于body定位是以首屏为准
<!DOCTYPE html>
<html lang="en">
<head>
    <meta charset="UTF-8">
    <title></title>
    <style>

        * {
            margin: 0;
            padding: 0;
        }

        .box1 {
            width: 100px;
            height: 100px;
            background-color: red;

            position: absolute;
            right: 0;
            bottom: 0;

        }

        .box2 {
            width: 2000px;
            height: 100px;
            background-color: green;
        }

        .box3 {
            width: 100px;
            height: 2000px;
            background-color: blue;
        }


    </style>
</head>
<body>

<div class="box1"></div>
<div class="box2"></div>
<div class="box3"></div>


</body>
</html>
一个绝对定位元素会忽略祖先元素的padding
<!DOCTYPE html>
<html lang="en">
<head>
    <meta charset="UTF-8">
    <title></title>
    <style>

        * {
            margin: 0;
            padding: 0;
        }

        .box1 {
            width: 100px;
            height: 100px;
            background-color: red;

            padding: 20px;

        }
        .box2 {
            width: 50px;
            height: 50px;
            background-color: yellow;
            position: absolute;
            left: 0;
            top: 0;
        }


    </style>
</head>
<body>

<div class="box1">
    <div class="box2"></div>
</div>

</body>
</html>
3 绝对定位水平居中
#1.注意当一个盒子绝对定位之后不能使用margin: 0 auto;让盒子自身居中
#2.如果想让过一个绝对定位的盒子自身居中, 可以使用left: 50%; margin-left:-元素宽度一半px;
示范
<!DOCTYPE html>
<html lang="en">
<head>
    <meta charset="UTF-8">
    <title></title>
    <style>

        * {
            margin: 0;
            padding: 0;
        }

        .box1 {
            width: 200px;
            height: 50px;
            background-color: red;

            position: absolute;
            left: 50%;
            margin-left: -100px;

        }


    </style>
</head>
<body>
<div class="box1"></div>
</body>
</html>
4 绝对定位的应用场景
#1、用于对元素进行微调
#2、配合相对定位来使用
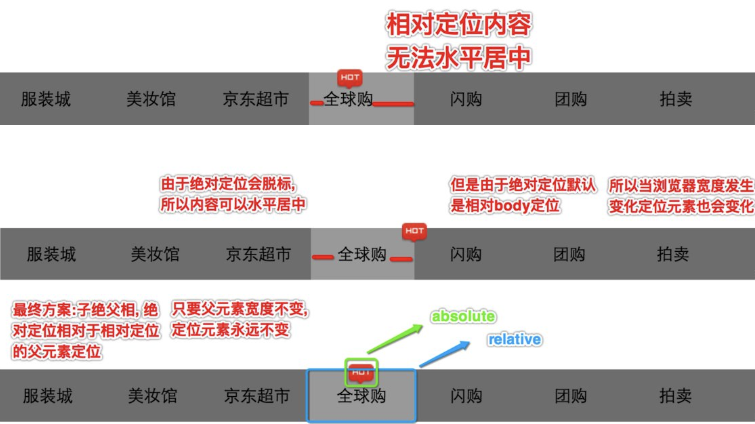
企业开发中一般相对定位和绝对定位都是一起出现, 很少单独使用===>子绝父相
那为何要用子绝父相呢,请看下图
** ****
****
练习1:

示范:子绝父相
<!DOCTYPE html>
<html lang="en">
<head>
    <meta charset="UTF-8">
    <title></title>
    <style>

        * {
            margin: 0;
            padding: 0;
        }

        ul {
            width: 800px;
            height: 50px;
            list-style: none;
            margin: 0 auto;
        }

        ul li {
            float: left;
            width: 100px;
            /*height: 50px;*/
            line-height: 50px;
            text-align: center;
        }

        a {
            display: inline-block;
            text-decoration: none;
            width: 100px;
            height: 50px;
            background-color: #5c5c62;

        }

        a:link {
            color: white;
        }

        a:visited {
            color: #b9950c;
        }

        a:hover{
            background-color: yellow;

        }

        a:hover {
            color: #55BBBB;
        }

        a:active {
            background-color: #003399;
        }

        ul li:nth-of-type(4) {
            position: relative;
        }

        img {
            width: 35px;

            /*
            相对定位弊端
            相对定位不会脱离标准流
            会继续在标准流中占用一份空间
            所以不利于布局界面
            */
            /*position: relative;*/
            /*top: -60px;*/
            /*left: 30px;*/


            /*
            绝对定位弊端
            绝对定位会脱离标准流,
            不会继续在标准流中占用一份空间

            但问题是默认情况下绝对定位的元素会以body为参考点

            所以会随着浏览器的宽度高度的变化而变化
            */
            /*
            position: absolute;
            top: 0px;
            left: 608px;
            */


            /*
            子绝父相
            子元素用绝对定位,父元素用相对定位
            */
            position: absolute;
            right: 0;
            top: 0;
        }


    </style>
</head>
<body>
    <ul>
        <li>
            <a href="#">服装城</a>
        </li>
        <li>
            <a href="#">美妆馆</a>
        </li>
        <li>
            <a href="#">京东超市</a>
        </li>
        <li>
            <a href="#">全球购</a>
            <img src="https://images2018.cnblogs.com/blog/1036857/201805/1036857-20180515210447998-344384162.png" alt="">
        </li>
        <li>
            <a href="#">闪购</a>
        </li>
        <li>
            <a href="#">团购</a>
        </li>
        <li>
            <a href="#">拍卖</a>
        </li>
        <li>
            <a href="#">金融</a>
        </li>
    </ul>
</body>
</html>
练习2:轮播图

示范
<!--<!DOCTYPE html>-->
<!--<html lang="en">-->
<!--<head>-->
<!--<meta charset="UTF-8">-->
<!--<title></title>-->
<!--<style>-->
<!--* {-->
<!--margin: 0;-->
<!--padding: 0;-->
<!--}-->
<!--.box1 {-->
<!--width: 300px;-->
<!--height: 300px;-->
<!--background-color: red;-->
<!--position: absolute;-->
<!--/*position: relative;*/-->
<!--/*position: fixed;*/-->
<!--/*position: static;*/-->
<!--}-->
<!--.box2 {-->
<!--width: 200px;-->
<!--height: 200px;-->
<!--background-color: green;-->
<!--/*position: absolute;*/-->
<!--/*position: relative;*/-->
<!--/*position: fixed;*/-->
<!--/*position: static;*/-->
<!--/*left: 200px;*/-->
<!--/*bottom: 200px;*/-->
<!--}-->
<!--.box3 {-->
<!--width: 100px;-->
<!--height: 100px;-->
<!--background-color: blue;-->
<!--position: absolute;-->
<!--right: 0;-->
<!--bottom: 0;-->
<!--}-->
<!--</style>-->
<!--</head>-->
<!--<body>-->
<!--<div class="box1">-->
<!--<div class="box2">-->
<!--<div class="box3"></div>-->
<!--</div>-->
<!--</div>-->
<!--</body>-->
<!--</html>-->
<!DOCTYPE html>
<html lang="en">
<head>
<meta charset="UTF-8">
<title></title>
<style>
* {
margin: 0;
padding: 0;
}
div {
width: 590px;
height: 470px;
border: 2px solid gold;
margin: 0 auto;
margin-top: 100px;
position: relative;
background-color: green;
}
span {
display: block;
width: 40px;
/*height: 80px;*/
background-color: rgba(0,0,0,0.3);
margin-top: 10px;
font-size: 50px;
color: white;
text-align: center;
line-height: 80px;
}
.leftArrow {
position: absolute;
left: 0px;
top:200px;
}
.rightArrow {
position: absolute;
right: 0px;
top:200px;
}
ol {
list-style: none;
width: 200px;
height: 40px;
background-color: rgba(255,255,255,0.7);
position: absolute;
right: 10px;
bottom:7px;
}
ol li {
width: 40px;
/*height: 40px;*/
float: left;
border: 1px solid gold;
box-sizing: border-box;
text-align: center;
line-height: 40px;
}
</style>
</head>
<body>
<div>
<img src="https://images2018.cnblogs.com/blog/1036857/201805/1036857-20180515224016405-1306758469.jpg" alt="">
<span class="leftArrow"><</span>
<span class="rightArrow">></span>
<ol>
<li>1</li>
<li>2</li>
<li>3</li>
<li>4</li>
<li>5</li>
</ol>
</div>
</body>
</html>
练习3:团购界面


示范
<!DOCTYPE html>
<html lang="en">
<head>
    <meta charset="UTF-8">
    <title></title>
    <style>
        * {
            margin: 0;
            padding: 0;
        }

        div {
            width: 300px;
            height: 300px;
            border: 2px solid #ccc;
            margin: 0 auto;
            margin-top: 100px;

            position: relative;
        }

        div img {
            width: 300px;
            height: 200px;
        }

        div .rx {
            width: 60px;
            height: 60px;

            position: absolute;
            left: 0px;
            top: 0px;

        }

        div .star {
            width: 70px;
            height: 15px;

            position: absolute;
            left: 0px;
            top: 205px;
        }

        div p {
            padding-top: 25px;
        }
    </style>
</head>
<body>

<div>
    <img src="https://images2018.cnblogs.com/blog/1036857/201805/1036857-20180515224158063-1650448180.jpg" alt="">
    <img src="https://images2018.cnblogs.com/blog/1036857/201805/1036857-20180515224206323-1896837444.png" alt="" class="rx">
    <img src="https://images2018.cnblogs.com/blog/1036857/201805/1036857-20180515224212575-1236813022.png" alt="" class="star">
    <p>
        多店通用】必胜客欢乐餐厅
        150元代金券!免费WiFi!
    </p>

</div>

</body>
</html>
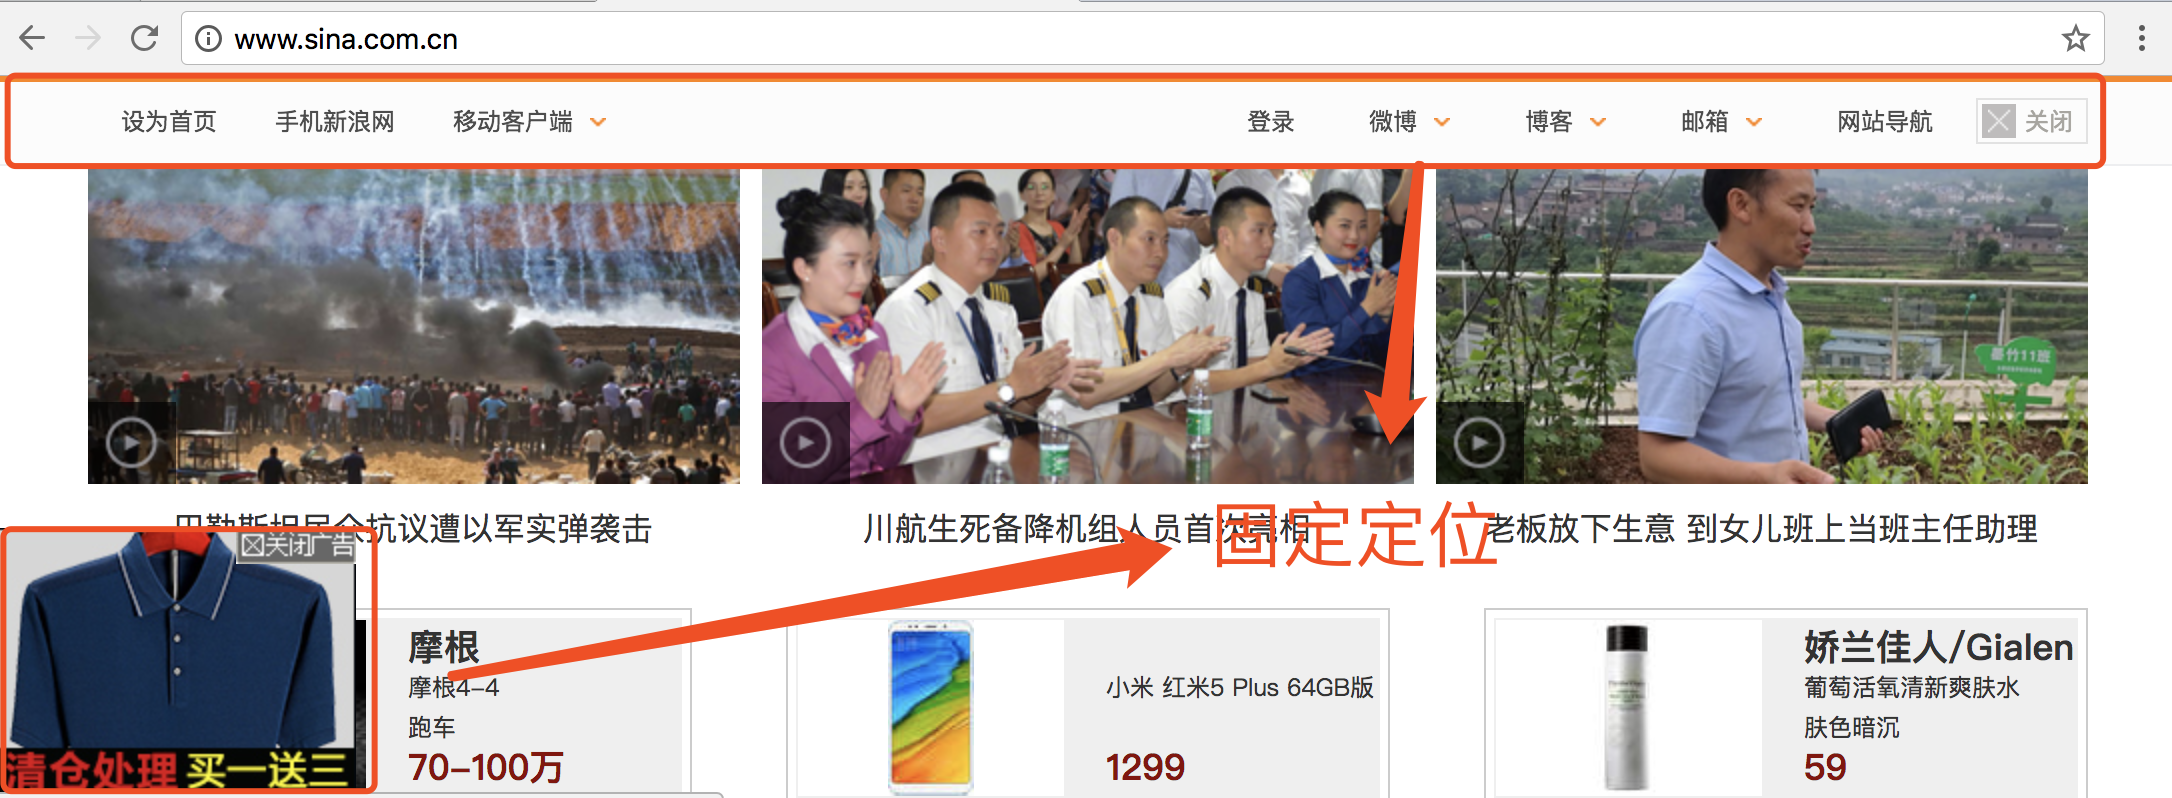
1.3、固定定位
#1、固定定位(和绝对定位高度相似,和背景的关联方式也高度相似)
背景的关联方式background-attachment: fixed;可以让图片不随着滚动条的滚动而滚动
而固定定位可以让某一个元素不随着滚动条的滚动而滚动

#2、注意点
    1、固定定位,就是相对浏览器窗口定位。页面如何滚动,这个盒子显示的位置不变。
    2、固定定位的元素是脱离标准流的,不会占用标准流中的空间
    3、固定定位和绝对定位一样不区分行内、块级、行内块级
    4、E6不支持固定定位
示范
<!DOCTYPE html>
<html lang="en">
<head>
    <meta charset="UTF-8">
    <title></title>

    <style>
        * {
            margin: 0;
            padding: 0;
        }


        .bg {
            width: 600px;
            height: 1000px;
            border: 1px solid #000;
            background-image: url("https://images2018.cnblogs.com/blog/1036857/201805/1036857-20180515224016405-1306758469.jpg");
            background-repeat: no-repeat;
            background-attachment: fixed;
        }


        div {
            width: 100px;
            height: 100px;
        }

        .box1 {
            background-color: red;
        }

        .box2 {
            border: 1px solid #000;
            border-radius: 50%;
            text-align: center;
            line-height: 100px;

            background-color: green;
            position: fixed;
            right: 0;
            bottom: 0;
        }

        .box3 {
            background-color: blue;
        }

        .box4 {
            background-color: yellow;
            height: 2000px;
        }


    </style>


</head>
<body>

<div class="bg"></div>

<div class="box1"></div>
<div class="box2">回到顶部</div>
<div class="box3"></div>
<div class="box4"></div>
</body>
</html>
固定定位应用场景
- 网页对联广告
- 网页头部通栏(穿透效果)
1.4、静态定位
#1、什么是静态定位?
默认情况下标准流中的元素position属性就等于static, 所以静态定位其实就是默认的标准流
1.5、z-index
#1、z-index属性:用于指定定位的元素的覆盖关系
    1.1、z-index值表示谁压着谁。数值大的压盖住数值小的。

    1.2、只有定位了的元素,才能有z-index值。也就是说,不管相对定位、绝
            对定位、固定定位,都可以使用z-index值。而浮动的东西不能用。

    1.3、z-index值没有单位,就是一个正整数。默认的z-index值是0。

    1.4、如果大家都没有z-index值(默认所有元素z-index值为0),或者z-
           index值一样,那么谁写在HTML后面,谁在上面能压住别人。定位了
           的元素,永远能够压住没有定位的元素。

#2、注意点:从父现象(父亲怂了,儿子再牛逼也没用)
    父元素没有z-index值, 那么子元素谁的z-index大谁盖住谁
    父元素z-index值不一样, 那么父元素谁的z-index大谁盖住谁
示范
<!DOCTYPE html>
<html lang="en">
<head>
    <meta charset="UTF-8">
    <title></title>

    <style>
        * {
            margin: 0;
            padding: 0;
        }

        /*div  {*/
            /*width: 100px;*/
            /*height: 100px;*/
        /*}*/

        /*.box1 {*/
            /*background-color: red;*/
            /*position: relative;*/
            /*top: 0px;*/
            /*left: 0px;*/

            /*!*z-index: 3;*!*/
        /*}*/

        /*.box2 {*/
            /*background-color: green;*/
            /*position: absolute;*/
            /*top: 50px;*/
            /*left: 50px;*/

            /*!*z-index: 2;*!*/
        /*}*/

        /*.box3 {*/
            /*background-color: blue;*/
            /*position: fixed;*/
            /*left: 100px;*/
            /*top: 100px;*/

            /*!*z-index: 1;*!*/
        /*}*/


        .father1 {
            width: 200px;
            height: 200px;
            background-color: red;


            position: relative;
            z-index: 5;
        }

        .father2 {
            width: 200px;
            height: 200px;
            background-color: green;

            position: relative;
            z-index: 4;
        }

        .son1 {
            width: 100px;
            height: 100px;
            background-color: blue;
            position: absolute;
            left: 200px;
            top: 200px;

            z-index: 1;


        }
        .son2 {
            width: 100px;
            height: 100px;
            background-color: yellow;
            position: absolute;
            left: 250px;
            /*top: 250px;*/

            z-index: 2;
            top: 50px;

        }

    </style>
</head>
<body>


<!--<div class="box1"></div>-->
<!--<div class="box2"></div>-->
<!--<div class="box3"></div>-->


<div class="father1">
    <div class="son1"></div>
</div>


<div class="father2">
    <div class="son2"></div>
</div>
</body>
</html>
练习题
练习博客页面
<!doctype html>
<html lang="zh">
<head>
    <meta charset="UTF-8">
    <title>Document</title>
    <style>
        * {
            margin: 0;
            padding: 0;
        }

        .clearfix {
            *zoom:1
        }

        .clearfix:before,.clearfix:after {
            content: " ";
            display: table
        }

        .clearfix:after {
            clear: both
        }

        .left {
            /*display: none;*/
            width: 20%;
            height: 100%;
            background-color: rgb(77,77,77);
            position: fixed;
            top: 0;
            left: 0;
            color: darkgrey;
        }
        .left .header-img {
            width: 120px;
            height: 120px;
            border: 5px solid white;
            border-radius: 50%;

            overflow: hidden;
            margin: 20px auto;
        }
        .left .header-img img {
            max-width: 120px;
        }

        .left .blog-title {
            text-align: center;
        }
        .left .blog-info {
            font-size: 12px;
            text-align: center;
            margin-top: 10px;
        }

        ul li {
            list-style: none;
        }

        a {
            text-decoration: none;
        }

        .blog-link,.blog-tag {
            margin-top: 20px;
            text-align: center;

            /*width: 100px;*/
            /*border: 5px solid #000;*/
            /*margin: 0 auto;*/
        }

        .blog-link a,.blog-tag a{
            color: darkgrey;
        }

        .blog-link a:hover,.blog-tag a:hover{
            color: white;
            font-size: 14px;
        }

        .right {
            width: 80%;
            height: 1000px;
            background-color: #eee;
            float: right;


        }
        .article-list {
            padding-left: 50px;
            width: 80%;
        }
        .article-list .article {
            background-color: white;
            margin-top: 20px;

            box-shadow: 3px 3px 3px rgba(0,0,0,0.2);
        }
        .article-list .article *{
            padding: 10px;
        }

        .article-list .article .article-header p {
            float: left;
            font-size: 24px;
            font-weight: bold;

            border-left: 5px solid red;
        }
        .article-list .article .article-header span {
            float: right;
            margin: 10px 0;
        }

        .article-list .article .article-info {
            border-bottom: 1px solid darkgrey;
        }

    </style>
</head>
<body>

<div class="left">
    <div class="header-img">
        <img src="o_tx.jpg" alt="">
    </div>
    <div class="blog-title">
        <p>我的博客</p>
    </div>
    <div class="blog-info">
        <p>这个人很懒,什么都没留下</p>
    </div>
    <div class="blog-link">
        <ul>
            <li><a href="#">关于我</a></li>
            <li><a href="#">微博</a></li>
            <li><a href="#">公众号</a></li>
        </ul>
    </div>

    <div class="blog-tag">
        <ul>
            <li><a href="#">JavaScript</a></li>
            <li><a href="#">Python</a></li>
            <li><a href="#">Golang</a></li>
        </ul>
    </div>

</div>
<div class="right">
    <div class="article-list">
        <div class="article">
            <div class="article-header clearfix">
                <p>海燕</p>
                <span>2018-07-03</span>
            </div>
            <div class="article-info">
                <p>在苍茫的大海上,狂风卷积着乌云。在乌云和大海之间,海燕像黑色的闪电,在高傲的飞翔</p>

            </div>
            <div class="article-tag">
                <span># HTML</span>
                <span># CSS</span>
            </div>
        </div>
    </div>
</div>
</body>
</html>
二、JavaScript
2.1、JavaScript简介
1、JavaScript起源
https://www.cnblogs.com/linhaifeng/articles/9346219.html
总结JavaScript用途:
#javaScript一般用来编写客户端脚本,来为html页面添加交互行为,是前台语言,而不是后台语言(node.js除外)
总结JavaScript的特点:
#1、解释执行(浏览器就是解释器):事先不编译、逐行执行、无需进行严格的变量声明。

#2、简单易用:可以使用任何文本编辑工具编写,只需要浏览器就可以执行程序。

 #3、基于对象:内置大量现成对象,编写少量程序可以完成目标
2、JavaScript组成
#1、ECMAScript:JavaScript的语法标准。包括变量、表达式、运算符、函数、if语句、for语句等。
#2、文档对象模型(DOM) Document object model:操作网页上的元素的API。比如让盒子移动、变色、轮播图等。
#3、浏览器对象模型(BOM) Broswer object model:操作浏览器部分功能的API。比如让浏览器自动滚动。
3、ECMAScript和JavaScript的关系
ECMAScript是一种由Ecma国际(前身为欧洲计算机制造商协会,英文名称是European Computer Manufacturers Association)通过ECMA-262标准化的脚本程序设计语言。这种语言在万维网上应用广泛,它往往被称为JavaScript或JScript,所以ECMAScript可以理解为是javascript的一个标准,而javascript是ECMA-262标准的实现和扩展。

1996年11月,JavaScript的创造者--Netscape公司,决定将JavaScript提交给国际标准化组织ECMA,希望这门语言能够成为国际标准。次年,ECMA发布262号标准文件(ECMA-262)的第一版,规定了浏览器脚本语言的标准,并将这种语言称为ECMAScript,这个版本就是1.0版。

该标准一开始就是针对JavaScript语言制定的,但是没有称其为JavaScript,有两个方面的原因。一是商标,JavaScript本身已被Netscape注册为商标。而是想体现这门语言的制定者是ECMA,而不是Netscape,这样有利于保证这门语言的开发性和中立性。

因此ECMAScript和JavaScript的关系是,前者是后者的标准,后者是前者的一种实现。
ECMAScript的历史
| 年份 | 名称 | 描述 |
|---|---|---|
| 1997 | ECMAScript 1 | 第一个版本 |
| 1998 | ECMAScript 2 | 版本变更 |
| 1999 | ECMAScript 3 | 添加正则表达式添加try/catch |
| ECMAScript 4 | 没有发布 | |
| 2009 | ECMAScript 5 | 添加"strict mode"严格模式添加JSON支持 |
| 2011 | ECMAScript 5.1 | 版本变更 |
| 2015 | ECMAScript 6(ES6) | 添加类和模块 |
| 2016 | ECMAScript 7 | 增加指数运算符(**)增加Array.prototype.includes |
2.2、JavaScript引入方式
1、方式一
<script>
  // 在这里写你的JS代码
</script>
2、方式二
<script src="xxx.js"></script>
2.3、JavaScript语法规范
#1、JavaScript对换行、缩进、空格不敏感。

    ps:每一条语句末尾要加上分号,虽然分号不是必须加的,但是为了程序今后要压缩,如果不加分号,压缩之后将不能运行。

#2、所有的符号,都是英语的。比如括号、引号、分号。

#3、JavaScript的注释:

  单行注释:             // 我是注释
   多行注释:
            /*
              多行注释1
              多行注释2
            */
2.4、变量
1、声明变量的语法
// 1. 先声明后定义
var name; // 声明变量时无需指定类型,变量name可以接受任意类型
name= "egon";

// 2. 声明立刻定义
var age = 18;
#1、弱类型、强类型
按照计算机语言的类型系统的设计方式,可以分为强类型和弱类型两种。二者之间的区别,就在于计算时是否可以不同类型之间对使用者透明地隐式转换。从使用者的角度来看,如果一个语言可以隐式转换它的所有类型,那么它的变量、表达式等在参与运算时,即使类型不正确,也能通过隐式转换来得到正确地类型,这对使用者而言,就好像所有类型都能进行所有运算一样,这样的语言被称作弱类型

#2、动态语言,静态语言
动态语言:声明变量时无需指定类型
静态语言:声明变量时必先指定类型


#3、JavaScript是一种弱类型、动态语言,弱类型具体表现如下

#2.1、一般规律是,约束越强越不容易出错,但编写程序时也越麻烦。在JavaScript中,因为约束比较弱,所以容易出现这种错误:最简单的例子:
 var a =200;


 var b ="1";


 var c= a + b;


你可能期望c是201,但实际上它是"2001",这个错误在强类型语言中决不会出现。然而正是因为JavaScript没有这些约束,所以可以很方便地拼接数字和字符串类型。

#2.2、再比如下面这个例子:
var a = '11';
a = a - '';
alert(typeof a);// -->number
“-”可以是一元运算符(取负),也可以是二元(减法运算)

js是弱类型语言
2、变量名命名规范
#1、由字母、数字、下划线、$ 组成,但是不能数字开头,也不能纯数字

#2、严格区分大小写

#3、不能包含关键字和保留字(以后升级版本要用的关键字)。
如:abstract、boolean、byte、char、class、const、debugger、double、enum、export、extends、final、float、goto
implements、import、int、interface、long、native、package、private、protected、public、short、static、super、synchronized、throws、transient、volatile
#4、推荐驼峰命名法:有多个有意义的单词组成名称的时候,第一个单词的首字母小写,其余的单词首字母写

#5、匈牙利命名:就是根据数据类型单词的的首字符作为前缀
3、ES6中let
ES6之前js没有块级作用域,ES6新增了let命令,用于声明变量(声明的变量属于块级作用域),流程控制语句的{}就是块级作用域。其用法类似于var,但是所声明的变量只在let命令所在的代码块内有效。例如:for循环的计数器就很适合使用let命令。
for(let i=1;i<=5;i++){}
4、常量
ES6新增const用来声明常量。一旦声明,其值就不能改变。
const PI = 3.1415926;
PI=3 //TypeError: "PI" is read-only
2.5、 数据类型与内置方法
js是动态语言:变量里面能够存储数字、字符串等。变量会自动的根据存储内容的类型不同,来决定自己的类型。
1、数值(Number)
JavaScript不区分整型和浮点型,就只有一种数字类型,即number
var x = 3;
var y = 3.1;
var z = 13e5;
var m = 13e-5;
var n = NaN; // typeof n结果"number"
四舍五入
var num=1.3456
num.toFixed(2) // "1.35"
字符串类型转成数字
#字符串转numbber
parseInt("123")  // 返回123

#NaN属性是代表非数字值的特殊值。该属性用于指示某个值不是数字。
parseInt("ABC")  // 返回NaN

#带有自动净化的功能;只保留字符串最开头的数字,后面的中文自动消失。例如:
console.log(parseInt("18林海峰")); //18

#只去末尾的中文,不会去开头的
console.log(parseInt("林海峰18")); // NaN


# 字符串中的数字转浮点
parseInt("123.456")  // 返回123
parseFloat("123.456")  // 返回123.456

#自动带有截断小数的功能:取整,不四舍五入
var a = parseInt("1.3") + parseInt("2.6"); //a=3

var a = parseFloat("1.3") + parseFloat("2.6"); //a=3.9
数字类型转成字符串
#数字转成字符串类型
var x=10;
var y='20';
var z=x+y; // z='1020'
typeof z; //String

#数字转成字符串类型
var m=123;
var n=String(m)

var a=123;
var b=a.toString()
2、字符串(String)
var a = "Hello"
var b = "world;
var c = a + b;
console.log(c);  // 得到Helloworld
常用方法:
| 方法 | 说明 |
|---|---|
| .length | 返回长度 |
| .trim() | 移除空白 |
| .trimLeft() | 移除左边的空白 |
| .trimRight() | 移除右边的空白 |
| .charAt(n) | 返回第n个字符 |
| .concat(value, …) | 拼接,拼接字符串通常使用“+”号 |
| .indexOf(substring, start) | 子序列位置 |
| .substring(from, to) | 根据索引获取子序列 |
| .slice(start, end) | 切片 |
| .toLowerCase() | 小写 |
| .toUpperCase() | 大写 |
| .split(delimiter, limit) | 分割 |
string.slice(start, stop)和string.substring(start, stop):

两者的相同点:
如果start等于end,返回空字符串
如果stop参数省略,则取到字符串末
如果某个参数超过string的长度,这个参数会被替换为string的长度

substirng()的特点:
如果 start > stop ,start和stop将被交换
如果参数是负数或者不是数字,将会被0替换

silce()的特点:
如果 start > stop 不会交换两者
如果start小于0,则切割从字符串末尾往前数的第abs(start)个的字符开始(包括该位置的字符)
如果stop小于0,则切割在从字符串末尾往前数的第abs(stop)个字符结束(不包含该位置字符)
补充:
ES6中引入了模板字符串。模板字符串(template string)是增强版的字符串,用反引号(`)标识,它的用途为
#1、完全可以当做普通字符串使用
var msg = `my name is egon`

#2、也可以用来定义多行字符串
var info = `
    name:egon
    age:18
    sex:male
`

#3、并且可以在字符串中嵌入变量
var name = "egon";
var age = 18;
var msg = `my name is ${name}, my age is ${age}`;
注意:
如果模板字符串中需要使用反引号,则在其前面要用反斜杠转义。
3、布尔值(Boolean)
区别于Python,true和false都是小写。
var a = true;
var b = false;
任何数据类型都可以转换为boolean类型:空字符串、0、null、undefined、NaN都是false。
#布尔值为假的数据类型
Boolean('')
Boolean(0)
Boolean(null)
Boolean(undefined)
Boolean(NaN)

# 其余数据类型的布尔值均为真,例如
Boolean([])
Boolean(123)
4、null和undefined
- null表示值是空,一般在需要指定或清空一个变量时才会使用,如 name=null;
- undefined表示当声明一个变量但未初始化时,该变量的默认值是undefined。还有就是函数无明确的返回值时,返回的也是undefined。
null表示变量的值是空,undefined则表示只声明了变量,但还没有赋值。
5、常用内置对象
JavaScript 中的所有事物都是对象:字符串、数值、数组、函数…
此外I,JavaScript还提供多个内建对象,比如 Array,Date,Math 等等
对象只是带有属性和方法的特殊数据类型


 9104
9104


 被折叠的 条评论
为什么被折叠?
被折叠的 条评论
为什么被折叠?
 到【灌水乐园】发言


