


 文章讲述了如何在Keras中使用sample_weight处理分类问题中的样本不平衡,通过调整不同类别样本的权重,以改善模型在训练和测试时的表现。作者通过实例展示了如何为不同类型的样本设置权重,并观察了权重加入前后模型性能的变化。
sample_weight在keras中文文档里面的解释是:权值的numpy array,用于在训练时调整损失函数(仅用于训练)。可以传递一个1D的与样本等长的向量用于对样本进行1对1的加权,或者在面对时序数据时,传递一个的形式为(samples,sequence_length)的矩阵来为每个时间步上的样本赋不同的权。这种情况下请确定在编译模型时添加了sample_weight_mode='temporal'。
上面的大致意思是,我们设置的sample_weight需要是一个一维向量,该向量长度与我们的参与训练的数据长度相同,例如:training_data的长度为1000,我们的training_sample_weight(训练集的sample_weight的名称)长度也需要为1000。时序数据与此类似(个人理解),仅需改变一下传入矩阵的维度,以及需要在model.compile()中加入sample_weight_mode='temporal'。
而我们有可能会在分类问题中遇到,某一种类的数据数量特别多,其他种类的数量特别少,导致神经网络无法正常的去学习,这个时候需要用到sample_weight这个参数。
这里我随机生成了三种不同类型的数据,三种数据类型的比例分别为0.1、0.8、0.1,其中训练集800个,验证集200个。
类型 1 数据 (X_type1 和 y_type1):X_type1是随机生成的均匀分布的数据。输出 y_type1 是 [1,0,0] 。类型 2 数据 (X_type2 和 y_type2):X_type2是随机生成的均匀分布的数据再乘以10 。输出 y_type2 是 [0,1,0] 。类型 3 数据 (X_type3 和 y_type3):X_type3是随机生成的均匀分布的数据再乘以20 。输出 y_type3 是 [0,0,1]
# 导入必要的库
import numpy as np
from tensorflow.keras.models import Sequential
from tensorflow.keras.layers import Dense
from tensorflow.keras.utils import to_categorical
from sklearn.model_selection import train_test_split
# 这里假设有1000个样本,每个样本有10个特征
num_samples1 = 100
num_samples2 = 800
num_samples3 = 100
num_features = 10
X1 = np.random.rand(num_samples1, num_features)
X2 = 10*np.random.rand(num_samples2,num_features)
X3 = 20*np.random.rand(num_samples3,num_features)
X = np.vstack((X1,X2))
X = np.vstack((X,X3))
# 生成整数标签作为多分类的标签
y1 = np.random.randint(1, size=100)
y2 = np.random.randint(1,2,size=800)
y3 = np.random.randint(2,3,size=100)
y = np.hstack((y1,y2))
y = np.hstack((y,y3))
# 将标签进行独热编码
y = to_categorical(y, num_classes=3)
# 划分训练集和测试集
X_train, X_val, y_train, y_val = train_test_split(X, y, test_size=0.2, random_state=42)
测试集也是按照上述比例生成:
X1_test = np.random.rand(10, num_features)
X2_test = 10*np.random.rand(80, num_features)
X3_test = 20*np.random.rand(10, num_features)
x_test = np.vstack((X1_test, X2_test))
x_test = np.vstack((x_test, X3_test))
y1_test = np.random.randint(1, size=10)
y2_test = np.random.randint(1, 2, size=80)
y3_test = np.random.randint(2, 3, size=10)
y_test = np.hstack((y1_test, y2_test))
y_test = np.hstack((y_test, y3_test))
# 将标签进行独热编码
y_test = to_categorical(y_test, num_classes=3)这是一个三分类问题,网络利用最简单的全连接神经网络进行处理。设置训练集的sample_weight和验证集的sample_weight,对于三种类型的数据权重分别设为0.8、0.2、0.8(因为type1和type3比例都为0.1,所以权重设为一样的),具体设置方法如下:
# 训练集权重设置
sample_weight_train = []
for i in range(len(X_train)):
    maxy = np.max(y_train[i])
    maxi = np.where(y_train[i] == maxy)
    maxi = list(maxi)
    if maxi[0] == np.array(0):
        sample_weight_train.append(0.8)
    elif maxi[0] == np.array(1):
        sample_weight_train.append(0.2)
    else:
        sample_weight_train.append(0.8)
# 验证集权重设置
sample_weight_val = []
for i in range(len(X_val)):
    maxy = np.max(y_val[i])
    maxi = np.where(y_val[i] == maxy)
    maxi = list(maxi)
    if maxi[0] == np.array(0):
        sample_weight_val.append(0.8)
    elif maxi[0] == np.array(1):
        sample_weight_val.append(0.2)
    else:
        sample_weight_val.append(0.8)
设置好之后进行网络模型搭建:
# 构建一个简单的DNN模型
model = Sequential()
model.add(Dense(64, input_dim=10, activation='relu'))
model.add(Dense(32, activation='relu'))
model.add(Dense(3, activation='softmax'))
# 编译模型
model.compile(loss='categorical_crossentropy', optimizer='adam', metrics=['accuracy'])
为了做对比实验,首先不加入sample_weight进行训练,并且在测试集中查看结果。
# 模型训练
model.fit(X_train, y_train, epochs=1000, batch_size=32, validation_data=(X_val, y_val))
这里利用均方差作为评估标准:
# 预测测试集
B = model.predict(x_test)
# 阈值为0.7
B[B>0.7] = 1
B[B<0.7] = 0
from skimage.metrics import mean_squared_error as compare_mse
# 画图
mse_1 = []
for i in range(len(y_test)):
    mse_1.append(compare_mse(y_test[i],B[i]))
plt.plot(mse_1)
plt.title("mse")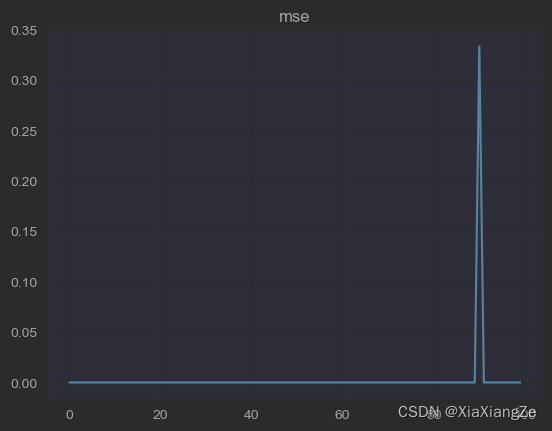
可以观察,其中有一个样本是预测不好的,这时我们重新加入sample_weight进行训练。
# 编译模型
model.compile(loss='categorical_crossentropy', optimizer='adam', metrics=['accuracy'] , weighted_metrics=[])注意,这里我在编译模型里设置weighted_metrics=[],如果我们没有设置的话,在模型训练过程中会产生一个警告,为了消除这一警告,所以这样设置:
WARNING:tensorflow:`evaluate()` received a value for `sample_weight`, but `weighted_metrics` were not provided. Did you mean to pass metrics to `weighted_metrics` in `compile()`? If this is intentional you can pass `weighted_metrics=[]` to `compile()` in order to silence this warning.
# 模型训练
model.fit(X_train, y_train, sample_weight=np.array(sample_weight_train), epochs=1000, batch_size=32, validation_data=(X_val, y_val, np.array(sample_weight_val)))
注意,sample_weight的格式需要为np格式,训练结束之后,同样观察其MSE,结果如下:
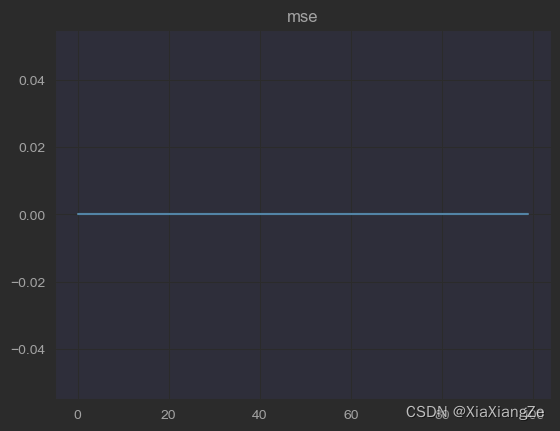
可以看出,所有数据100%预测正确,权重加入较为成功。
总结,在分类问题中,遇到样本种类个数不同时,可以考虑使用sample_weight来影响不同样本在训练过程中的影响,从而改善模型在测试阶段的能力,还有回归问题,由于时间原因,后续会补上。


 2522
2522

 被折叠的 条评论
为什么被折叠?
被折叠的 条评论
为什么被折叠?
 到【灌水乐园】发言


