


前提概要
通过springboot调用OpenAI接口,Java调用实现ChatGPT聊天,OpenAIAPI是一个自己封装的OpenAI GPT-3聊天API的Java工具类,可用于通过Java代码调用GPT-3模型进行自然语言交互,实现智能聊天等功能。
通过调用GPT-3模型,输入一段文本,返回机器人对话回复的文本。
1、实体类Entity
package com.strong.entity;

import lombok.Data;
import org.springframework.beans.factory.annotation.Value;
import org.springframework.context.annotation.PropertySource;
import org.springframework.stereotype.Component;

@Component
@Data
@PropertySource(value = "classpath:openAI.yml")
public class OpenAiGptEntity {
    @Value("${apiKey}")
    private String apiKey;
    @Value("${apiUrl}")
    private String apiUrl;
    @Value("${apiPrompt}")
    private String prompt;
}
2、openAI.yml配置文件
#需要替换成自己的密钥
apiKey: sk-A3zfGqzwgewgzdQsgewgwegwwgwgecme0lgFcxxxxxfs
#Gpt聊天请求的接口
apiUrl: https://api.openai.com/v1/completions
#这个对话的内容
apiPrompt: Hello,GPT!
3、service接口
package com.strong.service;

import org.springframework.stereotype.Service;

import java.io.IOException;


public interface OpenAiGptService {

    public String sendGptRequest(String apiUrl, String apiKey,String prompt) throws IOException;

}
4、service接口实现类
package com.strong.service.impl;

import com.strong.service.OpenAiGptService;
import org.springframework.stereotype.Service;

import java.io.BufferedReader;
import java.io.IOException;
import java.io.InputStreamReader;
import java.net.HttpURLConnection;
import java.net.URL;
import java.nio.charset.StandardCharsets;
@Service("getService")
public class OpenAiGptServiceImpl implements OpenAiGptService {

    @Override
    public String sendGptRequest(String apiUrl, String apiKey,String prompt) throws IOException {

        // 创建HTTP客户端,设置请求方法和请求头
        HttpURLConnection conn = (HttpURLConnection) new URL(apiUrl).openConnection();
        conn.setRequestMethod("POST");
        conn.setRequestProperty("Authorization", "Bearer " + apiKey);
        conn.setRequestProperty("Content-Type", "application/json");
        conn.setRequestProperty("accept", "*/*");
        conn.setRequestProperty("connection", "Keep-Alive");

        // 准备请求正文和文本提示
        String requestBody = String.format("{\"prompt\": \"%s\", \"max_tokens\": 70, \"temperature\": 0, \"model\": \"text-davinci-003\"}", prompt);

        // 设置请求正文,发送HTTP请求
        conn.setDoOutput(true);
        conn.setDoInput(true);
        conn.getOutputStream().write(requestBody.getBytes(StandardCharsets.UTF_8));

        // 解析返回的参数及信息
        BufferedReader reader = new BufferedReader(new InputStreamReader(conn.getInputStream()));
        StringBuilder response = new StringBuilder();
        String line;
        while ((line = reader.readLine()) != null) {
            response.append(line);
        }
        reader.close();

        // 返回响应字符串
        return response.toString();
    }

}
4、Controller类
package com.strong.controller;
import com.strong.entity.OpenAiGptEntity;
import com.strong.service.OpenAiGptService;
import org.springframework.beans.factory.annotation.Autowired;
import org.springframework.web.bind.annotation.GetMapping;
import org.springframework.web.bind.annotation.RestController;

import java.io.IOException;


@RestController
public class OpenAiGptController {
    @Autowired
    OpenAiGptService openAiGptService;

    @Autowired
    OpenAiGptEntity openAiGptEntity;

    @GetMapping("/goChatGpt")
    public String goChatGpt(){
        String resule = null;
        try {
            resule = openAiGptService.sendGptRequest(openAiGptEntity.getApiUrl(), openAiGptEntity.getApiKey(), openAiGptEntity.getPrompt());
            System.out.println(resule);
        } catch (IOException e) {
            e.printStackTrace();
        }
        return resule;
    }

}
特别注意:openAi为国外网站,请求需要FQ特殊访问,懂得都懂!!!
1)、IDEA配置代理端口
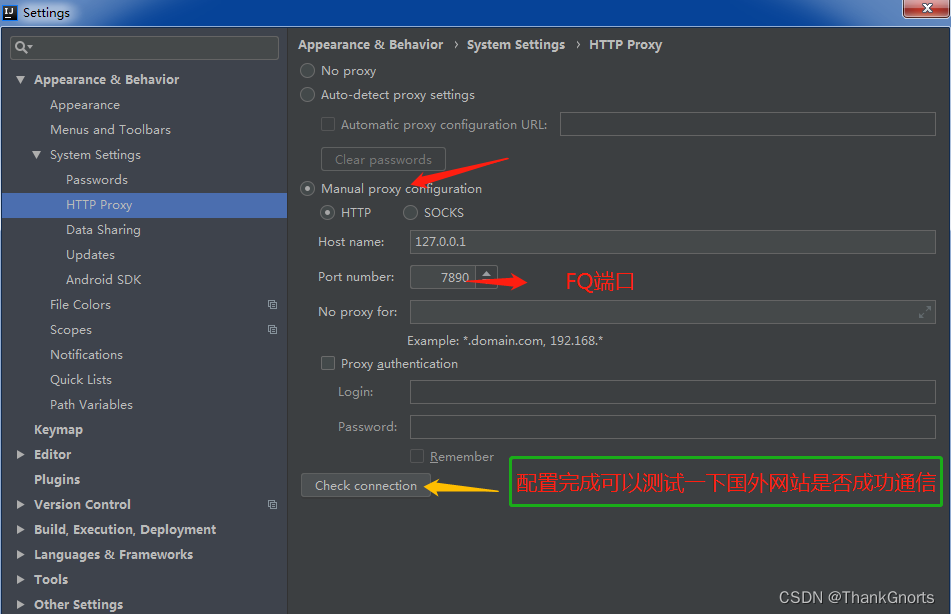
2)、Springboot启动类增加如下代码 proxyPort需要更改
String proxyHost = "127.0.0.1";
		//
        String proxyPort = "7890";
        // 对http开启代理
        System.setProperty("http.proxyHost", proxyHost);
        System.setProperty("http.proxyPort", proxyPort);
        // 对https也开启代理
        System.setProperty("https.proxyHost", proxyHost);
        System.setProperty("https.proxyPort", proxyPort);
最后大功告成,请求返回结果如下:
{
	"id": "cmpl-6xV01195MFetGk9uzlZ4ngpjQrpKv",
	"object": "text_completion",
	"created": 1679638533,
	"model": "text-davinci-003",
	"choices": [{
		"text": "\n\nHi there! Nice to meet you. What can I do for you?",
		"index": 0,
		"logprobs": null,
		"finish_reason": "stop"
	}],
	"usage": {
		"prompt_tokens": 9,
		"completion_tokens": 17,
		"total_tokens": 26
	}
}


 2099
2099


 被折叠的 条评论
为什么被折叠?
被折叠的 条评论
为什么被折叠?
 到【灌水乐园】发言


