


Android基础知识
---------------------------------------------------------------------------------------------------------------------------------------------------------------------------------------------------------------------------------------
认识Android中的Activity组件
<启动另一个Activity>
startActivity(new Intenr(MainActivity.this,AnotherActivity.class));
startActivity(new Intent(Intent.ACTION_VIEW,Uri.parse("http://www.baidu.com")); //启动一个页面
---------------------------------------------------------------------------------------------------------------------------------------------------------------------------------------------------------------------------------------
Activity生命周期
<学会看帮助文档>
在SDK中的docs文件夹下的index.html打开
Google对于安卓开发的官方说明书,需要看
<在Activity跳转过程中的生命周期>
场景:A Activity跳转到(通过按钮)B Acitity
第一种情况B Acitity 完全覆盖A Activity 执行的是A onCreate --A onstart -- A onResume 然后通过按钮启动B Activity那么执行 A onPause -- B onCreate -- B onStart -- B onResume -- A onStop 在B呈现出来之后才执行 A onStop
第二种情况B Acitity 没有完全覆盖A Activity 执行的是A onCreate --A onstart -- A onResume 然后通过按钮启动B Activity那么执行然后通过按钮启动B Activity那么执行 A onPause -- B onCreate -- B onStart -- B onResume 然后按返回执行B onPause -- A onResume -- B onStop -- B onDestory
---------------------------------------------------------------------------------------------------------------------------------------------------------------------------------------------------------------------------------------
Android studio 全方位指南之初识Android studio
<Android Studio下载安装>
访问google的方法:在百度中输入Google hosts 然后把最新的Google hosts 复制到系统的hosts配置文件末尾处(hosts路径在C:\Windows\System32\drivers\etc)
---------------------------------------------------------------------------------------------------------------------------------------------------------------------------------------------------------------------------------------
在Activity之间传递参数
<传递简单数据>
Intent intent = new Intent(MainActivity.this,AnotherActivity.class);
intent.putExtra(传入参数键值对);;
在启动的Activity中获取传递进来的数据 Intent intent_1 = getIntent(); String name = intent._1.getStringExtra(键); -- 这里假设传递过来的是一个String字符串
<传递数据包Bundle>
Bundle b = new Bundle();
b.putString("name","xiaoxin");
b.putInt("age",22);
intent.putExtras(b);
在另外的Activity中获取这个Bundle数据包
Intent intent_1 = getIntent();
Bundle data = intent_1.getExtras();
data.getString("name");
data.getInt("age");
注意:String.format();可以调整输出字符串的格式
第二种写法:
intent.putExtra("data",b);
在另外的Activity中获取
Bundle data = intent_1.getBundleExtra("data");
<传递值对象>
所谓的传递值对象就是传递自定义的数据类型的数据对象
这里有两种方法可以来实现
第一种是用java中的Serializable 优缺点:操作简单序列化由系统自动完成,但是速度比较慢
首先建立一个按钮用来启动另外一个Activity
<Button
    android:id="@+id/button"
    android:layout_width="wrap_content"
    android:layout_height="wrap_content"
    android:text="启动另外一个Activity"/>
创建一个AnotherActivity布局含有一个TextView
<TextView
    android:id="@+id/textView"
    android:layout_width="match_parent"
    android:layout_height="wrap_content" />
自定义的数据对象Student
package com.example.myapplication;

import java.io.Serializable;

/**
 * Created by 小新 on 2016/3/6.
 */
public class Student implements Serializable {
    private String name;
    private int age;

    public int getAge() {
        return age;
    }

    public String getName() {
        return name;
    }

    public void setAge(int age) {
        this.age = age;
    }

    public void setName(String name) {
        this.name = name;
    }
    public Student(String name , int age){
        this.name = name;
        this.age = age;
    }
}
findViewById(R.id.button).setOnClickListener(new View.OnClickListener() {
    @Override
    public void onClick(View v) {
        Intent intent = new Intent(MainActivity.this,Another.class);
        intent.putExtra("student",new Student("小新",22));
        startActivity(intent);
    }
});
在AnotherActivity中接收
TextView textView =(TextView) findViewById(R.id.textView);
Intent intent = getIntent();
Student student =(Student) intent.getSerializableExtra("student");
textView.setText(String.format("Student info(name = %s,age = %d)",student.getName(),student.getAge()));
FloatingActionButton fab = (FloatingActionButton) findViewById(R.id.fab);
fab.setOnClickListener(new View.OnClickListener() {
    @Override
    public void onClick(View view) {
        Snackbar.make(view, "Replace with your own action", Snackbar.LENGTH_LONG)
                .setAction("Action", null).show();
    }
});
第二种方法实现安卓自己内置的Parcelable 优缺点:操作起来比较复杂但是效率高 速度快
关键是在Student的这个类中
package com.example.myapplication;

import android.os.Parcel;
import android.os.Parcelable;
/**
 * Created by 小新 on 2016/3/6.
 */
public class Student implements Parcelable {
    private String name;
    private int age;

    public int getAge() {
        return age;
    }

    public String getName() {
        return name;
    }
    public void setName(String name) {
        this.name = name;
    }

    public void setAge(int age) {
        this.age = age;
    }
    public Student(String name , int age){
        this.name = name;
        this.age = age;
    }
    //实现安卓自带的Parcelable要实现这两个方法describeContents()  writeToParcel(Parcel dest, int flags)
    @Override
    public int describeContents() {
        return 0;
    }

    @Override
    public void writeToParcel(Parcel dest, int flags) {
        //保存数据,方便将数据传递给其他的程序或者组件
        dest.writeString(getName());
        dest.writeInt(getAge());
    }
    //这里命名必须CREATOR???
    public static final Creator<Student> CREATOR = new Creator<Student>() {
        @Override
        public Student createFromParcel(Parcel source) {
            //通过Paecel创建对象
            return new Student(source.readString(),source.readInt());
        }

        @Override
        public Student[] newArray(int size) {
            //返回它的大小
            return new Student[size];
        }
    };
}
在MainActivity中传递过去
findViewById(R.id.button).setOnClickListener(new View.OnClickListener() {
    @Override
    public void onClick(View v) {
        Intent intent = new Intent(MainActivity.this,Another.class);
        intent.putExtra("student",new Student("小新",22));
        startActivity(intent);
    }
});
在AnotherActivity中获取有些许区别
Intent intent = getIntent();
Student student = intent.getParcelableExtra("student");
textView.setText(String.format("Student info(name = %s,age = %d)",student.getName(),student.getAge()));
<获取Activity的返回参数>
finish();可以结束一个Activity
---------------------------------------------------------------------------------------------------------------------------------------------------------------------------------------------------------------------------------------
Android中Activity启动模式
<Android中Activity启动模式>
在xml中我们设置按钮名字的时候是小写的但是在手机上显示全部是大写的那么我们可以通过设置android:textAllCaps = “false”来设置
在AndroidMainfest.xml中我们可以给Activity配置android:launchMode
<SingleTop模式>
同一个文件里面设置的ID要不一样,但是不同文件中的ID是可以一样的
SingleTop模式:如果处于栈顶就不会创建新的实例,如果不是处于栈顶那么会创建新的实例
<SinleTask与SingleInstance>
SinleTask:在启动一个SinleTask的Activity实例时,如果系统中已经存在这样的一个实例,就将这个实例掉到任务栈的栈顶并且清除当前任务有位于它上面的所有Activity
SingleInstance:以singleInstance模式启动的Activity在整个系统中是单例的,如果在启动这样的Activiyt时,已经存在了一个实例,那么会把它所在的任务调度到前台,重用这个实例
-------------------------------------------------------------------------------------------------------------------在Android中Intent的概念及应用
隐式Intent的标准写法:
<intent-filter>
    <action android:name="android.intent.action.MAIN" />
    <category android:name="android.intent.category.LAUNCHER" />
</intent-filter>
action属性的写法 是:包名.intent.action.Activity名(约定成俗的格式)
优化:隐式启动Activity:
startActivity(new Intent(AnotherActivity.ACTION));这里在AnotherActivity中设置了一个
public static final String ACTION = “包名.intent.action.Activity名”
通过隐式的Intent可以访问不同APP中的Activity,如果我们要将我们的APP中的Activity设置成在别的Activity中不可以访问的话我们要在MainActivityfest.xml中设置exported属性 不设置的话默认情况下是true
<activity
    android:exported="false"
    android:name=".MainActivity"
    android:label="@string/app_name"
在A APP中的A Activity中通过隐式Intent访问 B APP中的 B Activity要捕获异常,有可能B Activity是不给访问的,它设置了exported属性
<通过浏览器启动本地的Activity>
通过这个Demo可以实现通过浏览器打开已经安装的APP,如果没安装的话我们可以给出一个下载的链接
第一步:实现一个HTML页面:
<a href="myapp://jp.app/oppenwith?name="小新",age="22" >启动应用程序</a>
第二步:在安卓客户端中设置
<intent-filter>
    <action android:name="android.intent.action.VIEW"></action>
    <category android:name="android.intent.category.DEFAULT"></category>
    <category android:name="android.intent.category.BROWSABLE"></category>
    <data android:scheme="myApp" android:host="jp.app" android:pathPrefix="/openwith"></data>
</intent-filter>
scheme是必须填的其他的可以不用填写。
第三步:可以在Activity中获取传递过来的数据
Intent intent = getIntent();
String action = intent.getAction();
if(Intent.ACTION_VIEW.equals(action)){
    Uri uri =intent.getData();
    if(uri!=null){
        String name = uri.getQueryParameter("name");
        String age = uri.getQueryParameter("age");
    }
}
Android中Context的理解及使用(多Activity之间的数据共享)
<Context的作用>
同一个应用程序可能有多个主Activity
<Application的用途>
在多个Activity中我们可以通过application进行数据的共享(多Activity之间的数据共享)
第一步:创建一个类继承application
package com.example.myapplication;

import android.app.Application;

/**
 * Created by 小新 on 2016/3/7.
 */
public class DataApp extends Application {
    public String getName() {
        return name;
    }

    public void setName(String name) {
        this.name = name;
    }

    public int getAge() {
        return age;
    }

    public void setAge(int age) {
        this.age = age;
    }

    private String name;
    private int age;

}
第二步:在MainActivityfest.xml中的application标签中加入android:name="DataApp"
<application
    android:name=".DataApp"
    android:allowBackup="true"
    android:icon="@mipmap/ic_launcher"
    android:label="@string/app_name"
    android:supportsRtl="true"
    android:theme="@style/AppTheme">
第三步:在我们想使用的activity中调用getApplication()方法可以获得DataApp对象,然后将要存储的数据通过set存储
在别的activity中也是通过getApplication()方法可以获得DataApp对象,在通过get()方法获取其他activity存储的数据
A Activity中
DateApp dataApp = getApplication();
dataApp.setName("xiaoxin");
B Activity中
DateApp dataApp = getApplication();
dataApp.getName();
第四步:用完的数据记得要回收否,设置成null,否则会一直存储在DataApp中的
<Application的生命周期>
public void onCreate() {
    super.onCreate();
    //application的的oncreate会比activity的oncreate先执行 所以我们可以方便的进行初始化的操作
}

@Override
public void onTerminate() {
    super.onTerminate();
    //一般是不会执行的只有在模拟的情况下才会执行
}

@Override
public void onLowMemory() {
    //在低内存的时候执行 一般情况下也是不执行的
    super.onLowMemory();
}

@Override
public void onTrimMemory(int level) {
    super.onTrimMemory(level);
    //程序在进行内存清理的时候下会执行
}

@Override
public void onConfigurationChanged(Configuration newConfig) {
    super.onConfigurationChanged(newConfig);
    //在配置发生改变的时候汇总执行
}
---------------------------------------------------------------------------------------------------------------------------------------------------------------------------------------------------------------------------------------
认识Android Service
<认识Service>
通过服务的启动方式可以分为两类服务:启动服务-停止服务 和绑定服务-接触绑定服务
启动服务-停止服务调用这个方法
public int onStartCommand(Intent intent, int flags, int startId) {
    return super.onStartCommand(intent, flags, startId);
}
绑定服务-接触绑定服务调用这个方法
public IBinder onBind(Intent intent) {
    // TODO: Return the communication channel to the service.
    throw new UnsupportedOperationException("Not yet implemented");
}
(来自别人博客)
- 启动服务,当一个Android组件(如一个Activity)调用startService()的时候,启动一个服务。服务一旦启动,就可以一直在后台运行下去,即使这个启动它的组件被摧毁。这样的服务模式,通常用于执行一个操作而不需要返回结果给调用者。
- Bound:绑定服务,当一个Android组件(如一个Activity)调用bindService()。一个绑定服务提供了一个客户端到服务端的接口,允许组件与服务之间进行交互,这样可以实现跨进程的通信。绑定服务的生命周期默认是跟随它的绑定组件的,但是一个绑定服务可以绑定多个Android组件,如果这些Android组件都被销毁,那么这个绑定服务也将被销毁。
创建服务
启动服务
startService(new Intent(MainActivity.this,MyService.class));
停止服务
stopService(new Intent(MainActivity.this,MyService.class));
服务在后台处理数据:启动服务后会执行onStartCommand方法
@Override
public int onStartCommand(Intent intent, int flags, int startId) {
    new Thread(){
        public void run(){
            while(true){
                System.out.print("服务正在运行...");
                try {
                    sleep(1000);
                } catch (InterruptedException e) {
                    e.printStackTrace();
                }
            }
        }
    }.start();
    return super.onStartCommand(intent, flags, startId);

}
<绑定服务>
1.创建一个服务类
public class MyService extends Service {
    public MyService() {
    }

    // 创建一个继承Binder的类,里面实现一个可以再客户端执行的方法
    public class MyBinder extends Binder {
        public void downLoad() {

        }
    }

    private MyBinder myBinder = new MyBinder();

    @Override
    public IBinder onBind(Intent intent) {
        // TODO: Return the communication channel to the service.
//        throw new UnsupportedOperationException("Not yet implemented");
        //放回一个IBinder类型的实例给客户端。客户端通过onServiceConnected方法中的 IBinder service参数接收
        return myBinder;
    }

}
2.在客户端绑定服务
bindService(new Intent(MainActivity.this,MyService.class),serviceConnection,0);这里要接收三个数据 第二个参数是客户端和服务端连接时的状态
绑定和接触绑定时候执行的方法ServiceConnection serviceConnection = new ServiceConnection() { @Override public void onServiceConnected(ComponentName name, IBinder service) { System.out.print("客户端与服务绑定的时候接收服务的返回的IBinder进行数据的交换"); MyService.MyBinder mbinder =(MyService.MyBinder) service; //这里可以执行服务端的downLoad方法 mbinder.downLoad(); } @Override public void onServiceDisconnected(ComponentName name) { System.out.print("绑定消失的时候执行的方法"); } };
这样就能通过客户端通知服务端做什么事了
---------------------------------------------------------------------------------------------------------------------------------------------------------------------------------------------------------------------------------------
Android中Service通信
<启动Service并传递数据>
这节课讲的是怎么通过Activity传递数据给服务端进行操作,全程都是讲代码,在他写代码的时候自己已经能一步一步想出思路了,以后忘记了直接再看一遍视频就好了(他是通过启动Servicec来传递数据的)
<绑定Service进行通信上下>
这个视频将的是通过绑定的方式将数据传给服务端,然后服务端放回数据给客户端(这一个系列的视频思路很清晰,可能是最近两天都在服务这一方面的知识,理解起来很容易,过多一段时间可能会变的模糊,所以可以选择的看这个系列的视频讲的不错)
还讲了子线程不能更新UI线程只能通过消息传递机制,这个机制自己之前有学,相当于在复习一次加深印象。
---------------------------------------------------------------------------------------------------------------------------------------------------------------------------------------------------------------------------------------
Android中AIDL理解与应用
AIDL:安卓接口定义语言
<跨应用启动Service>
在5.0版本以前我们可以通过在MainActivityfest.xml中service设置intent-filter来实现启动其他App的服务(隐式Intetn)
5.0版本我们只能通过显示Intent来启动其他应用程序的服务
Intent serviceIntent = new Intent();
serviceIntent.setComponent(new ComponentName(要启动的App包名,要启动App的类名));
startService(serviceIntent);
<跨应用绑定Service>
1.创建AIDL
// IMyAidlInterface.aidl
package com.example.myapplication;

// Declare any non-default types here with import statements

interface IMyAidlInterface {
    /**
     * Demonstrates some basic types that you can use as parameters
     * and return values in AIDL.
     */
    void basicTypes(int anInt, long aLong, boolean aBoolean, float aFloat,
            double aDouble, String aString);
}
2.在服务返回
public IBinder onBind(Intent intent) {
    // TODO: Return the communication channel to the service.
    return new IMyAidlInterface.Stub() {
        @Override
        public void basicTypes(int anInt, long aLong, boolean aBoolean, float aFloat, double aDouble, String aString) throws RemoteException {

        }
    } ;
}
在加上上面的启动外部服务的方法就能实现绑定外部服务
<跨应用绑定Service并通信>
把A App的AIDL复制到B APP中然后通过AIDL进行通信
在实现强制类型转换的时候要

视频可以再看多几遍
---------------------------------------------------------------------------------------------------------------------------------------------------------------------------------------------------------------------------------------
Amdroid广播接收器BroadcastReceiver
后注册的优先级高 可以设置优先级
abortBroadcast()中断广播,让其他广播接收不到
sendBroadcast()方法的广播不能中断
只有发送sendOrderBroadcast的广播才能被中断
---------------------------------------------------------------------------------------------------------------------------------------------------------------------------------------------------------------------------------------
Android的日志系统
PID:程序的进程ID
DDMS的路径 \SDK\tools用来查看日志 调试的重要工具 可以自己有空找找DDMS的使用
---------------------------------------------------------------------------------------------------------------------------------------------------------------------------------------------------------------------------------------
Android的权限系统
权限机制
<为代码添加权限检查>
这个代码是在网上找的,刚好和这个视频的一模一样
import android.content.Context;
 2 import android.content.pm.PackageManager;
 3
 4 public class Hello {
 5
 6     public static final String PERMISSION_SAY_HELLO = "com.example.authoritydemo.permission.SAY_HELLO";
 7
 8     public static void sayHello(Context cxt) {
 9         int checkResult = cxt.checkCallingOrSelfPermission(PERMISSION_SAY_HELLO);
10         // 判断是否被允许
11         if (checkResult != PackageManager.PERMISSION_GRANTED) {
12             throw new SecurityException("执行方法需要com.example.authoritydemo.permission.SAY_HELLO权限");
13         }
14         System.out.println("Say Hello www.baidu.com");
15     }
16
17 }
public class MainActivity extends Activity {
 2
 3     @Override
 4     protected void onCreate(Bundle savedInstanceState) {
 5         super.onCreate(savedInstanceState);
 6         setContentView(R.layout.activity_main);
 7
 8         Hello.sayHello(this);
 9     }
10
11 }
在配置文件中添加
<permission android:name="com.example.authoritydemo.permission.SAY_HELLO" />
    <uses-permission android:name="com.example.authoritydemo.permission.SAY_HELLO" />
<为基本组件添加权限检查>
在A app中 通过A activity启动 B activity(B activity有权限)因为这是在同一个app中的所以我们可以打开(只需要声明自定义的权限 permission)
如果想通过C app中的C activity启动A app中的B activity要给他赋予权限(赋予权限就是user-permission)
声明权限和赋予权限是不一样的
--------------------------------------------------------------------------------------------------------------------------------------------------------------------------------------------------------------------------------------
用户界面
Android Fragment
<使用Fragment>
1.创建一个类继承Fragment
package com.example.myapplication;

import android.support.v4.app.Fragment;
import android.os.Bundle;
import android.view.LayoutInflater;
import android.view.View;
import android.view.ViewGroup;

/**
 * A placeholder fragment containing a simple view.
 */
public class MainActivityFragment extends Fragment {

    public MainActivityFragment() {
    }

    @Override
    public View onCreateView(LayoutInflater inflater, final ViewGroup container,
                             Bundle savedInstanceState) {
        //在这个类中加载它的布局文件(R.layout.fragment_main)
        View root =inflater.inflate(R.layout.fragment_main, container, false);
        root.findViewById(R.id.btnShowAnotherActivity).setOnClickListener(new View.OnClickListener() {
            @Override
            public void onClick(View v) {

            }
        });
        return root;
    }
}
2.它的布局文件(添加了一个按钮)
<LinearLayout xmlns:android="http://schemas.android.com/apk/res/android"
    xmlns:tools="http://schemas.android.com/tools"
    android:layout_width="match_parent"
    android:layout_height="match_parent"
    android:paddingLeft="@dimen/activity_horizontal_margin"
    android:paddingRight="@dimen/activity_horizontal_margin"
    android:paddingTop="@dimen/activity_vertical_margin"
    android:paddingBottom="@dimen/activity_vertical_margin"
    tools:showIn="@layout/activity_main"
    tools:context="com.example.myapplication.MainActivityFragment">

    <Button
        android:text="打开另外一个Fragment"
        android:id="@+id/btnShowAnotherActivity"
        android:layout_width="match_parent"
        android:layout_height="wrap_content" />

</LinearLayout>
3.开启事务,提交事务在activity中添加fragment
public class MainActivity extends AppCompatActivity {

    @Override
    protected void onCreate(Bundle savedInstanceState) {
        super.onCreate(savedInstanceState);
        setContentView(R.layout.activity_main);

        if(savedInstanceState==null){
            //在activity中加载fragment
            getSupportFragmentManager().beginTransaction().add(R.id.fragment,new MainActivityFragment()).commit();
        }
<Fragment的生命周期>
onCreate--onCreateView-onPause--onDestroy 主要有这几个生命周期比较重要
<带侧边栏的activity>通过右拉点击可以打开其他的activity
<Tabbed activity>微信的界面滑动显示不同的页面
---------------------------------------------------------------------------------------------------------------------------------------------------------------------------------------------------------------------------------------
Android的基本布局
<LinearLayout>
android :layout_weight的用法按照父容器剩下的大小进行按比例的分配
<用代码控制子对象>
通过这个方法我们在activity中动态的添加和删除控件的布局,使得布局更加的灵活,这些小的知识点有可能记得不太清楚但是只要了解就好当我们需要用的时候我们可以通过查询获得
<RelativeLayout>一个控件不仅仅可以相对于父容器进行定位还可以相对应其他的控件进行定位
---------------------------------------------------------------------------------------------------------------------------------------------------------------------------------------------------------------------------------------
Android RecyclerView
RecyclerView是v7中新有的控件来代替传统的listview
---------------------------------------------------------------------------------------------------------------------------------------------------------------------------------------------------------------------------------------
Android的常用控件
<下拉列表>spinner
布局
<Spinner
    android:id="@+id/spinner"
    android:layout_width="wrap_content"
    android:layout_height="wrap_content"></Spinner>
在Activity中
数据
String [] data = new String[]{"a","b","c","d"};设配器 监听器
spinner = (Spinner) findViewById(R.id.spinner);
//设配器加载的是数据 第二个参数是下拉列表的布局  第三个参数是加载的数据来源
spinner.setAdapter(new ArrayAdapter<String>(this,android.R.layout.simple_list_item_1,data));
//一个监听事件 监听下拉列表被选择是哪个
spinner.setOnItemSelectedListener(new AdapterView.OnItemSelectedListener() {
    @Override
    public void onItemSelected(AdapterView<?> parent, View view, int position, long id) {
        System.out.print("选择的是:"+data[position]);
    }
<.日期选择器>DatePickerDialog
btn.setOnClickListener(new View.OnClickListener() {
    @Override
    public void onClick(View v) {
        //日期选择器
        new DatePickerDialog(MainActivity.this, new DatePickerDialog.OnDateSetListener() {
            @Override
            public void onDateSet(DatePicker view, int year, int monthOfYear, int dayOfMonth) {
                //这里要在按钮上显示事件的话,月份记得要加1
                btn.setText(String.format("%d"+"-"+"%d"+"-"+"%d",year,monthOfYear+1,dayOfMonth));
            }
            //这里点击按钮显示的时间是2016.3.9 1月份是从0开始的
        },2016,2,9).show();
    }
});
<时间选择器>TimePickerDialog
btn.setOnClickListener(new View.OnClickListener() {
    @Override
    public void onClick(View v) {
        new TimePickerDialog(MainActivity.this, new TimePickerDialog.OnTimeSetListener() {
            @Override
            public void onTimeSet(TimePicker view, int hourOfDay, int minute) {
                btn.setText(String.format("%d"+":"+"%d",hourOfDay,minute));
            }
            //3:20 true代表的是显示24小时进制
        },3,20,true).show();
    }
});
<单项选择>
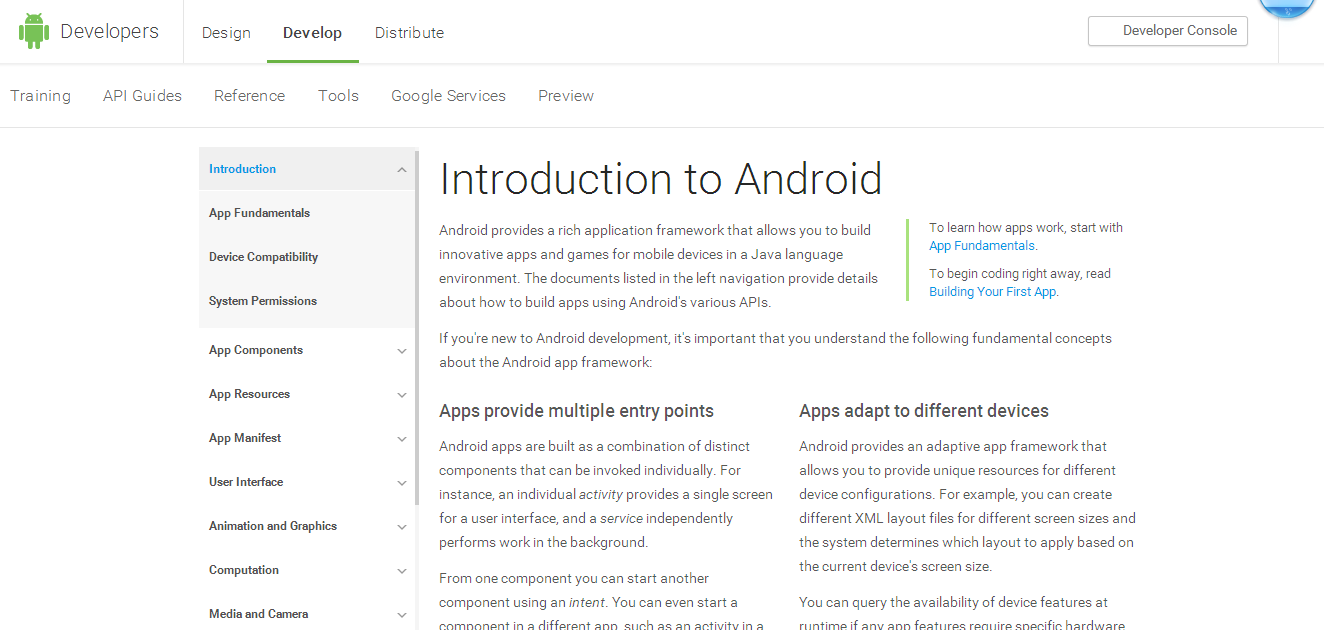
布局 记得要使用RadioGroup包含RadioButton
<TextView
    android:text="世界上谁最帅"
    android:layout_width="wrap_content"
    android:layout_height="wrap_content" />
 <RadioGroup
     android:layout_width="wrap_content"
     android:layout_height="wrap_content">
  <RadioButton
      android:id="@+id/A"
      android:text="选择A"
      android:layout_width="wrap_content"
      android:layout_height="wrap_content" />
  <RadioButton
      android:id="@+id/B"
      android:text="选择B"
      android:layout_width="wrap_content"
      android:layout_height="wrap_content" />
  <RadioButton
      android:id="@+id/C"
      android:text="选择C"
      android:layout_width="wrap_content"
      android:layout_height="wrap_content" />
  <RadioButton
      android:id="@+id/D"
      android:text="选择D"
      android:layout_width="wrap_content"
      android:layout_height="wrap_content" />
 </RadioGroup>
 <Button
     android:text="提交答案"
     android:id="@+id/commit"
     android:layout_width="wrap_content"
     android:layout_height="wrap_content" />
在Activity中
commit = (Button) findViewById(R.id.commit);
A = (RadioButton) findViewById(R.id.A);
commit.setOnClickListener(new View.OnClickListener() {
    @Override
    public void onClick(View v) {
        //A RadioButton被选择
        if(A.isChecked())
            Toast.makeText(MainActivity.this,"正确答案",Toast.LENGTH_LONG).show();
        else
            Toast.makeText(MainActivity.this,"错误答案",Toast.LENGTH_LONG).show();
    }
});
效果
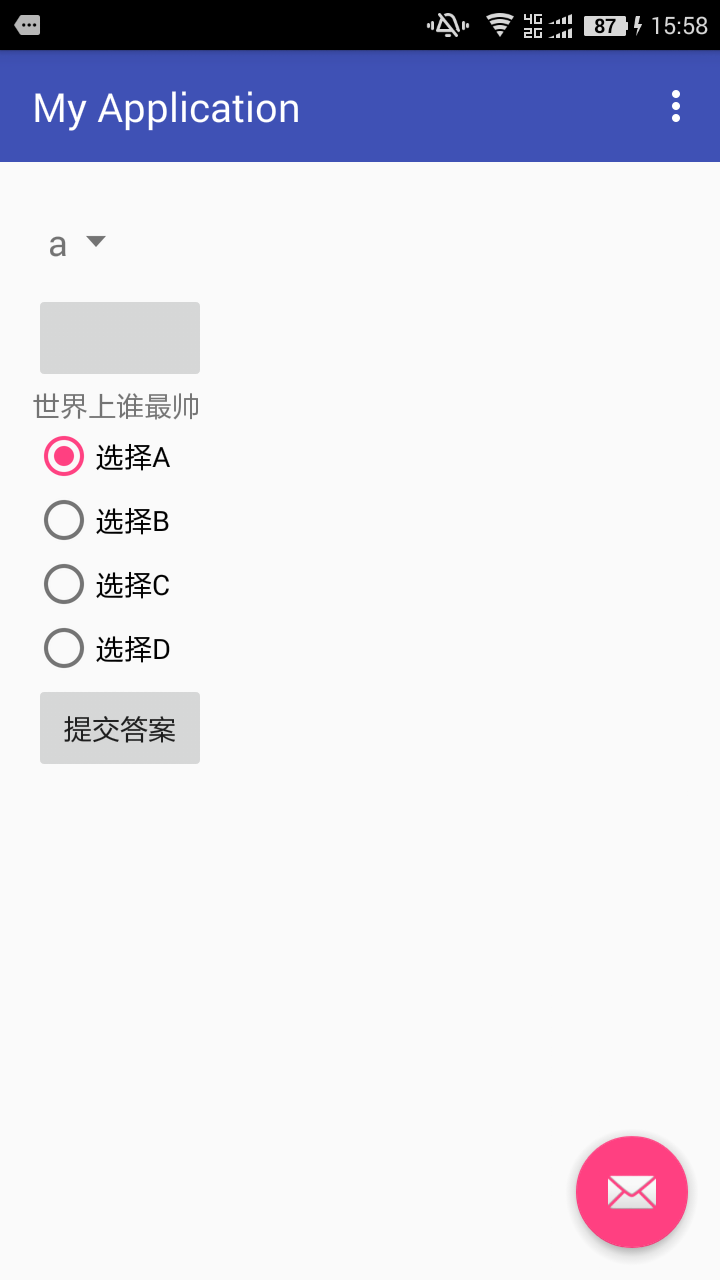
<多项选择>CheckBox
布局
<TextView
    android:text="你喜欢吃什么"
    android:layout_width="wrap_content"
    android:layout_height="wrap_content" />
 <CheckBox
     android:text="苹果"
     android:id="@+id/cb1"
     android:layout_width="wrap_content"
     android:layout_height="wrap_content"
     ></CheckBox>
 <CheckBox
     android:text="龙眼"
     android:id="@+id/cb2"
     android:layout_width="wrap_content"
     android:layout_height="wrap_content"
     ></CheckBox>
 <CheckBox
     android:text="西瓜"
     android:id="@+id/cb3"
     android:layout_width="wrap_content"
     android:layout_height="wrap_content"
     ></CheckBox>
 <CheckBox
     android:text="火龙果"
     android:id="@+id/cb4"
     android:layout_width="wrap_content"
     android:layout_height="wrap_content"
     ></CheckBox>
 <TextView
     android:id="@+id/tectView"
     android:layout_width="wrap_content"
     android:layout_height="wrap_content" />
在activity中
//找到控件
cb1 = (CheckBox) findViewById(R.id.cb1);
cb2 = (CheckBox) findViewById(R.id.cb2);
cb3 = (CheckBox) findViewById(R.id.cb3);
cb4 = (CheckBox) findViewById(R.id.cb4);
textView = (TextView) findViewById(R.id.tectView);
//实现控件的方法
cb1.setOnCheckedChangeListener(this);
cb2.setOnCheckedChangeListener(this);
cb3.setOnCheckedChangeListener(this);
cb4.setOnCheckedChangeListener(this);
//复选框被选择的话
public void onCheckedChanged(CompoundButton buttonView, boolean isChecked) {
    String string = "我喜欢吃";
    if(cb1.isChecked())
        string +=cb1.getText()+",";

    if(cb2.isChecked())
        string +=cb2.getText()+",";

    if(cb3.isChecked())
        string +=cb3.getText()+",";

    if(cb4.isChecked())
        string +=cb4.getText()+",";
    textView.setText(string);
}
效果
---------------------------------------------------------------------------------------------------------------------------------------------------------------------------------------------------------------------------------------
Android SlidingMenu菜单栏程序设计开发
这个专门重新写了一篇博客
http://blog.csdn.net/xin917480852/article/details/50844292
---------------------------------------------------------------------------------------------------------------------------------------------------------------------------------------------------------------------------------------
Android绘图API开发自定义视图控件
<自定义视图属性>
这个专门重新写了一篇博客
http://blog.csdn.net/xin917480852/article/details/50845732
<自定义控件皮肤>
简单的实现了按钮按下的时候显示不同的颜色的效果
<使用绘图Api自定义视图>
Paint的用法
---------------------------------------------------------------------------------------------------------------------------------------------------------------------------------------------------------------------------------------
Android自定义视图动画
<透明动画效果>
1.在AS目录下的res右键New--Android resource file
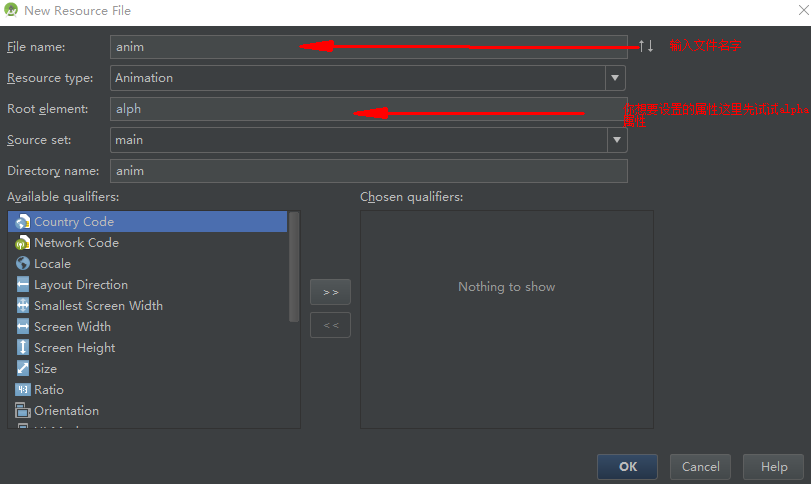
2.编写动画的xml文件
<?xml version="1.0" encoding="utf-8"?>
<alpha xmlns:android="http://schemas.android.com/apk/res/android"
    android:valueFrom="0"
    android:valueTo="1"
    android:duration="1000">

</alpha>
3.在activity中加载动画
btn.setOnClickListener(new View.OnClickListener() {
    @Override
    public void onClick(View v) {
                //AnimationUtils.loadAnimation加载你设定的动画
            v.startAnimation(AnimationUtils.loadAnimation(MainActivity.this,R.anim.alpha));
    }
});
让按钮的透明度由0到1
<旋转动画效果>
<?xml version="1.0" encoding="utf-8"?>
<rotate
    android:fromDegrees="0"
    android:toDegrees="360"
    android:duration="1000"
    android:pivotX="50%"
    android:pivotY="50%"
    xmlns:android="http://schemas.android.com/apk/res/android"></rotate>
v.startAnimation(AnimationUtils.loadAnimation(MainActivity.this,R.anim.rotate));
<移动动画效果>
<?xml version="1.0" encoding="utf-8"?>
<translate xmlns:android="http://schemas.android.com/apk/res/android"
    android:fromXDelta="0"
    android:fromYDelta="0"
    android:toXDelta="200"
    android:toYDelta="200"
    android:duration="1000"
    >

</translate>
v.startAnimation(AnimationUtils.loadAnimation(MainActivity.this,R.anim.translate));
<缩放动画效果>
<?xml version="1.0" encoding="utf-8"?>
<scale xmlns:android="http://schemas.android.com/apk/res/android"
    android:fromXScale="0"
    android:toXScale="1"
    android:fromYScale="0"
    android:toYScale="1"
    android:duration="1000"
    android:pivotY="50%"
    android:pivotX="50%"
    >

</scale>
v.startAnimation(AnimationUtils.loadAnimation(MainActivity.this,R.anim.scale));
<动画效果混合>
<?xml version="1.0" encoding="utf-8"?>
<set xmlns:android="http://schemas.android.com/apk/res/android"
    android:shareInterpolator="true"
    android:duration="1000">
    <alpha
        android:fromAlpha="0"
        android:toAlpha="1"
        ></alpha>
    <translate
        android:fromXDelta="200"
        android:fromYDelta="200"
        android:toYDelta="0"
        android:toXDelta="0"
        ></translate>

    <rotate
        android:fromDegrees="0"
        android:toDegrees="720"
        ></rotate>

</set>
v.startAnimation(AnimationUtils.loadAnimation(MainActivity.this,R.anim.mix));
<动画效果监听>
Animation animation = AnimationUtils.loadAnimation(MainActivity.this,R.anim.mix);
animation.setAnimationListener(new Animation.AnimationListener() {
    @Override//监听动画的开始
    public void onAnimationStart(Animation animation) {

    }
    @Override//监听动画的结束
    public void onAnimationEnd(Animation animation) {

    }
    @Override//监听动画的重复
    public void onAnimationRepeat(Animation animation) {

    }
});
<自定义动画效果>
1.新建一个类继承Animation
package com.example.myapplication;

import android.view.animation.Animation;
import android.view.animation.Transformation;

/**
 * Created by 小新 on 2016/3/10.
 */
public class MyAnimation extends Animation {
    @Override//获取它的宽度和高度  先执行这个在执行applyTransformation
    public void initialize(int width, int height, int parentWidth, int parentHeight) {
        super.initialize(width, height, parentWidth, parentHeight);
    }

    @Override
    protected void applyTransformation(float interpolatedTime, Transformation t) {
        super.applyTransformation(interpolatedTime, t);
        //interpolatedTime这个参数特别的重要,它是一个补间时间从0到1,也就是从0一直变化到1
        t.setAlpha(interpolatedTime*1);
        //t.getMatrix.下可以设置很多动画的属性 rotate scale translate等等

        //这一个的效果是直接到达没有轨迹的
        t.getMatrix().setTranslate(200,200);
        //这个乘以补间时间,所以移动的时候是由轨迹的
        t.getMatrix().setTranslate(200*interpolatedTime,200*interpolatedTime);
    }
}
2.在其他activity中使用它
myAnimation = new MyAnimation();
myAnimation.setDuration(1000);
v.startAnimation(myAnimation);
Android中动画补间动画和帧动画
补间动画:
是指通过指定View的初末状态和变化时间、方式,对View的内容完成一系列的图形变换来实现动画效果
主要包括四种效果:Alpha、Scale、Translate和Rotate。
帧动画就是Frame动画,即指定每一帧的内容和停留时间,然后播放动画。
---------------------------------------------------------------------------------------------------------------------------------------------------------------------------------------------------------------------------------------
Android创建和配置布局动画
<为布局添加动画效果>
1.创建一个布局文件
<LinearLayout xmlns:android="http://schemas.android.com/apk/res/android"
    xmlns:tools="http://schemas.android.com/tools"
    android:layout_width="match_parent"
    android:layout_height="match_parent"
    android:paddingLeft="@dimen/activity_horizontal_margin"
    android:paddingRight="@dimen/activity_horizontal_margin"
    android:paddingTop="@dimen/activity_vertical_margin"
    android:paddingBottom="@dimen/activity_vertical_margin"
    tools:showIn="@layout/activity_main"
    android:orientation="vertical"
    android:id="@+id/lin"
    tools:context="com.example.myapplication.MainActivityFragment">

    <Button
        android:text="按钮1"
        android:id="@+id/btn1"
        android:layout_width="match_parent"
        android:layout_height="wrap_content" />
    <Button
        android:text="按钮2"
        android:id="@+id/btn2"
        android:layout_width="match_parent"
        android:layout_height="wrap_content" />
    <Button
        android:text="按31"
        android:id="@+id/btn3"
        android:layout_width="match_parent"
        android:layout_height="wrap_content" />
    <Button
        android:text="按钮4"
        android:id="@+id/btn4"
        android:layout_width="match_parent"
        android:layout_height="wrap_content" />

</LinearLayout>
2.在activity中获取这个布局文件并且获取布局文件动画管理器为布局中的控件设置动画效果
package com.example.myapplication;

import android.support.v4.app.Fragment;
import android.os.Bundle;
import android.view.LayoutInflater;
import android.view.View;
import android.view.ViewGroup;
import android.view.animation.LayoutAnimationController;
import android.view.animation.ScaleAnimation;
import android.widget.LinearLayout;

/**
 * A placeholder fragment containing a simple view.
 */
public class MainActivityFragment extends Fragment {

    public MainActivityFragment() {
    }

    @Override
    public View onCreateView(LayoutInflater inflater, ViewGroup container,
            Bundle savedInstanceState) {

        LinearLayout  view = (LinearLayout) inflater.inflate(R.layout.fragment_main, container, false);
        //设置布局里面控件的动画效果
        ScaleAnimation scaleAnimation = new ScaleAnimation(0,1,0,1);
        scaleAnimation.setDuration(5000);
        //创建布局动画的管理器,并且将他要管理的动画效果给添加进来,第二个参数是设置延迟
        //所谓的延迟就是上一个控件运行到0.5f(一半)的动画效果后,它的下一个控件就可以执行动画效果可
        LayoutAnimationController layoutAnimationController = new LayoutAnimationController(scaleAnimation,0.5f);
        //设置布局中控件的动画顺序 一共有三个LayoutAnimationController.ORDER_RANDOM  随机 这里的随机有可能多个控件一起出来
        //                                   LayoutAnimationController.ORDER_NORMAL  从上往下
        //                                   LayoutAnimationController.ORDER_REVERSE 从下往上
        layoutAnimationController.setOrder(LayoutAnimationController.ORDER_RANDOM);
        //为布局设置动画执行起来
        view.setLayoutAnimation( layoutAnimationController);
//        layoutAnimationController.setOrder(LinearLayou);

        return view;
    }
}
<使用资源文件配置布局动画>
这里通过xml文件的配置我们可以实现控制布局文件中子控件的动画效果
---------------------------------------------------------------------------------------------------------------------------------------------------------------------------------------------------------------------------------------
Android ViewPager引导页
见另外一篇原创博客 http://blog.csdn.net/xin917480852/article/details/50877848
---------------------------------------------------------------------------------------------------------------------------------------------------------------------------------------------------------------------------------------
action Bar的使用(action Bar已经过时,使用ToolBar)
<在action Bar上添加按钮>
google官方提供了一系类的action bar icons在官网上我们可以下载使用(目的 是为了给用户一致性的体验)
向上关系:返回的是父控件的位置
前后关系:返回的是前一个activity
getSupportActionBar().setDisplayHomeAsUpEnabled(true)这个代码能将action Bar的返回按钮给显示出来,返回的是当前activity的父activity中去
android.R.id.home 这个id是and'r'oid中默认的action Bar上面的返回按钮的id
<自定义action Bar样式>
看视频看到这里发现google在2013年推出了ToolBar代替action Bar所以现在学习ToolBar
详细看原创ToolBar的博客 http://blog.csdn.net/xin917480852/article/details/50885794
---------------------------------------------------------------------------------------------------------------------------------------------------------------------------------------------------------------------------------------


 504
504


 被折叠的 条评论
为什么被折叠?
被折叠的 条评论
为什么被折叠?
 到【灌水乐园】发言


