一、 后端开发环境配置
1. 下载或拉取源码
2. 在idea中打开项目
3. maven install相应包
4. 数据库配置
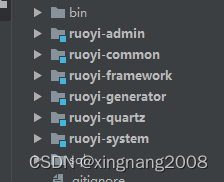
二、目录结构与用途
三、开始配置
1. 配置数据库。 ruoyi-admin-resources 下application-druid.yml
2. 其他如redis、log、server端口 ruoyi-admin-resources 下application.yml
四、代码生成与配置
1. 在mysql中创建表
2. 运行 ruoyi-admin 下的 RuoYiApplication
3. 运行前端 ——系统工具——导入,找到对应表。预览或生成(下载)
4. 将 生成的后端文件(除api.js 和index.vue)对应放在ruoyi-system\src\main\java\com\ruoyi\system 下的目录
5. 数据库中运行sql
6. 在Service目录中开发相应逻辑
五、增加定时任务
1. 定时任务,可以在ruoyi-admin或 任意一个模块下新建一个类,给类加上注释@Component("myTestTask")
2. 其中myTestTask是这个类的别名。
3. 在web页端添加任务,调用方法:myTestTask.myFunction,
4. 设置 cron表达式
5. 执行策略:如果在规定时间没有执行,再次启动任务时的策略。
	立即执行:错过的全部立即执行一次。
	执行一次:错过的立即执行一次,但只执行一次。
	放弃执行:不再执行错过的任务
六、集成websocket
1. 在ruoyi-framework下的config目录添加 WebSocketConfig内容如下:
	```
	package com.ruoyi.framework.config;

	import org.springframework.context.annotation.Bean;
	import org.springframework.context.annotation.Configuration;
	import org.springframework.web.socket.server.standard.ServerEndpointExporter;

	/**
	 * 开启WebSocket支持
	 */
	@Configuration
	public class WebSocketConfig {
	    @Bean
	    public ServerEndpointExporter serverEndpointExporter() {
	        return new ServerEndpointExporter();
	    }
	}
	```
	主要是引用 ServerEndpointExporter
2. 在 ruoyi-admin下的web controller目录下创建 WebSocketServer类,主要是加上注释
	```
	@ServerEndpoint("/websocket/{token}")
	@Component
	public class WebSocketServer {
	```
	这里的/websocket/{token} 是访问路径, {token} 是用户的token做参数,便于区分用户
3. 注意:WebSocketServer类中不能使用 @Autowired 注入, 可以用static + set 的方式传参,传入参数(如:Service)
	```
	 private static TokenService tokenService;
    @Autowired
    public void setTokenService(TokenService tokenService) {
        WebSocketServer.tokenService = tokenService;
    }
```
七、 实现后台运行
1.在config下添加RunConfig的class类, 里面有个run方法,指向一个Service去做要后台运行的逻辑。
package com.ruoyi.framework.config;

import com.ruoyi.sms.service.AsyncService;
import org.springframework.beans.factory.annotation.Autowired;
import org.springframework.stereotype.Component;

@Component
public class RunConfig {
    @Autowired
    AsyncService asyncService;
    /**
     * 后台运行
     */
    public void run(){
        while(true){
            asyncService.executeAsync();
        }
    }
}
2. 在 ruoyi-admin 下的 RuoYiApplication里 添加init()方法,并放在main方法中
public static void main(String[] args)
    {
        // System.setProperty("spring.devtools.restart.enabled", "false");
        SpringApplication.run(RuoYiApplication.class, args);
        System.out.println("(♥◠‿◠)ノ゙  若依启动成功   ლ(´ڡ`ლ)゙  \n" +
                " .-------.       ____     __        \n" +
                " ''-'   `'-'    `-..-'              ");
        init();
    }
 public static void init(){
        RunConfig config = SpringUtils.getBean(RunConfig.class);
        config.run();
    }


 7648
7648

 被折叠的 条评论
为什么被折叠?
被折叠的 条评论
为什么被折叠?
 到【灌水乐园】发言


