


前言
一步一步做出一个完整的导航栏
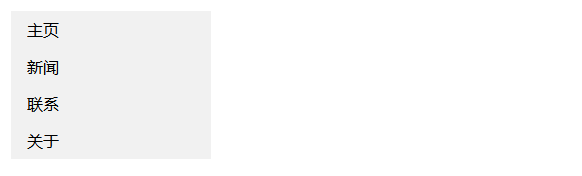
1. 最简导航栏
<!DOCTYPE html>
<html>
<head>
<meta charset="utf-8">
<title>hello world</title>
<style>
ul {
    list-style-type: none;
    margin: 0;
    padding: 0;
    width: 200px;
    background-color: #f1f1f1;
}

li a {
    display: block;
    color: #000;
    padding: 8px 16px;
    text-decoration: none;
}

</style>
</head>

<body>
<ul>
<li><a href="#home">主页</a></li>
<li><a href="#news">新闻</a></li>
<li><a href="#contact">联系</a></li>
<li><a href="#about">关于</a></li>
</ul>

</body>
</html>
- 效果
2 添加鼠标改变背景色
- < head > 的< style >中添加如下内容
/* 鼠标移动到选项上修改背景颜色 */
li a:hover {
    background-color: #555;
    color: white;
}
- 效果
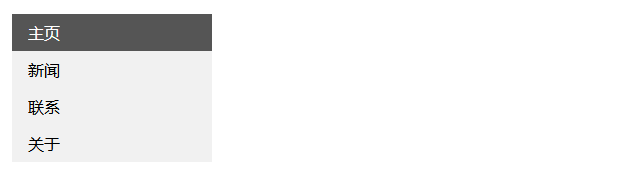
3 给首页添加颜色
<!DOCTYPE html>
<html>
<head>
<meta charset="utf-8">
<title>hello world</title>
<style>
ul {
    list-style-type: none;
    margin: 0;
    padding: 0;
    width: 200px;
    background-color: #f1f1f1;
}

li a {
    display: block;
    color: #000;
    padding: 8px 16px;
    text-decoration: none;
}
/* 个“首页”添加一个新的效果*/
li a.active {
    background-color: #4CAF50;
    color: white;
}
/* not(.active) 表示排除了a.active(即鼠标移到a.active的对象时不生效) */
li a:hover:not(.active) {
    background-color: #555;
    color: white;
}
</style>
</head>
<body>

<ul>
  <li><a class="active" href="#home">主页</a></li>
  <li><a href="#news">新闻</a></li>
  <li><a href="#contact">联系</a></li>
  <li><a href="#about">关于</a></li>
</ul>

</body>
</html>
- 效果
首页添加了新的效果
切鼠标移动到首页时,该效果不变。

4 加边框
4.1 思路
- 问题
如果直接给每个 li 都加框的话,相邻li中间会有两条线,很难看
li {
    text-align: center;
    border: 1px solid #555;
}
因此,我没先给ul加个外框
ul {
    ……
    border: 1px solid #555;
}
再给每个 a 加 下边框
li {
    ……
    border-bottom: 1px solid #555;
}
此时,最后一个a的下边框 和 ul的下边框重合,我们去掉最后一个a的下边框:
4.2 实际代码
<!DOCTYPE html>
<html>
<head>
<meta charset="utf-8">
<title>hello world</title>
<style>
ul {
    list-style-type: none;
    margin: 0;
    padding: 0;
    width: 200px;
    background-color: #f1f1f1;
    border: 1px solid #555;
}

li a {
    display: block;
    color: #000;
    padding: 8px 16px;
    text-decoration: none;
}

li {
    text-align: center;
    border-bottom: 1px solid #555;
}

li:last-child {
    border-bottom: none;
}

li a.active {
    background-color: #4CAF50;
    color: white;
}

li a:hover:not(.active) {
    background-color: #555;
    color: white;
}
</style>
</head>
<body>

<ul>
  <li><a class="active" href="#home">主页</a></li>
  <li><a href="#news">新闻</a></li>
  <li><a href="#contact">联系</a></li>
  <li><a href="#about">关于</a></li>
</ul>

</body>
</html>
- 效果

5 全屏高度固定导航条
5.1 思路
- 给body去掉 外部距离
body {
    margin: 0;
}
- 设置 ul 为全屏高度
ul {
    ……
    height: 100%;
    overflow: auto;
}
5.2 实际代码
<!DOCTYPE html>
<html>
<head>
<meta charset="utf-8">
<title>hello world</title>
<style>
body {
    margin: 0;
}

ul {
    list-style-type: none;
    margin: 0;
    padding: 0;
    width: 25%;
    background-color: #f1f1f1;
    position: fixed;
    height: 100%;
    overflow: auto;
}

li a {
    display: block;
    color: #000;
    padding: 8px 16px;
    text-decoration: none;
}

li a.active {
    background-color: #4CAF50;
    color: white;
}

li a:hover:not(.active) {
    background-color: #555;
    color: white;
}
</style>
</head>
<body>

<ul>
  <li><a class="active" href="#home">主页</a></li>
  <li><a href="#news">新闻</a></li>
  <li><a href="#contact">联系</a></li>
  <li><a href="#about">关于</a></li>
</ul>

<div style="margin-left:25%;padding:1px 16px;height:1000px;">
  <h2>标题</h2>
  <p>Some text..</p>
  <p>Some text..</p>
  <p>Some text..</p>
  <p>Some text..</p>
  <p>Some text..</p>
  <p>Some text..</p>
  <p>Some text..</p>
  <p>Some text..</p>
  <p>Some text..</p>
  <p>Some text..</p>
</div>

</body>
</html>
- 效果


 208
208


 被折叠的 条评论
为什么被折叠?
被折叠的 条评论
为什么被折叠?
 到【灌水乐园】发言


