


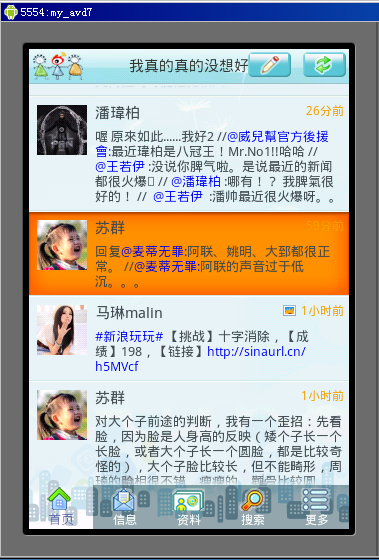
上一篇完成用户首页的UI实现,本篇接下来讲功能部分的实现,本页面主要的功能就用户关注的最新微博列表,从上一篇中知道本列表是用ID为Msglist的ListView控件来实现,本篇的主要就讲解如果获取微博列表数据给这个ListView提供显示数据。ListView每一条子数据分别由用户头像、用户昵称、发布时间、是否包含照片、微博内容这五部分组成,根据这五部分定义一个名为WeiBoInfo.java实体类,代码如下:

 代码
代码
public
class
WeiBoInfo {
// 文章id
private String id;
public String getId(){
return id;
}
public void setId(String id){
this .id = id;
}
// 发布人id
private String userId;
public String getUserId(){
return userId;
}
public void setUserId(String userId){
this .userId = userId;
}
// 发布人名字
private String userName;
public String getUserName(){
return userName;
}
public void setUserName(String userName){
this .userName = userName;
}
// 发布人头像
private String userIcon;
public String getUserIcon(){
return userIcon;
}
public void setUserIcon(String userIcon){
this .userIcon = userIcon;
}
// 发布时间
private String time;
public String getTime(){
return time;
}
public void setTime(String time)
{
this .time = time;
}
// 是否有图片
private Boolean haveImage = false ;
public Boolean getHaveImage(){
return haveImage;
}
public void setHaveImage(Boolean haveImage){
this .haveImage = haveImage;
}
// 文章内容
private String text;
public String getText(){
return text;
}
public void setText(String text){
this .text = text;
}
}
然后在res/layout目录下新建名为weibo.xml的Layout用来控制ListView子项的显示部件,代码很简单不多解释了,直接看下面代码:
代码
<?
xml version="1.0" encoding="utf-8"
?>
< LinearLayout
xmlns:android ="http://schemas.android.com/apk/res/android"
android:layout_width ="wrap_content"
android:layout_height ="wrap_content"
android:orientation ="horizontal" >
< ImageView
android:id ="@+id/wbicon"
android:layout_width ="wrap_content"
android:layout_height ="wrap_content"
android:src ="@drawable/usericon"
android:layout_margin ="8px" >
</ ImageView >
< LinearLayout
android:layout_width ="fill_parent"
android:layout_height ="wrap_content"
android:orientation ="vertical"
android:paddingLeft ="0px"
android:paddingRight ="5px"
android:layout_marginTop ="5px"
android:layout_marginBottom ="5px" >
< RelativeLayout
android:layout_width ="fill_parent"
android:layout_height ="wrap_content" >
< TextView
android:id ="@+id/wbuser"
android:layout_width ="wrap_content"
android:layout_height ="wrap_content"
android:textSize ="15px"
android:textColor ="#424952"
android:layout_alignParentLeft ="true" >
</ TextView >
< ImageView
android:id ="@+id/wbimage"
android:layout_width ="wrap_content"
android:layout_height ="wrap_content"
android:layout_marginTop ="3px"
android:layout_marginRight ="5px"
android:layout_toLeftOf ="@+id/wbtime" >
</ ImageView >
< TextView
android:id ="@+id/wbtime"
android:layout_width ="wrap_content"
android:layout_height ="wrap_content"
android:layout_alignParentRight ="true"
android:textColor ="#f7a200"
android:textSize ="12px" >
</ TextView >
</ RelativeLayout >
< TextView
android:id ="@+id/wbtext"
android:layout_width ="wrap_content"
android:layout_height ="wrap_content"
android:textColor ="#424952"
android:textSize ="13px"
android:layout_marginTop ="4px" >
</ TextView >
</ LinearLayout >
</ LinearLayout >
< LinearLayout
xmlns:android ="http://schemas.android.com/apk/res/android"
android:layout_width ="wrap_content"
android:layout_height ="wrap_content"
android:orientation ="horizontal" >
< ImageView
android:id ="@+id/wbicon"
android:layout_width ="wrap_content"
android:layout_height ="wrap_content"
android:src ="@drawable/usericon"
android:layout_margin ="8px" >
</ ImageView >
< LinearLayout
android:layout_width ="fill_parent"
android:layout_height ="wrap_content"
android:orientation ="vertical"
android:paddingLeft ="0px"
android:paddingRight ="5px"
android:layout_marginTop ="5px"
android:layout_marginBottom ="5px" >
< RelativeLayout
android:layout_width ="fill_parent"
android:layout_height ="wrap_content" >
< TextView
android:id ="@+id/wbuser"
android:layout_width ="wrap_content"
android:layout_height ="wrap_content"
android:textSize ="15px"
android:textColor ="#424952"
android:layout_alignParentLeft ="true" >
</ TextView >
< ImageView
android:id ="@+id/wbimage"
android:layout_width ="wrap_content"
android:layout_height ="wrap_content"
android:layout_marginTop ="3px"
android:layout_marginRight ="5px"
android:layout_toLeftOf ="@+id/wbtime" >
</ ImageView >
< TextView
android:id ="@+id/wbtime"
android:layout_width ="wrap_content"
android:layout_height ="wrap_content"
android:layout_alignParentRight ="true"
android:textColor ="#f7a200"
android:textSize ="12px" >
</ TextView >
</ RelativeLayout >
< TextView
android:id ="@+id/wbtext"
android:layout_width ="wrap_content"
android:layout_height ="wrap_content"
android:textColor ="#424952"
android:textSize ="13px"
android:layout_marginTop ="4px" >
</ TextView >
</ LinearLayout >
</ LinearLayout >
接下来为列表控件定义一个数据Adapter,代码如下:
代码
private
List
<
WeiBoInfo
>
wbList;
// 微博列表Adapater
public class WeiBoAdapater extends BaseAdapter{
private AsyncImageLoader asyncImageLoader;
@Override
public int getCount() {
return wbList.size();
}
@Override
public Object getItem( int position) {
return wbList.get(position);
}
@Override
public long getItemId( int position) {
return position;
}
@Override
public View getView( int position, View convertView, ViewGroup parent) {
asyncImageLoader = new AsyncImageLoader();
convertView = LayoutInflater.from(getApplicationContext()).inflate(R.layout.weibo, null );
WeiBoHolder wh = new WeiBoHolder();
wh.wbicon = (ImageView) convertView.findViewById(R.id.wbicon);
wh.wbtext = (TextView) convertView.findViewById(R.id.wbtext);
wh.wbtime = (TextView) convertView.findViewById(R.id.wbtime);
wh.wbuser = (TextView) convertView.findViewById(R.id.wbuser);
wh.wbimage = (ImageView) convertView.findViewById(R.id.wbimage);
WeiBoInfo wb = wbList.get(position);
if (wb != null ){
convertView.setTag(wb.getId());
wh.wbuser.setText(wb.getUserName());
wh.wbtime.setText(wb.getTime());
wh.wbtext.setText(wb.getText(), TextView.BufferType.SPANNABLE);
textHighlight(wh.wbtext, new char []{ ' # ' }, new char []{ ' # ' });
textHighlight(wh.wbtext, new char []{ ' @ ' }, new char []{ ' : ' , ' ' });
textHighlight2(wh.wbtext, " http:// " , " " );
if (wb.getHaveImage()){
wh.wbimage.setImageResource(R.drawable.images);
}
Drawable cachedImage = asyncImageLoader.loadDrawable(wb.getUserIcon(),wh.wbicon, new ImageCallback(){
@Override
public void imageLoaded(Drawable imageDrawable,ImageView imageView, String imageUrl) {
imageView.setImageDrawable(imageDrawable);
}
});
if (cachedImage == null ) {
wh.wbicon.setImageResource(R.drawable.usericon);
} else {
wh.wbicon.setImageDrawable(cachedImage);
}
}
return convertView;
}
上面的这个Adapter实现没有什么特别的很普通,不过这个中使用了AsyncImageLoader的方法,这个是用来实现用户头像图标的异步载入显示,这样能提高列表显示的速度,提高用户体验,AsyncImageLoader的代码如下:
代码
public
class
AsyncImageLoader {
// SoftReference是软引用,是为了更好的为了系统回收变量
private HashMap < String, SoftReference < Drawable >> imageCache;
public AsyncImageLoader() {
imageCache = new HashMap < String, SoftReference < Drawable >> ();
}
public Drawable loadDrawable( final String imageUrl, final ImageView imageView, final ImageCallback imageCallback){
if (imageCache.containsKey(imageUrl)) {
// 从缓存中获取
SoftReference < Drawable > softReference = imageCache.get(imageUrl);
Drawable drawable = softReference.get();
if (drawable != null ) {
return drawable;
}
}
final Handler handler = new Handler() {
public void handleMessage(Message message) {
imageCallback.imageLoaded((Drawable) message.obj, imageView,imageUrl);
}
};
// 建立新一个新的线程下载图片
new Thread() {
@Override
public void run() {
Drawable drawable = loadImageFromUrl(imageUrl);
imageCache.put(imageUrl, new SoftReference < Drawable > (drawable));
Message message = handler.obtainMessage( 0 , drawable);
handler.sendMessage(message);
}
}.start();
return null ;
}
public static Drawable loadImageFromUrl(String url){
URL m;
InputStream i = null ;
try {
m = new URL(url);
i = (InputStream) m.getContent();
} catch (MalformedURLException e1) {
e1.printStackTrace();
} catch (IOException e) {
e.printStackTrace();
}
Drawable d = Drawable.createFromStream(i, " src " );
return d;
}
// 回调接口
public interface ImageCallback {
public void imageLoaded(Drawable imageDrawable,ImageView imageView, String imageUrl);
}
}
完成上述的工作后,接下来就是显示微薄列表, 在HomeActivity的onCreate方法中调用loadList();代码如下:
代码
@Override
public void onCreate(Bundle savedInstanceState) {
super .onCreate(savedInstanceState);
setContentView(R.layout.home);
。。。。。。
loadList();
}
private void loadList(){
if (ConfigHelper.nowUser == null )
{
}
else
{
user = ConfigHelper.nowUser;
// 显示当前用户名称
TextView showName = (TextView)findViewById(R.id.showName);
showName.setText(user.getUserName());
OAuth auth = new OAuth();
String url = " http://api.t.sina.com.cn/statuses/friends_timeline.json " ;
List params = new ArrayList();
params.add( new BasicNameValuePair( " source " , auth.consumerKey));
HttpResponse response = auth.SignRequest(user.getToken(), user.getTokenSecret(), url, params);
if ( 200 == response.getStatusLine().getStatusCode()){
try {
InputStream is = response.getEntity().getContent();
Reader reader = new BufferedReader( new InputStreamReader(is), 4000 );
StringBuilder buffer = new StringBuilder(( int ) response.getEntity().getContentLength());
try {
char [] tmp = new char [ 1024 ];
int l;
while ((l = reader.read(tmp)) != - 1 ) {
buffer.append(tmp, 0 , l);
}
} finally {
reader.close();
}
String string = buffer.toString();
// Log.e("json", "rs:" + string);
response.getEntity().consumeContent();
JSONArray data = new JSONArray(string);
for ( int i = 0 ;i < data.length();i ++ )
{
JSONObject d = data.getJSONObject(i);
// Log.e("json", "rs:" + d.getString("created_at"));
if (d != null ){
JSONObject u = d.getJSONObject( " user " );
if (d.has( " retweeted_status " )){
JSONObject r = d.getJSONObject( " retweeted_status " );
}
// 微博id
String id = d.getString( " id " );
String userId = u.getString( " id " );
String userName = u.getString( " screen_name " );
String userIcon = u.getString( " profile_image_url " );
Log.e( " userIcon " , userIcon);
String time = d.getString( " created_at " );
String text = d.getString( " text " );
Boolean haveImg = false ;
if (d.has( " thumbnail_pic " )){
haveImg = true ;
// String thumbnail_pic=d.getString("thumbnail_pic");
// Log.e("thumbnail_pic", thumbnail_pic);
}
Date date = new Date(time);
time = ConvertTime(date);
if (wbList == null ){
wbList = new ArrayList < WeiBoInfo > ();
}
WeiBoInfo w = new WeiBoInfo();
w.setId(id);
w.setUserId(userId);
w.setUserName(userName);
w.setTime(time);
w.setText(text);
w.setHaveImage(haveImg);
w.setUserIcon(userIcon);
wbList.add(w);
}
}
} catch (IllegalStateException e) {
e.printStackTrace();
} catch (IOException e) {
e.printStackTrace();
} catch (JSONException e) {
e.printStackTrace();
}
}
if (wbList != null )
{
WeiBoAdapater adapater = new WeiBoAdapater();
ListView Msglist = (ListView)findViewById(R.id.Msglist);
Msglist.setOnItemClickListener( new OnItemClickListener(){
@Override
public void onItemClick(AdapterView <?> arg0, View view, int arg2, long arg3) {
Object obj = view.getTag();
if (obj != null ){
String id = obj.toString();
Intent intent = new Intent(HomeActivity. this ,ViewActivity. class );
Bundle b = new Bundle();
b.putString( " key " , id);
intent.putExtras(b);
startActivity(intent);
}
}
});
Msglist.setAdapter(adapater);
}
}
loadingLayout.setVisibility(View.GONE);
}
上面的loadList() 方法通过新浪Api接口http://api.t.sina.com.cn/statuses/friends_timeline.json获取当前登录用户及其所关注用户的最新微博消息,然后显示到列表中。


 683
683


 被折叠的 条评论
为什么被折叠?
被折叠的 条评论
为什么被折叠?
 到【灌水乐园】发言


