


转载至:https://blog.csdn.net/xwx617/article/details/79604362
为了提前准备今年的秋招,差不多开始复习算法与数据结构了,以前学算法的时候是以C语言为基础的,现在很久没碰C语言了,决定这次复习用Java实现,基本上是参考的Java算法神书:《数据结构与算法分析——Java语言描述》。
排序
选择排序
首先在未排序序列中找到最小(大)元素,存放到排序序列的起始位置,然后,再从剩余未排序元素中继续寻找最小(大)元素,然后放到已排序序列的末尾。以此类推,直到所有元素均排序完毕。
public class SelectionSort {

    //将数组array中的元素从小到大排序
    private static void selectionSort(int[] array) {
        for (int i = 0; i < array.length; i++) {
            //每完成一次大循环都要找出[i, array.length)中的最小值
            int minIndex = i;//每次大循环开始之前将i位置的值默认为最小值
            for (int j = i + 1; j < array.length; j++) {
                if (array[j] < array[minIndex]) {
                    //找到了比minIndex位置更小的值
                    minIndex = j;
                }
            }
            swap(array, minIndex, i);
        }
    }

    //交换数组array中两个位置的值
    private static void swap(int[] array, int indexOne, int indexTwo) {
        int temp = array[indexOne];
        array[indexOne] = array[indexTwo];
        array[indexTwo] = temp;
    }
}
插入排序
插入排序(以从小到大为例):从index为1的元素开始(即数组里的第二个元素),依次向前判断,若该元素比前一个元素小,则将该元素与前一个元素交换位置,直到该元素大于前一个元素,说明该元素已经处在了正确的位置(比前者大后者小),接着是从index为2的元素开始,以此类推。
为什么是从数组里第二个元素开始?答:因为第一个元素前面没有元素了,不需要进行判断。
public class InsertSort {

    //插入排序
    private static void insertSort(int[] array) {
        for (int i = 1; i < array.length; i++) {
            for (int j = i; j > 0; j--) {
                if (array[j] < array[j - 1]) {
                    //如果array[j]比array[j-1]小,说明array[j]应该向前移动
                    swap(array, j, j - 1);
                }else {
                    //若array[j]比array[j-1]大说明array[j]已经在正确的位置,可以提前结束这次大循环
                    break;
                }
            }
        }
    }

    //交换数组中两个元素的位置
    private static void swap(int[] array, int indexOne, int indexTwo) {
        int temp = array[indexOne];
        array[indexOne] = array[indexTwo];
        array[indexTwo] = temp;
    }
}
可以看到,插入排序和选择排序有一个很大的区别,插入排序可以提前终止内层循环(当array[j] > array[j-1]时),这样在数组是近乎有序的情况下,可以通过提前终止内层循环大幅度提高算法的效率。
对于上面这种插入排序的算法实际上还有优化的空间,因为上面这种算法每当这一轮要排序的元素比前一个元素要小的时候就要进行一次元素的交换,一次元素的交换相当于三次元素的赋值,因此如果我们将交换改成赋值操作的话,算法的速度就将得到提升,那么如何转变思想,让赋值操作能够替代交换操作呢?
我们可以复制一份当前这一轮要进行排序的元素,然后让该元素与前一个元素比较,若该元素小,那么就让前一个元素向后移动一次(移动到了该元素的位置),再将该元素和前前元素比较,若该元素依然小,那么就让前前元素向后移动一次(移动到了正常排序下该元素的前一个元素的位置),以此类推,直到该元素比其之前的某一个元素(取名为temp)大,那么就不再改变位置,直接将该元素赋值给temp的后一个元素即可(后一个元素在之前的比较中已经移动到了其原本位置的后面的位置)。
这样就将交换的操作转变为了赋值的操作,具体代码如下:
//插入排序
private static void insertSort(int[] array) {
    for (int i = 1; i < array.length; i++) {
        int element = array[i]; //将这一轮要排序的元素保存起来
        int j;//j用来保存这一轮要排序的元素的正确位置
        for (j = i; j > 0; j--) {
            if (array[j - 1] > element) {
                //array[j-1]比这一轮要排序的元素大,那么将array[j-1]向后移动一个位置
                array[j] = array[j - 1];
            }else {
                //array[j-1]比这一轮要排序的元素小,那么当前位置j就是元素的正确位置
                array[j] = element;
                break;
            }
        }
    }
}
冒泡排序
冒泡排序是所有排序中最简单的一种,以升序为例,冒泡的思想是每一轮比较都从头开始,依次比较相邻两个元素的大小,如果前一个元素比后一个元素大,就交换两个元素的位置。
public class BubbleSort {

    private static void bubbleSort(int[] array) {
        for (int i = 0; i < array.length; i++) {
            for (int j = 1; j < array.length; j++){
                if (array[j] < array[j - 1]) {
                    swap(array, j, j-1);
                }
            }
        }
    }

    //交换数组中两个元素的位置
    private static void swap(int[] array, int indexOne, int indexTwo) {
        int temp = array[indexOne];
        array[indexOne] = array[indexTwo];
        array[indexTwo] = temp;
    }
}
表
ArrayList的实现
ArrayList是Java是常用的一个数据结构,这是一种可扩充容量的数组,所以其内部实现就是基于数组,只不过在添加元素时若数组已满则自动扩容,下面这是我自己实现的一个简单的ArrayList,各位可以参考一下。由于List类型的数据结构都实现了Collection接口,而Collection接口又继承了Iterable接口,因此在此我也实现了Iterable接口。
public class MyArrayList<AnyType> implements Iterable{

    //List默认容量
    private static final int DEFAULT_CAPACITY = 10;
    //内部用来存放数据的数组
    private AnyType[] theItems;
    //当前ArrayList元素个数
    private int theSize;

    //实例化ArrayList时进行初始化
    public MyArrayList() {
        init();
    }

    //ArrayList初始化
    private void init() {
        theItems = (AnyType[]) new Object[DEFAULT_CAPACITY];
        theSize = 0;
    }

    //在ArrayList末尾添加元素
    public boolean add(AnyType element) {
        add(theSize, element);
        return true;
    }

    //在指定位置添加元素
    public boolean add(int idx, AnyType element) {
        if (theSize == theItems.length) {
            //若当前ArrayList已满,则首先进行扩容
            AnyType[] theOldItems =  theItems;
            theItems = (AnyType[]) new Object[theSize * 2];
            for (int i = 0; i < theSize; i++) {
                theItems[i] = theOldItems[i];
            }
        }
        //将要插入位置及其之后的的所有元素向后移动一位,将idx位置空出来
        for (int i = theSize; i > idx; i--) {
            theItems[i] = theItems[i - 1];
        }
        //插入到idx位置
        theItems[idx] = element;
        //元素个数加一
        theSize++;
        return true;
    }

    //得到指定位置的元素
    public AnyType get(int idx) {
        if (idx >= theSize || idx < 0) {
            throw new ArrayIndexOutOfBoundsException();
        }
        return theItems[idx];
    }

    //删除指定位置的元素
    public AnyType remove(int idx) {
        if (idx >= theSize || idx < 0) {
            throw new ArrayIndexOutOfBoundsException();
        }
        //保存要删除的元素
        AnyType removedItem = theItems[idx];
        //从指定位置开始依次将后一个元素向前移动
        for (int i = idx; i < theSize - 1; i++) {
            theItems[i] = theItems[i + 1];
        }
        return removedItem;
    }

    //返回一个自定义迭代器
    @Override
    public Iterator iterator() {
        return new MyArrayListIterator();
    }

    //自定义迭代器类
    private class MyArrayListIterator implements Iterator<AnyType>{

        //当前位置表示要被查看的下一个元素的数组下标
        private int current = 0;

        //判断是否还有下一个元素
        @Override
        public boolean hasNext() {
            return current < theSize;
        }

        //返回下一个元素
        @Override
        public AnyType next() {
            if (!hasNext()) {
                throw new NoSuchElementException();
            }
            return theItems[current++];
        }

        //删除由next()方法返回的最新的项
        @Override
        public void remove() {
            MyArrayList.this.remove(--current);
        }
    }
}
LinkedList的实现
LinkedList本质上是一个双向(不循环)链表,其在表头和表尾分别有两个空节点。在进行LinkedList的设计过程中有几点比较重要的知识点:
- LinkedList对外提供的方法永远是基于索引idx(类似于数组下标),不允许用户直接传一个Node的对象,对于Node对象的操作必须声明为private,在LinkedList内部进行,如getNode()
- LinkedList中的增加、删除操作的关键是找到对应的节点对象,因此不论是add还是remove方法,都是通过传入的idx找到对应的节点对象进行操作。
- modCount的作用是保护LinkedList的线程安全,任何通过Iterator修改LinkedList结构的行为都会同时更新expectedModCount和modCount,使这两个值相等。通过LinkedList对象修改其结构的方法只更新modCount。所以假设有两个线程A和B。A通过Iterator遍历并修改LinkedList,而B,与此同时,通过对象修改其结构,那么Iterator的相关方法就会抛出异常。这是相对容易发现的由线程竞争造成的错误。
- 由于所有的操作实质最终都是找到节点对象,即最终都要调用getNode方法,因此在空表时调用aad方法时需要特殊处理,因为此时getNode不能得到任何节点。
public class MyLinkedList<AnyType> implements Iterable{

    //LinkedList节点个数
    private int theSize;
    //LinkedList的头节点和尾节点
    private Node<AnyType> head;
    private Node<AnyType> tail;
    //记录LinkedList结构被修改的次数
    private int modCount = 0;

    //LinkedList构造方法
    public MyLinkedList() {
        //初始化
        init();
    }

    //初始化一个空的LinkedList
    private void init() {
        //创建头节点和尾节点
        head = new Node<>(null, null ,null);
        tail = new Node<>(null, head, null);
        head.next = tail;//空表时头节点的下一个节点就是尾节点
        //空表size为0
        theSize = 0;
        //修改了一次LinkedList结构
        modCount++;
    }

    //返回LinkedList节点个数
    public int size() {
        return theSize;
    }

    //判断LinkedList是否为空
    public boolean isEmpty() {
        return theSize == 0;
    }

    //向表尾插入节点
    public void add(AnyType data) {
        if (theSize == 0) {
            //插入的第一个元素需要特殊处理
            Node<AnyType> node = new Node<>(data, head, tail);
            head.next = node;
            tail.prev = node;
            modCount++;
            theSize++;
            return;
        }
        add(theSize, data);
    }

    //向指定位置插入节点
    public void add(int idx, AnyType data) {
        addBefore(getNode(idx), data);
    }

    //向指定节点的前面插入一个新节点,此方法不对外开放
    private void addBefore(Node<AnyType> node, AnyType data) {
        //新节点的前驱就是指定节点的前驱,后继就是指定节点
        Node<AnyType> newNode = new Node<>(data, node.prev, node);
        //修改新节点的前驱节点和后继节点的后继节点和前驱结点
        newNode.prev.next = newNode;
        newNode.next.prev = newNode;
        //节点数自增
        theSize++;
        //修改了一次结构
        modCount++;
    }

    //得到指定位置节点的数据
    public AnyType get(int idx) {
        return getNode(idx).data;
    }

    //得到指定位置的节点,此方法不对外开放
    private Node<AnyType> getNode(int idx) {
        return getNode(idx, 0, theSize - 1);
    }

    //得到lower和upper这个区间内的指定位置的节点,此方法不对外开放
    private Node<AnyType> getNode(int idx, int lower, int upper) {
        Node<AnyType> node;
        if (idx < lower || idx > upper) {
            throw new IndexOutOfBoundsException();
        }
        //根据idx在链表的前半部分还是后半部分决定是从头遍历还是从尾遍历
        if (idx < theSize / 2) {
            //在前半部分,从表头的下一个元素(即第一个有数据的节点)开始遍历
            node = head.next;
            for (int i = 0; i < idx; i++) {
                node = node.next;
            }
        } else {
            //在后半部分,从表尾开始遍历
            node = tail;
            for (int i = theSize; i > idx; i--) {
                node = node.prev;
            }
        }
        return node;
    }

    //移除指定位置的节点
    public AnyType remove(int idx) {
        return remove(getNode(idx));
    }

    //移除指定节点,此方法不对外开放
    private AnyType remove(Node<AnyType> node) {
        node.prev.next = node.next;
        node.next.prev = node.prev;
        theSize++;
        modCount++;
        return node.data;
    }


    //节点类 静态内部类
    private static class Node<AnyType>{

        //前一个节点和下一个节点
        public Node<AnyType> prev;
        public Node<AnyType> next;
        //该节点存放的数据
        public AnyType data;

        public Node(AnyType data, Node<AnyType> prev, Node<AnyType> next) {
            this.data = data;
            this.prev = prev;
            this.next = next;
        }
    }

    @Override
    public Iterator iterator() {
        return new LinkedListIterator();
    }

    //自定义迭代器
    private class LinkedListIterator implements Iterator<AnyType>{

        //要访问的下一个节点
        private Node<AnyType> current = head.next;
        //创建迭代器时默认和modCount相等
        private int expectedModCount = modCount;
        //
        private boolean okToRemove = false;

        @Override
        public boolean hasNext() {
            return current != tail;
        }

        @Override
        public AnyType next() {
            if (modCount != expectedModCount) {
                throw new ConcurrentModificationException();
            }
            if (!hasNext()) {
                throw new NoSuchElementException();
            }
            AnyType nextData = current.data;
            current = current.next;
            okToRemove = true;
            return nextData;
        }

        @Override
        public void remove() {
            if (modCount != expectedModCount) {
                throw new ConcurrentModificationException();
            }
            if (!okToRemove) {
                throw new IllegalStateException();
            }
            //移除前一次调用next时返回的节点
            MyLinkedList.this.remove(current.prev);
            expectedModCount++;
            okToRemove = false;
        }
    }
}
Stack栈的实现
栈比起List更为简单,其主要特点就是只能对栈顶元素进行操作,因此可以看做是ArrayList或LinkedList的简化版,Stack主要有两种实现方式,一种是顺序栈,一种是链栈。顺序栈就是以数组为基础进行设计的栈,链栈则是以单链表为基础进行设计的栈。
顺序栈
public class MyArrayStack<AnyType>{

    //默认容量为10
    private static final int DEFAULT_CAPACITY = 10;
    //存储数据的数组
    private AnyType[] theItems;
    //元素数量
    private int theSize;
    //栈顶指针 -1代表空栈
    private int top;

    //栈的构造方法,内部进行初始化
    public MyArrayStack() {
        init();
    }

    //初始化空栈
    private void init() {
        theItems = (AnyType[]) new Object[DEFAULT_CAPACITY];
        theSize = 0;
        top = -1;
    }

    //判断是否为空栈
    public boolean isEmpty() {
        return theSize == 0;
    }

    //获取栈顶元素
    public AnyType peek() {
        if (theSize == 0) {
            throw new EmptyStackException();
        }else {
            return theItems[top];
        }
    }

    //向栈内添加元素(只能向栈顶加入)
    public void push(AnyType element) {
        //判断是否满栈
        if (theSize == theItems.length) {
            //满栈则扩容
            AnyType[] newItems = (AnyType[]) new Object[2 * theSize + 1];
            for (int i = 0; i < theSize; i++) {
                newItems[i] = theItems[i];
            }
            theItems = newItems;
        }
        theItems[++top] = element;
        theSize++;
    }

    //弹出栈顶元素
    public AnyType pop() {
        if (theSize == 0) {
            //空栈则抛出异常
            throw new EmptyStackException();
        }
        AnyType popedItem = theItems[top--];
        theSize--;
        return popedItem;
    }
}
Queue队列的实现
参考博客:java数据结构与算法之(Queue)队列设计与实现
队列是一种先进先出的数据结构,出队的操作对应的是队头,入队的操作对应的是队尾。和Stack一样,Queue的实现也分成顺序队列和链队列,其底层实现分别是数组和链表。
顺序队列
关于顺序队列(底层都是利用数组作为容器)的实现,我们将采用顺序循环队列的结构来实现,在给出实现方案前先来分析一下为什么不直接使用顺序表作为底层容器来实现。实际上采用顺序表实现队列时,入队操作直接执行顺序表尾部插入操作,其时间复杂度为O(1),出队操作直接执行顺序表头部删除操作,其时间复杂度为O(n),主要用于移动元素,效率低,既然如此,我们就把出队的时间复杂度降为O(1)即可,为此在顺序表中添加一个头指向下标front和尾指向下标,出队和入队时只要改变front、rear的下标指向取值即可,此时无需移动元素,因此出队的时间复杂度也就变为O(1)。其过程如下图所示:
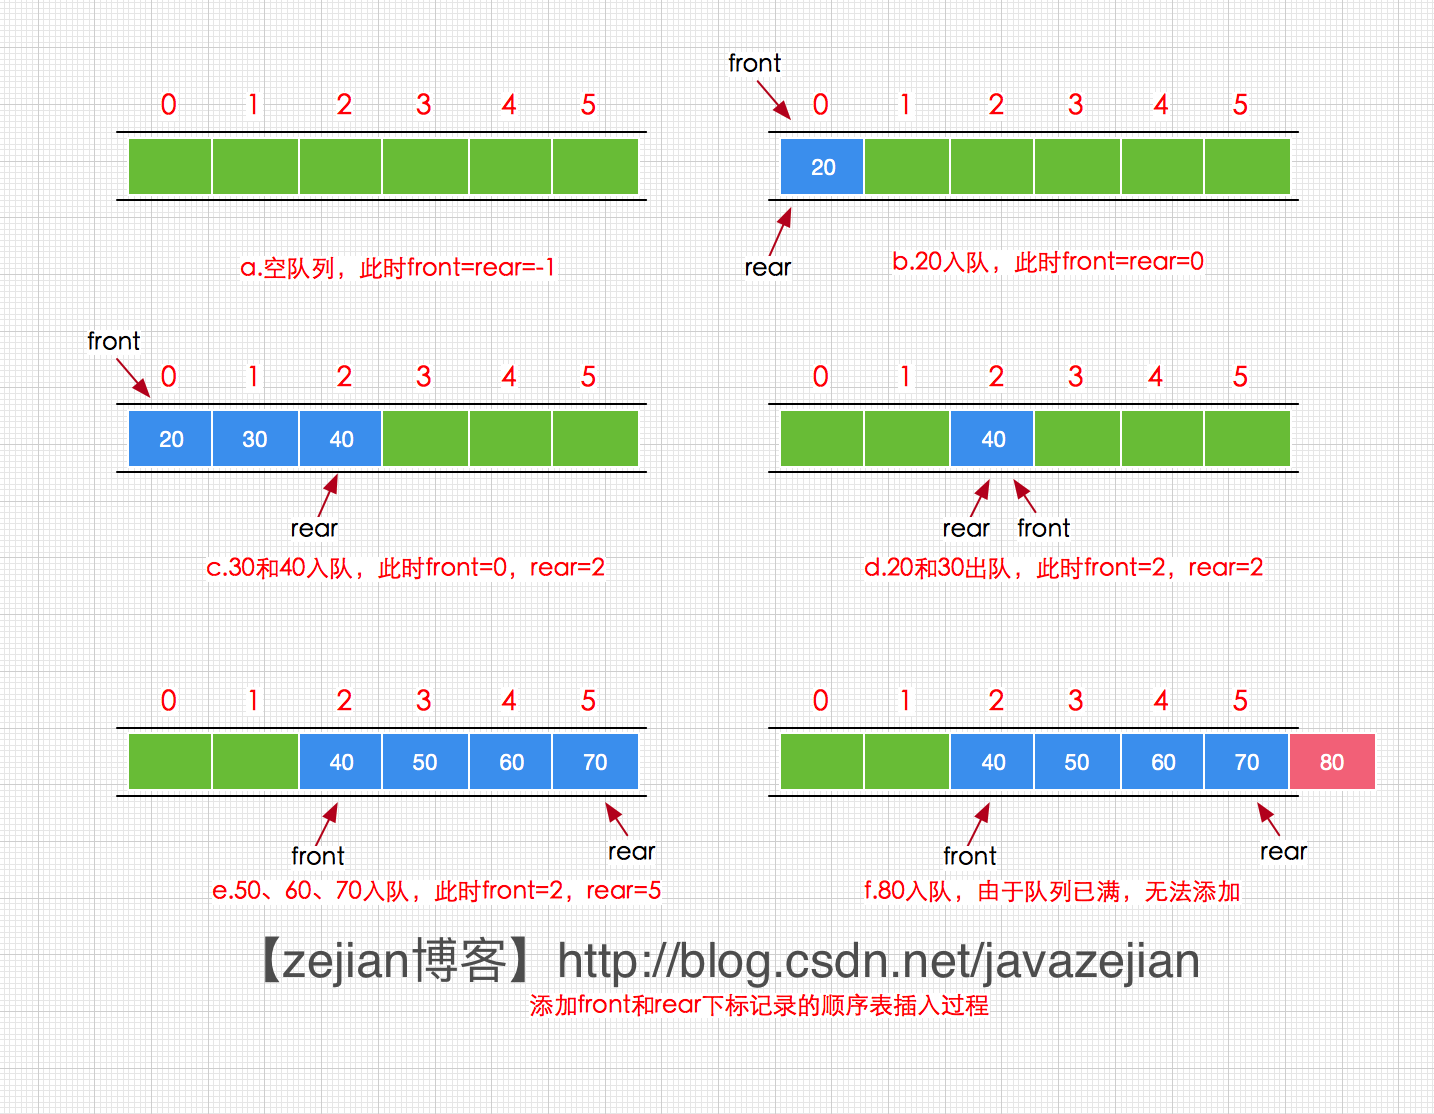
从图的演示过程,(a)操作时,是空队列此时front和rear都为-1,同时可以发现虽然我们通过给顺序表添加front和rear变量记录下标后使用得出队操作的时间复杂度降为O(1),但是却出现了另外一个严重的问题,那就是空间浪费,从图中的(d)和(e)操作可以发现,20和30出队后,遗留下来的空间并没有被重新利用,反而是空着,所以导致执行(f)操作时,出现队列已满的假现象,这种假现象我们称之为假溢出,之所以出现这样假溢出的现象是因为顺序表队列的存储单元没有重复利用机制,而解决该问题的最合适的方式就是将顺序队列设计为循环结构,接下来我们就通过循环顺序表来实现顺序队列。
顺序循环队列就是将顺序队列设计为在逻辑结构上收尾相接的循环结构,这样我们就可以重复利用存储单元,其过程如下所示:

简单分析一下:
其中采用循环结构的顺序表,可以循环利用存储单元,因此有如下计算关系(其中capacity为队列容量):
//其中front、rear的下标的取值范围是0~capacity-1,不会造成假溢出。
front=(front + 1) % capacity;//队头下标
rear=(rear + 1) % capacity;- front为队头元素的下标,rear则指向下一个入队元素的下标
- 当front=rear时,我们约定队列为空。
- 出队操作改变front下标指向,入队操作改变rear下标指向,size代表队列容量。
- 约定队列满的条件为front=(rear+1)%capacity,注意此时队列中仍有一个空的位置,此处留一个空位主要用于避免与队列空的条件front=rear相同。
- 队列内部的数组可扩容,并按照原来队列的次序复制元素数组
public class MyArrayQueue<AnyType> {

    //队列默认容量
    private static final int DEFAULT_CAPACITY = 10;
    //指向队头和队尾的下一个位置的指针
    private int front;
    private int rear;
    //存储元素的数组
    private AnyType[] theItems;
    //队列内元素个数
    private int theSize;

    //构造方法,初始化一个空队列
    public MyArrayQueue() {
        init();
    }

    //初始化空队列
    private void init() {
        front = 0;
        rear = 0;
        theItems = (AnyType[]) new Object[DEFAULT_CAPACITY];
        theSize = 0;
    }

    //入队,该方法在队满时会自动扩容
    public boolean add(AnyType element) {
        //首先判断是否满队
        if (front == ((rear + 1) % theItems.length)) {
            //满队则扩容
            ensureCapacity(2 * theSize + 1);
        }
        //向队尾插入元素
        theItems[rear] = element;
        //让rear指向队尾的下一个位置
        rear = (rear + 1) % theItems.length;
        //队列元素个数加一
        theSize++;
        return true;
    }

    //入队,该方法在队满时会抛出异常
    public boolean offer(AnyType element) {
        if (element == null) {
            throw new NullPointerException();
        }
        if (front == (rear + 1) % theItems.length) {
            throw new IllegalArgumentException();
        }
        //执行入队操作
        theItems[rear] = element;
        rear = (rear + 1) % theItems.length;
        theSize++;
        return true;
    }


    //出队,若队列为空返回null
    public AnyType poll() {
        //判断是否为空队列
        if (front == rear) {
            return null;
        }
        //将要出队的元素保存起来
        AnyType polledElement = theItems[front];
        //执行出队操作,不用将出队的元素赋值为null,只需改变队头指针即可,因为在以后的一系列入队和出队操作中会自动将其赋值为入队的元素
        front = (front + 1) % theItems.length;
        theSize--;
        return polledElement;
    }

    //出队,若队列为空抛出异常
    public AnyType remove() {
        if (front == rear) {
            throw new NoSuchElementException();
        }
        return poll();
    }

    //返回队头元素,队列为空返回null
    public AnyType peek() {
        if (front == rear) {
            return null;
        }
        return theItems[front];
    }

    //返回队头元素,队列为空时抛出异常
    public AnyType element() {
        if (front == rear) {
            throw new NoSuchElementException();
        }
        return theItems[front];
    }

    //返回队列中元素个数
    public int size() {
        return theSize;
    }

    //判断队列是否为空
    public boolean isEmpty() {
        return front == rear;
    }

    //清空队列
    public void clearQueue() {
        //将所有位置都置null
        for (int i = 0; i < theItems.length; i++) {
            theItems[i] = null;
        }
        //修改队头和队尾指针
        front = 0;
        rear = 0;
        theSize = 0;
    }

    //扩容,注意扩容后的数组元素会从0位置处开始排列
    private boolean ensureCapacity(int capacity) {
        if (capacity <= theItems.length) {
            //若扩容后的容量比当前队列容量还小则无需扩容
            return false;
        }
        AnyType[] newItems = theItems;
        theItems = (AnyType[]) new Object[capacity];
        int j = 0;
        for (int i = front; i != rear; i = (i + 1) % newItems.length ) {
            theItems[j++] = newItems[i];
        }
        //改变队头和队尾指针的位置
        front = 0;
        rear = theSize;
        return true;
    }
}
链队列
对于链式队列,将使用带头指针front和尾指针rear的单链表实现,front直接指向队头的第一个元素,rear指向队尾的最后一个元素,其结构如下:
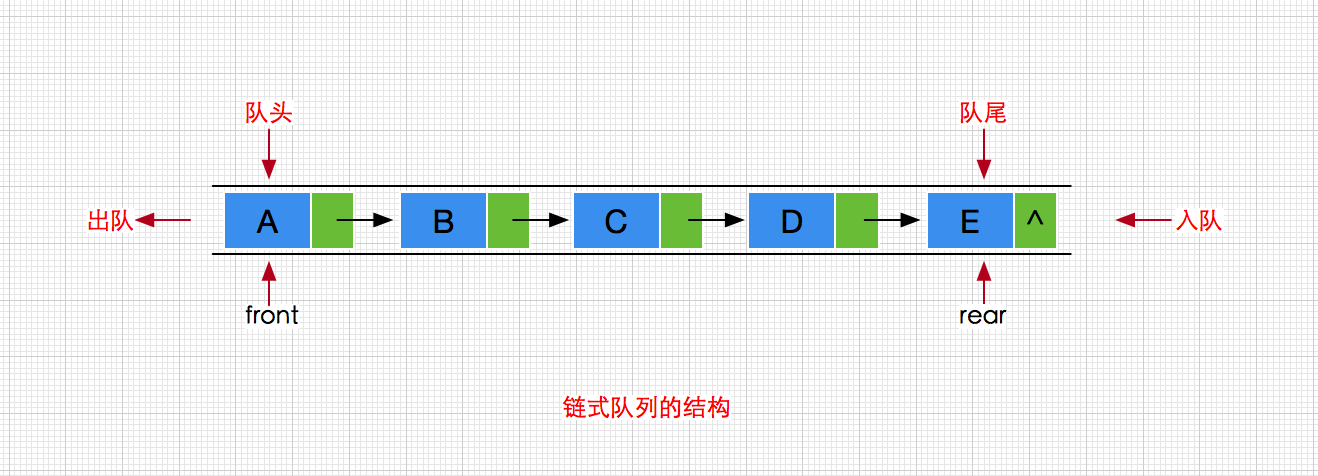
之所以选择单链表(带头尾指针)而不采用循环双链表或者双链表主要是双链表的空间开销(空间复杂度,多前继指针)相对单链表来说大了不少,而单链表只要新增头指针和尾指针就可以轻松实现常数时间内(时间复杂度为O(1))访问头尾结点。下面我们来看看如何设计链式队列:
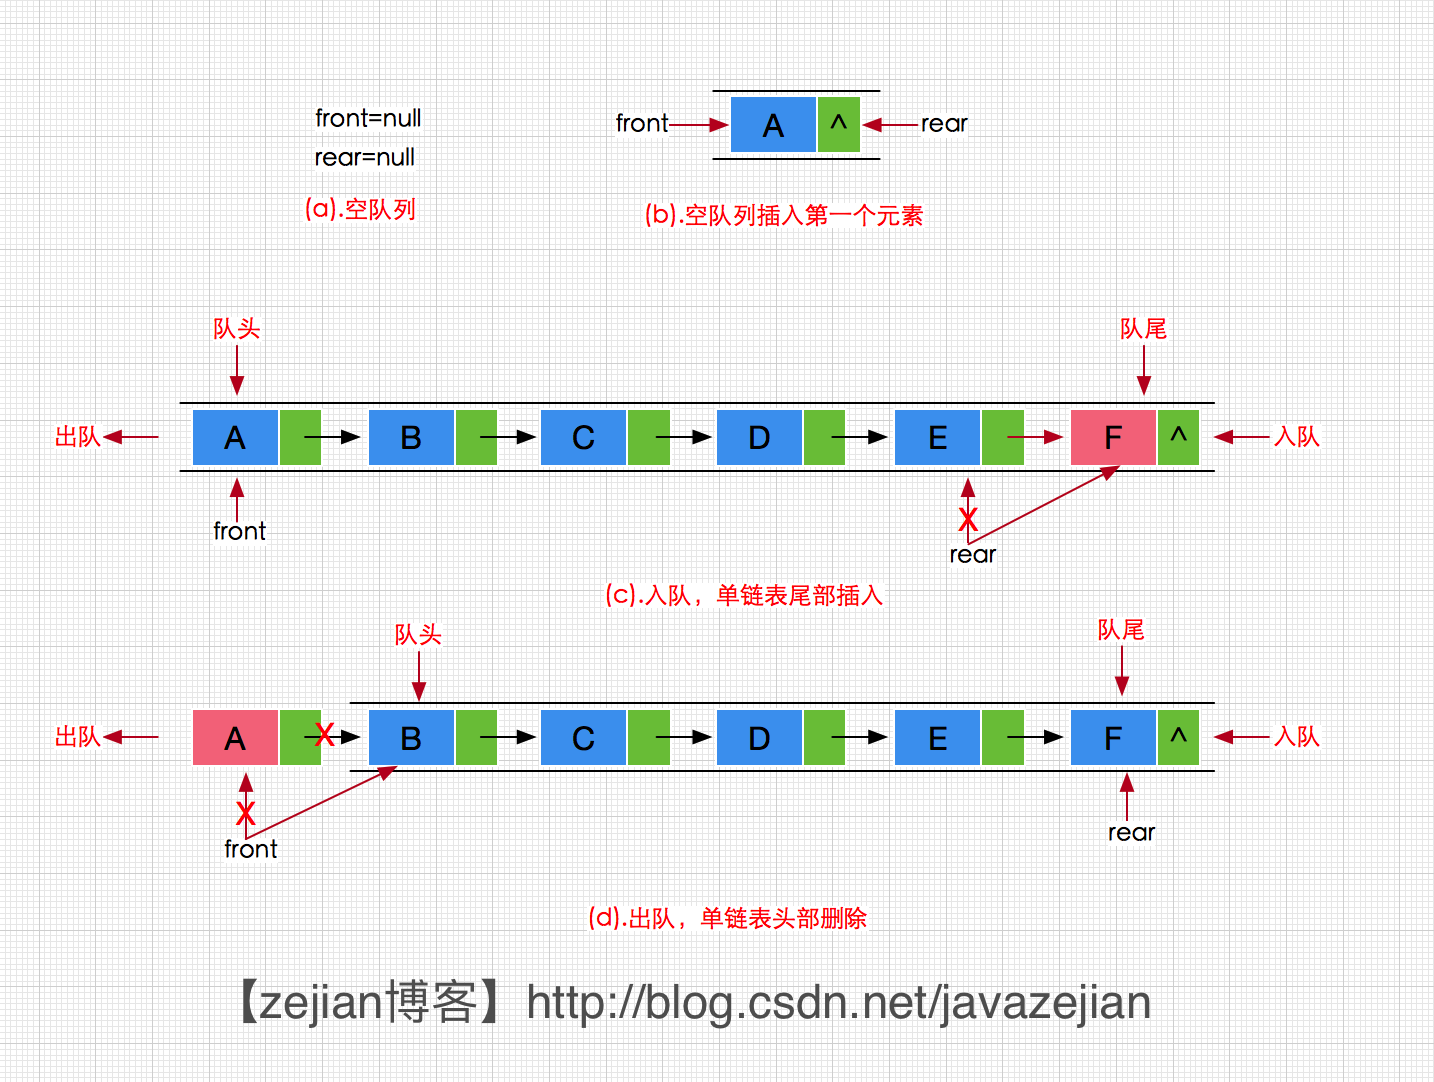
- 以上述的图为例分别设置front和rear指向队头结点和队尾结点,使用单链表的头尾访问时间复杂度为O(1)。
- 设置初始化空队列,使用front=rear=null,并且约定条件front==null&&rear==null成立时,队列为空。
- 出队操作时,若队列不为空获取队头结点元素,并删除队头结点元素,更新front指针的指向为front=front.next
- 入队操作时,使插入元素的结点在rear之后并更新rear指针指向新插入元素。
- 当第一个元素入队或者最后一个元素出队时,同时更新front指针和rear指针的指向。
这一系列过程如下图所示:
public class MyLinkedQueue<AnyType> {

    //队头元素和队尾元素
    private Node<AnyType> front;
    private Node<AnyType> rear;
    //队列元素个数
    private int theSize;
    //队列最大容量
    private int maxSize = 128;

    //构造方法,初始化空队列
    public MyLinkedQueue() {
        init();
    }

    //初始化空队列
    private void init() {
        front = rear = null;
        theSize = 0;
    }

    //判断是否为空队列
    public boolean isEmpty() {
        return front == null && rear == null;
    }

    //返回队列元素个数
    public int size() {
        return theSize;
    }

    //入队,队满则扩容
    public boolean add(AnyType element) {
        Node<AnyType> node = new Node<>(element, null);
        //首先判断是否是空队列
        if (isEmpty()) {
            //空队列插入第一个元素需要特殊处理
            //修改队列头元素和队尾元素
            front = node;
            rear = node;
            theSize++;
            return true;
        }
        //不是空队列则只需修改队尾元素即可
        rear.next = node;
        rear = node;
        theSize++;
        return true;
    }

    //入队,队满不进行扩容
    public boolean offer(AnyType element) {
        //传入参数不允许为空
        if (element == null) {
            throw new NullPointerException();
        }
        //判断是否队满
        if (theSize == maxSize) {
            throw new IllegalArgumentException();
        }
        //队列还有位置才进行入队操作
        return add(element);
    }

    //返回队头元素,若队列为空则返回null
    public AnyType peek() {
        if (isEmpty()) {
            return null;
        }
        return front.data;
    }

    //返回队头元素,若队列为空则抛出异常
    public AnyType element() {
        if (isEmpty()) {
            throw new NoSuchElementException();
        }
        return front.data;
    }

    //出队,若为空队列则返回null
    public AnyType poll() {
        if (isEmpty()) {
            return null;
        }
        //保存出队元素
        Node<AnyType> polledNode = front;
        //进行出队操作
        front = front.next;
        theSize--;
        return polledNode.data;
    }

    //出队,若队列为空则抛出异常
    public AnyType remove() {
        if (isEmpty()) {
            throw new NoSuchElementException();
        }
        return poll();
    }

    //清空队列
    public boolean clearQueue() {
        if (isEmpty()) {
            throw new NoSuchElementException();
        }
        front = rear = null;
        theSize = 0;
        return true;
    }

    //节点类
    private static class Node<AnyType> {
        private AnyType data;
        private Node<AnyType> next;

        public Node(AnyType data, Node<AnyType> next) {
            this.data = data;
            this.next = next;
        }
    }
}
树
二叉树
参考博客:java数据结构与算法之树基本概念及二叉树(BinaryTree)的设计与实现
二叉查找树
二叉查找树的特性:任意根节点的左子树上的所有节点都小于根结点,右子树上的所有节点都大于根结点。
contains方法、findMin和findMax方法就不再赘述了,都只是比较简单的递归实现,我们主要讨论插入和删除节点的算法(递归)。
二叉查找树的插入算法实现(递归):
插入算法比较简单,总体上来说就是先和当前节点元素比较,若比当前节点元素小则说明应该在当前节点的左子树,反之在右子树,直到当前节点为null时说明这就是要插入的正确位置。
//向树中插入一个元素
public void insert(AnyType element) {
    insert(element, root);
}

//向传入的根节点对应的树中找到合适的位置插入元素,此方法不对外开放
private BinaryNode<AnyType> insert(AnyType element, BinaryNode<AnyType> node) {
    //若节点为null说明当前位置可以插入
    if (node == null) {
        node = new BinaryNode<>(element, null, null);
        return node;
    }
    //否则先和当前节点比较
    int compareResult = element.compareTo(node.element);
    if (compareResult < 0) {
        //比当前节点小则应该在其左子树上
        node.left = insert(element, node.left);
    } else if (compareResult > 0) {
        //比当前节点大则应该在其右子树上
        insert(element, node.right);
    } else {
        //和当前节点一样大说明不应该插入到任何位置
    }
    return node;
}
二叉查找树的删除算法实现(递归):
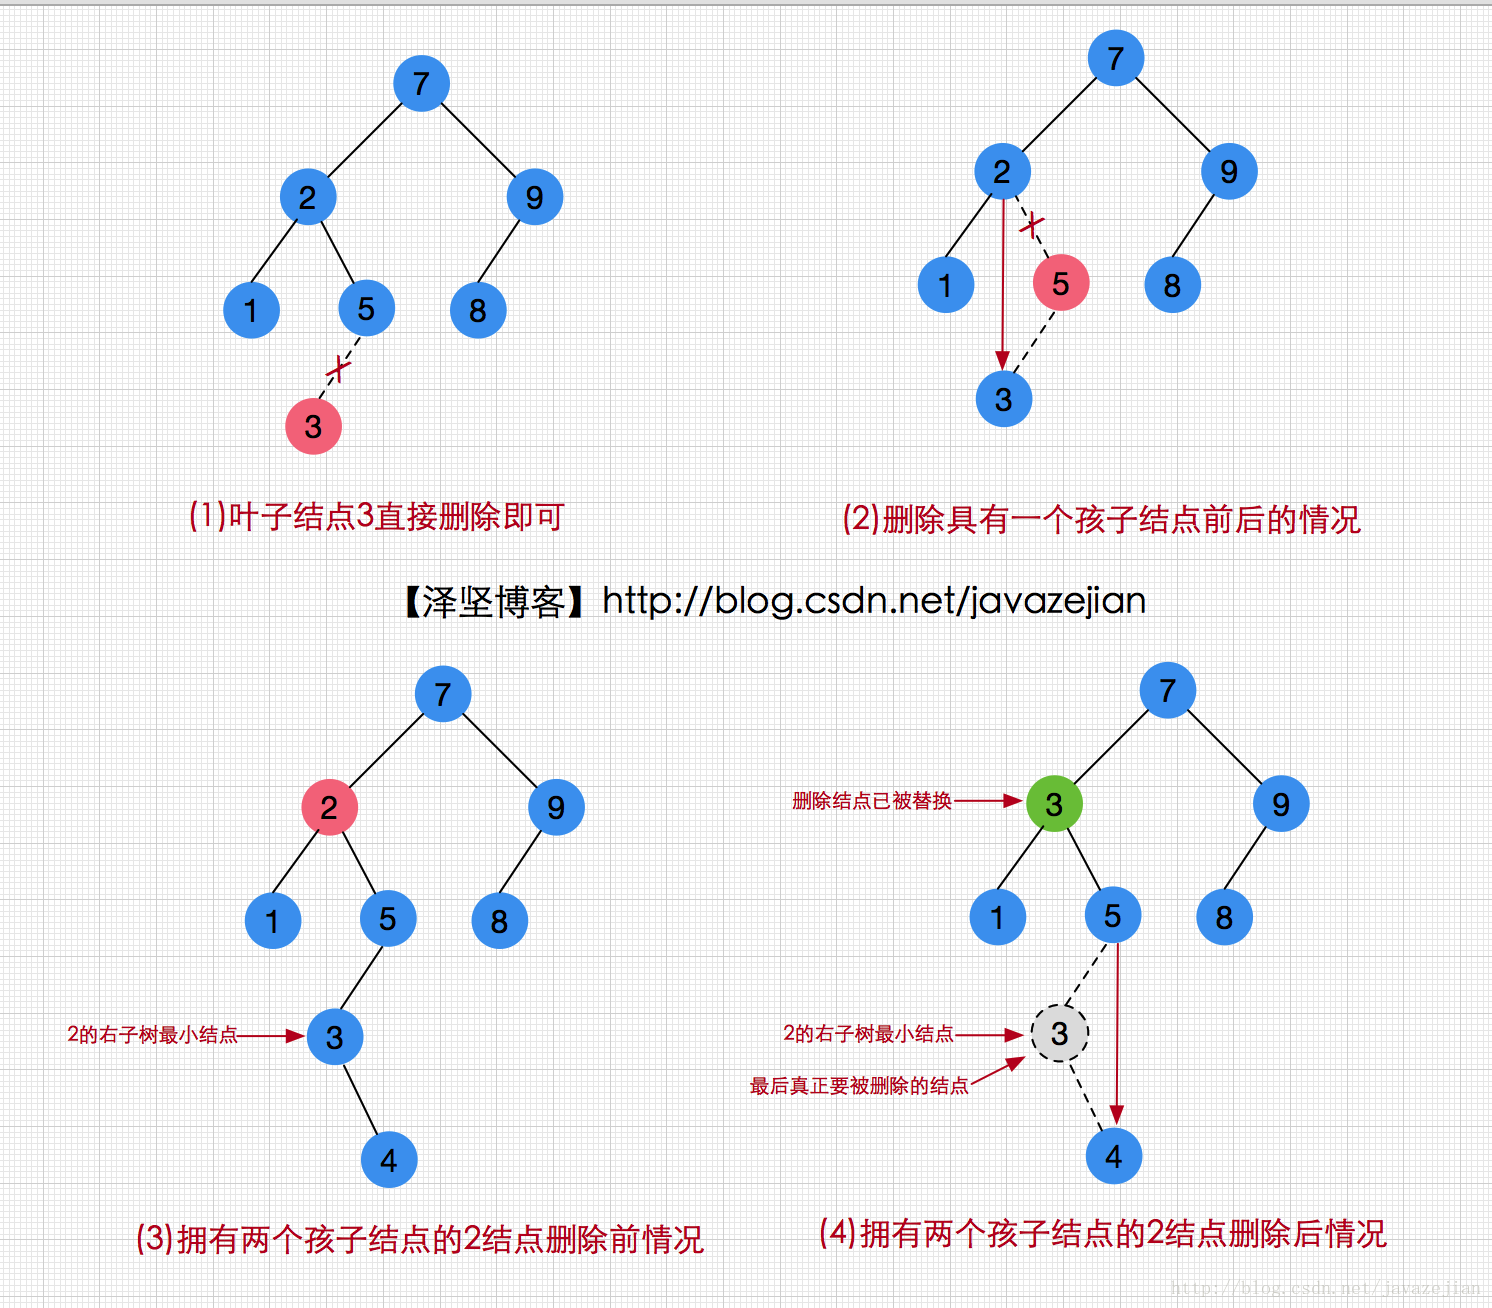
对于二叉树来说,删除是一种比较麻烦的操作,因为涉及到了多种情况(设要删除的结点为q,其父母结点为p):
- 如果要删除的结点q恰好是叶子结点,那么它可以立即被删除
- 如果要删除的结点q拥有一个孩子结点,则应该调整要被删除的父结点(p.left 或 p.right)指向被删除结点的孩子结点(q.left 或 q.right)
- 如果要删除的结点q拥有两个孩子结点,则删除策略是用q的右子树的最小的数据替代要被删除结点的数据,并递归删除用于替换的结点(此时该结点已为空),此时二叉查找树的结构并不会被打乱,其特性仍旧生效。
为了更新清晰描述这个过程,我们可以借助下图来理解:
//删除树中对应元素的节点
public void remove(AnyType element) {
    remove(element, root);
}

//删除指定节点对应的树中包含与element相同的元素的节点,此方法不对外开放
private BinaryNode<AnyType> remove(AnyType element, BinaryNode<AnyType> node) {
    if (node == null) {
        //若当前节点为空,说明整个树中不含对应节点
        return null;
    }
    //否则和当前节点比较
    int compareResult = element.compareTo(node.element);
    if (compareResult < 0) {
        //比当前节点小则应该在其左子树上
        node.left = remove(element, node.left);
    } else if (compareResult > 0) {
        //比当前节点大则应该在其右子树上
        node.right = remove(element, node.right);
    } else if (node.left != null && node.right !=null) {
        //和当前节点相同说明应该删除当前节点
        //若当前节点同时拥有左右孩子节点,则需要用该节点的右子树上最小的节点替换之,再递归的删除最小的节点原来的位置上的节点
        node.element = findMin(node.right);//找到该节点右子树最小的节点并用最小的节点替换该节点
        node.right = remove(node.element, node.right);//递归的删除
    } else {
        //和当前节点相同说明应该删除当前节点
        //若当前节点不同时拥有左右孩子节点
        if (node.left != null) {
            //只有左孩子节点
            node = node.left;
        } else {
            //只有右孩子节点或没有孩子节点
            node = node.right;
        }
    }
    return node;
}
二叉查找树源码:
//二叉查找树
public class BinarySearchTree<AnyType extends Comparable<? super AnyType>> {

    //二叉查找树的根结点
    private BinaryNode<AnyType> root;

    //构造方法,初始化一棵空树
    public BinarySearchTree() {
        root = null;
    }

    //判断是否为空树
    public boolean isEmpty() {
        return root == null;
    }

    //让树成为空树
    public void makeEmpty() {
        root = null;
    }

    //判断当前树中是否有一个节点包含了传入的数据
    public boolean contains(AnyType element) {
        return contains(element, root);
    }

    //判断当前节点上是否包含传入的数据,该方法不对外开放
    private boolean contains(AnyType element, BinaryNode<AnyType> node) {
        //先判断是否为空节点,空节点则返回false
        if (node == null) {
            return false;
        }
        //不是空节点则先判断该节点是否包含对应数据
        int compareResult = element.compareTo(node.element);
        if (compareResult < 0) {
            //比该节点小说明在其左子树上
            return contains(element, node.left);
        } else if (compareResult > 0) {
            //比该节点大说明在其右子树上
            return contains(element, node.right);
        } else {
            //在根结点上
            return true;
        }
    }

    //返回树中最小项
    public AnyType findMin() {
        return findMin(root);
    }

    //返回树中最大项
    public AnyType findMax() {
        return findMax(root);
    }

    //返回指定根结点对应的树中最小的一项,此方法不对外开放
    private AnyType findMin(BinaryNode<AnyType> node) {
        if (node == null) {
            return null;
        }
        while (node.left != null) {
            node = node.left;
        }
        return node.element;
    }

    //返回指定根结点对应的树中最大的一项,此方法不对外开放
    private AnyType findMax(BinaryNode<AnyType> node) {
        //如果传入的树的根结点为null则返回null
        if (node == null) {
            return null;
        }
        //如果当前节点没有右子树了,说明当前节点就是最大的
        if (node.right == null) {
            return node.element;
        }
        //否则递归遍历右子树
        return findMax(node.right);
    }

    //向树中插入一个元素
    public void insert(AnyType element) {
        insert(element, root);
    }

    //向传入的根节点对应的树中找到合适的位置插入元素,此方法不对外开放
    private BinaryNode<AnyType> insert(AnyType element, BinaryNode<AnyType> node) {
        //若节点为null说明当前位置可以插入
        if (node == null) {
            node = new BinaryNode<>(element, null, null);
            return node;
        }
        //否则先和当前节点比较
        int compareResult = element.compareTo(node.element);
        if (compareResult < 0) {
            //比当前节点小则应该在其左子树上
            node.left = insert(element, node.left);
        } else if (compareResult > 0) {
            //比当前节点大则应该在其右子树上
            insert(element, node.right);
        } else {
            //和当前节点一样大说明不应该插入到任何位置
        }
        return node;
    }

    //删除树中对应元素的节点
    public void remove(AnyType element) {
        remove(element, root);
    }

    //删除指定节点对应的树中包含与element相同的元素的节点,此方法不对外开放
    private BinaryNode<AnyType> remove(AnyType element, BinaryNode<AnyType> node) {
        if (node == null) {
            //若当前节点为空,说明整个树中不含对应节点
            return null;
        }
        //否则和当前节点比较
        int compareResult = element.compareTo(node.element);
        if (compareResult < 0) {
            //比当前节点小则应该在其左子树上
            node.left = remove(element, node.left);
        } else if (compareResult > 0) {
            //比当前节点大则应该在其右子树上
            node.right = remove(element, node.right);
        } else if (node.left != null && node.right !=null) {
            //和当前节点相同说明应该删除当前节点
            //若当前节点同时拥有左右孩子节点,则需要用该节点的右子树上最小的节点替换之,再递归的删除最小的节点原来的位置上的节点
            node.element = findMin(node.right);//找到该节点右子树最小的节点并用最小的节点替换该节点
            node.right = remove(node.element, node.right);//递归的删除
        } else {
            //和当前节点相同说明应该删除当前节点
            //若当前节点不同时拥有左右孩子节点
            if (node.left != null) {
                //只有左孩子节点
                node = node.left;
            } else {
                //只有右孩子节点或没有孩子节点
                node = node.right;
            }
        }
        return node;
    }

    //二叉树中的节点类
    private static class BinaryNode<AnyType> {

        //节点中存放的数据
        private AnyType element;
        //左右孩子节点
        private BinaryNode<AnyType> left;
        private BinaryNode<AnyType> right;

        //构造方法
        private BinaryNode(AnyType element, BinaryNode<AnyType> left, BinaryNode<AnyType> right) {
            this.element = element;
            this.left = left;
            this.right = right;
        }
    }
}


 4448
4448

 被折叠的 条评论
为什么被折叠?
被折叠的 条评论
为什么被折叠?
 到【灌水乐园】发言


