


Vue的生命周期
内容讲解
【1】vue生命周期状态介绍
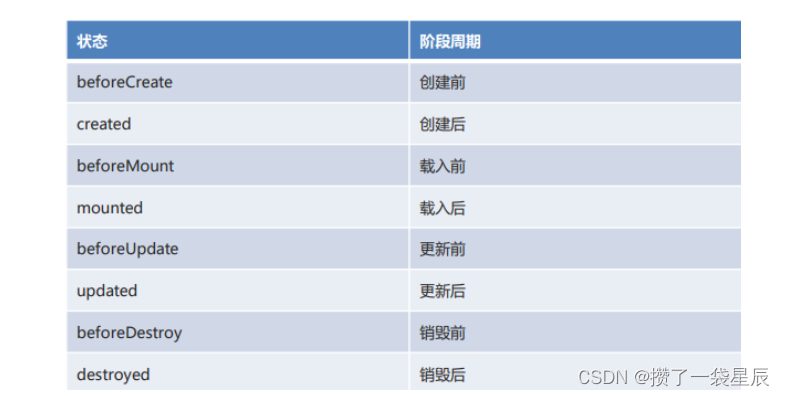
重点掌握生命周期函数:created,表示vue对象创建后。数据准备好了,视图还没有准备。
我们一般在created生命周期函数中书写向后台加载数据的代码。
【2】代码实现
<!DOCTYPE html>
<html lang="en">
<head>
    <meta charset="UTF-8">
    <meta name="viewport" content="width=device-width, initial-scale=1.0">
    <title>生命周期</title>
    <script src="js/vue.js"></script>
</head>
<body>
<div id="app">
    {{message}}
</div>
</body>
<script>
    let vm = new Vue({
        el: '#app',
        data: {
            message: 'Vue的生命周期'
        },
        //vue对象创建前,所有内容都是未定义类型
        beforeCreate: function () {
            console.group('------beforeCreate创建前状态------');
            console.log("%c%s", "color:red", "el     : " + this.$el); //undefined
            console.log("%c%s", "color:red", "data   : " + this.$data); //undefined
            console.log("%c%s", "color:red", "message: " + this.message);//undefined
        },
        //表示vue对象创建完毕
        //我们可以在该生命周期中先准备好数据,然后视图此时还没准备好
        created: function () {
            console.group('------created创建完毕状态------');
            //el的值是undefined说明视图还没有准备好
            console.log("%c%s", "color:red", "el     : " + this.$el); //undefined
            //说明在该生命周期中数据已经准备好了,
            console.log("%c%s", "color:red", "data   : " + this.$data); //已被初始化
            console.log("%c%s", "color:red", "message: " + this.message); //已被初始化
        },
        //就是vue挂载视图前,还没有将数据挂载到视图中
        beforeMount: function () {
            console.group('------beforeMount挂载前状态------');
            console.log("%c%s", "color:red", "el     : " + (this.$el)); //已被初始化
            console.log(this.$el);
            console.log("%c%s", "color:red", "data   : " + this.$data); //已被初始化
            console.log("%c%s", "color:red", "message: " + this.message); //已被初始化
        },
        //就是vue挂载视图后,vue中的data数据已经挂载到视图中了
        mounted: function () {
            console.group('------mounted 挂载结束状态------');
            console.log("%c%s", "color:red", "el     : " + this.$el); //已被初始化
            console.log(this.$el);
            console.log("%c%s", "color:red", "data   : " + this.$data); //已被初始化
            console.log("%c%s", "color:red", "message: " + this.message); //已被初始化
        },
        //表示更新前 必须有数据的更新才会执行该生命周期
        beforeUpdate: function () {
            console.group('beforeUpdate 更新前状态===============》');
            let dom = document.getElementById("app").innerHTML;
            console.log(dom);
            console.log("%c%s", "color:red", "el     : " + this.$el);
            console.log(this.$el);
            console.log("%c%s", "color:red", "data   : " + this.$data);
            console.log("%c%s", "color:red", "message: " + this.message);
        },
        //更新完成
        updated: function () {
            console.group('updated 更新完成状态===============》');
            let dom = document.getElementById("app").innerHTML;
            console.log(dom);
            console.log("%c%s", "color:red", "el     : " + this.$el);
            console.log(this.$el);
            console.log("%c%s", "color:red", "data   : " + this.$data);
            console.log("%c%s", "color:red", "message: " + this.message);
        },
        //销毁前
        //必须执行销毁方法才可以执行该生命周期
        beforeDestroy: function () {
            console.group('beforeDestroy 销毁前状态===============》');
            console.log("%c%s", "color:red", "el     : " + this.$el);
            console.log(this.$el);
            console.log("%c%s", "color:red", "data   : " + this.$data);
            console.log("%c%s", "color:red", "message: " + this.message);
        },
        //销毁后
        destroyed: function () {
            console.group('destroyed 销毁完成状态===============》');
            console.log("%c%s", "color:red", "el     : " + this.$el);
            console.log(this.$el);
            console.log("%c%s", "color:red", "data   : " + this.$data);
            console.log("%c%s", "color:red", "message: " + this.message);
        }
    });


    // 更新data中message数据值
    vm.message = "hehe";

    // 销毁Vue对象
    vm.$destroy();
    vm.message = "hehe";// 销毁后 Vue 实例会解绑所有内容,更新无效
</script>
</html>
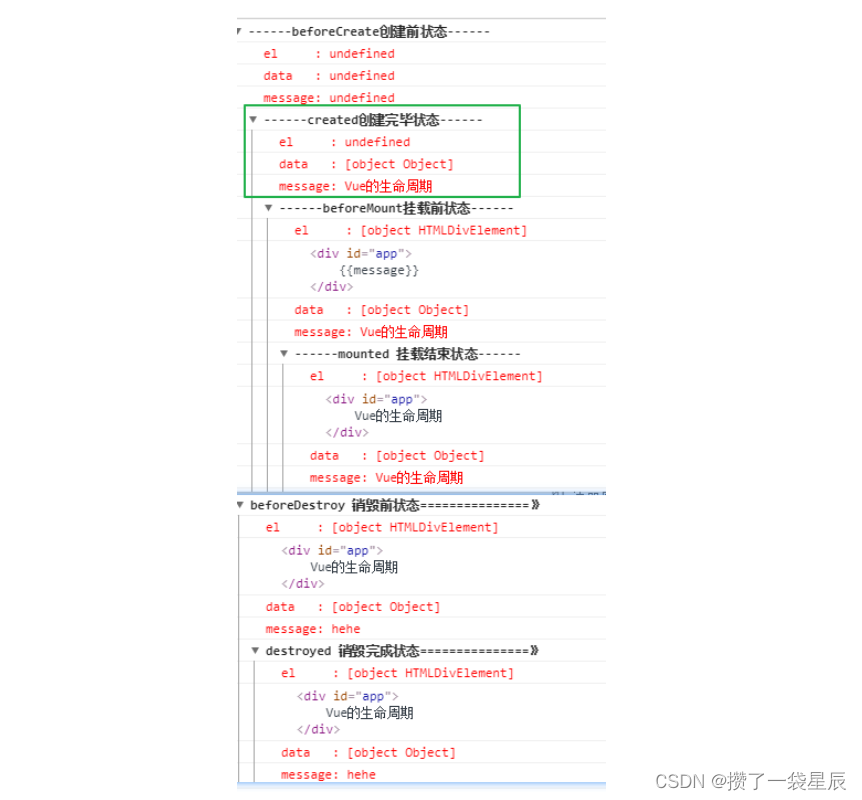
【3】运行效果
【4】created生命周期应用场景:
表示数据已经准备好了,但是视图还没有准备。
我们在该生命周期中可以进行准备数据即可,然后在后面的生命周期mounted挂载后会将之前准备好的数据自动挂载到视图中。
<!DOCTYPE html>
<html lang="en">
<head>
    <meta charset="UTF-8">
    <meta name="viewport" content="width=device-width, initial-scale=1.0">
    <title>生命周期</title>
    <script src="js/vue.js"></script>
</head>
<body>
<div id="app">
    {{message}}
    <div v-for="user in list">
        {{user}}
    </div>

    <hr>
</div>
</body>
<script>

    new Vue({
        el:"#app",
        data:{
            message:"好友列表",
            list:[] //用户信息的集合
        },
        methods:{
            queryUsers(){
                //向后台发起查询,将查询数据放到data中list中
                //模拟后台查询用户数据放到list中
                this.list=["张三","李四","王五"];
                console.log("呵呵")
            }
        },

        //vue实例创建完成后要来执行的一个生命周期的方法
        created(){
            //一般我们在这个方法中去对数据进行初始化,比如调用queryUsers方法从后台查询初始数据对list变量赋值
            this.queryUsers();
        }
    });
</script>
</html>
内容小结
1.vue的生命周期有八个阶段
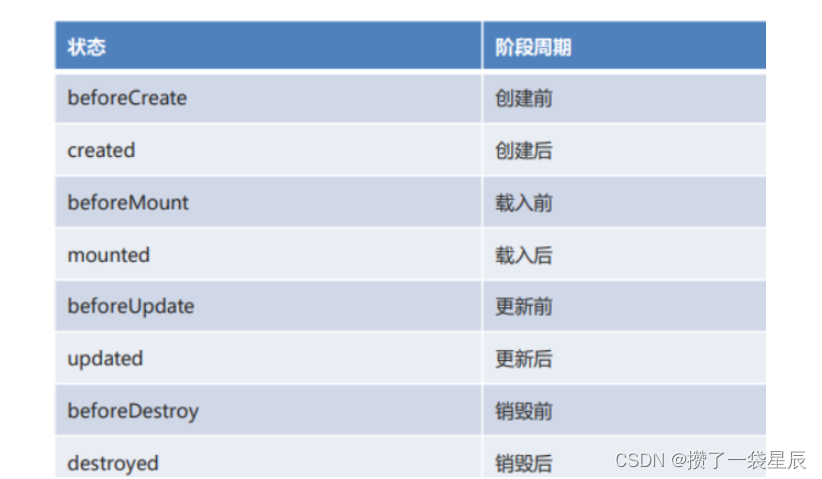
2.掌握created生命周期,表示对象创建后,我们可以在该生命周期中进行准备数据,此时视图还没有准备好,当执行到mounted生命周期的时候就会将准备好的数据挂载到视图中


 2万+
2万+

 被折叠的 条评论
为什么被折叠?
被折叠的 条评论
为什么被折叠?
 到【灌水乐园】发言


