


本笔记来自b站尚硅谷
文章目录
Springboot


HelloWorld原理


配置文件中 last-name 和 lastName是一样的
@Value获取值和@ConfigurationProperties获取值比较

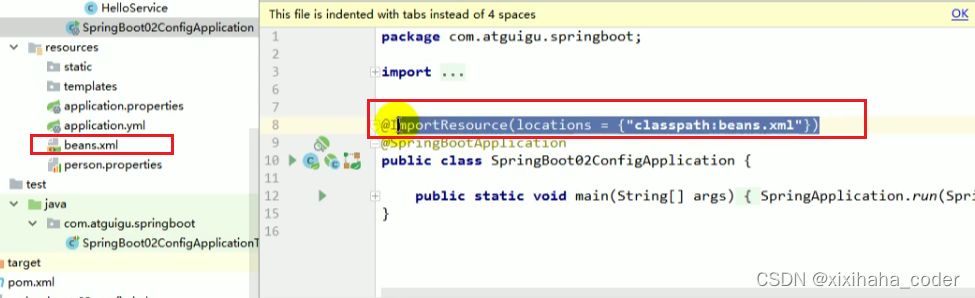
@PropertySource 和 @ImportResource


profile


自动配置原理

自动配置
相关注解@configurationProperties 读配置文件的配置 能配什么属性都是靠xxxProperties类,这些属性又是和配置文件绑定的
根据不同的条件判断,判断这个配置类是否生效

我们可以通过用debug=true属性﹔来让控制台打印自动配置报告,这样我们就可以很方便的知道哪些自动配置类生效
整合日志


使用

指定配置


如果使用的是logback-spring.xml 这个名字, 就没有以上的配置 不然报错~
全面接管SpringMVC
- 肯定不推荐加@EnableWebMvc


启动流程
1.创建springapplication对象

2 运行run方法
扫描创建加载所有组建的地方 refreshContext(context);
自定义starter
1.先创建一个空项目,后创建一个maven工程

2.再创建一个springboot项目

springboot项目结构

<dependencies>
    <!--		所有starter的基本配置-->
    <dependency>
        <groupId>org.springframework.boot</groupId>
        <artifactId>spring-boot-starter</artifactId>
    </dependency>

</dependencies>
HelloService
package com.tian.starter;

public class HelloService {

    HelloProperties helloProperties;

    public String sayHello(String name){
        return helloProperties.getPrefix()+"-"+name+"-"+helloProperties.getSuffix();
    }

    public HelloProperties getHelloProperties() {
        return helloProperties;
    }

    public void setHelloProperties(HelloProperties helloProperties) {
        this.helloProperties = helloProperties;
    }
}
HelloProperties
package com.tian.starter;

import org.springframework.boot.context.properties.ConfigurationProperties;

@ConfigurationProperties(prefix = "tian.hello")
public class HelloProperties {
    private String prefix;
    private String suffix;

    public String getPrefix() {
        return prefix;
    }

    public void setPrefix(String prefix) {
        this.prefix = prefix;
    }

    public String getSuffix() {
        return suffix;
    }

    public void setSuffix(String suffix) {
        this.suffix = suffix;
    }
}
HelloServiceConfiguration
@Configuration
@ConditionalOnWebApplication //web才生效
@EnableConfigurationProperties(HelloProperties.class)
public class HelloServiceConfiguration {

    @Autowired
    HelloProperties helloProperties;

    @Bean
    public HelloService helloService(){
        HelloService helloService = new HelloService();
        helloService.setHelloProperties(helloProperties);
        return helloService;
    }
}
spring.factories
org.springframework.boot.autoconfigure.EnableAutoConfiguration=\
com.tian.starter.HelloServiceConfiguration
maven项目 引入依赖
<dependencies>
    <!--    引入自动配置模块-->
    <dependency>
        <groupId>com.tian.starter</groupId>
        <artifactId>tian-spring-boot-starter-autoconfigurer</artifactId>
        <version>0.0.1-SNAPSHOT</version>
    </dependency>
</dependencies>
两个项目打包
new 一个springboot项目测试
<dependency>
    <groupId>org.springframework.boot</groupId>
    <artifactId>spring-boot-starter-web</artifactId>
</dependency>
<!--引入自定义的starter-->
<dependency>
    <groupId>com.tian.starter</groupId>
    <artifactId>tian-spring-boot-starter</artifactId>
    <version>1.0-SNAPSHOT</version>
</dependency>
controller
@RestController
public class HelloController {
    @Autowired
    HelloService helloService;

    @GetMapping("/hello")
    public String hello(){
        return  helloService.sayHello("tian");
    }
}
访问测试

dev-tools

ctrl+f9 重新编译
yml提示

@RequestAttribute

知识点
redisTemplate 底层用的就是Lettuce
指标监控
springboot Actuator
1.导入依赖

直接访问
localhost:8080/actuator/health
但是不能访问某些端点 比如 localhost:8080/actuator/beans
可以配置暴露所有端点

最常用的Endpoint
- Health:监控状况
- Metrics:运行时指标
- Loggers:日法记录


 591
591


 被折叠的 条评论
为什么被折叠?
被折叠的 条评论
为什么被折叠?
 到【灌水乐园】发言


