CAS+Shiro 自定义 pac4jRealm 每次判断权限都要重复执行doGetAuthorizationInfo()两次

代码如下:

public class UserRealm extends Pac4jRealm(){
  
  @Override
  public AuthorizationInfo  doGetAuthorizationInfo(PrincipalCollection principals) {
    // TODO Auto-generated method stub
    System.out.println("Onece");
    Set<String> roles=new HashSet()<>;
    roles.add("admin");
    SimpleAuthorizationInfo authorizationInfo = new SimpleAuthorizationInfo();
    authorizationInfo.setRoles(roles);
    return authorizationInfo ;
}

在controller层有一个方法

    @RequestMapping("/hello2")
    @ResponseBody
    public String hello2() {
        SecurityUtils.getSubject().checkRoles("user");
        return "success";
    }

当执行chekRoles 执行了doGetAuthorizationInfo() 方法 但是要打印两个"Onece" 请问这是什么原因呢?

原因如下:

这个问题其实换一个标题问题更清晰:即是 Spring Aop注解执行两次 方法体执行一次!!!
在我的业务场景中 使用CGLIB动态代理 通过DynamicAdvisedInterceptor来处理 intercept是aop处理入口:
包含四个参数 第一个是代理方法 第二个是目标方法 第三个是方法参数 第四个是方法代理信息

    @Override
    public Object intercept(Object proxy, Method method, Object[] args, MethodProxy methodProxy) throws Throwable {
        Object oldProxy = null;
        boolean setProxyContext = false;
        Class<?> targetClass = null;
        Object target = null;
        try {
            if (this.advised.exposeProxy) {
                // Make invocation available if necessary.
                oldProxy = AopContext.setCurrentProxy(proxy);
                setProxyContext = true;
            }
            // May be null. Get as late as possible to minimize the time we
            // "own" the target, in case it comes from a pool...
            target = getTarget();
            if (target != null) {
                targetClass = target.getClass();
            }
            List<Object> chain = this.advised.getInterceptorsAndDynamicInterceptionAdvice(method, targetClass);
            Object retVal;
            // Check whether we only have one InvokerInterceptor: that is,
            // no real advice, but just reflective invocation of the target.
            if (chain.isEmpty() && Modifier.isPublic(method.getModifiers())) {
                // We can skip creating a MethodInvocation: just invoke the target directly.
                // Note that the final invoker must be an InvokerInterceptor, so we know
                // it does nothing but a reflective operation on the target, and no hot
                // swapping or fancy proxying.
                Object[] argsToUse = AopProxyUtils.adaptArgumentsIfNecessary(method, args);
                retVal = methodProxy.invoke(target, argsToUse);
            }
            else {
                // We need to create a method invocation...
                retVal = new CglibMethodInvocation(proxy, target, method, args, targetClass, chain, methodProxy).proceed();
            }
            retVal = processReturnType(proxy, target, method, retVal);
            return retVal;
        }
        finally {
            if (target != null) {
                releaseTarget(target);
            }
            if (setProxyContext) {
                // Restore old proxy.
                AopContext.setCurrentProxy(oldProxy);
            }
        }
    }

通过打断点发现了bug出现的原因:


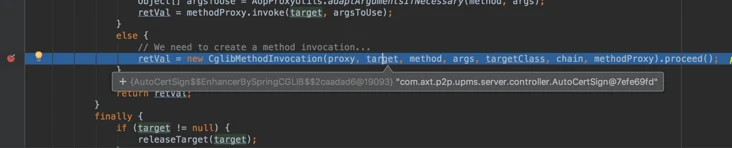
第一次执行时 代理方法和目标方法 是同一个!!!


第二次执行时 目标方法才是真正的方法体!!!

解决方法就是去除掉


当前我的pub-shiro项目依赖了 pub-datasource模块 pub-datasource模块里面使用了

@Aspect
@EnableAspectJAutoProxy(exposeProxy=true,proxyTargetClass=true)
@Component

使用了cglib代理 而后在shiroConfig中 注入了DefaultAdvisorAutoProxyCreator代理器 存在了两个代理器 这两个代理器的区别和为什么出现该问题的原因 我还在研究中 得出答案会来更新
本问题即是Spring Aop注解执行两次 方法体执行一次!!! 代理1 代理 代理2 而 代理2 代理 真正的方法体!!! 这也就是为什么shiro中 权限校验方法执行两次 而真正的方法体执行一次的原因。

地址:https://segmentfault.com/q/1010000014766223

  • 0
    点赞
  • 0
    收藏
    觉得还不错? 一键收藏
  • 0
    评论
Spring Boot 是一个快速开发框架,它提供了一系列的工具和插件,可以快速构建一个企业级的应用程序。而 Shiro 是一个强大而灵活的安全框架,可以提供身份验证、授权、密码加密、会话管理等功能。CAS 是一个单点登录(SSO)协议,可以实现用户在多个应用系统中使用同一个身份验证。 下面是一个简单的 Spring Boot + Shiro + CAS 的示例应用程序: 1. 创建一个 Spring Boot 应用程序,并添加依赖: ```xml <dependency> <groupId>org.springframework.boot</groupId> <artifactId>spring-boot-starter-web</artifactId> </dependency> <dependency> <groupId>org.apache.shiro</groupId> <artifactId>shiro-spring-boot-web-starter</artifactId> <version>1.5.3</version> </dependency> <dependency> <groupId>org.jasig.cas.client</groupId> <artifactId>cas-client-core</artifactId> <version>3.6.0</version> </dependency> ``` 2. 配置 Shiro: ```java @Configuration public class ShiroConfig { @Bean public CasRealm casRealm() { CasRealm realm = new CasRealm(); realm.setCasServerUrlPrefix("https://cas.example.com/cas"); realm.setCasService("https://myapp.example.com/cas"); realm.setDefaultRoles("user"); realm.setRoleAttributeNames("memberOf"); return realm; } @Bean public DefaultWebSecurityManager securityManager() { DefaultWebSecurityManager manager = new DefaultWebSecurityManager(); manager.setRealm(casRealm()); return manager; } @Bean public ShiroFilterFactoryBean shiroFilter() { ShiroFilterFactoryBean filter = new ShiroFilterFactoryBean(); filter.setSecurityManager(securityManager()); filter.setLoginUrl("https://cas.example.com/cas/login?service=https://myapp.example.com/cas"); filter.setSuccessUrl("/home"); filter.setUnauthorizedUrl("/403"); filter.setFilterChainDefinitionMap(Collections.singletonMap("/**", "authc")); return filter; } } ``` 3. 配置 CAS: ```java @Configuration public class CasConfig { @Bean public CasAuthenticationFilter casAuthenticationFilter() { CasAuthenticationFilter filter = new CasAuthenticationFilter(); filter.setCasServerLoginUrl("https://cas.example.com/cas/login"); filter.setServerName("https://myapp.example.com/cas"); filter.setAuthenticationSuccessHandler(authenticationSuccessHandler()); filter.setAuthenticationFailureHandler(authenticationFailureHandler()); return filter; } @Bean public SimpleUrlAuthenticationSuccessHandler authenticationSuccessHandler() { SimpleUrlAuthenticationSuccessHandler handler = new SimpleUrlAuthenticationSuccessHandler(); handler.setDefaultTargetUrl("/home"); handler.setAlwaysUseDefaultTargetUrl(true); return handler; } @Bean public SimpleUrlAuthenticationFailureHandler authenticationFailureHandler() { SimpleUrlAuthenticationFailureHandler handler = new SimpleUrlAuthenticationFailureHandler(); handler.setDefaultFailureUrl("/login?error=true"); return handler; } @Bean public FilterRegistrationBean<CasAuthenticationFilter> casFilterRegistrationBean() { FilterRegistrationBean<CasAuthenticationFilter> registration = new FilterRegistrationBean<>(); registration.setFilter(casAuthenticationFilter()); registration.addUrlPatterns("/*"); registration.setName("CAS Authentication Filter"); registration.setOrder(1); return registration; } @Bean public ServletListenerRegistrationBean<SingleSignOutHttpSessionListener> singleSignOutHttpSessionListener() { ServletListenerRegistrationBean<SingleSignOutHttpSessionListener> registration = new ServletListenerRegistrationBean<>(); registration.setListener(new SingleSignOutHttpSessionListener()); registration.setOrder(2); return registration; } @Bean public ServletRegistrationBean<Servlet> casValidationServletRegistrationBean() { ServletRegistrationBean<Servlet> registration = new ServletRegistrationBean<>(); registration.setServlet(new Cas20ProxyReceivingTicketValidationFilter()); registration.addUrlMappings("/cas/*"); registration.setName("CAS Validation Filter"); registration.setOrder(3); return registration; } } ``` 4. 创建一个 HomeController: ```java @Controller public class HomeController { @GetMapping("/home") public String home() { return "home"; } @GetMapping("/403") public String error403() { return "403"; } } ``` 5. 创建一个 CAS 认证服务器: ```java @SpringBootApplication public class CasServerApplication { public static void main(String[] args) { SpringApplication.run(CasServerApplication.class, args); } } ``` 6. 创建一个 CAS 客户端: ```java @SpringBootApplication @EnableScheduling public class CasClientApplication { public static void main(String[] args) { SpringApplication.run(CasClientApplication.class, args); } } ``` 这就是一个简单的 Spring Boot + Shiro + CAS 的示例应用程序。

“相关推荐”对你有帮助么?

  • 非常没帮助
  • 没帮助
  • 一般
  • 有帮助
  • 非常有帮助
提交
评论
添加红包

请填写红包祝福语或标题

红包个数最小为10个

红包金额最低5元

当前余额3.43前往充值 >
需支付:10.00
成就一亿技术人!
领取后你会自动成为博主和红包主的粉丝 规则
hope_wisdom
发出的红包
实付
使用余额支付
点击重新获取
扫码支付
钱包余额 0

抵扣说明:

1.余额是钱包充值的虚拟货币,按照1:1的比例进行支付金额的抵扣。
2.余额无法直接购买下载,可以购买VIP、付费专栏及课程。

余额充值