


原创 小尘哥 小尘哥 2024年09月05日 21:44 河南
系统基础框架使用了若依的微服务版,接到一个需求,一个大数据量的审核任务的审核进度要在页面上实时展示出来。基于此需求迅速想到最简单粗暴的解决方式:前端定时轮询。但是仅靠前端轮询肯定是不靠谱的,因为每次请求都是一次Http,会大量消耗资源,,因此综合分析后决定使用websocket建立长连接进行数据推送的方式。
以下为简单的消息推送示例,使用时需要根据自身业务集成具体业务实现。
一、后端改造
1、pom增加websocket依赖
-
<dependency> -
<groupId>org.springframework.boot</groupId> -
<artifactId>spring-boot-starter-websocket</artifactId> -
</dependency>
2、配置websocketconfig
-
@Configuration -
@EnableWebSocket -
public class WebSocketConfig { -
@Bean -
public ServerEndpointExporter serverEndpointExporter() { -
return new ServerEndpointExporter(); -
} -
}
3、 编写WebSocket服务类
-
@Component -
@ServerEndpoint(value = "/system/websocket") -
public class WebSocket { -
private static Map<String , Session> clientMap = new ConcurrentHashMap<>(); -
/** -
* 客户端与服务端连接成功 -
* @param session -
*/ -
@OnOpen -
public void onOpen(Session session){ -
clientMap.put(session.getId(),session); -
} -
/** -
* 客户端与服务端连接关闭 -
* @param session -
*/ -
@OnClose -
public void onClose(Session session){ -
clientMap.remove(session.getId()); -
} -
/** -
* 客户端与服务端连接异常 -
* @param error -
* @param session -
*/ -
@OnError -
public void onError(Throwable error,Session session) { -
error.printStackTrace(); -
} -
/** -
* 客户端向服务端发送消息 -
* @param message -
* @throws IOException -
*/ -
@OnMessage -
public void onMsg(Session session,String message) throws IOException { -
//以下为模拟发送消息 -
sendMessage(); -
} -
@Scheduled(cron = "0/10 * * * * ?") -
private void sendMessage(){ -
//获得Map的Key的集合 -
Set<String> sessionIdSet = clientMap.keySet(); -
// 此处相当于一个广播操作//迭代Key集合 -
for (String sessionId : sessionIdSet) { -
//根据Key得到value -
Session session = clientMap.get(sessionId); -
//发送消息给客户端,每10s给前端推送一个UUI -
session.getAsyncRemote().sendText(IdUtils.simpleUUID()); -
} -
} -
}
二、前端改造
websocket连接工具类
-
/** -
* 参数说明: -
* webSocketURL:String webSocket服务地址 eg: ws://127.0.0.1:8080/websocket (后端接口若为restful风格可以带参数) -
* callback:为带一个参数的回调函数 -
* message:String 要传递的参数值(不是一个必要的参数) -
*/ -
export default { -
// 初始化webSocket -
webSocketInit (webSocketURL) { // ws://127.0.0.1:8080/websocket -
this.webSocket = new WebSocket(webSocketURL) -
this.webSocket.onopen = this.onOpenwellback -
this.webSocket.onmessage = this.onMessageCallback -
this.webSocket.onerror = this.onErrorCallback -
this.webSocket.onclose = this.onCloseCallback -
}, -
// 自定义回调函数 -
setOpenCallback (callback) { // 与服务端连接打开回调函数 -
this.webSocket.onopen = callback -
}, -
setMessageCallback (callback) { // 与服务端发送消息回调函数 -
this.webSocket.onmessage = callback -
}, -
setErrorCallback (callback) { // 与服务端连接异常回调函数 -
this.webSocket.onerror = callback -
}, -
setCloseCallback (callback) { // 与服务端连接关闭回调函数 -
this.webSocket.onclose = callback -
}, -
close () { // 关闭连接 -
this.webSocket.close() -
}, -
sendMessage (message) { // 发送消息函数 -
this.webSocket.send(message) -
} -
}
2、示例页面
-
<template> -
<div> -
<el-button type="primary" @click="sendMessage">发送消息</el-button> -
<el-button type="primary" @click="closeMessage">关闭消息</el-button> -
<p v-for="(content, index) in text">{{index}}.{{ content }}</p> -
</div> -
</template> -
<script> -
import websocket from '@/api/websocket' -
import request from '@/utils/request' -
export default { -
name: "WebSocketDemo", -
data () { -
return { -
text: [], -
webSocketObject: null -
} -
}, -
created() { -
websocket.webSocketInit('ws://localhost:9250/system/websocket') -
websocket.setOpenCallback(res => { -
console.log('建立连接成功',res); -
}) -
websocket.setMessageCallback(res => { -
this.text.push(res.data) ; -
console.log('发送消息成功',res); -
}) -
websocket.setErrorCallback(res => { -
console.log('接收失败消息',res); -
}) -
websocket.setCloseCallback(res => { -
console.log('连接关闭',res); -
}) -
websocket.setCloseCallback(res => { -
console.log('连接关闭',res); -
}) -
}, -
methods: { -
sendMessage () { -
// 使用websocket交互 -
// websocket.sendMessage("123"); -
// 常规接口,通过http交互 -
request({ -
url : '/system/websocket/send?msg=123', -
method : 'post' -
}).then((res) => { -
this.text.push(res.data) ; -
console.log(this.text) -
}) -
}, -
//关闭websocket连接(若后台依然有定时任务,建议使用http的方式删除后台的定时任务执行) -
closeMessage(){ -
websocket.close() -
} -
} -
} -
</script>
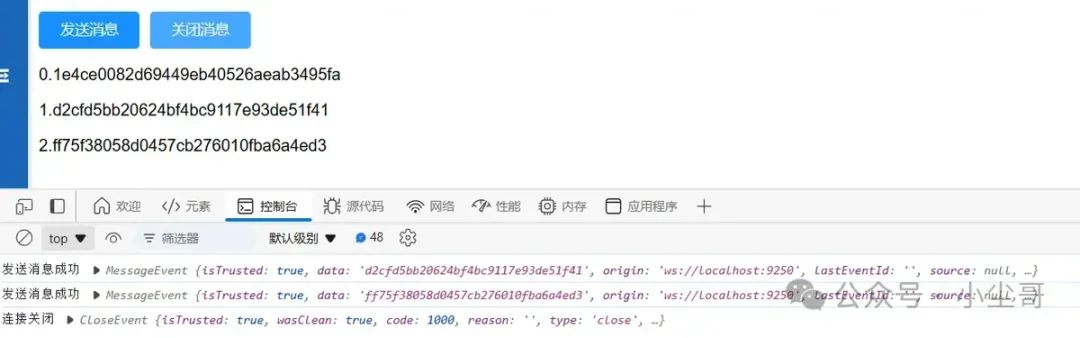
三、示例效果
定时推送uuid并在页面展示,可根据实际业务,修改为返回需要的审核状态即可。
其他大佬推荐可以使用MQTT、comet(长轮询)、SSE(长连接)等方式实现以上需求,待有时间再做一篇各种方式的对比。


 9412
9412

 被折叠的 条评论
为什么被折叠?
被折叠的 条评论
为什么被折叠?
 到【灌水乐园】发言


