


王道训练营Java31期
Day02 (值传递、理解JVM栈帧、Junit测试类改写)
idea版本:2018.3
个人感觉当日最难的是:找到用Junit来进行自动测试的方式、理解JVM内存图(引用)
仅仅做记录,不代表能解决之后的问题。
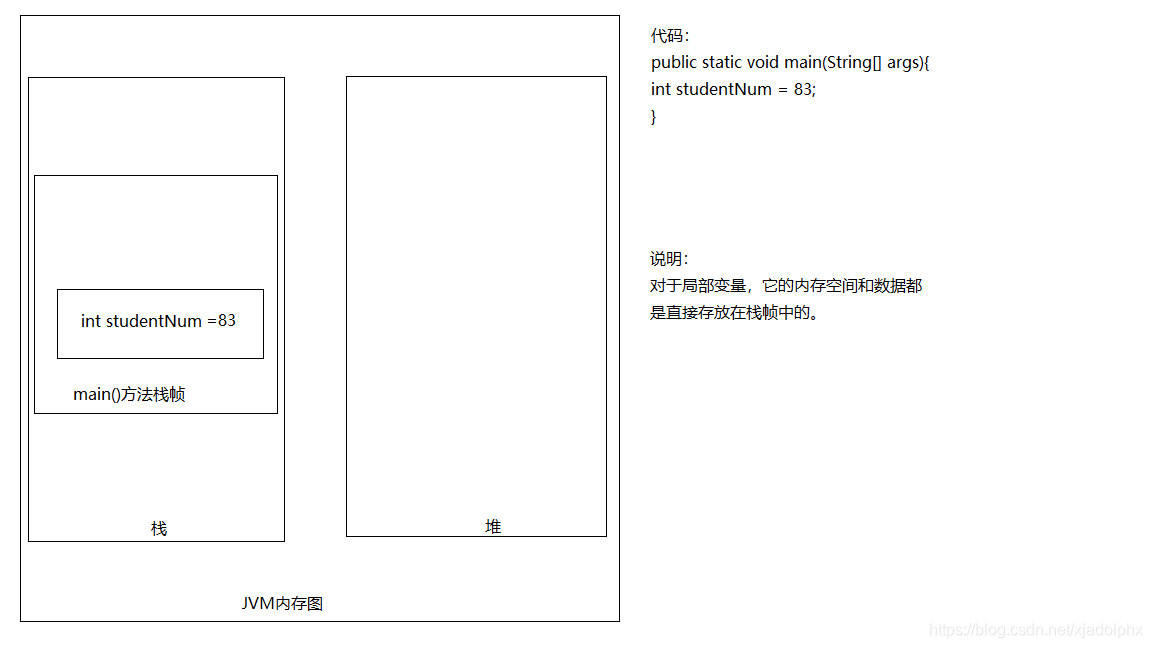
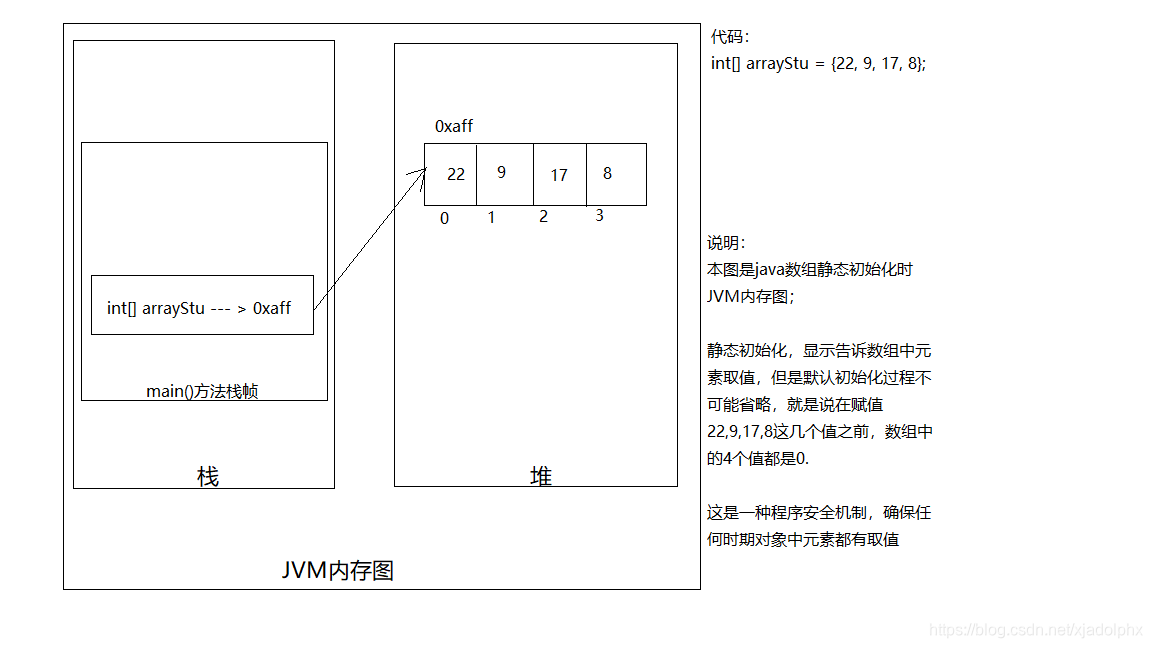
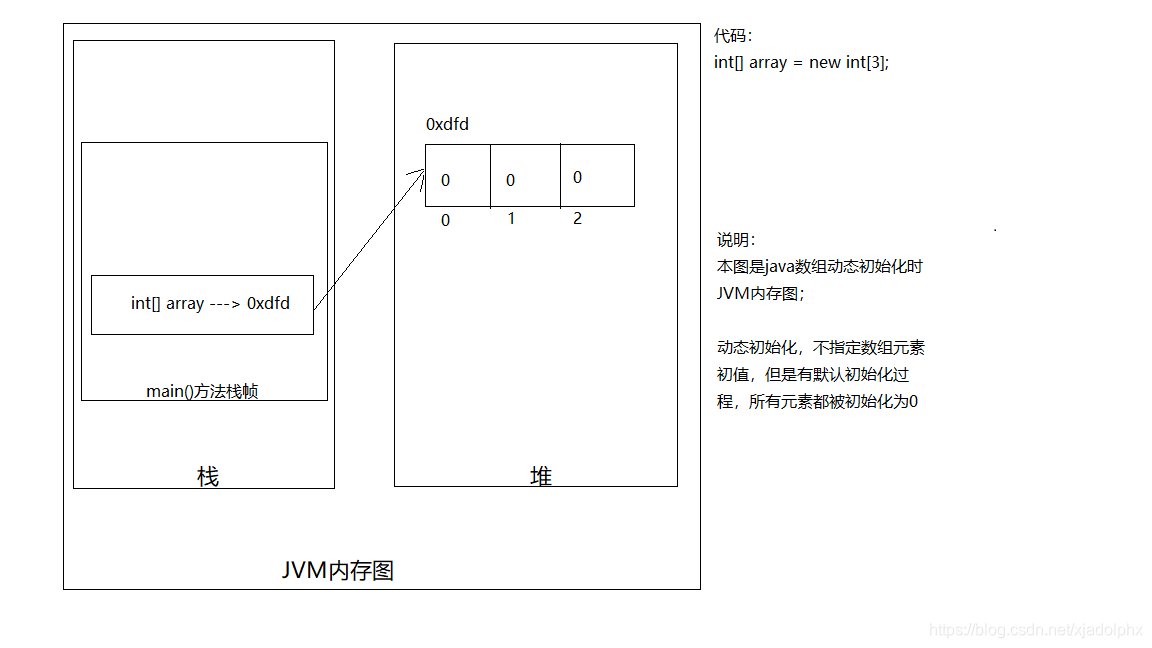
一.理解JVM内存图
二.idea2018.3中,使用Junit来进行测试
目前问题:
1.不会写Class类,找的帖子需要改动的地方还没理解
2.还没用过
参考:https://blog.csdn.net/index20001/article/details/99588033
三.实践记录:
1.导入Junit库。每次新建工程都需要 File -> Project Structure 下逐个添加


代码中写import,导入junit包,应该可以没有警告信息。
之后复制如下代码到自己新建类Calculator.java中,注意格式。
public class Calculator {

    public int add(int x, int y) { //加法
        return x + y;
    }

    public int sub(int x, int y) { //减法
        return x - y;
    }

    public int mul(int x, int y) { //乘法
        return x * y;
    }

    public int div(int x, int y) { //除法
        return x / y;
    }

    public int div2(int x, int y) { //除法 做了异常判断
        try {
            int z = x / y;
        } catch (Exception e) {
            e.printStackTrace();
        }
        return x / y;
    }

    public void unCompleted(int x, int y) { //未完成的模块:例如平方、开方等等
        //TODO
    }

    //    public static void main(String[] args) { // 传统代码测试
    //        int a = 8;
    //        int b = 2;
    //        Calculator calculator = new Calculator();
    //        if (calculator.add(a, b) == 10) {
    //              System.out.println("Test passed!");
    //               } else {
    //              System.out.println("Test failed!");
    //        }
    //        if (calculator.sub(a, b) == 6) {
    //              System.out.println("Test passed!");
    //               } else {
    //              System.out.println("Test failed!");
    //        }
    //        if (calculator.mul(a, b) == 16) {
    //              System.out.println("Test passed!");
    //               } else {
    //              System.out.println("Test failed!");
    //        }
    //        if (calculator.div(a, b) == 4) {
    //              System.out.println("Test passed!");
    //               } else {
    //              System.out.println("Test failed!");
    //        }
    //        System.out.println(calculator.div2(a,0));
    //    }
}
然后选中类名Calculator,CTRL+SHIFT+T(T就是Test测试,以后记住)。

之后生成一个对话框,需要自己定义Junit测试类的名字,自己选择需要测试的方法(打钩)。如图:


自动生成一个测试类。这个里面add()函数是空的,需要单独另写。
将参考博客的代码复制粘贴进去(添加了Throw Exception到方法声明后面)


本机代码:
package com.cskaoyanxy.java02.method;

import org.junit.Test;

import static org.junit.Assert.*;

public class CalculatorTest_JUnit {

    Calculator calculator = new Calculator();

    @Test
    public void add() throws Exception {
        if (calculator.add(8, 2) == 10) {
            System.out.println("Test add passed!");
        } else {
            System.out.println("Test add failed!");
        }
    }

    @Test
    public void sub() throws Exception {
        if (calculator.sub(19, 5) == 14) {
            System.out.println("Test sub passed!");
        } else {
            System.out.println("Test sub failed!");
        }
    }

    @Test
    public void mul() throws Exception {
        if (calculator.mul(7, 3) == 21) {
            System.out.println("Test mul passed!");
        } else {
            System.out.println("Test mul failed!");
        }
    }

    @Test
    public void div() throws Exception {
    }

    @Test
    public void div2() throws Exception {
    }

    @Test
    public void unCompleted() {
    }
}
本机运行:


四.思考
函数方法怎么改写到类?能不能直接调用
王道长风老师给了现成代码,解决了这两个问题。具体代码以及操作以及注释:
1.Junit类测试模板(类)
package com.cskaoyanxy.java02.method;

import org.junit.Test;
/**以下注释来自老师代码
 * 有啥用:在一个类中 实现类似 多个main()方法的作用
 *
 * 使用:
 *  1,直接在类体中,写注解(annotation) @Test
 *  注解:是和class平级关系的数据类型,它也是引用数据类型
 *  写完后,用alt+enter进行依赖导入
 *  在注解下面写
 *  public void 方法名(){}
 *
 *  注意事项:
 *  public void 是死的格式,不能够改变任何一个地方
 *  方法名可以自由发挥 但是要遵守规范
 *  方法参数列表必须为空,不能写参数
 *  做单元测试的类中,不要写main方法,没有太大意义
 *
 *  既然注解是和class平级的数据类型,如果我要在一个Test类中使用Junit,可以吗?
 *
 *
 */
/**
 * @program: day02_method_again
 * @description: 测试Junit,用老师给的代码
 * @author:
 * @create: 2021-03-31 08:53
 **/

public class JunitDemo {
    int a;
    @Test
    public void test(){
//        a++;
        System.out.println("456");
        System.out.println(a);
    }
    @Test
    public void test2(){
//        a++;
        System.out.println("123");
        System.out.println(a);
    }
}
本机运行:
(用老师给的测试代码没有选择类,按ctrl + shift + T,没有参考的教程里自动生成测试代码的那一步,没有弹出任何窗口)

2.强制使用Junit方式:
package com.cskaoyanxy.java02.method;

/**
 * @program: day02_method_again
 * @description: 强制使用Junit测试,用@符号导入包,public void 写
 * @author: xjxuyang
 * @create: 2021-03-31 08:57
 **/

//Annotation type expected
//如果想要强行使用,也是有办法的
//需要限定,告诉编译器,我用的注解 Test 是哪里的Test
//怎么去确定的描述一个类的位置 要带上包名 + 类名
//包名 + 类名 = 全限定类名 可以准确找到一个类

public class TestForce {
    @org.junit.Test
    public void test2() {
        System.out.println("1");
    }
}
运行,结果如下:


 596
596

 被折叠的 条评论
为什么被折叠?
被折叠的 条评论
为什么被折叠?
 到【灌水乐园】发言


