


在做后台系统时一般都会涉及到权限控制的问题,目前公司项目的处理是根据后端返回的权限表,动态添加路由来控制权限
这里先说一下整体的思路:我们先把一份整体的路由表数据给到后端,后端根据用户的权限,筛选返回其中的部分路由数据,我们根据接口返回的数据进行动态添加路由以及菜单的渲染,
以下是具体步骤:
1、在router文件夹里,添加menuData.js,这里面是需要给到后端的完整的权限表数据,具体格式由前端和后端沟通确定,这里仅做参考
const menuData = [
  // 用户管理===一级导航,不做跳转
  {
    title: '用户管理', // 标题
    icon: 'ico-aside2', // icon
    path: '1', // 路由路径
    name: '', // 路由别名
    component: '', // 路由挂载组件
    redirect: '', // 路由重定向地址
    children: [ // 当前路由下的子路由
      {
        title: '客户',
        icon: '',
        path: 'customer',
        name: 'Customer',
        component: 'Customer',
        redirect: 'customer-list',
        children: [
          {
            title: '客户列表',
            icon: '',
            path: 'customer-list',
            name: 'CustomerList',
            component: 'CustomerList',
            redirect: '',
            children: []
          },
          {
            title: '客户详情',
            icon: '',
            path: 'customer-details',
            name: 'CustomerDetails',
            component: 'CustomerDetails',
            redirect: '',
            children: []
          }
        ]
      }
    ]
  },
  // 系统设置===一级导航,不做跳转
  {
    title: '系统设置', // 标题
    icon: 'ico-aside5', // icon
    path: '2', // 路由路径
    name: '', // 路由别名
    component: '', // 路由挂载组件
    redirect: '', // 路由重定向地址
    children: [
      {
        title: '后台用户管理',
        icon: '',
        path: 'account',
        name: 'Account',
        component: 'Account',
        redirect: 'account-list',
        children: [
          {
            title: '后台用户管理列表',
            icon: '',
            path: 'account-list',
            name: 'AccountList',
            component: 'AccountList',
            redirect: '',
            children: []
          }
        ]
      }
    ]
  }
]

export default menuData
2、参考element-admin的权限控制,router文件夹里index.js修改如下:
import Vue from 'vue'
import Router from 'vue-router'
import { routerComponents } from './routerComponents' // 路由组件
import { constantRoutes, asyncRoutes, asyncRoutesCommon, errorRoute } from './constantRoutes' // 默认路由表

Vue.use(Router)

// 创建 Router实例
const createRouter = (clear = false) => new Router({
  // scrollBehavior: () => ({ y: 0 }),
  mode: 'history',
  routes: clear ? [] : constantRoutes
})

const router = createRouter()

// 重置路由
export function resetRouter (clear = false) {
  const newRouter = createRouter(clear)
  router.matcher = newRouter.matcher // reset router
}

// 添加路由
export function addRouter (menuData) {
  return new Promise(async (resolve, reject) => {
    /** 在这里写自己的逻辑 S */
    // 去掉一级导航,保留二级、三级导航
    let childList = []
    menuData.map(item => {
      childList.push(item.children)
    })
    childList = [].concat.apply([], childList)
    // 筛选生成动态路由表
    const tempRoutes = handleRoutesTable(childList)
    asyncRoutes[0].children = asyncRoutesCommon.concat(tempRoutes)
    /** 在这里写自己的逻辑 E */

    // 清空路由
    resetRouter(true)
    // 重新添加路由
    const newRoutes = [...constantRoutes, ...asyncRoutes, ...errorRoute]
    router.options.routes = newRoutes
    router.addRoutes(newRoutes)
    // console.log(newRoutes)
    resolve()
  })
}

// 过滤权限路由
function handleRoutesTable (childList) {
  let child = []
  if (childList.length === 0) return child
  childList.map((item, idx) => {
    child.push({
      path: item.path,
      name: item.name,
      meta: { title: item.title },
      component: routerComponents[item.component],
      redirect: item.children.length ? item.path + '/' + item.children[0].path : '',
      children: []
    })
    if (item.children.length) {
      child[idx].children = handleRoutesTable(item.children)
    }
  })
  return child
}

export default router
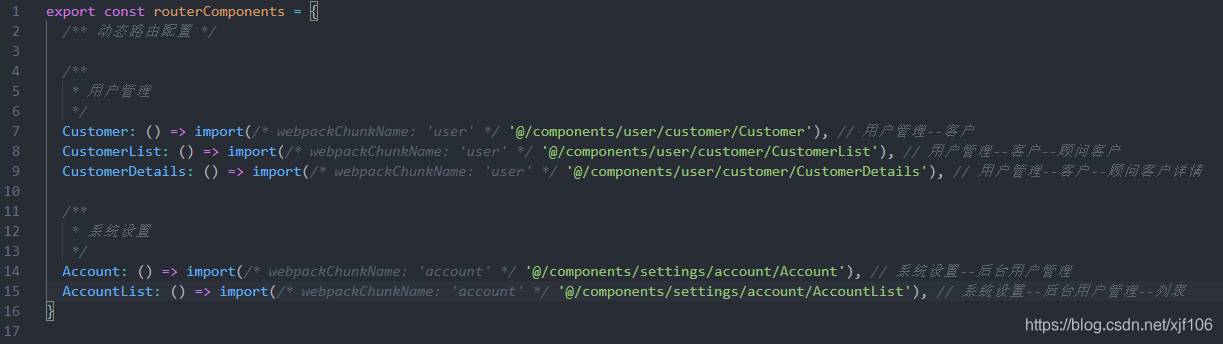
tips:我把引用的路由组件分离到routerComponents.js里去了,如图:
tips:import { constantRoutes, asyncRoutes, errorRoute } from './constantRoutes' // 默认路由表
项目需要设置默认的路由表,比如登录页,404页面,其他不需要权限就能进入的页面

3、把后端返回的权限数据放在vuex里,方便后面使用,在全局路由拦截beforeEach里面判断,如果有则next(),没有则在store的actions.js里重新请求权限接口

actions.js如下
import Vue from 'vue'
import router from '../router'
import store from './index'

// import menuData from '../router/menuData' // 使用动态路由时注释这行

export default {
  getPermissionList: ({commit}) => {
    // 这里是为了防止重复获取
    if (store.state.mutations.routes !== null) return

    // 请求 权限列表 接口
    Vue.prototype.$api.pGetMenu({
      uid: store.state.mutations.userId, // 账号id
      token: store.state.mutations.userToken // 登录token
    }).then(response => {
      console.log(response)
      commit('updatePermissionList', response.data)
    }).catch(error => {
      console.log(error.response)
      Vue.prototype.$msgbox.alert(error.response.data.message, {
        callback: action => {
          if (error.response.data.message === 'token验证失败') {
            router.replace({ path: '/login' })
          }
        }
      })
    })
  }
}
mutations.js如下
import getters from './getters.js'
import { addRouter } from '@/router/index'

const state = {
  routes: null
}

const mutations = {
  /** 权限控制 S */
  updatePermissionList (state, menuData) {
    state.routes = menuData
    addRouter(menuData)
  }
  /** 权限控制 E */
}

export default {
  state,
  mutations,
  getters
}
4、根据vuex里的权限数据,动态渲染侧边栏菜单,这里就不做展示了
====================================
至此,vue根据后端返回权限数据,动态添加路由就结束了,感谢大哥 @_Delete 的技术支持,让我顺利搞完了权限控制这一块!


 415
415


 被折叠的 条评论
为什么被折叠?
被折叠的 条评论
为什么被折叠?
 到【灌水乐园】发言


