


基于ubuntu20.4搭建的K8S集群新增工作节点带GPU显卡过程记录
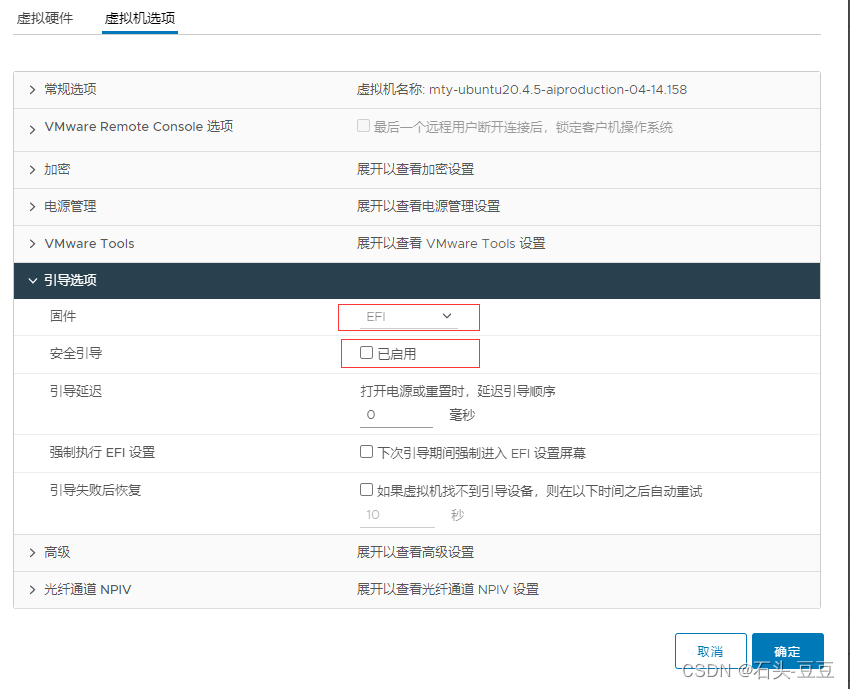
1、创建虚拟机引导选择efi
2、添加显卡,修改虚拟机-高级参数,添加以下两个参数
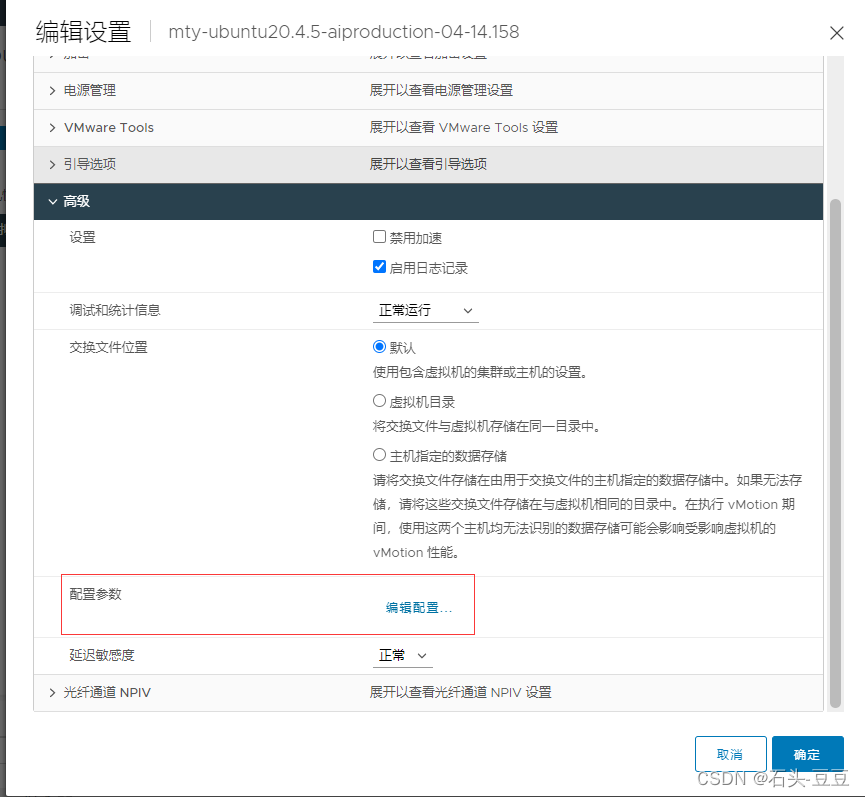
pciPassthru.64bitMMIOSizeGB:192
pciPassthru.use64bitMMIO:TRUE
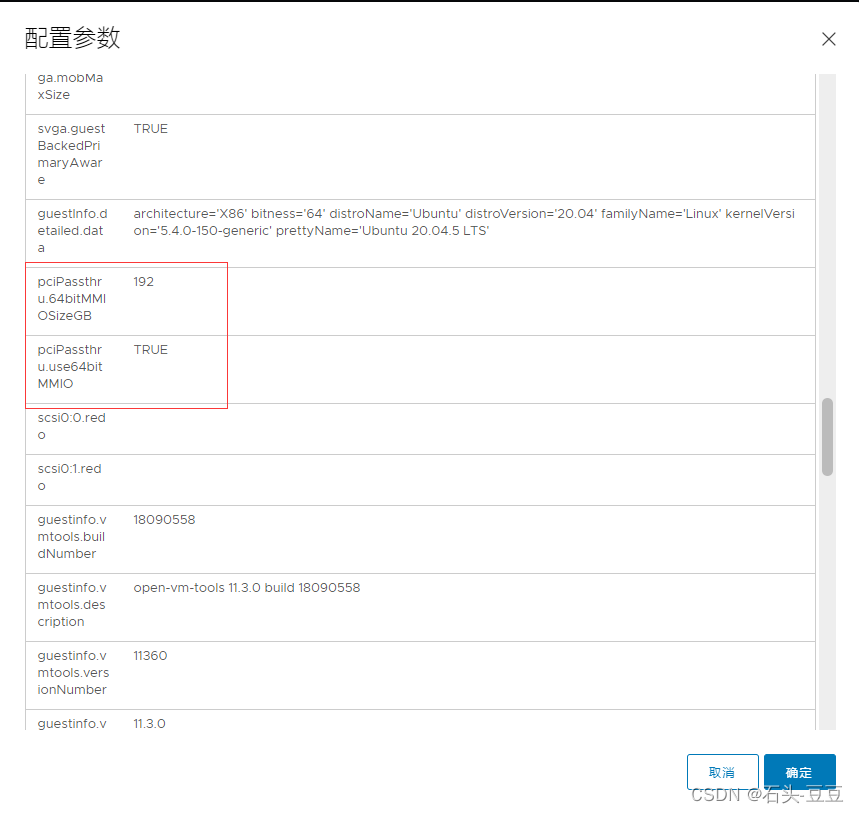
否则可能无法开机。
3、添加直通显卡,安装显卡驱动。
3.1、查看显卡
root@mty-aiproduction-05:~# lspci |grep NVIDIA
0b:00.0 3D controller: NVIDIA Corporation Device 2235 (rev a1)
3.2、无法查看到显卡型号
升级pci
root@mty-aiproduction-05:~# update-pciids
  % Total    % Received % Xferd  Average Speed   Time    Time     Time  Current
                                 Dload  Upload   Total   Spent    Left  Speed
100  289k  100  289k    0     0  13228      0  0:00:22  0:00:22 --:--:-- 12003
Done.
root@mty-aiproduction-05:~# lspci |grep NVIDIA
0b:00.0 3D controller: NVIDIA Corporation GA102GL [A40] (rev a1)
升级后可以正常查看PCI显卡型号。
3.3、安装显卡驱动
查看支持的显卡驱动版本
ubuntu-drivers devices
root@mty-aiproduction-05:~# ubuntu-drivers devices
ERROR:root:could not open aplay -l
Traceback (most recent call last):
  File "/usr/share/ubuntu-drivers-common/detect/sl-modem.py", line 35, in detect
    aplay = subprocess.Popen(
  File "/usr/lib/python3.8/subprocess.py", line 858, in __init__
    self._execute_child(args, executable, preexec_fn, close_fds,
  File "/usr/lib/python3.8/subprocess.py", line 1704, in _execute_child
    raise child_exception_type(errno_num, err_msg, err_filename)
FileNotFoundError: [Errno 2] No such file or directory: 'aplay'
== /sys/devices/pci0000:00/0000:00:16.0/0000:0b:00.0 ==
modalias : pci:v000010DEd00002235sv000010DEsd0000145Abc03sc02i00
vendor   : NVIDIA Corporation
driver   : nvidia-driver-470 - distro non-free
driver   : nvidia-driver-515-server - distro non-free
driver   : nvidia-driver-515 - distro non-free
driver   : nvidia-driver-515-open - distro non-free
driver   : nvidia-driver-510 - distro non-free
driver   : nvidia-driver-530-open - distro non-free recommended
driver   : nvidia-driver-525-open - distro non-free
driver   : nvidia-driver-525 - distro non-free
driver   : nvidia-driver-470-server - distro non-free
driver   : nvidia-driver-530 - distro non-free
driver   : nvidia-driver-525-server - distro non-free
driver   : xserver-xorg-video-nouveau - distro free builtin

== /sys/devices/pci0000:00/0000:00:0f.0 ==
modalias : pci:v000015ADd00000405sv000015ADsd00000405bc03sc00i00
vendor   : VMware
model    : SVGA II Adapter
manual_install: True
driver   : open-vm-tools-desktop - distro free
安装显卡驱动
apt -y install nvidia-driver-525
查看是否安装成功!
root@mty-aiproduction-05:~# nvidia-smi
Fri Jun 16 06:20:15 2023
+-----------------------------------------------------------------------------+
| NVIDIA-SMI 525.116.04   Driver Version: 525.116.04   CUDA Version: 12.0     |
|-------------------------------+----------------------+----------------------+
| GPU  Name        Persistence-M| Bus-Id        Disp.A | Volatile Uncorr. ECC |
| Fan  Temp  Perf  Pwr:Usage/Cap|         Memory-Usage | GPU-Util  Compute M. |
|                               |                      |               MIG M. |
|===============================+======================+======================|
|   0  NVIDIA A40          Off  | 00000000:0B:00.0 Off |                  Off |
|  0%   36C    P0    78W / 300W |      0MiB / 49140MiB |      0%      Default |
|                               |                      |                  N/A |
+-------------------------------+----------------------+----------------------+

+-----------------------------------------------------------------------------+
| Processes:                                                                  |
|  GPU   GI   CI        PID   Type   Process name                  GPU Memory |
|        ID   ID                                                   Usage      |
|=============================================================================|
|  No running processes found                                                 |
+-----------------------------------------------------------------------------+
4、安装docker
4.1、安装docker源
curl -fsSL https://download.docker.com/linux/ubuntu/gpg | sudo apt-key add -
add-apt-repository "deb [arch=amd64] http://mirrors.aliyun.com/docker-ce/linux/ubuntu $(lsb_release -cs) stable"
apt update
4.2、安装docker
apt-get -y install docker-ce
5、配置系统参数
5.1、关闭防火墙与swap
ufw disable
echo 'SELinux="disabled"' >> /etc/selinux/semanage.conf
swapoff -a
5.2、设置ipvs
apt install  ipvsadm
modprobe br_netfilter
cat > /etc/modules-load.d/ipvs.modules <<EOF
#!/bin/bash
modprobe -- ip_vs
modprobe -- ip_vs_rr
modprobe -- ip_vs_wrr
modprobe -- ip_vs_sh
modprobe -- nf_conntrack
EOF
chmod 755 /etc/modules-load.d/ipvs.modules
bash /etc/modules-load.d/ipvs.modules
lsmod | grep -e ip_vs -e nf_conntrack
5.3、内核参数配置
cat > /etc/sysctl.d/k8s.conf <<EOF
net.bridge.bridge-nf-call-ip6tables = 1
net.bridge.bridge-nf-call-iptables = 1
net.ipv4.ip_forward = 1
net.ipv4.vs.conn_reuse_mode = 0
net.ipv4.vs.conntrack = 1
net.ipv4.vs.expire_nodest_conn = 1
EOF

cat >/etc/sysctl.conf <<EOF
kernel.sysrq = 0
net.ipv4.ip_forward = 0
net.ipv4.conf.all.send_redirects = 0
net.ipv4.conf.default.send_redirects = 0
net.ipv4.conf.all.accept_source_route = 0
net.ipv4.conf.default.accept_source_route = 0
net.ipv4.conf.all.accept_redirects = 0
net.ipv4.conf.default.accept_redirects = 0
net.ipv4.conf.all.secure_redirects = 0
net.ipv4.conf.default.secure_redirects = 0
net.ipv4.icmp_echo_ignore_broadcasts = 1
net.ipv4.icmp_ignore_bogus_error_responses = 1
net.ipv4.conf.all.rp_filter = 1
net.ipv4.conf.default.rp_filter = 1
net.ipv4.tcp_syncookies = 1
kernel.dmesg_restrict = 1
net.ipv6.conf.all.accept_redirects = 0
net.ipv6.conf.default.accept_redirects = 0
EOF

sysctl --system
6、安装nvidia-docker
6.1、安装nvidia-docker 源
参考:https://blog.csdn.net/Y3_flybird/article/details/126846976
curl -s -L https://nvidia.github.io/nvidia-docker/gpgkey | sudo apt-key add -
distribution=$(. /etc/os-release;echo $ID$VERSION_ID)
curl -s -L https://nvidia.github.io/nvidia-docker/$distribution/nvidia-docker.list | sudo tee /etc/apt/sources.list.d/nvidia-docker.list
apt update
6.2、安装nvidia-docker
sudo apt-get install -y nvidia-docker2
6.3、修改docker配置文件daemon.json
root@mty-aiproduction-05:~# cat /etc/docker/daemon.json
{
    "runtimes": {
        "nvidia": {
            "path": "nvidia-container-runtime",
            "runtimeArgs": []
        }
    },
    "exec-opts": ["native.cgroupdriver=systemd"],
    "data-root": "/data/docker"
}
重启docker
systemctl restart docker
7、安装、配置kubeadm、kubelet
7.1、安装kubernete 源
curl https://mirrors.aliyun.com/kubernetes/apt/doc/apt-key.gpg | sudo apt-key add -
sudo add-apt-repository "deb https://mirrors.aliyun.com/kubernetes/apt/ kubernetes-xenial main"
apt update
7.2、安装kubeadm、kubelet
apt-get -y install kubelet=1.20.11-00 kubeadm=1.20.11-00 kubectl=1.20.11-00
7.3、配置kubeadm
cat > /etc/systemd/system/kubelet.service.d/10-kubeadm.conf <<EOF
# Note: This dropin only works with kubeadm and kubelet v1.11+
[Service]
Environment="KUBELET_CGROUP_ARGS=--cgroup-driver=systemd"
Environment="KUBELET_KUBECONFIG_ARGS=--bootstrap-kubeconfig=/etc/kubernetes/bootstrap-kubelet.conf --kubeconfig=/etc/kubernetes/kubelet.conf"
Environment="KUBELET_CONFIG_ARGS=--config=/var/lib/kubelet/config.yaml"
# This is a file that "kubeadm init" and "kubeadm join" generates at runtime, populating the KUBELET_KUBEADM_ARGS variable dynamically
EnvironmentFile=-/var/lib/kubelet/kubeadm-flags.env
# This is a file that the user can use for overrides of the kubelet args as a last resort. Preferably, the user should use
# the .NodeRegistration.KubeletExtraArgs object in the configuration files instead. KUBELET_EXTRA_ARGS should be sourced from this file.
EnvironmentFile=-/etc/default/kubelet
ExecStart=
ExecStart=/usr/bin/kubelet \$KUBELET_CGROUP_ARGS \$KUBELET_KUBECONFIG_ARGS \$KUBELET_CONFIG_ARGS \$KUBELET_KUBEADM_ARGS \$KUBELET_EXTRA_ARGS
EOF
systemctl daemon-reload
systemctl enable kubelet

modprobe br_netfilter
7.4、加入K8S集群
打印加入集群命令
kubeadm token create --print-join-command
执行命令加入集群
kubeadm join 100.64.14.201:6443 --token u2xczu.eoja3601noxhk05z --discovery-token-ca-cert-hash sha256:ac54d58c57e2fe4ac421a81bd25e6bc50ff6de4125af4b91e5e3e5c9a5109584
节点打标签使其可以调度vgpu管理程序
kubectl label node "node-name" nvidia-device-enable=enable
7.5、检查vGPU管理程序是否正常调度
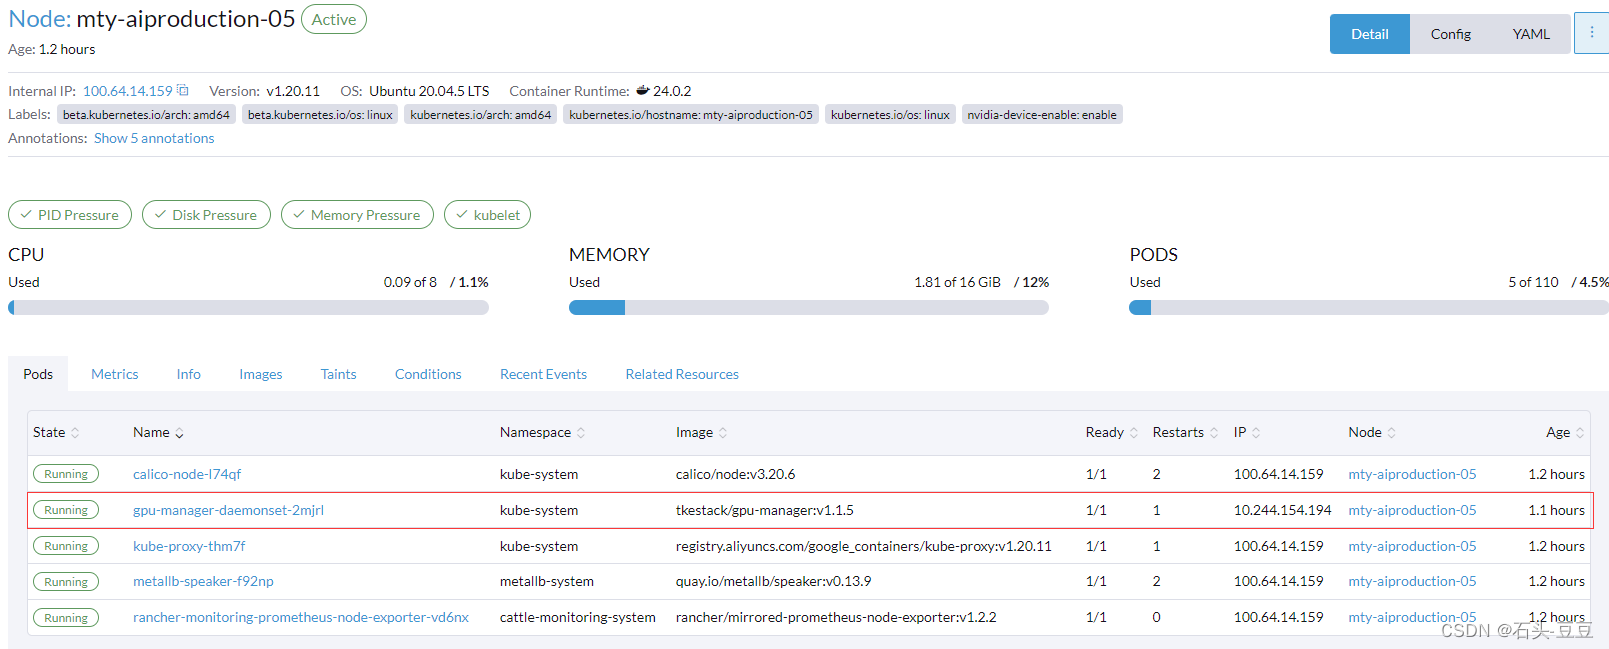
7.6、k8s master查看gpu资源
[root@mty-master-02 ~]# kubectl describe node mty-aiproduction-05
Name:               mty-aiproduction-05
Roles:              <none>
Labels:             beta.kubernetes.io/arch=amd64
                    beta.kubernetes.io/os=linux
                    kubernetes.io/arch=amd64
                    kubernetes.io/hostname=mty-aiproduction-05
                    kubernetes.io/os=linux
                    nvidia-device-enable=enable
Annotations:        kubeadm.alpha.kubernetes.io/cri-socket: /var/run/dockershim.sock
                    management.cattle.io/pod-limits: {"cpu":"200m","memory":"50Mi"}
                    management.cattle.io/pod-requests: {"cpu":"350m","memory":"30Mi","pods":"5"}
                    node.alpha.kubernetes.io/ttl: 0
                    projectcalico.org/IPv4Address: 100.64.14.159/24
                    projectcalico.org/IPv4IPIPTunnelAddr: 10.244.154.192
                    volumes.kubernetes.io/controller-managed-attach-detach: true
CreationTimestamp:  Fri, 16 Jun 2023 15:18:55 +0800
Taints:             <none>
Unschedulable:      false
Lease:
  HolderIdentity:  mty-aiproduction-05
  AcquireTime:     <unset>
  RenewTime:       Fri, 16 Jun 2023 16:18:42 +0800
Conditions:
  Type                 Status  LastHeartbeatTime                 LastTransitionTime                Reason                       Message
  ----                 ------  -----------------                 ------------------                ------                       -------
  NetworkUnavailable   False   Fri, 16 Jun 2023 15:43:37 +0800   Fri, 16 Jun 2023 15:43:37 +0800   CalicoIsUp                   Calico is running on this node
  MemoryPressure       False   Fri, 16 Jun 2023 16:16:08 +0800   Fri, 16 Jun 2023 15:43:29 +0800   KubeletHasSufficientMemory   kubelet has sufficient memory available
  DiskPressure         False   Fri, 16 Jun 2023 16:16:08 +0800   Fri, 16 Jun 2023 15:43:29 +0800   KubeletHasNoDiskPressure     kubelet has no disk pressure
  PIDPressure          False   Fri, 16 Jun 2023 16:16:08 +0800   Fri, 16 Jun 2023 15:43:29 +0800   KubeletHasSufficientPID      kubelet has sufficient PID available
  Ready                True    Fri, 16 Jun 2023 16:16:08 +0800   Fri, 16 Jun 2023 15:43:29 +0800   KubeletReady                 kubelet is posting ready status. AppArmor enabled
Addresses:
  InternalIP:  100.64.14.159
  Hostname:    mty-aiproduction-05
Capacity:
  cpu:                       8
  ephemeral-storage:         304919168Ki
  hugepages-1Gi:             0
  hugepages-2Mi:             0
  memory:                    16379672Ki
  pods:                      110
  tencent.com/vcuda-core:    100
  tencent.com/vcuda-memory:  191
Allocatable:
  cpu:                       8
  ephemeral-storage:         281013504764
  hugepages-1Gi:             0
  hugepages-2Mi:             0
  memory:                    16277272Ki
  pods:                      110
  tencent.com/vcuda-core:    100
  tencent.com/vcuda-memory:  191
System Info:
  Machine ID:                 dc12a8bd47d24fa1a7aa944d9f1286cb
  System UUID:                06df1742-e004-805a-d465-b084ae58ff5b
  Boot ID:                    3527717d-8535-4ff2-92c6-7832bd9b42f9
  Kernel Version:             5.4.0-152-generic
  OS Image:                   Ubuntu 20.04.5 LTS
  Operating System:           linux
  Architecture:               amd64
  Container Runtime Version:  docker://24.0.2
  Kubelet Version:            v1.20.11
  Kube-Proxy Version:         v1.20.11
PodCIDR:                      10.244.28.0/24
PodCIDRs:                     10.244.28.0/24
Non-terminated Pods:          (5 in total)
  Namespace                   Name                                                 CPU Requests  CPU Limits  Memory Requests  Memory Limits  AGE
  ---------                   ----                                                 ------------  ----------  ---------------  -------------  ---
  cattle-monitoring-system    rancher-monitoring-prometheus-node-exporter-vd6nx    100m (1%)     200m (2%)   30Mi (0%)        50Mi (0%)      59m
  kube-system                 calico-node-l74qf                                    250m (3%)     0 (0%)      0 (0%)           0 (0%)         57m
  kube-system                 gpu-manager-daemonset-2mjrl                          0 (0%)        0 (0%)      0 (0%)           0 (0%)         54m
  kube-system                 kube-proxy-thm7f                                     0 (0%)        0 (0%)      0 (0%)           0 (0%)         59m
  metallb-system              metallb-speaker-f92np                                0 (0%)        0 (0%)      0 (0%)           0 (0%)         58m
Allocated resources:
  (Total limits may be over 100 percent, i.e., overcommitted.)
  Resource                  Requests   Limits
  --------                  --------   ------
  cpu                       350m (4%)  200m (2%)
  memory                    30Mi (0%)  50Mi (0%)
  ephemeral-storage         0 (0%)     0 (0%)
  hugepages-1Gi             0 (0%)     0 (0%)
  hugepages-2Mi             0 (0%)     0 (0%)
  tencent.com/vcuda-core    0          0
  tencent.com/vcuda-memory  0          0
以上,gpu节点安装完成。


 3951
3951


 被折叠的 条评论
为什么被折叠?
被折叠的 条评论
为什么被折叠?
 到【灌水乐园】发言


