


CompletableFuture异步编程
多线程
首先我们回顾一下初始化线程的四种方式:
1、继承Thread类
2、实现Runnable结构
3、实现Callable接口+FutureTask(可以拿到返回结果,可以处理异常),Callable支持泛型,泛型类型即返回结果类型。FutureTask的get()方法是阻塞等待当前线程任务执行完成,拿到返回值4、线程池:当前系统中线程池只能有一两个,异步任务交由线程池自己去选择线程执行
1和2:主进程无法获取线程的运算结果
3:主进程可以获取当前线程的运算结果,但是不利于控制服务器种的线程资源,可能导致服务器资源耗尽
4:线程池执行异步任务性能稳定,也可以选择获取执行结果(可以不获取)并捕获异常。但是,在业务复杂情况下,一个异步调用可能会依赖于另一个异步调用的执行结果。可以通过如下两种方式初始化线程池
Executors.newFixedThreadPool(3);
//或
new ThreadPollExecutor(corePoolSize,maximumPoolSize,keepAliveTime,TimeUnit,unit,workQueue,threadFactory,handler);
四种方式代码如下:
public class ThreadTest {
    //一般一个系统里面只有一个线程池
	public static ExecutorService service = Executors.newFixedThreadPool(10);
	public static void main(String[] args) throws ExecutionException, InterruptedException {
        System.out.println("main.............start.......");
        /**
         * 1、继承Thread
         * 2、实现Runnable
         * 3、实现Callable接口+FutureTask(可以拿到返回结果,可以处理异常)
         * 4、线程池=ExecutorService
         *      让线程池直接执行任务
         *      service.execute(new Runnable01());execute方法只能传入Runnable接口,所以它没有返回值,但是submit可以传入Runnable(还可以传如一个T 接收返回结果),也可以传入Callable,所以submit方法是有一个返回值(Future类型)的
         *      创建:Executors或者自定义线程池
         * 区别:
         *  1、2不能得到返回值。3可以获取返回值
         *  1、2、3都不能控制资源
         *  4可以控制资源,性能稳定。
         */
//当前系统中池只有一两个,每个异步任务,提交给线程池让他自己去执行就行

//        1、继承Thread
//        Thread01 thread01 = new Thread01();
//        thread01.start();//启动线程

//        2、实现Runnable
//        Runnable01 runnable01 = new Runnable01();
//        new Thread(runnable01).start();

//        3、实现Callable接口+FutureTask
        FutureTask<Integer> futureTask = new FutureTask<>(new Callable01());
        new Thread(futureTask).start();
        //阻塞等待整个线程执行完成,获取返回结果
        Integer integer = futureTask.get();
//        4、线程池
        service.execute(new Runnable01());
        System.out.println("main.............end......."+integer);
    }
	public static class Thread01 extends Thread{
        @Override
        public void run() {
            System.out.println("当前线程:"+Thread.currentThread().getId());
            int i = 10/2;
            System.out.println("当前运行结果:" + i);
        }
    }
	public static class Runnable01 implements Runnable{
        @Override
        public void run() {
            System.out.println("当前线程:"+Thread.currentThread().getId());
            int i = 10/2;
            System.out.println("当前运行结果:" + i);
        }
    }
	public static class Callable01 implements Callable<Integer>{
        @Override
        public Integer call() throws Exception {
            System.out.println("当前线程:"+Thread.currentThread().getId());
            int i = 10/2;
            System.out.println("当前运行结果:" + i);
            return i;
        }
    }
}
线程池
我们以后在实际业务中前三种启动线程的方式都不用,我们将所有的多线程异步任务都交给线程池执行。
线程池(ThreadPoolExecutor)的继承机构:
顶级接口Executor: 定义了execute(Runnbale command)方法
子接口ExecutorService
最常用实现类:ThreadPoolExecutor
如果调用ThreadPoolExecutor实现类的构造器创建线程池时并不会马上创建线程,只有当调用其execute方法时才会去创建线程,类似于延时加载(创建线程)。
使用线程池的好处:
- 降低资源的消耗:通过重复利用已经创建好的线程降低线程的创建和销毁带来的损耗
- 提高响应速度 :因为线程池中的线程数没有超过线程池的最大上限时,有的线程处于等待分配任务的状态,当任务来时无须创建新的线程就能执行
- 提高线程的可管理性 :线程池会根据当前系统特点对池内的线程进行优化处理,减少创建和销毁线程带来的系统开销。无限的创建和销毁线程不仅消耗系统资源,还降低系统的稳定性,使用线程池进行统一分配
我们这里再回顾一下线程池的七大参数
- corePoolSize: 核心线程数[一直存在,除非设置核心线程的超时时间allowCoreThreadTimeOut];核心线程数的意思就是线程池创建好以后就准备就绪的线程数量,核心线程如果是空闲的就会等待接收异步任务去执行。核心线程数是多少,线程工厂就会创建几个线程并且start。
- maximumPoolSize: 最大线程数量,用于控制线程资源
- keepAliveTime: 存活时间。如果当前正在运行的线程数量大于core数量,那么就会释放空闲的线程(释放数量=maximumPoolSize-corePoolSize)。释放条件:只要线程空闲时间大于指定的keepAliveTime;
- unit: 线程空闲时间的时间单位
- BlockingQueue workQueue: 工作队列。如果任务有很多,就会将多的任务放在队列里面。只要有线程空闲,就会去队列里面取出新的任务继续执行
- ThreadFactory: 创建线程的工厂
- RejectedExecutionHandler handler: 拒绝策略:如果队列满了,就会按照我们指定的拒绝策略,拒绝执行新的任务。
- AbortPolicy :抛出运行时异常RejectedExecutionException。这种策略丢弃任务,并抛出异常。(jdk默认策略)
- CallerRunsPolicy : 线程调用运行该任务的 execute 本身。此策略提供简单的反馈控制机制,能够减缓新任务的提交速度。
- DiscardOldestPolicy(弃老策略)jdk:如果执行程序尚未关闭,则位于工作队列头部的任务将被删除,然后重试执行程序。
- DiscardPolicy :发生拒绝策略时,不触发任何动作
线程池的工作顺序
- 线程池创建,执行execut方法后准备好core数量的核心线程,准备接受任务
- 新任务进来,如果有空闲的core线程那么就执行任务。core如果满了,就将再进来的任务放入阻塞队列中。空闲的core就会自己去阻塞队列获取任务执行
- 阻塞队列满了,就直接开新线程执行(执行的是最近来的新任务,而不是阻塞队列中的任务),最大只能开到max指定的数量
- max满了就用RejectedExecutionHandler拒绝任务
- max都执行完成,有很多空闲,在指定的时间keepAliveTime以后,释放空闲的线程(max-core)。
**例子:**一个线程池 core 7, max 20, queue 50, 100并发进来怎么分配的
7个会立即执行。50个进入队列,再开13个线程进行执行,剩下30个就用拒绝策略。
以下为自定义线程池的过程:
     ThreadPoolExecutor executor = new ThreadPoolExecutor(
                5,
                200,
                10,
                TimeUnit.SECONDS,
                new LinkedBlockingQueue<>(100000),
                Executors.defaultThreadFactory(),
                new ThreadPoolExecutor.AbortPolicy());
常见的4种线程池
newSingleThreadExecutor: 创建一个单线程化的线程池,他只会用唯一的工作线程来执行任务,保证所有任务。后台从队列里面获取任务,挨个执行。
newFixedThreadPool: 创建一个定长线程池,可控制线程最大并发数,超出的线程会在队列中等待。固定大小,core=max,表示线程都不可回收。
newCachedThreadPool: 创建一个可缓存的线程池,如果线程池长度超过处理需要,可灵活回收空闲线程。它的core是0,表示所有线程都可以回收。
newScheduledThreadPool: 创建一个定长线程池。支持定时(设置一个延时时间表示多长时间之后执行任务)和周期性地执行任务。
但是这里我们注意,在阿里的开发手册里面明确提出不要使用这四种线程池,因为前两种的阻塞队列是无界队列,可能会出现OOM。后两种的maxmum都是无上限的,也可能会报OOM。我们在开发中使用线程池**最好是new ThreadPoolExecutor(…);**然后根据业务需要自行设置这七大参数。
CompletableFuture组合式异步编程
注意事项:使用异步编排CompletableFuture必须调用它的affof()方法,否则可能出现线程池执行过程中线程被挂起的情况,也就会导致任务执行阻塞。
在我们的项目中,查询商品详情页的逻辑比较复杂,有些数据甚至涉及到了远程调用(极其花费时间),具体查询数据流程如下:
- 获取sku的基本信息 0.5s
- 获取sku的图片信息 0.5s
- 获取sku的促销信息 1s
- 获取spu的所有销售属性 1s
- 获取规格参数组及组下的规格参数 1.5s
- spu详情 1s(以上所有时间只是用于描述问题)
这里如果是单线程同步执行的话,访问我们的商品详情页需要足足5.5s。但是多线程下可能只需要1.5s即可(即执行时间最长的那个任务所需时间)。但我们这里的业务又有所不同: 1、2、3可以异步完成,4、5、6依赖于1完成之后的结果,4、5、6又可以异步完成,所以我们需要使用CompletableFuture进行异步编排 ,以使得456任务在获取到1执行完成之后的结果之后才异步执行。
下面我们就使用异步编程达到这一目标。
首先我们要学会JUC包下的CompletableFuture如何使用的,这里首先看一下它的源码,了解其继承结构:
public class CompletableFuture<T> implements Future<T>, CompletionStage<T>
public interface Future<V> {
public interface CompletionStage<T> {
可以看到其实现了Future接口,前面我们说创建线程的第三个方法实现Callable接口时就提到了其需要与FutrueTask联合使用,FutureTask也实现了Future这个接口。想要用好CompletableFuture,我们就需要了解Future这个接口,因为CompletableFuture(JDK8)是在Future(JDK5)基础上进行改进的,下面为拓展内容,想直接跟项目走的同学可以先行跳过。
Futrue接口的原理:
为了更快的了解Future模式,我们先来看一个生活中的例子。
场景1:
午饭时间到了,同学们要去吃饭了,小王(红色)下楼,走了20分钟,来到了肯德基,点餐,排队,吃饭一共花了20分钟,又花了20分钟走回公司继续工作,合计1小时。
场景2:
午饭时间到了,同学们要去吃饭了,小王点了个肯德基外卖,一分钟它就拿到了一个订单(虽然订单不能当饭吃,但是有了订单,还怕吃不上饭嘛)。接着小王可以继续干活,30分钟后,外卖到了,接着小王花了10分钟吃饭,接着又可以继续工作了,成功的卷到了隔壁红色的小王。
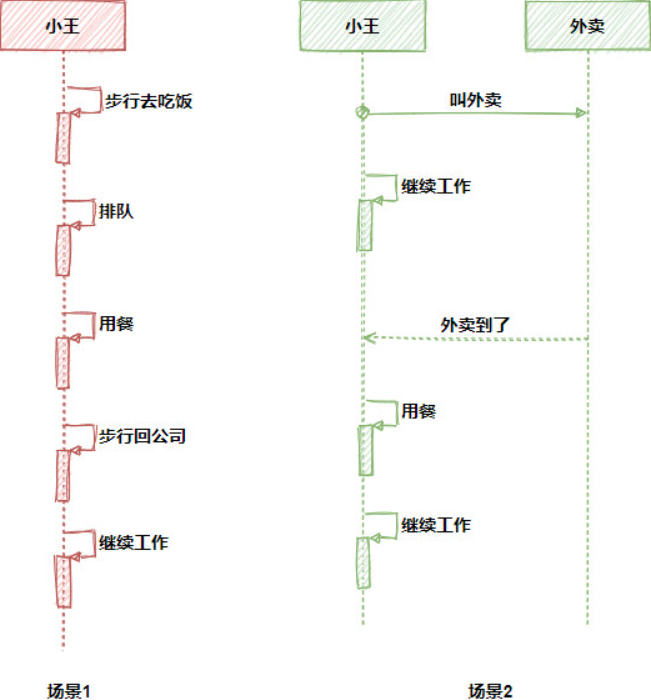
很明显,在这2个场景中,红色的小王的工作时间更加紧凑,特别是那些排队的时间都可以让外卖员去干,因此可以更加专注于自己的本职工作。聪明的你应该也已经体会到了,场景1就是典型的函数同步调用,而场景2是典型的异步调用。
而场景2的异步调用,还有一个特点,就是它拥有一个返回值,这个返回值就是我们的订单。这个订单很重要,凭借着这个订单,我们才能够取得当前这个调用所对应的结果。
这里的订单就如同Future模式中的Future,这是一个合约,一份承诺。虽然订单不能吃,但是手握订单,不怕没吃的,虽然Future不是我们想要的结果,但是拿着Future就能在将来得到我们想要的结果。
因此,Future模式很好的解决了那些需要返回值的异步调用。
Future模式中的主要角色
一个典型的Future模式由以下几个部分组成:
-
Main:系统启动,调用Client发出请求
-
Client:返回Data对象,立即返回FutureData,并开启ClientThread线程装配RealData
-
Data:返回数据的接口
-
FutureData:Future数据,构造很快,但是是一个虚拟的数据,需要装配RealData,好比一个订单
-
RealData:真实数据,其构造是比较慢的,好比上面例子中的肯德基午餐。
它们之间的相互关系如下图:
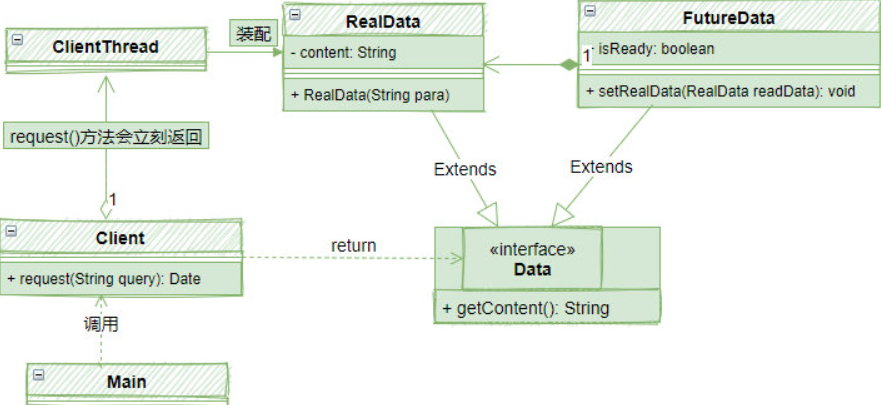
其中值得注意是Data,RealData和FutureData。这是一组典型的代理模式,Data接口表示对外数据,RealData表示真实的数据,就好比午餐,获得它的成本比较高,需要很多时间;相对的FutureData作为RealData的代理,类似于一个订单/契约,通过FutureData,可以在将来获得RealData。
因此Future模式本质上是代理模式的一种实际应用。
实现一个简单的Future模式
根据上面的设计,让我们来实现一个简单的代理模式吧!
首先是Data接口,代表数据:
public interface Data {
    public String getResult ();
}
接着是FutureData,也是整个Future模式的核心:
public class FutureData implements Data {
    // 内部需要维护RealData
    protected RealData realdata = null;
    protected boolean isReady = false;
    public synchronized void setRealData(RealData realdata) {
        if (isReady) {
            return;
        }
        this.realdata = realdata;
        isReady = true;
        //RealData已经被注入,通知getResult()
        notifyAll();
    }
    //会等待RealData构造完成
    public synchronized String getResult() {
        while (!isReady) {
            try {
                //一直等待,直到RealData被注入
                wait();
            } catch (InterruptedException e) {
            }
        }
        //真正需要的数据从RealData获取
        return realdata.result;
    }
}
下面是RealData:
public class RealData implements Data {
    protected final String result;
    public RealData(String para) {
        StringBuffer sb=new StringBuffer();
        //假设这里很慢很慢,构造RealData不是一个容易的事
        result =sb.toString();
    }
    public String getResult() {
        return result;
    }
}
然后从Client得到Data:
public class Client {
    //这是一个异步方法,返回的Data接口是一个Future
    public Data request(final String queryStr) {
        final FutureData future = new FutureData();
        new Thread() {
            public void run() {
                // RealData的构建很慢,所以在单独的线程中进行
                RealData realdata = new RealData(queryStr);
                //setRealData()的时候会notify()等待在这个future上的对象
                future.setRealData(realdata);
            }
        }.start();
        // FutureData会被立即返回,不会等待RealData被构造完
        return future;
    }
}
最后一个Main函数,把所有一切都串起来:
public static void main(String[] args) {
    Client client = new Client();
    //这里会立即返回,因为得到的是FutureData而不是RealData
    Data data = client.request("name");
    System.out.println("请求完毕");
    try {
        //这里可以用一个sleep代替了对其他业务逻辑的处理
        //在处理这些业务逻辑的过程中,RealData被创建,从而充分利用了等待时间
        Thread.sleep(2000);
    } catch (InterruptedException e) {
    }
    //使用真实的数据,如果到这里数据还没有准备好,getResult()会等待数据准备完,再返回
    System.out.println("数据 = " + data.getResult());
}
这是一个最简单的Future模式的实现,虽然简单,但是已经包含了Future模式中最精髓的部分。对大家理解JDK内部的Future对象,有着非常重要的作用。
Java中的Future模式
Future模式是如此常用,在JDK内部已经有了比较全面的实现和支持。下面,让我们一起看看JDK内部的Future实现:
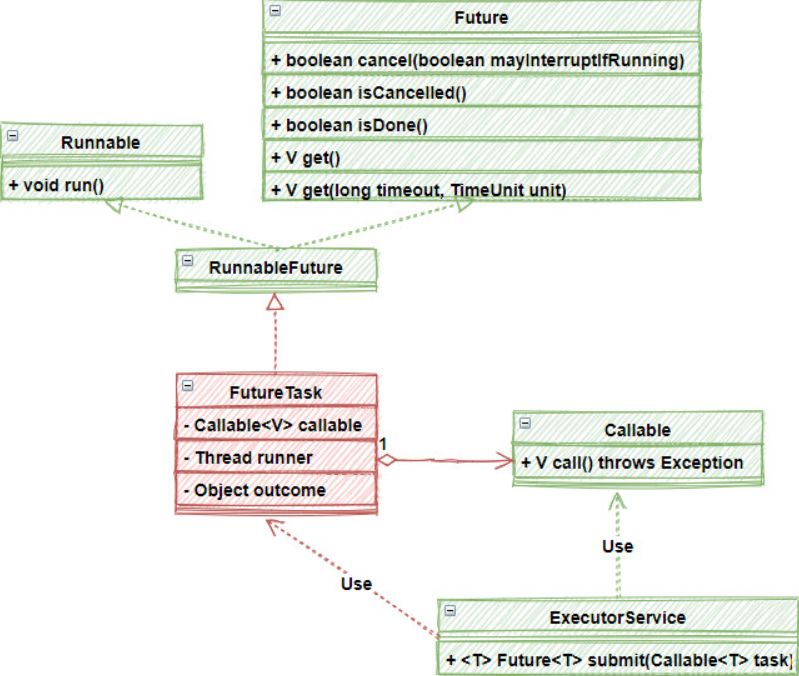
首先,JDK内部有一个Future接口,这就是类似前面提到的订单,当然了,作为一个完整的商业化产品,这里的Future的功能更加丰富了,除了get()方法来获得真实数据以外,还提供一组辅助方法,比如:
-
cancel():如果等太久,你可以直接停止执行这个任务
-
isCancelled():任务是不是已经取消了
-
isDone():检查计算是否完成,即线程执行的任务是不是已经完成了
-
get():有2个get()方法,不带参数的表示无穷等待,或者你可以只等待给定时间,它是阻塞住其调用线程去等待异步线程执行结果
下面代码演示了这个Future的使用方法:
    //异步操作 可以用一个线程池
    ExecutorService executor = Executors.newFixedThreadPool(1);
    //执行FutureTask,相当于上例中的 client.request("name") 发送请求
    //在这里开启线程进行RealData的call()执行
    Future<String> future = executor.submit(new RealData("name"));
    System.out.println("请求完毕,数据准备中");
    try {
        //这里依然可以做额外的数据操作,这里使用sleep代替其他业务逻辑的处理
        Thread.sleep(2000);
    } catch (InterruptedException e) {
    }
    //如果此时call()方法没有执行完成,则依然会等待
    System.out.println("数据 = " + future.get());
整个使用过程非常简单,下面我们来分析一下executor.submit()里面究竟发生了什么:
public <T> Future<T> submit(Callable<T> task) {
    if (task == null) throw new NullPointerException();
    // 根据Callable对象,创建一个RunnableFuture,这里其实就是FutureTask
    RunnableFuture<T> ftask = newTaskFor(task);
    //将ftask推送到线程池
    //在新线程中执行的,就是run()方法,在下面的代码中有给出
    execute(ftask);
    //返回这个Future,将来通过这个Future就可以得到执行的结果
    return ftask;
}
protected <T> RunnableFuture<T> newTaskFor(Callable<T> callable) {
    return new FutureTask<T>(callable);
}
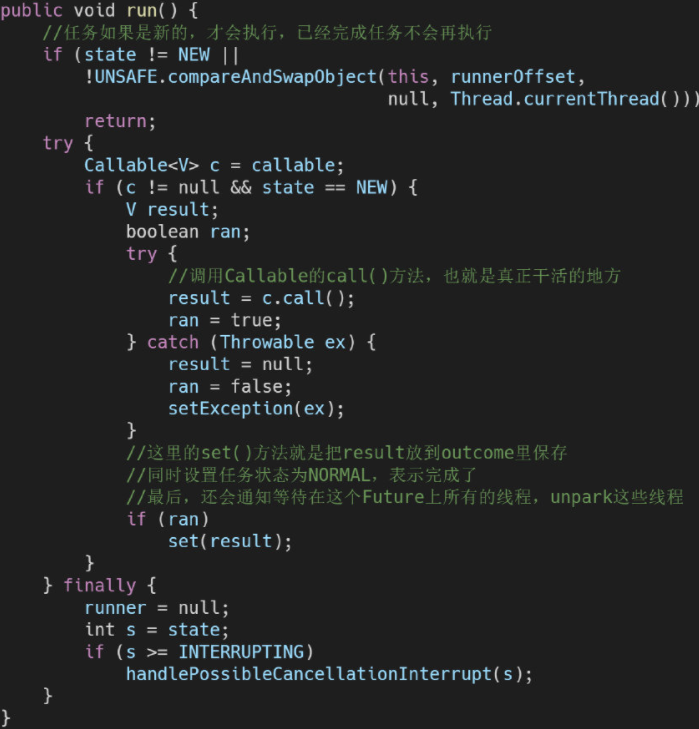
最关键的部分在下面,FutureTask作为一个线程单独执行时,会将结果保存到outcome中,并设置任务的状态,下面是FutureTask的run()方法:
从FutureTask中获得结果的实现如下:
public V get() throws InterruptedException, ExecutionException {
    int s = state;
    //如果没有完成,就等待,回到用park()方法阻塞线程
    //同时,所有等待线程会在FutureTask的waiters字段中排队等待
    if (s <= COMPLETING)
        s = awaitDone(false, 0L);
    return report(s);
}
private V report(int s) throws ExecutionException {
    //outcome里保存的就是最终的计算结果
    Object x = outcome;
    if (s == NORMAL)
        //正常完成,就返回outcome
        return (V)x;
    //如果没有正常完成, 比如被用户取消了,或者有异常了,就抛出异常
    if (s >= CANCELLED)
        throw new CancellationException();
    throw new ExecutionException((Throwable)x);
}
到这里你大致应该就对Future的原理有了一定的了解了,下面就开始学习它的加强版。
Future模式的高阶版本之CompletableFuture
Future模式虽然好用,但也有一个问题,那就是将任务提交给线程后,调用线程并不知道这个任务什么时候执行完,如果执行调用get()方法或者isDone()方法判断,可能会进行不必要的等待,那么系统的吞吐量很难提高。
为了解决这个问题,JDK对Future模式又进行了加强,创建了一个CompletableFuture,它可以理解为Future模式的升级版本,它最大的作用是提供了一个回调机制,可以在任务完成后,自动回调一些后续的处理,这样,整个程序可以把“结果等待”完全给移除了。
下面来看一个简单的例子:
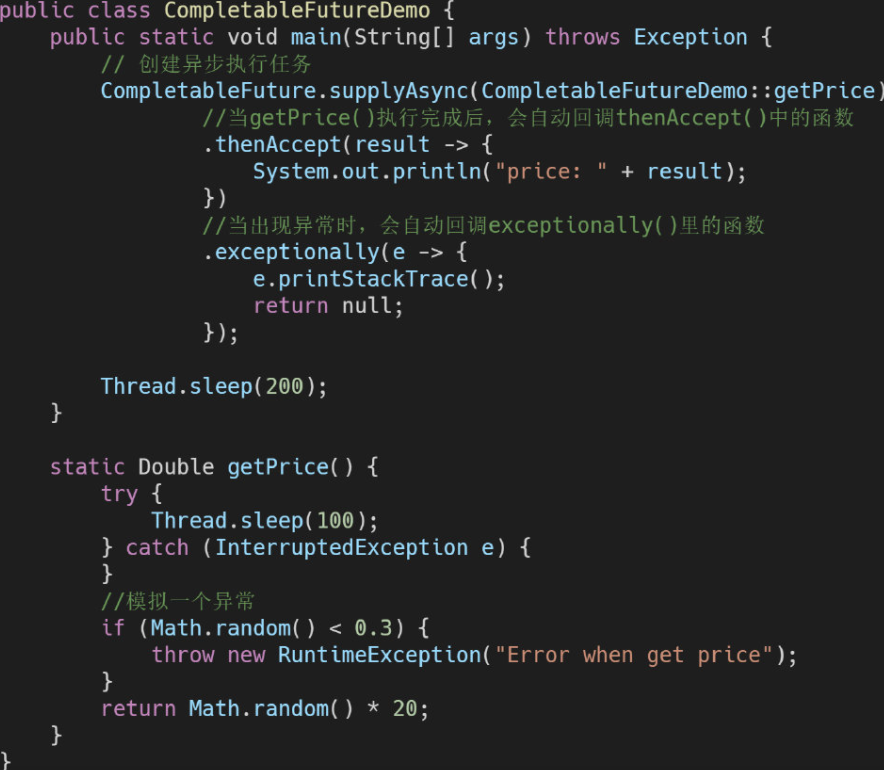
在这个例子中,首先以getPrice()为基础创建一个异步调用,接着使用thenAccept()方法,设置了一个后续的操作,也就是当getPrice()执行完成后的后续处理。
不难看到,CompletableFuture比一般的Future更具有实用性,因为它可以在Future执行成功后,自动回调进行下一步的操作,因此整个程序不会有任何阻塞的地方(也就是说你不用去到处等待Future的执行,而是让Future执行成功后,自动来告诉你) 。
以上面的代码为例,CompletableFuture之所有会有那么神奇的功能,完全得益于AsyncSupply类(由上述代码中的supplyAsync()方法创建)。
AsyncSupply在执行时,如下所示:
    public void run() {
        CompletableFuture<T> d;
        Supplier<T> f;
        if ((d = dep) != null && (f = fn) != null) {
            dep = null; fn = null;
            if (d.result == null) {
                try {
                    //这里就是你要执行的异步方法
                    //结果会被保存下来,放到d.result字段中
                    d.completeValue(f.get());
                } catch (Throwable ex) {
                    d.completeThrowable(ex);
                }
            }
            //执行成功了,进行后续处理,在这个后续处理中,就会调用thenAccept()中的消费者
            //这里就相当于Future完成后的通知
            d.postComplete();
        }
    }
继续看d.postComplete(),这里会调用后续一系列操作
final void postComplete() {
                //省略部分代码,重点在tryFire()里
                //在tryFire()里,真正触发了后续的调用,也就是thenAccept()中的部分
                f = (d = h.tryFire(NESTED)) == null ? this : d;
}
这里就介绍完了前沿知识,下面我们回到我们的项目:
谷粒商城项目使用CompletableFuture
创建异步对象
runAsync 和 supplyAsync方法
CompletableFuture 提供了四个静态方法来创建一个异步对象。
public static CompletableFuture<Void> runAsync(Runnable runnable)
public static CompletableFuture<Void> runAsync(Runnable runnable, Executor executor)
public static <U> CompletableFuture<U> supplyAsync(Supplier<U> supplier)
public static <U> CompletableFuture<U> supplyAsync(Supplier<U> supplier, Executor executor)
没有指定Executor的方法会使用ForkJoinPool.commonPool() 作为它的线程池执行异步代码。如果指定线程池,则使用指定的线程池运行。以下所有的方法都类同。
- runAsync方法不支持返回值。
- supplyAsync可以支持返回值,使用fet获取返回结果
为什么一个支持返回值一个不支持呢?看下其参数,一个Runnable接口一个Supplier接口,这两个一个是直接run方法运行,一个是get方法会返回一个值。后文的接收参数无返回值用的Consumer接口,accept方法只接收参数不返回参数。但这个返回值只是给CompletableFuture这个类的泛型赋值,泛型会决定方法究竟有无具体有意义的返回值,但它们最后都会返回一个CompletableFuture对象
测试代码如下:
public static void main(String[] args) throws ExecutionException, InterruptedException {
    System.out.println("main.............start.......");
//        CompletableFuture<Void> future = CompletableFuture.runAsync(() -> {
//            System.out.println("当前线程:" + Thread.currentThread().getId());
//            int i = 10 / 2;
//            System.out.println("当前运行结果:" + i);
//        }, executor);
	CompletableFuture<Integer> future = CompletableFuture.supplyAsync(() -> {
        System.out.println("当前线程:" + Thread.currentThread().getId());
        int i = 10 / 2;
        System.out.println("当前运行结果:" + i);
        return i;
    }, executor);
    Integer integer = future.get();
    System.out.println("main.............end......."+integer);
}
计算结果完成时的回调方法
当CompletableFuture的计算结果完成或者抛出异常的时候,可以通过调用的whenComplete方法和exceptionally方法执行特定的Action。主要是下面的方法:
//可以处理异常,无返回值
public CompletableFuture<T> whenComplete(BiConsumer<? super T,? super Throwable> action)
public CompletableFuture<T> whenCompleteAsync(BiConsumer<? super T,? super Throwable> action)
public CompletableFuture<T> whenCompleteAsync(BiConsumer<? super T,? super Throwable> action, Executor executor)
//可以处理异常,有返回值
public CompletableFuture<T> exceptionally(Function<Throwable,? extends T> fn)
可以看到Action的类型是BiConsumer<? super T,? super Throwable>它可以处理正常的计算结果或者异常情况。所以whenComplete 可以处理正常和异常的计算结果,exceptionally只处理异常情况。但是whenComplete只能监控是否出现了问题,不能修改返回结果,因为它没有返回值,而exceptionally有返回值,所以它可以修改返回结果。
whenComplete 和whenCompleteAsync 的区别:
- whenComplete:是执行当前任务的线程执行继续执行 whenComplete 的任务。
- whenCompleteAsync:是把whenCompleteAsync这个任务执行提交给线程池来进行执行
方法不以 Async 结尾,意味着 Action 使用相同的线程执行,而 Async 可能会使用其他线程 执行(如果是使用相同的线程池,也可能会被同一个线程选中执行)
测试代码如下:
public class ThreadTest {
    public static ExecutorService executor = Executors.newFixedThreadPool(10);

    public static void main(String[] args) throws ExecutionException, InterruptedException {
        System.out.println("main.............start.......");
//        CompletableFuture<Void> future = CompletableFuture.runAsync(() -> {
//            System.out.println("当前线程:" + Thread.currentThread().getId());
//            int i = 10 / 2;
//            System.out.println("当前运行结果:" + i);
//        }, executor);
        CompletableFuture<Integer> future = CompletableFuture.supplyAsync(() -> {
            System.out.println("当前线程:" + Thread.currentThread().getId());
            int i = 10 / 0;
            System.out.println("当前运行结果:" + i);
            return i;
        }, executor).whenComplete((result,exception)->{
            //虽然能得到异常信息,但是没法修改返回数据
            System.out.println("异步任务完成了...结果是"+result+";异常是"+exception);
        //可以感知异常,同时返回默认值
        }).exceptionally(throwable -> {
            return 10;
        });
        Integer integer = future.get();
        System.out.println("main.............end......."+integer);
}
handle 方法
handle 是执行任务完成时对结果的处理即可以对上一步的执行结果进行修改并且返回修改后的值。 handle 方法和 thenApply 方法处理方式基本一样。不同的是 handle 是在任务完成后再执行,还可以处理异常的任务。thenApply 只可以执行正常的任务,任务出现异常则不执行 thenApply 方法。
public <U> CompletionStage<U> handle(BiFunction<? super T, Throwable, ? extends U> fn);
public <U> CompletionStage<U> handleAsync(BiFunction<? super T, Throwable, ? extends U> fn);
public <U> CompletionStage<U> handleAsync(BiFunction<? super T, Throwable, ? extends U> fn, Executor executor)
/**
* 方法执行完成后的处理
*/
CompletableFuture<Integer> future = CompletableFuture.supplyAsync(() -> {
            System.out.println("当前线程:" + Thread.currentThread().getId());
            int i = 10 / 5;
            System.out.println("当前运行结果:" + i);
            return i;
        }, executor).handle((result,exception)->{
            if (result != null){
                return result*2;
            }
            if (exception != null){
                return 0;
            }
            return 0;
        });
        Integer integer = future.get();
        System.out.println("main.............end......."+integer);
}
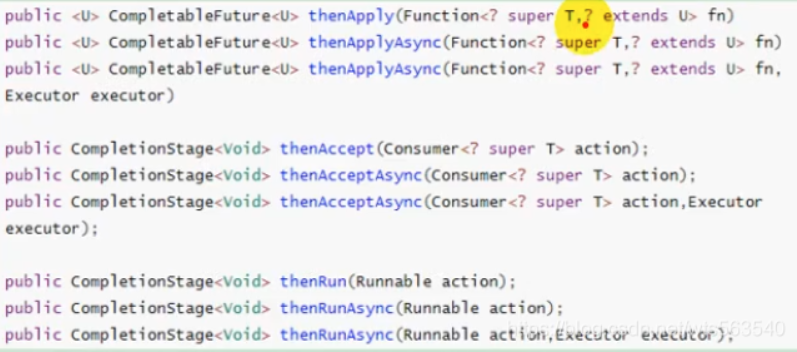
线程串行化
线程串行化的意思很明显就是同步执行,一个个执行,也就是前一个任务执行完毕,下一个任务才可以执行,哪怕方法带有ASync也是这样的,Async只能保证下一个任务会交给线程池去异步处理,而不是由上一个任务的线程接着执行下一个任务。
-
thenApply方法:当一个线程依赖另一个线程时,获取上一个任务返回的结果,并返回当前任务的返回值。 -
thenApplyAsync:能接受上一步结果,有返回值 -
thenAccept方法:消费处理结果。接收任务的处理结果,并消费处理,无返回结果。 -
thenAcceptAsync:能接受上一步结果,但是无返回值 -
thenRun方法:只要前面的任务执行完成,就开始执行thenRun,但它不能获取上一步的执行结果带有
Async默认是异步执行的(即任务交给线程池处理),同之前,以上方法执行都要前置任务成功完成。Function <? super T, ? extends U>
T:上一个任务返回结果的类型
U:当前任务的返回值类型
Tips:从这里开始以及下面的所有run,accept,apply方法都有相同的特性:
- thenRun 方法:
只要上面的任务执行完成,就开始执行 thenRun,不接收上一步结果,且无返回值。 - thenAccept 方法:
消费处理结果。接收任务的处理结果,并消费处理,无返回结果。 - thenApply 方法:
当一个线程依赖另一个线程时,获取上一个任务返回的结果,并返回当前任务的返回值。
- /**
           * 线程串行化
           * 1)、thenRun 不能获取得到上一步的执行结果
           */
  //        CompletableFuture<Void> thenRunAsync = CompletableFuture.supplyAsync(() -> {
  //            System.out.println("当前线程:" + Thread.currentThread().getId());
  //            int i = 10 / 5;
  //            System.out.println("当前运行结果:" + i);
  //            return i;
  //        }, executor).thenRunAsync(() -> {
  //            System.out.println("任务2启动了。。。。");
  //        }, executor);

        /**
         * 线程串行化
         * 1)、thenRun 不能获取得到上一步的执行结果,无返回值
         * 2)、thenAcceptAsync能接收上一步返回结果,但无返回值
         */

//        CompletableFuture<Void> thenRunAsync = CompletableFuture.supplyAsync(() -> {
//            System.out.println("当前线程:" + Thread.currentThread().getId());
//            int i = 10 / 5;
//            System.out.println("当前运行结果:" + i);
//            return i;
//        }, executor).thenAcceptAsync(res -> {
//            System.out.println("任务2启动了。。。。"+res);
//        }, executor);

        /**
         * 线程串行化
         * 1)、thenRun 不能获取得到上一步的执行结果,无返回值
         * 2)、thenAcceptAsync能接收上一步返回结果,但无返回值
         * 3)、thenApplyAsync能接收上一步的返回结果,也有返回值
         */
        CompletableFuture<String> thenApplyAsync = CompletableFuture.supplyAsync(() -> {
            System.out.println("当前线程:" + Thread.currentThread().getId());
            int i = 10 / 5;
            System.out.println("当前运行结果:" + i);
            return i;
        }, executor).thenApplyAsync(res -> {
            System.out.println("任务2启动了。。。。" + res);
            return "hello" + res;
        }, executor);

        System.out.println("main.............end......."+ thenApplyAsync.get());
    }
两任务组合-都要完成
- runAfterBoth
两个CompletionStage(顶级接口,也是CompletableFuture的父接口),两个任务都执行完毕才会执行下一步的操作(Runnable),这个方法不能获取前两个任务执行的结果,只需两个future 处理完任务后, 就会自动处理该任务。
这里说明一下两个组合任务,一个是方法的调用者一个是参数other,action是第三个要执行的任务。
public CompletionStage<Void> runAfterBoth(CompletionStage<?> other,Runnable action);
public CompletionStage<Void> runAfterBothAsync(CompletionStage<?> other,Runnable action);
public CompletionStage<Void> runAfterBothAsync(CompletionStage<?> other,Runnable action,Executor)
- thenAcceptBoth
当两个CompletionStage都执行完成后,把结果一块交给thenAcceptBoth进行处理。这个方法组合两个 future,可以获取两个 future 任务的返回结果(泛型T和U),然后处理任务,没有返回值。
public <U> CompletionStage<Void> thenAcceptBoth(CompletionStage<? extends U> other,BiConsumer<? super T, ? super U> action);
public <U> CompletionStage<Void> thenAcceptBothAsync(CompletionStage<? extends U> other,BiConsumer<? super T, ? super U> action);
public <U> CompletionStage<Void> thenAcceptBothAsync(CompletionStage<? extends U> other,BiConsumer<? super T, ? super U> action,     Executor executor);
- thenCombine
thenCombine 会把两个 CompletionStage 的任务都执行完成后,把两个任务的结果一块交给 thenCombine 来处理。它组合两个 future,获取两个 future 的返回结果,并返回当前任务的返回值
public <U,V> CompletionStage<V> thenCombine(CompletionStage<? extends U> other,BiFunction<? super T,? super U,? extends V> fn);
public <U,V> CompletionStage<V> thenCombineAsync(CompletionStage<? extends U> other,BiFunction<? super T,? super U,? extends V> fn);
public <U,V> CompletionStage<V> thenCombineAsync(CompletionStage<? extends U> other,BiFunction<? super T,? super U,? extends V> fn,Executor executor);
  /**
         * 不能得到两个任务的参数,也无返回结果
         */
//        future01.runAfterBothAsync(future02,()->{
//            System.out.println("任务三开始。。。");
//        },executor);
        /**
         * 能得到两个任务的参数,无返回结果
         */
//        future01.thenAcceptBothAsync(future02,(f1,f2)->{
//            System.out.println("任务三开始。。。之前的结果"+f1+":"+f2);
//        },executor);

        /**
         * 能得到两个任务的参数,无返回结果
         */
		CompletableFuture<String> thenCombineAsync = future01.thenCombineAsync(future02, (f1, f2) -> {
            System.out.println("任务三开始。。。之前的结果" + f1 + ":" + f2);
            return f1 + ":" + f2 + "->haha";
        }, executor);
        System.out.println("main.............end......." + thenCombineAsync.get());
}
两任务组合-只要有一个任务完成就执行接下来的任务
- runAfterEither 方法:run开头的不接收上一步的结果,自己也无返回值
两个CompletionStage,任何一个完成了都会执行下一步的操作(Runnable)
public CompletionStage<Void> runAfterEither(CompletionStage<?> other,Runnable action);
public CompletionStage<Void> runAfterEitherAsync(CompletionStage<?> other,Runnable action);
public CompletionStage<Void> runAfterEitherAsync(CompletionStage<?> other,Runnable action,Executor executor);
- acceptEither 方法
两个CompletionStage,谁执行返回的结果快,action就用那个CompletionStage的结果进行下一步的处理操作。即两个任务有一个执行完成,获取它的返回值,执行新任务,没有新的返回值。
public CompletionStage<Void> acceptEither(CompletionStage<? extends T> other,Consumer<? super T> action);
public CompletionStage<Void> acceptEitherAsync(CompletionStage<? extends T> other,Consumer<? super T> action);
public CompletionStage<Void> acceptEitherAsync(CompletionStage<? extends T> other,Consumer<? supe
- applyToEither 方法:accept和apply两个开头的需要获取上一步的结果,但accept只接受无返回值,apply有返回值
两个CompletionStage,谁执行返回的结果快,我就用那个CompletionStage的结果进行下一步的转化操作。
public <U> CompletionStage<U> applyToEither(CompletionStage<? extends T> other,Function<? super T, U> fn);
public <U> CompletionStage<U> applyToEitherAsync(CompletionStage<? extends T> other,Function<? super T, U> fn);
public <U> CompletionStage<U> applyToEitherAsync(CompletionStage<? extends T> other,Function<? sup
   CompletableFuture<Object> future01 = CompletableFuture.supplyAsync(() -> {
            System.out.println("任务1线程:" + Thread.currentThread().getId());
            int i = 10 / 5;
            System.out.println("任务1线程结束");
            return i;
        }, executor);
        CompletableFuture<Object> future02 = CompletableFuture.supplyAsync(() -> {
            System.out.println("任务2线程:" + Thread.currentThread().getId());
            try {
                Thread.sleep(3000);
            } catch (InterruptedException e) {
                e.printStackTrace();
            }
            System.out.println("任务2线程结束");
            return "hello";
        }, executor);
- thenCompose 方法
thenCompose 方法允许你对两个 CompletionStage 进行流水线操作,第一个操作完成时,将其结果作为参数传递给第二个操作。
public <U> CompletableFuture<U> thenCompose(Function<? super T, ? extends CompletionStage<U>> fn);
public <U> CompletableFuture<U> thenComposeAsync(Function<? super T, ? extends CompletionStage<U>> fn) ;
public <U> CompletableFuture<U> thenComposeAsync(Function<? super T, ? extends CompletionStage
多任务组合
public static CompletableFuture<Void> allOf(CompletableFuture<?>... cfs)
allOf:等待所有任务完成之后才会执行后面的任务
CompletableFuture<String> futureAttr = CompletableFuture.supplyAsync(() -> {
              System.out.println("查询商品的属性");
              return "黑色+256g";
          },executor);

        CompletableFuture<String> futureImg = CompletableFuture.supplyAsync(() -> {
            try {
                Thread.sleep(3000);
                System.out.println("查询商品的图片信息");
            } catch (InterruptedException e) {
                e.printStackTrace();
            }
            return "hello.jpg";
        },executor);

        CompletableFuture<String> futureDesc = CompletableFuture.supplyAsync(() -> {
            System.out.println("查询商品的介绍");
            return "华为";
        },executor);
        CompletableFuture<Void> allOf = CompletableFuture.allOf(futureAttr, futureImg, futureDesc);
        allOf.get();//等待所有线程执行完
        System.out.println("main.............end......."+futureAttr.get()+"=>"+futureImg.get()+"=>"+futureDesc.get() );
    }
public static CompletableFuture<Object> anyOf(CompletableFuture<?>... cfs)
anyOf:参数传入的任务中只要有一个任务完成就会接着执行下面的任务。
CompletableFuture<String> futureAttr = CompletableFuture.supplyAsync(() -> {
              System.out.println("查询商品的属性");
              return "黑色+256g";
          },executor);

        CompletableFuture<String> futureImg = CompletableFuture.supplyAsync(() -> {
            try {
                Thread.sleep(3000);
                System.out.println("查询商品的图片信息");
            } catch (InterruptedException e) {
                e.printStackTrace();
            }
            return "hello.jpg";
        },executor);

        CompletableFuture<String> futureDesc = CompletableFuture.supplyAsync(() -> {
            System.out.println("查询商品的介绍");
            return "华为";
        },executor);
//        CompletableFuture<Void> allOf = CompletableFuture.allOf(futureAttr, futureImg, futureDesc);
//        allOf.get();//等待所有线程执行完
        CompletableFuture<Object> anyOf = CompletableFuture.anyOf(futureAttr, futureImg, futureDesc);
        System.out.println("main.............end......."+anyOf.get() );
商品详情
一、搭建页面环境
配置 Nginx 和 网关
-
修改本地的 hosts文件
vim /etc/hosts,将商品详情页的访问也由nginx进行转发,因为这里我们也需要用到nginx的动静分离。# Gulimall Host Start 127.0.0.1 gulimall.com 127.0.0.1 search.gulimall.com 127.0.0.1 item.gulimall.com # Gulimall Host End -
配置Nginx(将search下的请求转给网关)
商城业务-检索服务的时候已经配置过了,这里不需要修改(之前配置的*.gulimall.com)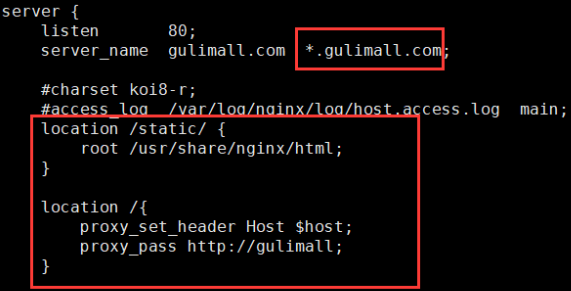
listen和server_name表示监听访问此服务器的请求中域名是gulimall.com或者*.gulimall.com并且端口是80的请求。如果有这些请求就会根据location中设定的转发路由进行转发:首先匹配的是/static路径下的(表示静态资源的访问),然后/表示除了之前转发的请求其他所有请求都转发给http://gulimall,这里gulimall我们在nginx的配置文件中配过了它是网关服务的地址,所以这些请求都会转发给网关,然后会带上原有的请求域名(Host $host)。
-
配置网关
修改gulimall-gateway服务/src/main/resources路径下的 application.yml- id: gulimall_host_route uri: lb://gulimall-product predicates: - Host=gulimall.cn,item.gulimall.cn
动静资源配置
-
将
2.分布式高级篇/代码/html/详情页路径下的 shangpinxiangqing.html 复制到 gulimall-product服务src/main/resources/templates路径下 并修改名字为 item.html -
将
2.分布式高级篇/代码/html/详情页路径下的所有其他静态资源复制到 nginx 的静态资源目录中hgw@HGWdeAir item % pwd /Users/hgw/Documents/Software/mydata/nginx/html/static/item hgw@HGWdeAir item % ll total 0 drwxrwxr-x@ 5 hgw staff 160B 5 29 2019 bootstrap drwxrwxr-x@ 13 hgw staff 416B 3 22 2020 image drwxrwxr-x@ 284 hgw staff 8.9K 3 22 2020 img drwxrwxr-x@ 6 hgw staff 192B 3 22 2020 js drwxrwxr-x@ 6 hgw staff 192B 3 22 2020 scss -
修改index.html中的静态资源请求路径
href="      -->		href="/static/item/
src="		-->		src="/static/item/
调整页面跳转
-
修改gulimall-search服务中
list.html文件,这里||表示字符串拼接<p class="da"> <a th:href="|http://item.gulimall.com/${product.skuId}.html|" > <img th:src="${product.skuImg}" class="dim"> </a> </p> -
编写 Controller 实现页面跳转:添加“com.atguigu.gulimall.product.web.ItemController”类,代码如下:
@Controller
public class ItemController {
    /**
     * 展示当前sku的详情
     * @param skuId
     * @return
     */
    @GetMapping("/{skuId}.html")
    public String skuItem(@PathVariable("skuId") Long skuId) {
        System.out.println("准备查询:" + skuId + "的详情");
        return "item.html";
    }
}
二、模型抽取

分析商品详情页的数据模型后,我们建立以下VO,因为它是前端视图模型
@Data
public class SkuItemVo {
    // 1、sku基本信息    pms_sku_info
    SkuInfoEntity info;
    // 2、sku的图片信息   pms_sku_images
    List<SkuImagesEntity> images;
    // 3、获取 spu 的销售属性组合
    List<SkuItemSaleAttrsVo> saleAttr;
    // 4、获取 spu 的介绍 pms_spu_info_desc
    SpuInfoDescEntity desp;
    // 5、获取 spu 的规格参数信息
    List<SpuItemAttrGroupVo> groupAttrs;

    // 销售属性组合
    @Data
    public static class SkuItemSaleAttrsVo {
        private Long attrId;
        private String attrName;
        private String attrValues;
    }

    // 规格参数
    @Data
    public static class SpuItemAttrGroupVo{
        private String groupName;
        private List<SpuBaseAttrsVo> attrs;
    }

    // 基本属性
    @Data
    public static class SpuBaseAttrsVo {
        private String attrName;
        private String attrValues;
    }

}
后因为联表查询原因将内部类提取出来(因为mybatis找不到内部类,所以需要抽取出来)
@Data
public class SkuItemVo {
    // 1、sku基本信息    pms_sku_info表
    SkuInfoEntity info;

    // 2、sku的图片信息   pms_sku_images表
    List<SkuImagesEntity> images;

    // 3、获取 spu 的销售属性组合
    List<SkuItemSaleAttrsVo> saleAttr;

    // 4、获取 spu 的介绍 pms_spu_info_desc表
    SpuInfoDescEntity desp;

    // 5、获取 spu 的规格参数信息
    List<SpuItemAttrGroupVo> groupAttrs;
}
35查的数据不在同一个表中,需要多表联查才能得到全部数据,所以我们在这里为其也各封装一个VO
销售属性组合:
@Data
public class SkuItemSaleAttrsVo {
    private Long attrId;
    private String attrName;
    private String attrValues;
}
规格参数 :
@ToString
@Data
public class SpuItemAttrGroupVo {
    private String groupName;
    private List<Attr> attrs;
}
@Data
public class Attr {
    private Long attrId;
    private String attrName;
    private String attrValue;

}
三、封装商品
Controller 层编写:
@Controller
public class ItemController {
    @Autowired
    SkuInfoService skuInfoService;
    /**
     * 展示当前sku的详情
     * @param skuId
     * @return
     */
    @GetMapping("/{skuId}.html")
    public String skuItem(@PathVariable("skuId") Long skuId, Model model) {
        SkuItemVo skuItemVo = skuInfoService.item(skuId);
        model.addAttribute("item",skuItemVo);
        return "item.html";
    }
}
Service 实现类方法编写:
sku 基本信息获取
查询 pms_sku_info
// 1、sku基本信息    pms_sku_info
SkuInfoEntity info = getById(skuId);
skuItemVo.setInfo(info);
获取spu的图片信息
查询 pms_sku_images
@Autowired
SkuImagesService imagesService;
// 2、sku的图片信息   pms_sku_images
List<SkuImagesEntity> images = imagesService.getImagesBySkuId(skuId);
skuItemVo.setImages(images);
注入 SkuImagesService,调用该实现类的 getImagesBySkuId(skuId) 方法获取spu的图片信息
com.atguigu.gulimall.product.service.impl 路径下的 SkuImagesServiceImpl 实现类编写:
@Override
public List<SkuImagesEntity> getImagesBySkuId(Long skuId) {
    SkuImagesDao imagesDao = this.baseMapper;
    List<SkuImagesEntity> imagesEntities = imagesDao.selectList(new QueryWrapper<SkuImagesEntity>().eq("sku_id", skuId));
    return imagesEntities;
}
获取spu的销售属性组合
@Autowired
SkuSaleAttrValueService saleAttrValueService;
// 3、获取 spu 的销售属性组合
List<SkuItemSaleAttrsVo> saleAttrVos = saleAttrValueService.getSaleAttrsBySpuId(spuId);
skuItemVo.setSaleAttr(saleAttrVos);
注入 SkuSaleAttrValueService,调用该实现类的getSaleAttrsBySpuId(spuId) 方法
@Override
public List<SkuItemSaleAttrsVo> getSaleAttrsBySpuId(Long spuId) {
    SkuSaleAttrValueDao dao = this.baseMapper;
    List<SkuItemSaleAttrsVo> saleAttrVos = dao.getSaleAttrsBySpuId(spuId);
    return saleAttrVos;
}
使用SkuSaleAttrValueDao 层 getSaleAttrsBySpuId 方法:
@Mapper
public interface SkuSaleAttrValueDao extends BaseMapper<SkuSaleAttrValueEntity> {
    List<SkuItemSaleAttrsVo> getSaleAttrsBySpuId(@Param("spuId") Long spuId);
}
gulimall-product/src/main/resources/mapper/product/SkuSaleAttrValueDao.xml
<select id="getSaleAttrsBySpuId" resultType="com.atguigu.gulimall.product.vo.SkuItemSaleAttrsVo">
    SELECT
        ssav.attr_id attr_id,
        ssav.attr_name attr_name,
        GROUP_CONCAT(DISTINCT ssav.attr_value) attr_values
    FROM pms_sku_info info
             LEFT JOIN pms_sku_sale_attr_value ssav ON ssav.sku_id = info.sku_id
    WHERE spu_id = #{spuId}
    GROUP BY ssav.attr_id,ssav.attr_name;
</select>
分析当前spu有多少sku,所有sku涉及到的属性组合
- 通过spu_id 查询
pms_sku_info表,获得当前spu对应的 sku_id - 通过sku_id 查询
pms_sku_sale_attr_value表,获取 当前spu对应的所有的sku的销售属性 - 通过汇总函数 GROUP_CONCAT封装成我们想要的样子
获取 spu 的介绍
查询 pms_spu_info_desc
@Autowired
SpuInfoDescService spuInfoDescService;
// 4、获取 spu 的介绍 pms_spu_info_desc
Long spuId = info.getSpuId();
SpuInfoDescEntity spuInfoDescEntity = spuInfoDescService.getById(spuId);
skuItemVo.setDesp(spuInfoDescEntity);
获取 spu 的规格参数信息
查询 pms_spu_info_desc
@Autowired
AttrGroupService attrGroupService;
Long spuId = info.getSpuId();
Long catalogId = info.getCatalogId();
// 5、获取 spu 的规格参数信息 pms_spu_info_desc
List<SpuItemAttrGroupVo> attrGroupVos = attrGroupService.getAttrGroupWithAttrsBySpuId(spuId,catalogId);
skuItemVo.setGroupAttrs(attrGroupVos);
注入 AttrGroupService,调用该实现类的 getAttrGroupWithAttrsBySpuId(spuId,catalogId) 方法
/**
 * 查处当前spuId对应的所有属性分组信息 以及 当前分组下的所有属性对应的值
 * @param spuId
 * @param catalogId
 * @return
 */
@Override
public List<SpuItemAttrGroupVo> getAttrGroupWithAttrsBySpuId(Long spuId, Long catalogId) {
    AttrGroupDao baseMapper = this.getBaseMapper();
    List<SpuItemAttrGroupVo> vos = baseMapper.getAttrGroupWithAttrsBySpuId(spuId,catalogId);
    return vos;
}
使用AttrGroupDao 层 getAttrGroupWithAttrsBySpuId 方法:
@Mapper
public interface AttrGroupDao extends BaseMapper<AttrGroupEntity> {
    List<SpuItemAttrGroupVo> getAttrGroupWithAttrsBySpuId(@Param("spuId") Long spuId, @Param("catalogId") Long catalogId);
}
gulimall-product/src/main/resources/mapper/product/AttrGroupDao.xml :
<!--resultType为返回集合里面的元素的类型,并且这个元素只要有嵌套属性就要自定义结果集:
因为mybatis找不到内部类以及如果属性是一个对象mybatis不能完成自动的属性与字段映射,因为它找不到这个对象所在类,那么也就无法知晓这个对象中有什么属性了),还有一个好处就是我们不需要为查询出来的数据所在字段定义别名了,自定义结果集可以指定属性和字段的映射。-->
<resultMap id="spuItemAttrGroupVo" type="com.atguigu.gulimall.product.vo.SpuItemAttrGroupVo">
    <result property="groupName" column="attr_group_name"></result>
    <collection property="attrs" ofType="com.atguigu.gulimall.product.vo.Attr">
        <result property="attrName" column="attr_name"></result>
        <result property="attrValue" column="attr_value"></result>
    </collection>
</resultMap>
<select id="getAttrGroupWithAttrsBySpuId" resultMap="spuItemAttrGroupVo">
    SELECT
        pav.spu_id,
        ag.attr_group_name,
        ag.attr_group_id,
        aar.attr_id,
        attr.attr_name,
        pav.attr_value
    FROM pms_attr_group ag LEFT JOIN pms_attr_attrgroup_relation aar ON ag.attr_group_id = aar.attr_group_id
                           LEFT JOIN pms_attr attr ON attr.attr_id = aar.attr_id
                           LEFT JOIN pms_product_attr_value pav on pav.attr_id = attr.attr_id
    WHERE ag.catelog_id=#{catalogId} AND pav.spu_id = #{spuId};
</select>
这里说明一下:只要书写SQL的时候涉及到了嵌套查询(即查询数据是一个对象的某个属性)时,需要将其封装出来并且单独创建一个VO,然后我们自己设计一个resultMap进行属性与字段的关联。
这里使用了联表查询:
- 通过
catelog_id查询 pms_attr_group 表中对应的属性分组的信息attr_group_id、attr_group_name - 通过
attr_group_id联表查询 pms_attr_attrgroup_relation 表中的属性idattr_id - 通过
attr_id联表查询 pms_attr 表中对应的attr_name、attr_id - 通过
attr_id联表查询 pms_product_attr_value 表中对应的 属性值attr_value
四、详情页渲染
基本渲染
1、添加thymeleaf的名称空间,跟java导包差不多意思
<!DOCTYPE html>
<html lang="en" xmlns:th="http://www.thymeleaf.org">
2、标题名设置
<div class="box-name" th:text="${item.info.skuTitle}">
   华为 HUAWEI Mate 10 6GB+128GB 亮黑色 移动联通电信4G手机 双卡双待
</div>
<div class="box-hide" th:text="${item.info.skuSubtitle}">预订用户预计11月30日左右陆续发货!麒麟970芯片!AI智能拍照!
   <a href="/static/item/"><u></u></a>
</div>
3、大图显示
<div class="imgbox">
   <div class="probox">
      <img class="img1" alt="" th:src="${item.info.skuDefaultImg}">
      <div class="hoverbox"></div>
   </div>
   <div class="showbox">
      <img class="img1" alt="" th:src="${item.info.skuDefaultImg}">
   </div>
</div>
4、价格设置
<div class="box-summary clear">
  <ul>
    <li>京东价</li>
    <li>
      <span>¥</span>
      <span th:text="${#numbers.formatDecimal(item.info.price,0,2)}">4499.00</span>
    </li>
    <li>
      预约享资格
    </li>
    <li>
      <a href="/static/item/">
        预约说明
      </a>
    </li>
  </ul>
</div>
5、是否有货
<li th:text="${item.hasStock?'有货':'无货'}">
   <span>无货</span>, 此商品暂时售完
</li>
6、小图显示
<div class="box-lh-one">
   <ul>
      <li th:each="img:${item.images}" th:if="${!#strings.isEmpty(img.imgUrl)}"><img th:src="${img.imgUrl}" /></li>
   </ul>
</div>
7、销售属性
<div class="box-attr-3">
   <div class="box-attr-2 clear" th:each="attr:${item.saleAttr}">
      <dl>
         <dt>选择[[${attr.attrName}]]</dt>
         <dd th:each="val:${#strings.listSplit(attr.attrValues,',')}">
            [[${val}]]
         </dd>
      </dl>
   </div>
</div>
8、商品介绍
<img class="xiaoguo" th:src="${desccp}" th:each="desccp:${#strings.listSplit(item.desp.decript,',')}" />
9、规格包装
<li class="baozhuang actives" id="li2">
   <div class="guiGebox" >
      <div class="guiGe" th:each="group:${item.groupAttrs}">
         <h3 th:text="${group.groupName}">主体</h3>
         <dl>
            <div th:each="attr:${group.attrs}">
               <dt th:text="${attr.attrName}">品牌</dt>
               <dd th:text="${attr.attrValue}">华为(HUAWEI)</dd>
            </div>
         </dl>
      </div>
      <div class="package-list">
         <h3>包装清单</h3>
         <p>手机(含内置电池) X 1、5A大电流华为SuperCharge充电器X 1、5A USB数据线 X 1、半入耳式线控耳机 X 1、快速指南X 1、三包凭证 X 1、取卡针 X 1、保护壳 X 1</p>
      </div>
   </div>
</li>
五、sku组合切换
需求:通过用户选择的不同销售属性渲染特定的sku商品
通过选择销售属性获取该销售属性对应的sku,通过算法选中该sku
1、封装Vo类
-
在
com.atguigu.gulimall.product.vo路径下创建 AttrValueWithSkuIdVo 类@Data public class AttrValueWithSkuIdVo { private String attrValue; private String skuIds; } -
修改 SkuItemSaleAttrsVo 类
@Data
public class SkuItemSaleAttrsVo {
    private Long attrId;
    private String attrName;
    private List<AttrValueWithSkuIdVo> attrValues;
}
2、修改Dao层mapper
修改gulimall-product/src/main/resources/mapper/product/SkuSaleAttrValueDao.xml
<resultMap id="skuItemSaleAttrsVo" type="com.atguigu.gulimall.product.vo.SkuItemSaleAttrsVo">
  <result property="attrId" column="attr_id"/>
  <result property="attrName" column="attr_name"/>
  <collection property="attrValues" ofType="com.atguigu.gulimall.product.vo.AttrValueWithSkuIdVo">
    <result property="attrValue" column="attr_value"/>
    <result property="skuIds" column="sku_ids"/>
  </collection>
</resultMap>
<select id="getSaleAttrsBySpuId" resultMap="skuItemSaleAttrsVo">
  SELECT
  ssav.attr_id attr_id,
  ssav.attr_name attr_name,
  ssav.attr_value attr_value,
  GROUP_CONCAT(DISTINCT info.sku_id) sku_ids
  FROM pms_sku_info info
  LEFT JOIN pms_sku_sale_attr_value ssav ON ssav.sku_id = info.sku_id
  WHERE info.spu_id = #{spuId}
  GROUP BY ssav.attr_id,ssav.attr_name,ssav.attr_value;
</select>
3、 修改item.html文件,重新渲染销售属性
<div class="box-attr-3">
   <div class="box-attr-2 clear" th:each="attr:${item.saleAttr}">
      <dl>
         <dt>选择[[${attr.attrName}]]</dt>
         <dd th:each="vals:${attr.attrValues}">
            <a
               th:attr="
    class=${#lists.contains(#strings.listSplit(vals.skuIds,','),item.info.skuId.toString())}?'sku_attr_value checked':'sku_attr_value',
               skus=${vals.skuIds}">
               [[${vals.attrValue}]]
            </a>
         </dd>
      </dl>
   </div>
</div>
<script>
   $(".sku_attr_value").click(function () {
      // 1、点击的元素添加自定义的属性。为了识别我们是刚才被点击
      var skus = new Array();
      $(this).addClass("ckicked");
      // 寻找本列属性中class属性中有 ckicked
      var curr = $(this).attr("skus").split(",");
      // 将当前被点击的所有sku组合数组放进去
      skus.push(curr);
      // 去掉同一行中所有的 checked
      $(this).parent().parent().find(".sku_attr_value").removeClass("checked");
      // 寻找其他属性中class属性有 checked
      $("a[class='sku_attr_value checked']").each(function () {
         skus.push($(this).attr("skus").split(","));
      });
      console.log(skus);
      // 2、取出他们的交集,得到skuId
      var filterEle = skus[0];
      for (var i = 1; i<skus.length; i++) {
         filterEle = $(filterEle).filter(skus[i]);
      }
      console.log(filterEle[0]);
      // 3、跳转
      location.href = "http://item.gulimall.cn/"+ filterEle[0] +".html";
   });
   $(function () {
      $(".sku_attr_value").parent().css({"border":"solid 1px #CCC"});
      $("a[class='sku_attr_value checked']").parent().css({"border":"solid 1px red"});
   })
</script>
六、商品详情的异步编排优化
第一步、编写创建线程池工具类
1、系统中线程池应设置为是可配置的,而不是在我们的代码中写死的。所以接下来我们添加一个线程池属性的配置类,并注入到容器中
package com.atguigu.gulimall.product.config;
//这个注解的意思就是将此配置类与配置文件中前缀为gulimall.thread的属性绑定
@ConfigurationProperties(prefix = "gulimall.thread")
//绑定完之后我们需要把这个类放进容器才能生效,这个优先级应该是比上一个注解高的
@Component
//设置属性的setter和getter方法,这样才能通过setter注入成功拿到配置文件中给属性配置的属性值
@Data
public class ThreadPoolConfigProperties {
    private Integer coreSize;
    private Integer maxSize;
    private Integer keepAliveTime;
}
这里提示需要导入一个工具依赖,不导也可以:
<dependency>
    <groupId>org.springframework.boot</groupId>
    <artifactId>spring-boot-configuration-processor</artifactId>
    <optional>true</optional>
</dependency>
2、添加线程池属性的配置
添加完线程池属性的配置类之后我们就可以在gulimall-product服务的application.yml属性配置文件中修改我们的线程池属性的配置了。
# 配置线程池
gulimall:
  thread:
    core-size: 20
    max-size: 200
    keep-alive-time: 10
3、在我们这个系统里面只有一个线程池,所以我们在我们系统的config配置包下添加一个线程池的配置类,线程池的属性值的获取这里直接调用与配置文件相对应的属性配置类即可,代码如下:
package com.atguigu.gulimall.product.config;

//如果ThreadPoolConfigProperties.class类没有加上@Component注解,那么我们就需要在配置类里加载对应的属性配置类到容器中
//@EnableConfigurationProperties(ThreadPoolConfigProperties.class)
@Configuration
public class MyThreadConfig {
    @Bean//下面我们可以直接使用ThreadPoolConfigProperties,而不需要@Autowired注解是因为这两个类本身就都在容器中
    public ThreadPoolExecutor threadPoolExecutor(ThreadPoolConfigProperties pool) {
        return new ThreadPoolExecutor(pool.getCoreSize(),
                pool.getMaxSize(),
                pool.getKeepAliveTime(),
                TimeUnit.SECONDS,
                new LinkedBlockingDeque<>(100000),
                Executors.defaultThreadFactory(),
                new ThreadPoolExecutor.AbortPolicy());
    }
}
第二步、异步编排优化
为了使我们的任务进行的更快,我们可以让查询的各个子任务多线程执行,但是由于各个任务之间可能有相互依赖的关系,因此就涉及到了异步编排。
在这次查询中spu的销售属性、介绍、规格参数信息都需要spuId,因此依赖sku基本信息的获取,所以我们要让这些任务在1之后运行。因为我们需要1运行的结果,因此调用thenAcceptAsync(),它可以接受上一步的结果且没有返回值。最后时,我们需要调用get()方法使得所有方法都已经执行完成。
首先将我们服务中自定义的全局线程池取出
@Autowired
ThreadPoolExecutor executor;
- infoFuture
- saleAttrFuture
- descFuture
- baseAttrFuture (这三个异步任务需要 infoFuture 执行完得到其结果才能执行)
- imageFuture
@Override
public SkuItemVo item(Long skuId) {
    SkuItemVo skuItemVo = new SkuItemVo();

    // 1、sku基本信息    pms_sku_info
    CompletableFuture<SkuInfoEntity> infoFuture = CompletableFuture.supplyAsync(() -> {
        SkuInfoEntity info = getById(skuId);
        skuItemVo.setInfo(info);
        return info;
    }, executor);

    // 2、获取 spu 的销售属性组合
    CompletableFuture<Void> saleAttrFuture = infoFuture.thenAcceptAsync(res -> {
        List<SkuItemSaleAttrsVo> saleAttrVos = saleAttrValueService.getSaleAttrsBySpuId(res.getSpuId());
        skuItemVo.setSaleAttr(saleAttrVos);
    }, executor);

    // 3、获取 spu 的介绍 pms_spu_info_desc
    CompletableFuture<Void> descFuture = infoFuture.thenAcceptAsync(res -> {
        SpuInfoDescEntity spuInfoDescEntity = spuInfoDescService.getById(res.getSpuId());
        skuItemVo.setDesp(spuInfoDescEntity);
    }, executor);

    // 4、获取 spu 的规格参数信息 pms_spu_info_desc
    CompletableFuture<Void> baseAttrFuture = infoFuture.thenAcceptAsync(res -> {
        List<SpuItemAttrGroupVo> attrGroupVos = attrGroupService.getAttrGroupWithAttrsBySpuId(res.getSpuId(), res.getCatalogId());
        skuItemVo.setGroupAttrs(attrGroupVos);
    }, executor);

    // 5、sku的图片信息   pms_sku_images
    CompletableFuture<Void> imageFuture = CompletableFuture.runAsync(() -> {
        List<SkuImagesEntity> images = imagesService.getImagesBySkuId(skuId);
        skuItemVo.setImages(images);
    }, executor);
    // 等待所有任务都完成
    //第一个任务不需要等待,因为234任务只有在1任务完成之后才能执行
    CompletableFuture.allOf(saleAttrFuture,descFuture,baseAttrFuture,imageFuture).join();
    return skuItemVo;
}
总结
下面我们来梳理一下为什么响应速度加快,因为只有第一个任务的查询结果后面需要用到,这里会同步阻塞一下(相对于后面的任务而言,对于与它无关的任务仍然是异步的),然后会调用线程池异步执行其他所有任务,最后在所有任务执行完毕后会给 CompletableFuture一个信号然后就可以返回数据了。
这里为什么说CompletableFuture是Future的加强版,我们看第一个方法调用CompletableFuture.supplyAsync,这个方法是异步的,因为我们传了一个线程池进去,如果是future那么我们需要手动调用get方法获取它的返回值,如果调用get方法时返回值没有准备好,则还会等待它准备好,但是CompletableFuture好就好在它有一个回调机制,我们不需要管他返回值什么时候处理好,因为是异步的,可以去做别的事情,then…方法会在返回值处理好之后自动调用其后面的方法。
**那为什么最后我们还要get方法呢?**allof方法的意义是将参数中的CompletableFuture全部组合在一起,全部执行完才会返回CompletableFuture对象,这里我们可以继续对其操作,比如获取异常啊,拿着结果继续处理。但此时不需要,因为中间三个调用之后它们没有后续调用了,它们执行过后我们就可以把数据进行返回了,所以回调机制就用不到了我们才需要手动get等他们执行完(相当于原始的future了,所以需要手动去等一下异步执行的结果,但这个get我们可以放在一个保证它一定执行完的时间点进行,中间去做其他事就可以,因为它们的执行都是异步的)。
感谢耐心看到这里的同学,觉得文章对您有帮助的话希望同学们不要吝啬您手中的赞,动动您智慧的小手,您的认可就是我创作的动力!
之后还会勤更自己的学习笔记,感兴趣的朋友点点关注哦。


 185
185


 被折叠的 条评论
为什么被折叠?
被折叠的 条评论
为什么被折叠?
 到【灌水乐园】发言


