


SpringMvc是主流的MVC框架,它是基于Spring提供的web应用框架,该框架遵循servlet规范。该框架的作用是接收Servlet容器(如Tomcat)传递过来的请求并返回响应。SpringMvc的核心就是servlet实例,而这个servlet在spring中就是DispatcherServlet实例。
dispatcher英文翻译过来就是调度的意思。它的主要功能如下:
1、文件上传解析,假设请求类型是multipart将通过MultipartResolver进行文件上传解析;
2、通过HandlerMapping,将请求映射到处理器(返回一个HandlerExecutionChain,它包含一个处理器、多个HandlerInterceptor拦截器;
3、 通过HandlerAdapter支持多种类型的处理器(HandlerExecutionChain中的处理器);
4、通过ViewResolver解析逻辑视图名到详细视图实现;
5、本地化解析;
6、渲染详细的视图等;
7、假设运行过程中遇到异常将交给HandlerExceptionResolver来解析。 从以上我们能够看出DispatcherServlet主要负责流程的控制(并且在流程中的每一个关键点都是非常easy扩展的)
Springboot项目在启动过程中涉及到 配置系统属性、获取监听器,发布应用开始启动事件、初始化参数、配置环境、创建应用上下文、预处理上下文、刷新上下文、再次刷新上下文、发布应用已经启动事件、发布应用启动完成事件。而启动 Tomcat 是刷新上下文 这一步。
下文中,我们将从代码的角度了解DispatcherServlet是如何在tomcat服务器启动的过程中加载并对外提供服务。
步骤一:DispatcherServlet bean对象的生成
1.在自动配置类DispatcherServletAutoConfiguration类中,内部类DispatcherServletConfiguration通过
@Bean(name = DEFAULT_DISPATCHER_SERVLET_BEAN_NAME)
的方式向spring容器中注入了类型为DispatcherServlet,beanName为dispatcherServlet的bean实例。
内部类DispatcherServletRegistrationConfiguration通过
@Bean(name = DEFAULT_DISPATCHER_SERVLET_REGISTRATION_BEAN_NAME)
注入了类型为DispatcherServletRegistrationBean,beanName为dispatcherServletRegistration的bean实例。
public static final String DEFAULT_DISPATCHER_SERVLET_BEAN_NAME = "dispatcherServlet";

	/*
	 * The bean name for a ServletRegistrationBean for the DispatcherServlet "/"
	 */
	public static final String DEFAULT_DISPATCHER_SERVLET_REGISTRATION_BEAN_NAME = "dispatcherServletRegistration";

	@Configuration
	@Conditional(DefaultDispatcherServletCondition.class)
	@ConditionalOnClass(ServletRegistration.class)
	@EnableConfigurationProperties(WebMvcProperties.class)
	protected static class DispatcherServletConfiguration {

		private final WebMvcProperties webMvcProperties;

		public DispatcherServletConfiguration(WebMvcProperties webMvcProperties) {
			this.webMvcProperties = webMvcProperties;
		}

        //注意此处,该注解向spring容器中注入了beanName为dispatcherServlet的bean
		@Bean(name = DEFAULT_DISPATCHER_SERVLET_BEAN_NAME)
		public DispatcherServlet dispatcherServlet() {
			DispatcherServlet dispatcherServlet = new DispatcherServlet();
			dispatcherServlet.setDispatchOptionsRequest(
					this.webMvcProperties.isDispatchOptionsRequest());
			dispatcherServlet.setDispatchTraceRequest(
					this.webMvcProperties.isDispatchTraceRequest());
			dispatcherServlet.setThrowExceptionIfNoHandlerFound(
					this.webMvcProperties.isThrowExceptionIfNoHandlerFound());
			return dispatcherServlet;
		}

		@Bean
		@ConditionalOnBean(MultipartResolver.class)
		@ConditionalOnMissingBean(name = DispatcherServlet.MULTIPART_RESOLVER_BEAN_NAME)
		public MultipartResolver multipartResolver(MultipartResolver resolver) {
			// Detect if the user has created a MultipartResolver but named it incorrectly
			return resolver;
		}

	}

	@Configuration
	@Conditional(DispatcherServletRegistrationCondition.class)
	@ConditionalOnClass(ServletRegistration.class)
	@EnableConfigurationProperties(WebMvcProperties.class)
	@Import(DispatcherServletConfiguration.class)
	protected static class DispatcherServletRegistrationConfiguration {

		private final ServerProperties serverProperties;

		private final WebMvcProperties webMvcProperties;

		private final MultipartConfigElement multipartConfig;

		public DispatcherServletRegistrationConfiguration(
				ServerProperties serverProperties, WebMvcProperties webMvcProperties,
				ObjectProvider<MultipartConfigElement> multipartConfigProvider) {
			this.serverProperties = serverProperties;
			this.webMvcProperties = webMvcProperties;
			this.multipartConfig = multipartConfigProvider.getIfAvailable();
		}

        //注意此处,该注解向spring容器注入了beanName为dispatcherServletRegistration的bean
		@Bean(name = DEFAULT_DISPATCHER_SERVLET_REGISTRATION_BEAN_NAME)
		@ConditionalOnBean(value = DispatcherServlet.class, name = DEFAULT_DISPATCHER_SERVLET_BEAN_NAME)
		public DispatcherServletRegistrationBean dispatcherServletRegistration(
				DispatcherServlet dispatcherServlet) {
            //注意此处,将dispatcherServlet赋值到DispatcherServletRegistrationBean父类
            //对象ServletRegistrationBean的属性servlet中。
			DispatcherServletRegistrationBean registration = new DispatcherServletRegistrationBean(
					dispatcherServlet, this.serverProperties.getServlet().getPath());
			registration.setName(DEFAULT_DISPATCHER_SERVLET_BEAN_NAME);
			registration.setLoadOnStartup(
					this.webMvcProperties.getServlet().getLoadOnStartup());
			if (this.multipartConfig != null) {
				registration.setMultipartConfig(this.multipartConfig);
			}
			return registration;
		}

	}
2.在自动装配类ServletWebServerFactoryAutoConfiguration中该类通过
@Import({ ServletWebServerFactoryAutoConfiguration.BeanPostProcessorsRegistrar.class,
      ServletWebServerFactoryConfiguration.EmbeddedTomcat.class,
      ServletWebServerFactoryConfiguration.EmbeddedJetty.class,
      ServletWebServerFactoryConfiguration.EmbeddedUndertow.class })
引入了ServletWebServerFactoryConfiguration类。
在该类中可以看到
@ConditionalOnMissingBean(value = ServletWebServerFactory.class, search = SearchStrategy.CURRENT)
根据springboot默认引入的是tomcat服务器,所以最终tomcat、jetty、undertow三种注入bean的判断中最终引入的是tomcat。此时根据条件spring容器注入的是TomcatServletWebServerFactory类型的bean。
class ServletWebServerFactoryConfiguration {

	@Configuration
	@ConditionalOnClass({ Servlet.class, Tomcat.class, UpgradeProtocol.class })
	@ConditionalOnMissingBean(value = ServletWebServerFactory.class, search = SearchStrategy.CURRENT)
	public static class EmbeddedTomcat {
        //注意此处,往spring容器注入的是TomcatServletWebServerFactory类型的bean
		@Bean
		public TomcatServletWebServerFactory tomcatServletWebServerFactory() {
			return new TomcatServletWebServerFactory();
		}

	}

	/**
	 * Nested configuration if Jetty is being used.
	 */
	@Configuration
	@ConditionalOnClass({ Servlet.class, Server.class, Loader.class,
			WebAppContext.class })
	@ConditionalOnMissingBean(value = ServletWebServerFactory.class, search = SearchStrategy.CURRENT)
	public static class EmbeddedJetty {

		@Bean
		public JettyServletWebServerFactory JettyServletWebServerFactory() {
			return new JettyServletWebServerFactory();
		}

	}

	/**
	 * Nested configuration if Undertow is being used.
	 */
	@Configuration
	@ConditionalOnClass({ Servlet.class, Undertow.class, SslClientAuthMode.class })
	@ConditionalOnMissingBean(value = ServletWebServerFactory.class, search = SearchStrategy.CURRENT)
	public static class EmbeddedUndertow {

		@Bean
		public UndertowServletWebServerFactory undertowServletWebServerFactory() {
			return new UndertowServletWebServerFactory();
		}

	}

}
步骤二:spring容器启动并将DispatcherServlet与tomcat服务器关联起来
1.在springboot项目中,应用是通过Application里的main方法启动,跟踪main方法
+Application#main
+SpringApplication#run(Class<?> primarySource, String... args)
+SpringApplication#run(Class<?>[] primarySources, String[] args)
+SpringApplication#run(String... args)
进入到SpringApplication的run方法中。
public ConfigurableApplicationContext run(String... args) {
		StopWatch stopWatch = new StopWatch();
		stopWatch.start();
		ConfigurableApplicationContext context = null;
		Collection<SpringBootExceptionReporter> exceptionReporters = new ArrayList<>();
		configureHeadlessProperty();
		SpringApplicationRunListeners listeners = getRunListeners(args);
		listeners.starting();
		try {
			ApplicationArguments applicationArguments = new DefaultApplicationArguments(
					args);
			ConfigurableEnvironment environment = prepareEnvironment(listeners,
					applicationArguments);
			configureIgnoreBeanInfo(environment);
			Banner printedBanner = printBanner(environment);
            //关注此处,此处生成了应用上下文
			context = createApplicationContext();
			exceptionReporters = getSpringFactoriesInstances(
					SpringBootExceptionReporter.class,
					new Class[] { ConfigurableApplicationContext.class }, context);
			prepareContext(context, environment, listeners, applicationArguments,
					printedBanner);
            //关注此处,此处完成了tomcat服务器和servlet的关联
			refreshContext(context);
			afterRefresh(context, applicationArguments);
			stopWatch.stop();
			if (this.logStartupInfo) {
				new StartupInfoLogger(this.mainApplicationClass)
						.logStarted(getApplicationLog(), stopWatch);
			}
			listeners.started(context);
			callRunners(context, applicationArguments);
		}
		catch (Throwable ex) {
			handleRunFailure(context, ex, exceptionReporters, listeners);
			throw new IllegalStateException(ex);
		}

		try {
			listeners.running(context);
		}
		catch (Throwable ex) {
			handleRunFailure(context, ex, exceptionReporters, null);
			throw new IllegalStateException(ex);
		}
		return context;
	}
在run方法中,我们需要关注两处,分别是
(1)createApplicationContext方法
(2)refreshContext方法
进入到createApplicationContext方法,该方法会返回AnnotationConfigServletWebServerApplicationContext类型的上下文.
protected ConfigurableApplicationContext createApplicationContext() {
		Class<?> contextClass = this.applicationContextClass;
		if (contextClass == null) {
			try {
                //webApplicationType是通过SpringApplication构造方法里的deduceWebApplicationType方法赋值的,赋值的类型是SERVLET
				switch (this.webApplicationType) {
                /** 由于webApplicationType的类型是SERVLET,返回DEFAULT_WEB_CONTEXT_CLASS类型的上下文,
而DEFAULT_WEB_CONTEXT_CLASS的定义是public static final String DEFAULT_WEB_CONTEXT_CLASS
= "org.springframework.boot."
			+ "web.servlet.context.AnnotationConfigServletWebServerApplicationContext";
所以会返回的上下文是AnnotationConfigServletWebServerApplicationContext
**/
				case SERVLET:
					contextClass = Class.forName(DEFAULT_WEB_CONTEXT_CLASS);
					break;
				case REACTIVE:
					contextClass = Class.forName(DEFAULT_REACTIVE_WEB_CONTEXT_CLASS);
					break;
				default:
					contextClass = Class.forName(DEFAULT_CONTEXT_CLASS);
				}
			}
			catch (ClassNotFoundException ex) {
				throw new IllegalStateException(
						"Unable create a default ApplicationContext, "
								+ "please specify an ApplicationContextClass",
						ex);
			}
		}
		return (ConfigurableApplicationContext) BeanUtils.instantiateClass(contextClass);
	}
继续跟踪refreshContext方法,该方法的入参是createApplicationContext返回的AnnotationConfigServletWebServerApplicationContext类型的上下文。点击源码深入到AbstractApplicationContext#refresh方法中,该方法是调用的AnnotationConfigServletWebServerApplicationContext对象的refresh方法。
+SpringApplication#run(String... args)
+SpringApplication#refreshContext(ConfigurableApplicationContext context)
+SpringApplication#refresh(ApplicationContext applicationContext)
+AbstractApplicationContext#refresh()
可以看到该方法中有一个onRefresh方法,该方法是一个空方法。
@Override
	public void refresh() throws BeansException, IllegalStateException {
		synchronized (this.startupShutdownMonitor) {
           //。。。。省略

			try {
				// Allows post-processing of the bean factory in context subclasses.
				postProcessBeanFactory(beanFactory);

				//。。。。省略

				// Initialize other special beans in specific context subclasses.
				onRefresh();

				//。。。。省略
			}

			catch (BeansException ex) {
				//。。。。省略
			}

			finally {
				// Reset common introspection caches in Spring's core, since we
				// might not ever need metadata for singleton beans anymore...
				resetCommonCaches();
			}
		}
	}
根据继承树我们发现AnnotationConfigServletWebServerApplicationContext继承了ServletWebServerApplicationContext,最终继承了AbstractApplicationContext类。
根据java的动态绑定机制,AbstractApplicationContext的onRefresh方法调用时,实际调用的是ServletWebServerApplicationContext中的重写的onRefresh方法。
	@Override
	protected void onRefresh() {
		super.onRefresh();
		try {
            //关注此方法,该方法建立了spring容器与tomcat之间的关系
			createWebServer();
		}
		catch (Throwable ex) {
			throw new ApplicationContextException("Unable to start web server", ex);
		}
	}
关注并进入createWebServer方法
private void createWebServer() {
		WebServer webServer = this.webServer;
		ServletContext servletContext = getServletContext();
		if (webServer == null && servletContext == null) {
            //获取工厂对象,返回的是TomcatServletWebServerFactory类型的实例
			ServletWebServerFactory factory = getWebServerFactory();
            //获取web服务器对象
			this.webServer = factory.getWebServer(getSelfInitializer());
		}
		else if (servletContext != null) {
			try {
				getSelfInitializer().onStartup(servletContext);
			}
			catch (ServletException ex) {
				throw new ApplicationContextException("Cannot initialize servlet context",
						ex);
			}
		}
		initPropertySources();
	}
点击进入到getWebServerFactory方法中,该方法通过getBeanFactory().getBean(beanNames[0], ServletWebServerFactory.class)返回一个ServletWebServerFactory类型的工厂bean。
protected ServletWebServerFactory getWebServerFactory() {
// Use bean names so that we don't consider the hierarchy
String[] beanNames = getBeanFactory()
.getBeanNamesForType(ServletWebServerFactory.class);
if (beanNames.length == 0) {
throw new ApplicationContextException(
"Unable to start ServletWebServerApplicationContext due to missing "
+ "ServletWebServerFactory bean.");
}
if (beanNames.length > 1) {
throw new ApplicationContextException(
"Unable to start ServletWebServerApplicationContext due to multiple "
+ "ServletWebServerFactory beans : "
+ StringUtils.arrayToCommaDelimitedString(beanNames));
}
return getBeanFactory().getBean(beanNames[0], ServletWebServerFactory.class);
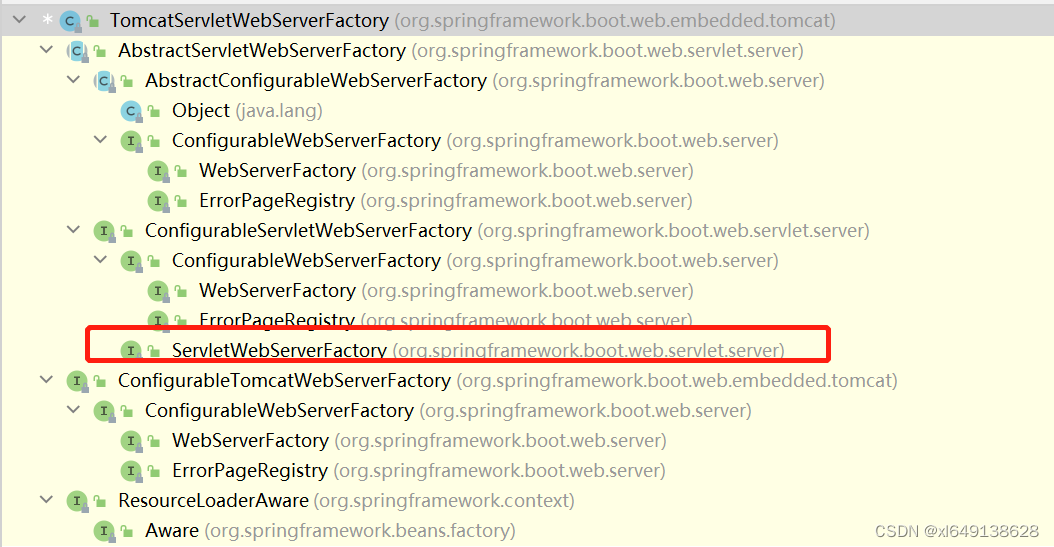
}之前在步骤一中,spring通过自动装配返回的是 TomcatServletWebServerFactory类型的工厂bean。查看TomcatServletWebServerFactory的继承和实现树,发现该类实现了ServletWebServerFactory,所以在aplicationContext中的获取的是TomcatServletWebServerFactory的实例。
在 ServletWebServerApplicationContext#createWebServer方法中调用factory.getWebServer(getSelfInitializer())方法,因为factory是TomcatServletWebServerFactory类型的对象,所以调用的是TomcatServletWebServerFactory里的getWebServer方法。该方法的入参是getSelfInitializer()返回的对象,跟踪getSelfInitializer()方法最后定位到ServletWebServerApplicationContext#selfInitialize(ServletContext servletContext)方法。
private void selfInitialize(ServletContext servletContext) throws ServletException {
		prepareWebApplicationContext(servletContext);
		ConfigurableListableBeanFactory beanFactory = getBeanFactory();
		ExistingWebApplicationScopes existingScopes = new ExistingWebApplicationScopes(
				beanFactory);
		WebApplicationContextUtils.registerWebApplicationScopes(beanFactory,
				getServletContext());
		existingScopes.restore();
		WebApplicationContextUtils.registerEnvironmentBeans(beanFactory,
				getServletContext());
        //关注getServletContextInitializerBeans方法
		for (ServletContextInitializer beans : getServletContextInitializerBeans()) {
			beans.onStartup(servletContext);
		}
	}
进入到ServletWebServerApplicationContext#getServletContextInitializerBeans方法。发现该方法返回一个ServletContextInitializerBeans类型的对象。
protected Collection<ServletContextInitializer> getServletContextInitializerBeans() {
		return new ServletContextInitializerBeans(getBeanFactory());
	}
进入ServletContextInitializerBeans的构造方法,关注addServletContextInitializerBeans方法。
public ServletContextInitializerBeans(ListableBeanFactory beanFactory) {
		this.initializers = new LinkedMultiValueMap<>();
        //关注此方法,该方法往initializers这个Map对象里添加ServletContextInitializer类型的数据
		addServletContextInitializerBeans(beanFactory);
		addAdaptableBeans(beanFactory);
		List<ServletContextInitializer> sortedInitializers = this.initializers.values()
				.stream()
				.flatMap((value) -> value.stream()
						.sorted(AnnotationAwareOrderComparator.INSTANCE))
				.collect(Collectors.toList());
		this.sortedList = Collections.unmodifiableList(sortedInitializers);
	}
一路跟踪进去
+ServletContextInitializerBeans#addServletContextInitializerBeans(ListableBeanFactory beanFactory)方法中找到getOrderedBeansOfType(beanFactory, ServletContextInitializer.class)这个方法,getOrderedBeansOfType是从spring容器中获取ServletContextInitializer类型的bean。在步骤一的自动装配阶段,代码向容器中注入了类型为DispatcherServletRegistrationBean的bean对象。
private void addServletContextInitializerBeans(ListableBeanFactory beanFactory) {
for (Entry<String, ServletContextInitializer> initializerBean : getOrderedBeansOfType(
beanFactory, ServletContextInitializer.class)) {
//向容器注入servlet
addServletContextInitializerBean(initializerBean.getKey(),
initializerBean.getValue(), beanFactory);
}
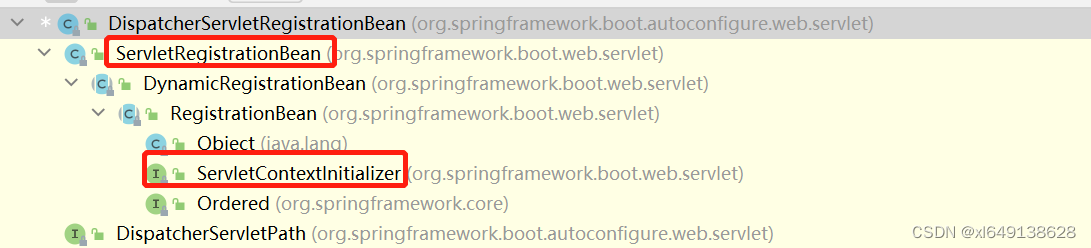
}获取DispatcherServletRegistrationBean类的继承和实现树,发现DispatcherServletRegistrationBean实现了ServletContextInitializer接口,getOrderedBeansOfType(beanFactory, ServletContextInitializer.class)实际上返回的是DispatcherServletRegistrationBean类型的对象。
继续跟踪下去,发现ServletContextInitializerBeans#addServletContextInitializerBeans(ListableBeanFactory beanFactory)方法里调用了addServletContextInitializerBean(String beanName, ServletContextInitializer initializer, ListableBeanFactory beanFactory)方法。源码如下图所示
因DispatcherServletRegistrationBean继承了ServletRegistrationBean所以会进入第一个if判断里的
private void addServletContextInitializerBean(String beanName,
			ServletContextInitializer initializer, ListableBeanFactory beanFactory) {
		if (initializer instanceof ServletRegistrationBean) {
			Servlet source = ((ServletRegistrationBean<?>) initializer).getServlet();
			addServletContextInitializerBean(Servlet.class, beanName, initializer,
					beanFactory, source);
		}
		else if (initializer instanceof FilterRegistrationBean) {
			Filter source = ((FilterRegistrationBean<?>) initializer).getFilter();
			addServletContextInitializerBean(Filter.class, beanName, initializer,
					beanFactory, source);
		}
		else if (initializer instanceof DelegatingFilterProxyRegistrationBean) {
			String source = ((DelegatingFilterProxyRegistrationBean) initializer)
					.getTargetBeanName();
			addServletContextInitializerBean(Filter.class, beanName, initializer,
					beanFactory, source);
		}
		else if (initializer instanceof ServletListenerRegistrationBean) {
			EventListener source = ((ServletListenerRegistrationBean<?>) initializer)
					.getListener();
			addServletContextInitializerBean(EventListener.class, beanName, initializer,
					beanFactory, source);
		}
		else {
			addServletContextInitializerBean(ServletContextInitializer.class, beanName,
					initializer, beanFactory, initializer);
		}
	}
在该逻辑中调用了addServletContextInitializerBean方法,最终向initializers对象里添加了DispatcherServletRegistrationBean类型的bean。
private void addServletContextInitializerBean(Class<?> type, String beanName,
			ServletContextInitializer initializer, ListableBeanFactory beanFactory,
			Object source) {
        //向initializers对象中添加DispatcherServletRegistrationBean类型的bean
		this.initializers.add(type, initializer);
		if (source != null) {
			// Mark the underlying source as seen in case it wraps an existing bean
			this.seen.add(source);
		}
		if (ServletContextInitializerBeans.logger.isDebugEnabled()) {
			String resourceDescription = getResourceDescription(beanName, beanFactory);
			int order = getOrder(initializer);
			ServletContextInitializerBeans.logger.debug("Added existing "
					+ type.getSimpleName() + " initializer bean '" + beanName
					+ "'; order=" + order + ", resource=" + resourceDescription);
		}
	}
了解完ServletWebServerApplicationContext类中getSelfInitializer()方法的逻辑后,回到createWebServer方法里调用的factory.getWebServer(getSelfInitializer())方法。因为factory对象是TomcatServletWebServerFactory类型的实例,所以getWebServer方法调用的是TomcatServletWebServerFactory里的getWebServer方法。
观察getWebServer方法
public WebServer getWebServer(ServletContextInitializer... initializers) {
		Tomcat tomcat = new Tomcat();
		File baseDir = (this.baseDirectory != null) ? this.baseDirectory
				: createTempDir("tomcat");
		tomcat.setBaseDir(baseDir.getAbsolutePath());
		Connector connector = new Connector(this.protocol);
		tomcat.getService().addConnector(connector);
		customizeConnector(connector);
		tomcat.setConnector(connector);
        //关注此处,tomcat.getHost 实现了StandardEngine放入StandardHost的逻辑
		tomcat.getHost().setAutoDeploy(false);
		configureEngine(tomcat.getEngine());
		for (Connector additionalConnector : this.additionalTomcatConnectors) {
			tomcat.getService().addConnector(additionalConnector);
		}
        //关注此处
		prepareContext(tomcat.getHost(), initializers);
        //关注此处
		return getTomcatWebServer(tomcat);
	}
点开其中的prepareContext方法,
protected void prepareContext(Host host, ServletContextInitializer[] initializers) {
		File documentRoot = getValidDocumentRoot();
        //继承了StandardContext类
		TomcatEmbeddedContext context = new TomcatEmbeddedContext();
		if (documentRoot != null) {
			context.setResources(new LoaderHidingResourceRoot(context));
		}
		context.setName(getContextPath());
		context.setDisplayName(getDisplayName());
		context.setPath(getContextPath());
		File docBase = (documentRoot != null) ? documentRoot
				: createTempDir("tomcat-docbase");
		context.setDocBase(docBase.getAbsolutePath());
          // 注册一个FixContextListener监听,这个监听用于设置context的配置状态以及是否加入登录验证的逻辑
		context.addLifecycleListener(new FixContextListener());
		context.setParentClassLoader(
				(this.resourceLoader != null) ? this.resourceLoader.getClassLoader()
						: ClassUtils.getDefaultClassLoader());
		resetDefaultLocaleMapping(context);
		addLocaleMappings(context);
		context.setUseRelativeRedirects(false);
		configureTldSkipPatterns(context);
		WebappLoader loader = new WebappLoader(context.getParentClassLoader());
		loader.setLoaderClass(TomcatEmbeddedWebappClassLoader.class.getName());
		loader.setDelegate(true);
		context.setLoader(loader);
		if (isRegisterDefaultServlet()) {
			addDefaultServlet(context);
		}
		if (shouldRegisterJspServlet()) {
			addJspServlet(context);
			addJasperInitializer(context);
		}
		context.addLifecycleListener(new StaticResourceConfigurer(context));
		ServletContextInitializer[] initializersToUse = mergeInitializers(initializers);
		host.addChild(context);
        //关注此处
		configureContext(context, initializersToUse);
		postProcessContext(context);
	}
protected void configureContext(Context context,
ServletContextInitializer[] initializers) {
TomcatStarter starter = new TomcatStarter(initializers);
if (context instanceof TomcatEmbeddedContext) {
// Should be true
((TomcatEmbeddedContext) context).setStarter(starter);
}
//将tomcatStarter这个ServletContainerInitializer放入上下文中
context.addServletContainerInitializer(starter, NO_CLASSES);
for (LifecycleListener lifecycleListener : this.contextLifecycleListeners) {
context.addLifecycleListener(lifecycleListener);
}
for (Valve valve : this.contextValves) {
context.getPipeline().addValve(valve);
}
for (ErrorPage errorPage : getErrorPages()) {
new TomcatErrorPage(errorPage).addToContext(context);
}
for (MimeMappings.Mapping mapping : getMimeMappings()) {
context.addMimeMapping(mapping.getExtension(), mapping.getMimeType());
}
configureSession(context);
for (TomcatContextCustomizer customizer : this.tomcatContextCustomizers) {
customizer.customize(context);
}
}继续回到TomcatServletWebServerFactory#getWebServer方法,在该方法的最后面返回的是getTomcatWebServer方法返回的对象。进入到该方法发现new 了一个TomcatWebServer对象。
protected TomcatWebServer getTomcatWebServer(Tomcat tomcat) {
		return new TomcatWebServer(tomcat, getPort() >= 0);
	}
进入该对象的构造方法
public TomcatWebServer(Tomcat tomcat, boolean autoStart) {
		Assert.notNull(tomcat, "Tomcat Server must not be null");
		this.tomcat = tomcat;
		this.autoStart = autoStart;
        //关注此方法
		initialize();
	}
进入initialize方法,代码如下
private void initialize() throws WebServerException {
		TomcatWebServer.logger
				.info("Tomcat initialized with port(s): " + getPortsDescription(false));
		synchronized (this.monitor) {
			try {
                //生成StandardService,StandardEngine,并赋值到StandardEngine对象到
                //StandardService的engine属性中
				addInstanceIdToEngineName();

				Context context = findContext();
				context.addLifecycleListener((event) -> {
					if (context.equals(event.getSource())
							&& Lifecycle.START_EVENT.equals(event.getType())) {
						// Remove service connectors so that protocol binding doesn't
						// happen when the service is started.
						removeServiceConnectors();
					}
				});
                //关注此方法,启动tomcat服务器
				// Start the server to trigger initialization listeners
				this.tomcat.start();

				// We can re-throw failure exception directly in the main thread
				rethrowDeferredStartupExceptions();

				try {
					ContextBindings.bindClassLoader(context, context.getNamingToken(),
							getClass().getClassLoader());
				}
				catch (NamingException ex) {
					// Naming is not enabled. Continue
				}

				// Unlike Jetty, all Tomcat threads are daemon threads. We create a
				// blocking non-daemon to stop immediate shutdown
				startDaemonAwaitThread();
			}
			catch (Exception ex) {
				stopSilently();
				throw new WebServerException("Unable to start embedded Tomcat", ex);
			}
		}
	}
关注this.tomcat.start();方法,该方法启动了tomcat服务器,进入start方法。
public void start() throws LifecycleException {
        getServer();
        getConnector();
        server.start();
    }
点击server.start方法 发现start方法是一个待实现的方法。
public void start() throws LifecycleException;
start方法是server对象调用的,server对象是tomcat对象的一个属性,回到TomcatServletWebServerFactory#getWebServer方法中tomcat对象是通过
Tomcat tomcat = new Tomcat();
来实现的。tomcat的server属性是在getWebServer方法的tomcat.getService().addConnector(connector);这段代码中getService方法赋值的。点开该方法
public Service getService() {
        return getServer().findServices()[0];
    }
继续点击Tomcat类里的getServer方法
public Server getServer() {

        if (server != null) {
            return server;
        }

        System.setProperty("catalina.useNaming", "false");
        //对tomcat里的server属性赋值
        server = new StandardServer();

        initBaseDir();

        server.setPort( -1 );

        Service service = new StandardService();
        service.setName("Tomcat");
        //对standardServer里的services属性赋值
        server.addService(service);
        return server;
    }
观看上面的代码发现server是 StandardServer类型的对象。获取该类型的继承实现树,发现继承了
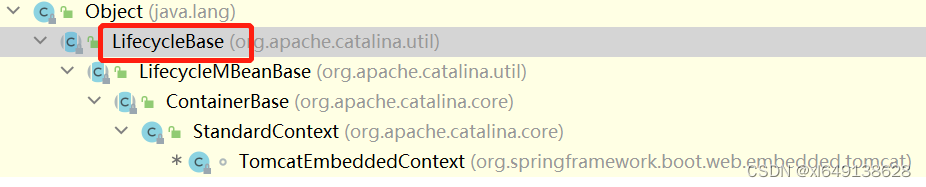
LifecycleBase类。
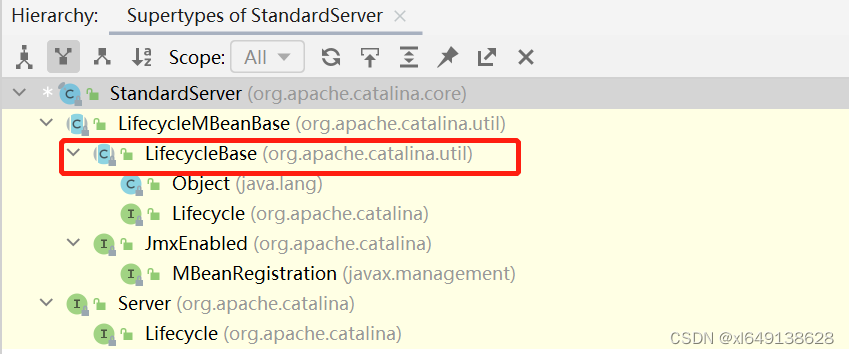
所以server.start方法这个待实现的方法实际调用的是LifecycleBase里的start方法
public final synchronized void start() throws LifecycleException {

        if (LifecycleState.STARTING_PREP.equals(state) || LifecycleState.STARTING.equals(state) ||
                LifecycleState.STARTED.equals(state)) {

            if (log.isDebugEnabled()) {
                Exception e = new LifecycleException();
                log.debug(sm.getString("lifecycleBase.alreadyStarted", toString()), e);
            } else if (log.isInfoEnabled()) {
                log.info(sm.getString("lifecycleBase.alreadyStarted", toString()));
            }

            return;
        }

        if (state.equals(LifecycleState.NEW)) {
            init();
        } else if (state.equals(LifecycleState.FAILED)) {
            stop();
        } else if (!state.equals(LifecycleState.INITIALIZED) &&
                !state.equals(LifecycleState.STOPPED)) {
            invalidTransition(Lifecycle.BEFORE_START_EVENT);
        }

        try {
            setStateInternal(LifecycleState.STARTING_PREP, null, false);
            //关注该方法
            startInternal();
            if (state.equals(LifecycleState.FAILED)) {
                // This is a 'controlled' failure. The component put itself into the
                // FAILED state so call stop() to complete the clean-up.
                stop();
            } else if (!state.equals(LifecycleState.STARTING)) {
                // Shouldn't be necessary but acts as a check that sub-classes are
                // doing what they are supposed to.
                invalidTransition(Lifecycle.AFTER_START_EVENT);
            } else {
                setStateInternal(LifecycleState.STARTED, null, false);
            }
        } catch (Throwable t) {
            // This is an 'uncontrolled' failure so put the component into the
            // FAILED state and throw an exception.
            ExceptionUtils.handleThrowable(t);
            setStateInternal(LifecycleState.FAILED, null, false);
            throw new LifecycleException(sm.getString("lifecycleBase.startFail", toString()), t);
        }
    }
在start方法中找到startInternal()方法,发现该方法也是一个未实现的方法,根据动态绑定机制实际调用的是StandardServer类里的startInternal()方法。
protected void startInternal() throws LifecycleException {

        fireLifecycleEvent(CONFIGURE_START_EVENT, null);
        setState(LifecycleState.STARTING);

        globalNamingResources.start();

        // Start our defined Services
        synchronized (servicesLock) {
            for (int i = 0; i < services.length; i++) {
                //关注此处
                services[i].start();
            }
        }
    }
在上面的代码段services[i].start()中,servics是standardServer的一个属性,该属性是在Tomcat类里的getServer方法里的server.addService(service)实现赋值的。赋值的类型是StandardService。所以services[i].start()执行的是StandardService里的start方法。
而StandardService的继承实现关系如下图所示。

所以start方法实际调用的是LifecycleBase里的start方法,重复上面的的逻辑,在start方法中执行startInternal方法,在上面的内容中提到startInternal方法是一个待实现的方法。它调用的是StandardService类里的startInternal方法。
if(log.isInfoEnabled())
            log.info(sm.getString("standardService.start.name", this.name));
        setState(LifecycleState.STARTING);

        // Start our defined Container first
        if (engine != null) {
            synchronized (engine) {
                //关注此处
                engine.start();
            }
        }

        synchronized (executors) {
            for (Executor executor: executors) {
                executor.start();
            }
        }

        mapperListener.start();

        // Start our defined Connectors second
        synchronized (connectorsLock) {
            for (Connector connector: connectors) {
                try {
                    // If it has already failed, don't try and start it
                    if (connector.getState() != LifecycleState.FAILED) {
                        connector.start();
                    }
                } catch (Exception e) {
                    log.error(sm.getString(
                            "standardService.connector.startFailed",
                            connector), e);
                }
            }
        }
    }
在该方法中可以看到engine.start()方法,engine是在此文上面TomcatWebServer类构造时的initialize方法中赋值的,赋值的对象类型是StandardEngine。
engine赋值过程具体的调用链路如下:
+TomcatWebServer#TomcatWebServer(Tomcat tomcat, boolean autoStart)
+TomcatWebServer#initialize()
+TomcatWebServer#addInstanceIdToEngineName()
+Tomcat#getEngine()
+StandardServer#setContainer(Engine engine)
+StandardService#setContainer(Engine engine)
在addInstanceIdToEngineName方法中通过this.tomcat.getEngine()找到Tomcat类里的getEngine方法,该方法中通过Engine engine = new StandardEngine();进行初始化,并通过service.setContainer(engine)【注:service是通过getServer().findServices()[0]返回的StandardService】赋值,service.setContainer(engine)实际调用的是StandardService里的setContainer方法并通过this.engine = engine对engine属性赋值。以下的代码取自StandardService类里的setContainer方法,可以看到赋值过程。
@Override
    public void setContainer(Engine engine) {
        Engine oldEngine = this.engine;
        if (oldEngine != null) {
            oldEngine.setService(null);
        }
        //对StandardService里的engine属性赋值
        this.engine = engine;
        if (this.engine != null) {
            this.engine.setService(this);
        }
        if (getState().isAvailable()) {
            if (this.engine != null) {
                try {
                    this.engine.start();
                } catch (LifecycleException e) {
                    log.warn(sm.getString("standardService.engine.startFailed"), e);
                }
            }
            // Restart MapperListener to pick up new engine.
            try {
                mapperListener.stop();
            } catch (LifecycleException e) {
                log.warn(sm.getString("standardService.mapperListener.stopFailed"), e);
            }
            try {
                mapperListener.start();
            } catch (LifecycleException e) {
                log.warn(sm.getString("standardService.mapperListener.startFailed"), e);
            }
            if (oldEngine != null) {
                try {
                    oldEngine.stop();
                } catch (LifecycleException e) {
                    log.warn(sm.getString("standardService.engine.stopFailed"), e);
                }
            }
        }

        // Report this property change to interested listeners
        support.firePropertyChange("container", oldEngine, this.engine);
    }
继续回到StandardService里的startInternal()方法里的engine.start()方法,该方法调用的是StandardEngine里的start方法,根据该类的继承实现树,实际调用的是LifecycleBase里的start方法。
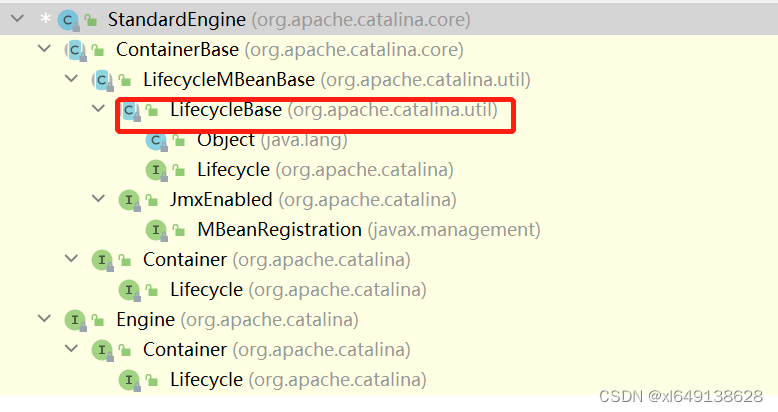
该方法上文有分析,继续根据start方法里调用的startInternal方法,这个时候实际调用的是StandardEngine里的startInternal方法。以下是StandardEngine里的startInternal方法源码。
在该源码中可以看到super.startInternal方法,实际调用的是ContainerBase类里的startInternal方法。
 protected synchronized void startInternal() throws LifecycleException {

        // Log our server identification information
        if(log.isInfoEnabled())
            log.info( "Starting Servlet Engine: " + ServerInfo.getServerInfo());
        //关注此处代码
        // Standard container startup
        super.startInternal();
    }
进入ContainerBase类里的startInternal方法,关注
protected synchronized void startInternal() throws LifecycleException {

        // Start our subordinate components, if any
        logger = null;
        getLogger();
        Cluster cluster = getClusterInternal();
        if (cluster instanceof Lifecycle) {
            ((Lifecycle) cluster).start();
        }
        Realm realm = getRealmInternal();
        if (realm instanceof Lifecycle) {
            ((Lifecycle) realm).start();
        }
        // 关注此处
        // Start our child containers, if any
        Container children[] = findChildren();
        List<Future<Void>> results = new ArrayList<>();
        for (int i = 0; i < children.length; i++) {
            results.add(startStopExecutor.submit(new StartChild(children[i])));
        }

        boolean fail = false;
        for (Future<Void> result : results) {
            try {
                result.get();
            } catch (Exception e) {
                log.error(sm.getString("containerBase.threadedStartFailed"), e);
                fail = true;
            }

        }
        if (fail) {
            throw new LifecycleException(
                    sm.getString("containerBase.threadedStartFailed"));
        }

        // Start the Valves in our pipeline (including the basic), if any
        if (pipeline instanceof Lifecycle)
            ((Lifecycle) pipeline).start();


        setState(LifecycleState.STARTING);

        // Start our thread
        threadStart();

    }
在Container children[] = findChildren();这段代码中获取到获取到容器children里的值
public Container[] findChildren() {
        synchronized (children) {
            Container results[] = new Container[children.size()];
            return children.values().toArray(results);
        }
    }
而children里的值是在
+TomcatServletWebServerFactory#getWebServer(ServletContextInitializer... initializers)
+Tomcat#getHost()
+StandardEngine#addChild(Container child)
+ContainerBase#addChild(Container child)
+ContainerBase#addChildInternal(Container child)
中赋值的
private void addChildInternal(Container child) {

        if( log.isDebugEnabled() )
            log.debug("Add child " + child + " " + this);
        synchronized(children) {
            if (children.get(child.getName()) != null)
                throw new IllegalArgumentException("addChild:  Child name '" +
                                                   child.getName() +
                                                   "' is not unique");
            child.setParent(this);  // May throw IAE
            //关注此处对children属性赋值,赋值类型为StandardHost
            children.put(child.getName(), child);
        }
在赋值过程中实际的代码调用过程为
1.TomcatServletWebServerFactory类里的getWebServer方法中的tomcat.getHost().setAutoDeploy(false)
2.Tomcat类中的getHost()方法通过Host host = new StandardHost()初始化了一个StandardHost类型的对象并调用了getEngine().addChild(host)方法
3.getEngine返回的是StandardEngine类型的对象。此时addChild调用的是StandardEngine里的addChild方法。
4.StandardEngine的addChild方法里调用了super.addChild(child),StandardEngine的父类是ContainerBase类,实际调用的是ContainerBase里的addChild方法。
5.ContainerBase类中的addChild方法中调用了addChildInternal(Container child)方法,该方法对
ContainerBase中的children属性进行了赋值。
回到本文ContainerBase类里的startInternal方法,在该方法中通过线程池的方式调用了StandardHost中的start方法。即通过内部类StartChild中的call方法调用逻辑child.start()实现了
对StandardHost中start方法的调用。
Callable和Future的关系
可以用Future.get来获取Callable接口返回的执行结果,还可以通过Future.isDone()来判断任务是否已经执行完了
在call()未执行完毕之前,调用get()的线程(假定此时是主线程)会被阻塞,直到call方法返回了结果后,此时future.get才会得到结果,然后主线程才会切换到runnable状态
Future是一个存储器,存储了call()这个任务的结果,而这个任务的执行时间是无法提前确定的
        List<Future<Void>> results = new ArrayList<>();
        for (int i = 0; i < children.length; i++) {
            results.add(startStopExecutor.submit(new StartChild(children[i])));
        }

        boolean fail = false;
        for (Future<Void> result : results) {
            try {
                //调用了StartChild里的call方法
                result.get();
            } catch (Exception e) {
                log.error(sm.getString("containerBase.threadedStartFailed"), e);
                fail = true;
            }

        }
而StandardHost中没有start方法,参考 StandardHost的继承实现树,实际调用的是LifecycleBase里的start方法,在该start方法中调用了startInternal方法。startInternal方法是一个待实现的方法,实际调用的是StandardHost中的startInternal方法

在该类的startInternal方法中
protected synchronized void startInternal() throws LifecycleException {

        // Set error report valve
        String errorValve = getErrorReportValveClass();
        if ((errorValve != null) && (!errorValve.equals(""))) {
            try {
                boolean found = false;
                Valve[] valves = getPipeline().getValves();
                for (Valve valve : valves) {
                    if (errorValve.equals(valve.getClass().getName())) {
                        found = true;
                        break;
                    }
                }
                if(!found) {
                    Valve valve =
                        (Valve) Class.forName(errorValve).getConstructor().newInstance();
                    getPipeline().addValve(valve);
                }
            } catch (Throwable t) {
                ExceptionUtils.handleThrowable(t);
                log.error(sm.getString(
                        "standardHost.invalidErrorReportValveClass",
                        errorValve), t);
            }
        }
        //关注此处,调用了父类的startInternal方法
        super.startInternal();
    }
调用了父类的startInternal方法即ContainerBase的startInternal方法。 重复之前的流程分析,
在ContainerBase 类中startInternal方法中Container children[] = findChildren();这段代码的children属性是通过
+TomcatServletWebServerFactory#getWebServer(ServletContextInitializer... initializers)
+TomcatServletWebServerFactory#prepareContext(Host host, ServletContextInitializer[] initializers)
+StandardHost#addChild(Container child)
+ContainerBase#addChild(Container child)
+ContainerBase#addChildInternal(Container child)
上面的调用链路赋值的。
1.TomcatServletWebServerFactory类中的getWebServer方法调用了该类的prepareContext方法。
2.在prepareContext方法中TomcatEmbeddedContext context = new TomcatEmbeddedContext()
处理化了一个TomcatEmbeddedContext即TomcatEmbedded上下文对象。
3.prepareContext方法中通过host.addChild(context)方法,将TomcatEmbeddedContext赋值到host对象即StandardHost类型的对象中。
4.StandardHost类中的addChild(Container child)方法里调用了super.addChild(child)方法。
5.ContainerBase(基础容器)是StandardHost的父类,addChild实际调用的是ContainerBase里的addChild方法。
6.ContainerBase中的addChild调用了该类中的addChildInternal方法,该方法通过入参child对children属性进行了赋值
7.addChildInternal的入参child实际上是步骤3中初始化的TomcatEmbeddedContext类型的context。所以
StandardHost里的children属性实际上是TomcatEmbeddedContext类型的context。
注:addChildInternal源码可以参考本文上面的源码,此处不再贴现。
回到StandardHost调用的startInternal方法的分析,在本文上面我们明确了实际调用的是ContainerBase类里的startInternal方法。类似StandardEngine调用ContainerBase类中的startInternal方法,通过多线程池的方法调用了
results.add(startStopExecutor.submit(new StartChild(children[i])))
StartChild类中的call方法,该方法中调用了child.start方法,而child是StartChild构造方法的入参。
而传入的children[i] 实际上是TomcatEmbeddedContext类型的对象。而child.start实际上是TomcatEmbeddedContext调用了start方法。而TomcatEmbeddedContext中没有start方法,根据动态绑定机制,真正执行的是LifecycleBase类里的start方法。
在LifecycleBase中的start方法中调用了startInternal方法。因start方法的调用者是TomcatEmbeddedContext。按照动态绑定机制回调用TomcatEmbeddedContext中的startInternal方法,因TomcatEmbeddedContext中没有该方法,所以实际上调用的是其父类StandardContext中的startInternal方法。
由于StandardContext中的startInternal方法很长,我们只截取关键部分
protected synchronized void startInternal() throws LifecycleException {

        //。。。。省略
        try {
            //。。。。省略


            // Call ServletContainerInitializers
            for (Map.Entry<ServletContainerInitializer, Set<Class<?>>> entry :
                initializers.entrySet()) {
                try {
                    //关注此处
                    entry.getKey().onStartup(entry.getValue(),
                            getServletContext());
                } catch (ServletException e) {
                    log.error(sm.getString("standardContext.sciFail"), e);
                    ok = false;
                    break;
                }
            }

            //。。。。省略
            // Start ContainerBackgroundProcessor thread
            super.threadStart();
        } finally {
            // Unbinding thread
            unbindThread(oldCCL);
        }

        //。。。。省略
    }
而initializers属性是通过下面的调用链路
+TomcatServletWebServerFactory#getWebServer(ServletContextInitializer... initializers)
+TomcatServletWebServerFactory#prepareContext(Host host, ServletContextInitializer[] initializers)
+TomcatServletWebServerFactory#configureContext(Context context, ServletContextInitializer[] initializers)
+StandardContext.addServletContainerInitializer( ServletContainerInitializer sci, Set<Class<?>> classes)
在TomcatServletWebServerFactory的configureContext方法中调用了
context.addServletContainerInitializer(starter, NO_CLASSES)这一段代码
在这段代码中context是在prepareContext中通过
TomcatEmbeddedContext context = new TomcatEmbeddedContext()
生成的。入参starter是在configureContext中通过
TomcatStarter starter = new TomcatStarter(initializers)
方法生成的。因为TomcatEmbeddedContext中没有addServletContainerInitializer方法实际上是调用的其父类StandardContext里的addServletContainerInitializer的方法。设置的StandardContext里的initializers属性实际上是一个TomcatStarter类型的对象。
在StandardContext中的startInternal方法中,entry.getKey()返回的是TomcatStarter,
for (Map.Entry<ServletContainerInitializer, Set<Class<?>>> entry :
initializers.entrySet()) {
try {
//关注此处,getServletContext返回的是ApplicationContext
entry.getKey().onStartup(entry.getValue(),
getServletContext());
} catch (ServletException e) {
log.error(sm.getString("standardContext.sciFail"), e);
ok = false;
break;
}
}
onStartup方法调用的是TomcatStarter中的onStartup方法。该方法中的initializer.onStartup中的调用者initializer属性是
ServletWebServerApplicationContext中createWebServer方法里调用的getSelfInitializer生成的对象来赋值的,按照本文上面的分析getSelfInitializer返回的是DispatcherServletRegistrationBean类型的对象。
public void onStartup(Set<Class<?>> classes, ServletContext servletContext)
			throws ServletException {
		try {
			for (ServletContextInitializer initializer : this.initializers) {
				initializer.onStartup(servletContext);
			}
		}
		catch (Exception ex) {
			this.startUpException = ex;
			// Prevent Tomcat from logging and re-throwing when we know we can
			// deal with it in the main thread, but log for information here.
			if (logger.isErrorEnabled()) {
				logger.error("Error starting Tomcat context. Exception: "
						+ ex.getClass().getName() + ". Message: " + ex.getMessage());
			}
		}
	}
所以根据DispatcherServletRegistrationBean的继承树,调用的实际上是RegistrationBean里的onStartup方法。

在该方法中调用了register(String description, ServletContext servletContext)方法
实际上调用的是父类DynamicRegistrationBean里的register方法。
protected final void register(String description, ServletContext servletContext) {
        //关注此处
		D registration = addRegistration(description, servletContext);
		if (registration == null) {
			logger.info(StringUtils.capitalize(description) + " was not registered "
					+ "(possibly already registered?)");
			return;
		}
		configure(registration);
	}
继续分析addRegistration方法,该方法是一个未实现的方法,实际调用的是DispatcherServletRegistrationBean父类ServletRegistrationBean里的addRegistration方法。
到此我们终于分析到DipatcherServlet被Tomcat管理的最核心的代码了。
protected ServletRegistration.Dynamic addRegistration(String description,
			ServletContext servletContext) {
		String name = getServletName();
		logger.info("Servlet " + name + " mapped to " + this.urlMappings);
        //关注此处
		return servletContext.addServlet(name, this.servlet);
	}
在ServletRegistrationBean中的servlet属性是通过DispatcherServletRegistrationBean自动装配时的
DispatcherServletRegistrationBean registration = new DispatcherServletRegistrationBean( dispatcherServlet, this.serverProperties.getServlet().getPath());
这段代码进行赋值的。赋值的类型是DispatcherServlet。而servletContext对象是在StandardContext类里的startInternal方法中调用getServletContext()方法
生成的,生成的源码如下
public ServletContext getServletContext() {

        if (context == null) {
            context = new ApplicationContext(this);
            if (altDDName != null)
                context.setAttribute(Globals.ALT_DD_ATTR,altDDName);
        }
        return (context.getFacade());

    }
其中context.getFacade调用了getFacade方法,该方法返回的是ApplicationContext里的facade属性,该属性是通过
private final ServletContext facade = new ApplicationContextFacade(this)
赋值。传入的this就是ApplicationContext类型的对象。分析其构造方法,其对ApplicationContextFacade里的context属性赋值,赋值类型是ApplicationContext。
public ApplicationContextFacade(ApplicationContext context) {
        super();
        this.context = context;

        classCache = new HashMap<>();
        objectCache = new ConcurrentHashMap<>();
        initClassCache();
    }
所以context.getFacade返回的是ApplicationContextFacade类型的值。
DynamicRegistrationBean类中的addRegistration方法中调用的servletContext.addServlet(name, this.servlet)实际上是ApplicationContextFacade调用addServlet方法
public ServletRegistration.Dynamic addServlet(String servletName,
            Servlet servlet) {
        if (SecurityUtil.isPackageProtectionEnabled()) {
            return (ServletRegistration.Dynamic) doPrivileged("addServlet",
                    new Class[]{String.class, Servlet.class},
                    new Object[]{servletName, servlet});
        } else {
            return context.addServlet(servletName, servlet);
        }
    }
在该方法中调用了context.addServlet(servletName, servlet),context是ApplicationContextFacade属性按本文上面分析是ApplicationContext,所以调用的是ApplicationContext里的addServlet方法
private ServletRegistration.Dynamic addServlet(String servletName, String servletClass,
            Servlet servlet, Map<String,String> initParams) throws IllegalStateException {

        if (servletName == null || servletName.equals("")) {
            throw new IllegalArgumentException(sm.getString(
                    "applicationContext.invalidServletName", servletName));
        }

        if (!context.getState().equals(LifecycleState.STARTING_PREP)) {
            //TODO Spec breaking enhancement to ignore this restriction
            throw new IllegalStateException(
                    sm.getString("applicationContext.addServlet.ise",
                            getContextPath()));
        }

        Wrapper wrapper = (Wrapper) context.findChild(servletName);

        // Assume a 'complete' ServletRegistration is one that has a class and
        // a name
        if (wrapper == null) {
            wrapper = context.createWrapper();
            wrapper.setName(servletName);
            context.addChild(wrapper);
        } else {
            if (wrapper.getName() != null &&
                    wrapper.getServletClass() != null) {
                if (wrapper.isOverridable()) {
                    wrapper.setOverridable(false);
                } else {
                    return null;
                }
            }
        }

        ServletSecurity annotation = null;
        if (servlet == null) {
            wrapper.setServletClass(servletClass);
            Class<?> clazz = Introspection.loadClass(context, servletClass);
            if (clazz != null) {
                annotation = clazz.getAnnotation(ServletSecurity.class);
            }
        } else {

            wrapper.setServletClass(servlet.getClass().getName());
            //关注此处,此处将servlet即DispatcherServlet设置到StandardWrapper里的instance属性中
            wrapper.setServlet(servlet);
            if (context.wasCreatedDynamicServlet(servlet)) {
                annotation = servlet.getClass().getAnnotation(ServletSecurity.class);
            }
        }

        if (initParams != null) {
            for (Map.Entry<String, String> initParam: initParams.entrySet()) {
                wrapper.addInitParameter(initParam.getKey(), initParam.getValue());
            }
        }

        ServletRegistration.Dynamic registration =
                new ApplicationServletRegistration(wrapper, context);
        if (annotation != null) {
            registration.setServletSecurity(new ServletSecurityElement(annotation));
        }
        return registration;
}| 组件名称 | 说明 |
|---|---|
| Server | 表示整个Servlet 容器,因此 Tomcat 运行环境中只有唯一一个 Server 实例 |
| Service | Service 表示一个或者多个 Connector 的集合,这些 Connector 共享同一个 Container 来处理其请求。在同一个 Tomcat 实例内可以包含任意多个 Service 实例,他们彼此独立。 |
| Connector | Tomcat 连接器,用于监听和转化 Socket 请求,同时将读取的 Socket 请求交由 Container 处理,支持不同协议以及不同的 I/O 方式。 |
| Container | Container 表示能够执行客户端请求并返回响应的一类对象,在 Tomcat 中存在不同级别的容器:Engine、Host、Context、Wrapper |
| Engine | Engine 表示整个 Servlet 引擎。在 Tomcat 中,Engine 为最高层级的容器对象,虽然 Engine 不是直接处理请求的容器,确是获取目标容器的入口 |
| Host | Host 作为一类容器,表示 Servlet 引擎(即Engine)中的虚拟机,与一个服务器的网络名有关,如域名等。客户端可以使用这个网络名连接服务器,这个名称必须要在 DNS 服务器上注册 |
| Context | Context 作为一类容器,用于表示 ServletContext,在 Servlet 规范中,一个 ServletContext 即表示一个独立的 web 应用 |
| Wrapper | Wrapper 作为一类容器,用于表示 Web 应用中定义的 Servlet |
| Executor | 表示 Tomcat 组件间可以共享的线程池 |


 2548
2548


 被折叠的 条评论
为什么被折叠?
被折叠的 条评论
为什么被折叠?
 到【灌水乐园】发言


