


 这篇博客介绍了Swift中UITableView的基础使用,包括设置代理、懒加载初始化、添加到视图及实现代理方法的步骤,提供了简单的代码示例,并展示了运行结果。
swift出来很久了,看了一些资料,一直没仔细去看,最近有时间看这资料简单写了些,只能算是一个入门吧,下面看代码
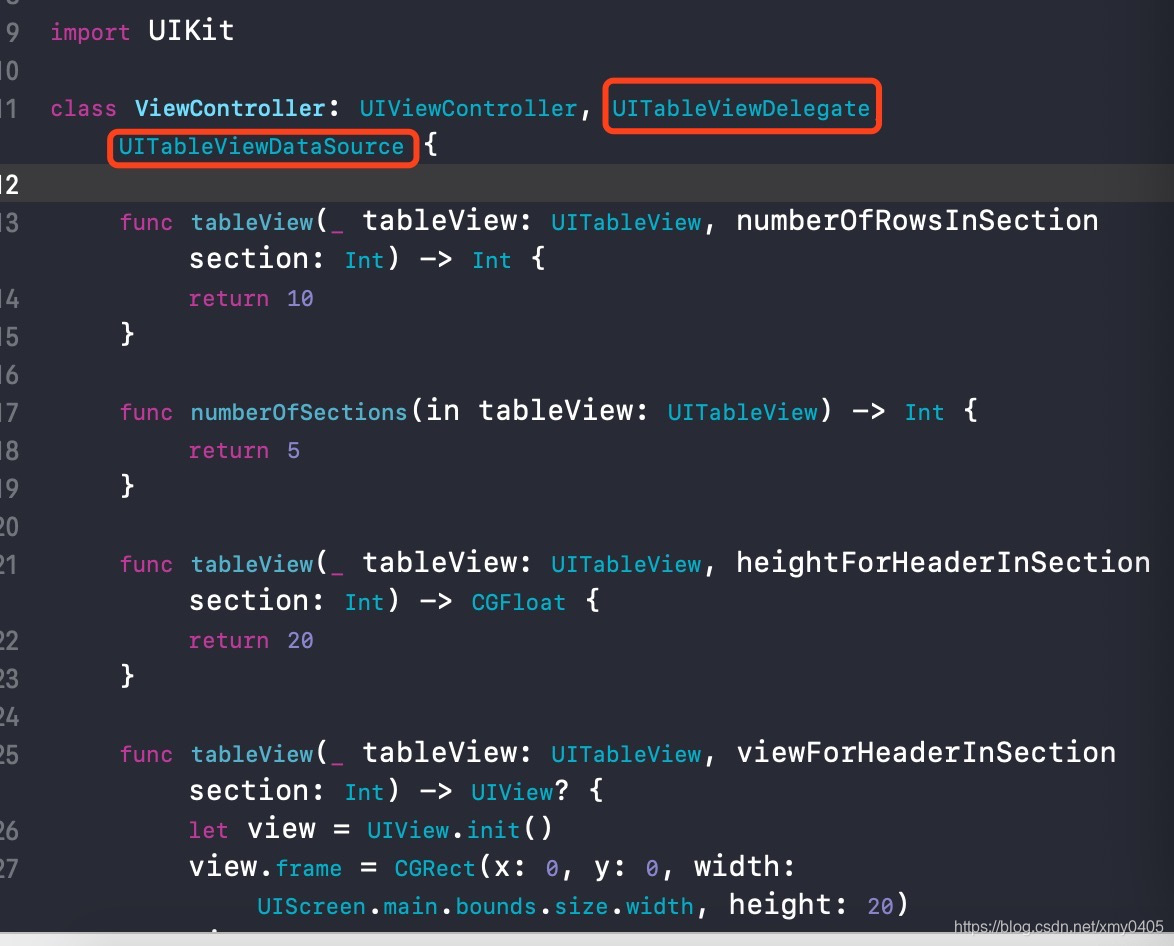
1、和oc一样,使用tableview要使用它的代理,引入如下图所示:
2、初始化table,使用懒加载,代码如下
lazy var table:UITableView = {

        let table = UITableView(frame: self.view.bounds,style: UITableView.Style.plain)

        table.backgroundColor = UIColor.lightGray

        return table

    }()
3、添加table到当前vc,在viewDidLoad中,代码如下:
        self.view .addSubview(table)

        table.register(NormalCell.self, forCellReuseIdentifier: "normalcell")

        table.delegate = self

        table.dataSource = self
4、和oc类似,实现tableview的代理方法,全部代码如下:
import UIKit

class ViewController: UIViewController, UITableViewDelegate, UITableViewDataSource {

    func tableView(_ tableView: UITableView, numberOfRowsInSection section: Int) -> Int {
        return 10
    }

    func numberOfSections(in tableView: UITableView) -> Int {
        return 5
    }

    func tableView(_ tableView: UITableView, heightForHeaderInSection section: Int) -> CGFloat {
        return 20
    }

    func tableView(_ tableView: UITableView, viewForHeaderInSection section: Int) -> UIView? {
        let view = UIView.init()
        view.frame = CGRect(x: 0, y: 0, width: UIScreen.main.bounds.size.width, height: 20)
        view.backgroundColor = UIColor.lightGray

        let lbl = UILabel.init()
        lbl.frame = CGRect(x: 15, y: 0, width: 100, height: 20)
        lbl.text = String(section)
        view.addSubview(lbl)

        return view
    }

    func tableView(_ tableView: UITableView, cellForRowAt indexPath: IndexPath) -> UITableViewCell {
        let cell = UITableViewCell.init(style: UITableViewCell.CellStyle.default, reuseIdentifier: "naormalCell")
        cell.textLabel?.text = String(format: "行:%d", indexPath.row+1)//String(indexPath.row)
        cell.selectionStyle = UITableViewCell.SelectionStyle.none

        return cell
    }

    func tableView(_ tableView: UITableView, heightForRowAt indexPath: IndexPath) -> CGFloat {
        return 60
    }

    func tableView(_ tableView: UITableView, didSelectRowAt indexPath: IndexPath) {
        tableView.deselectRow(at: indexPath, animated: true)
        let destination = SeconViewController()
        destination.message = "传递的字符串"
        self.present(destination, animated: true, completion: nil)
    }

    func tableView(_ tableView: UITableView, canEditRowAt indexPath: IndexPath) -> Bool {
        return true
    }

    func tableView(_ tableView: UITableView, editingStyleForRowAt indexPath: IndexPath) -> UITableViewCell.EditingStyle {
        return UITableViewCell.EditingStyle.delete
    }

    func tableView(_ tableView: UITableView, commit editingStyle: UITableViewCell.EditingStyle, forRowAt indexPath: IndexPath) {
        if editingStyle == UITableViewCell.EditingStyle.delete {
            //在这里处理删除数据

        }
    }

    func tableView(_ tableView: UITableView, titleForDeleteConfirmationButtonForRowAt indexPath: IndexPath) -> String? {
        return "删除"
    }

    lazy var table:UITableView = {
        let table = UITableView(frame: self.view.bounds,style: UITableView.Style.plain)
        table.backgroundColor = UIColor.lightGray
        return table
    }()

    override func viewDidLoad() {

        super.viewDidLoad()

        self.view .addSubview(table)
//        table.register(NormalCell.self, forCellReuseIdentifier: "normalcell")
        table.delegate = self
        table.dataSource = self


        // Do any additional setup after loading the view.
    }


}
5、运行结果如下图所示:
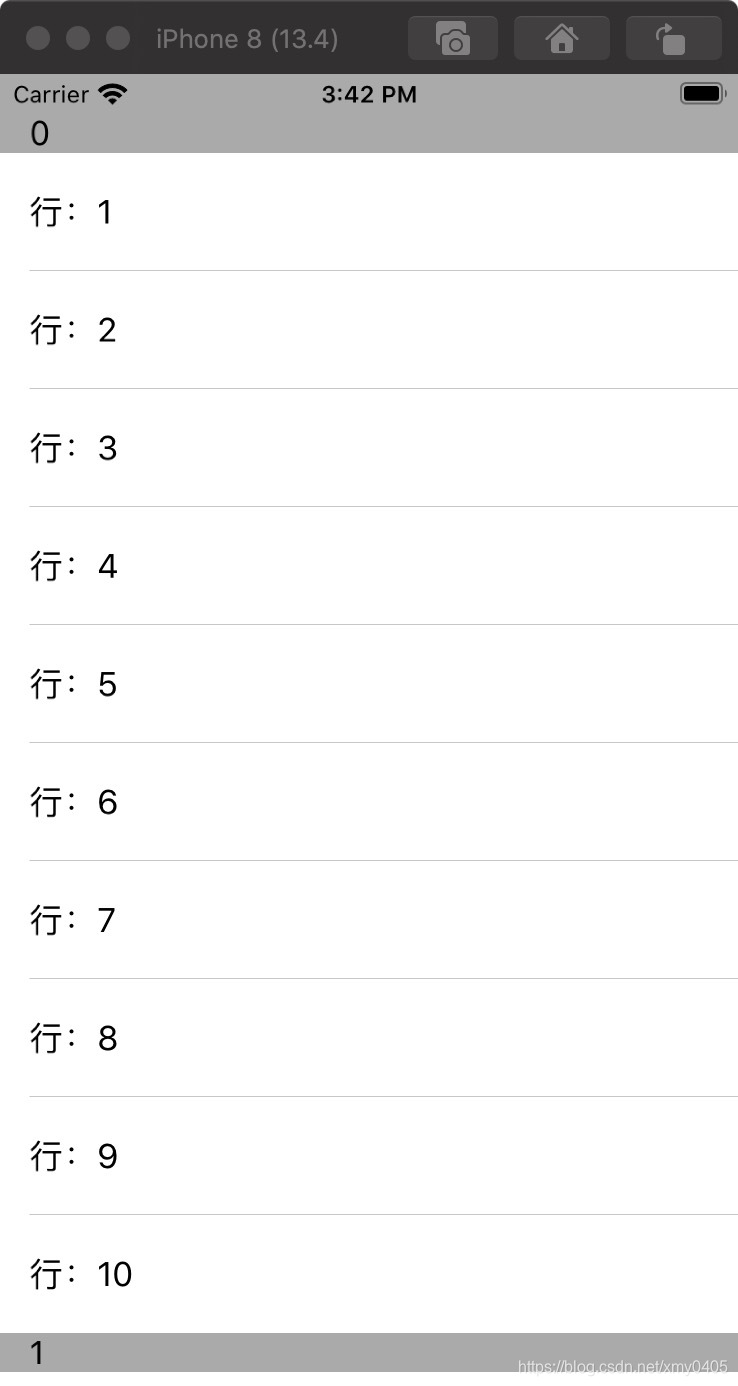
这就是tableview的基本用法了。


 5896
5896

 被折叠的 条评论
为什么被折叠?
被折叠的 条评论
为什么被折叠?
 到【灌水乐园】发言


